Overview
This document provides detailed step-by-step instructions for setting up devices for the Charge Anywhere applications. Each section is dedicated to a specific device, including connection guidelines and visual references to ensure a seamless setup process.
Quick Navigation: To see a chronological history of all recent changes, please view the Change Log at the bottom of this document.
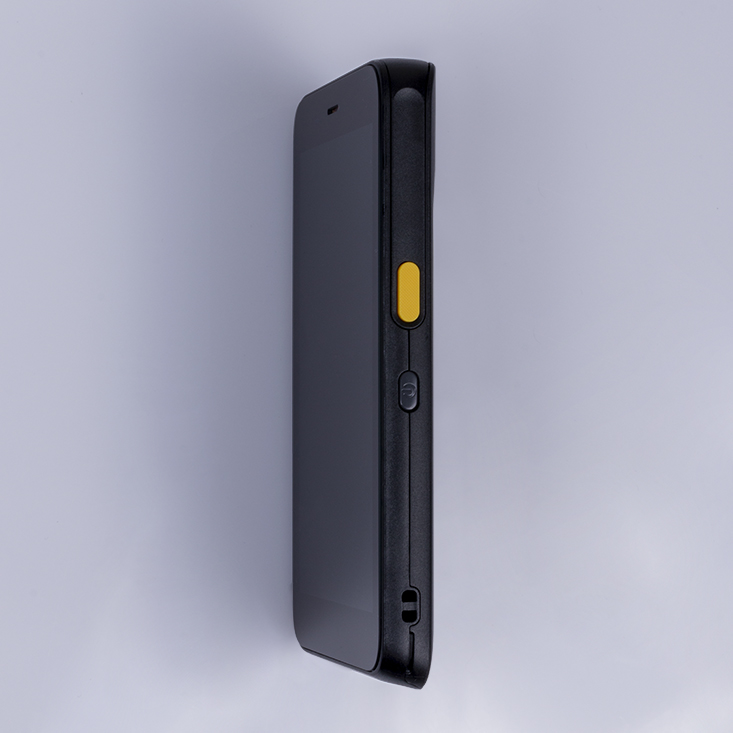
WizarPOS Terminal
Supported Models
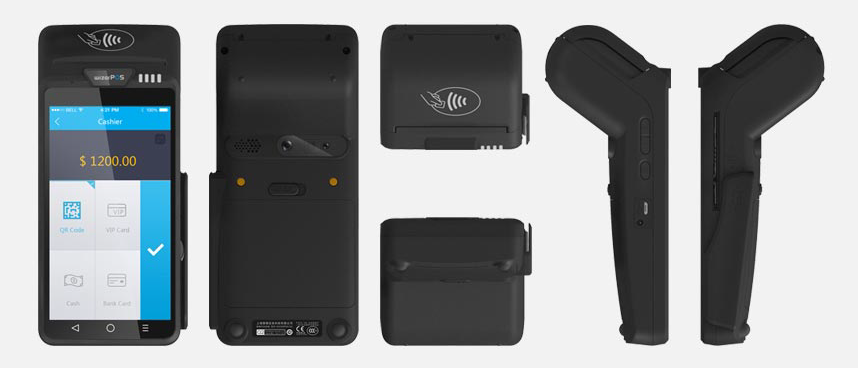
Q2
Connecting the Device
The device (Card Reader or Printer) is connected automatically after successfully registering with the Charge Anywhere application on the WizarPOS terminal. If the device is not connected or the RKI process does not complete automatically, follow these steps:
- Open Equipment Set Up:
- Open the app on the WizarPOS terminal.
- Navigate to Configuration > Set Up Options > Equipment Set Up.
- Connecting the Device:
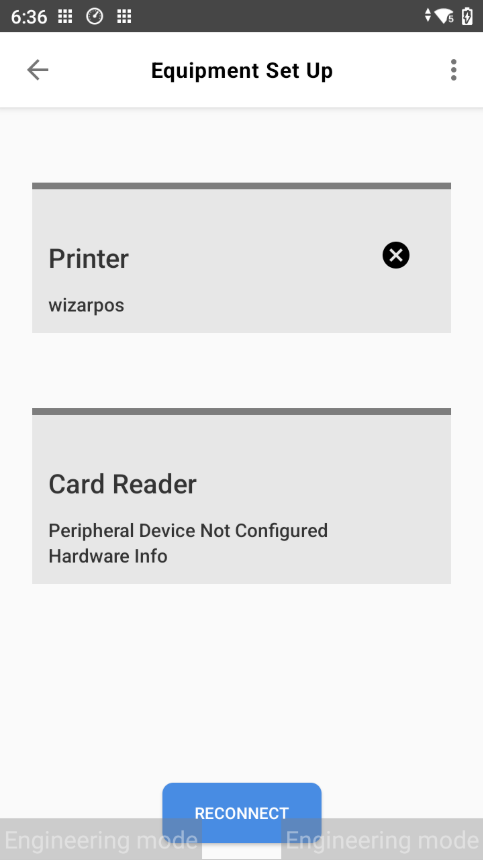
- If the card reader or printer is not connected, the system will display Peripheral Device Not Configured.
- Tap Card Reader or Printer to begin the connection process.
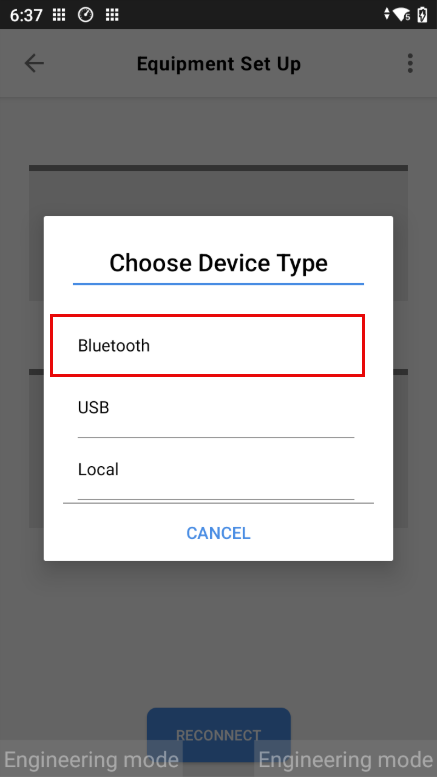
- You will be prompted to Choose Device Type.
- Reconnecting an Existing Device (If Necessary):
- If the device (Card Reader or Printer) is already connected but not functioning as expected, you must reconnect it.
- Tap Card Reader or Printer, and a dialog box will appear stating, Device already connected! Do you want to remove this device?
- Select OK to disconnect the device.
- Tap Card Reader or Printer again to restart the connection process.
- You will be prompted to Choose Device Type.
- Select Connection Type:
- You will see a dialog box asking you to select the connection type:
- Bluetooth
- USB
- Local
- Select Local to establish a local connection.
- You will see a dialog box asking you to select the connection type:
- Remote Key Injection (RKI):
- The Remote Key Injection (RKI) process is initiated automatically (once only), during the first successful connection of the device (Card Reader or Printer).
- To Perform RKI Manually:
- Navigate to the Equipment Set Up screen.
- Tap the three dots menu in the top-right corner of the screen.
- Select Perform RKI from the dropdown menu.
Q3
Connecting the Device
The device (Card Reader or Printer) is connected automatically after successfully registering with the Charge Anywhere application on the WizarPOS terminal. If the device is not connected or the RKI process does not complete automatically, follow these steps:
- Open Equipment Set Up:
- Open the app on the WizarPOS terminal.
- Navigate to Configuration > Set Up Options > Equipment Set Up.
- Connecting the Device:
- If the card reader or printer is not connected, the system will display Peripheral Device Not Configured.
- Tap Card Reader or Printer to begin the connection process.
- You will be prompted to Choose Device Type.
- Reconnecting an Existing Device (If Necessary):
- If the device (Card Reader or Printer) is already connected but not functioning as expected, you must reconnect it.
- Tap Card Reader or Printer, and a dialog box will appear stating, Device already connected! Do you want to remove this device?
- Select OK to disconnect the device.
- Tap Card Reader or Printer again to restart the connection process.
- You will be prompted to Choose Device Type.
- Select Connection Type:
- You will see a dialog box asking you to select the connection type:
- Bluetooth
- USB
- Local
- Select Local to establish a local connection.
- You will see a dialog box asking you to select the connection type:
- Remote Key Injection (RKI):
- The Remote Key Injection (RKI) process is initiated automatically (once only), during the first successful connection of the device (Card Reader or Printer).
- To Perform RKI Manually:
- Navigate to the Equipment Set Up screen.
- Tap the three dots menu in the top-right corner of the screen.
- Select Perform RKI from the dropdown menu.
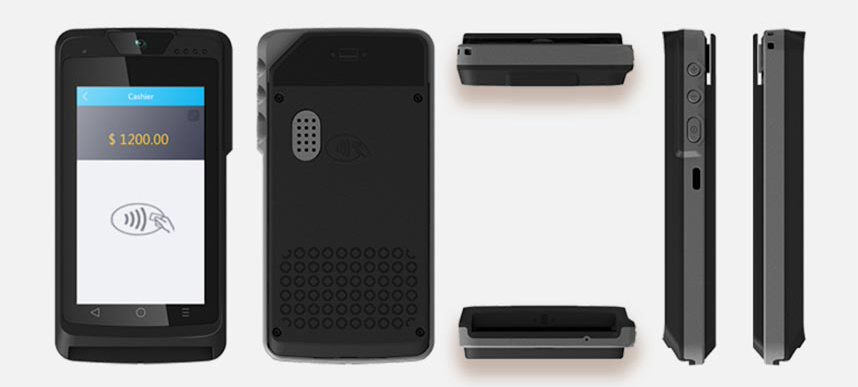
Q2 Premium

Connecting the Device
The device (Card Reader or Printer) is connected automatically after successfully registering with the Charge Anywhere application on the WizarPOS terminal. If the device is not connected or the RKI process does not complete automatically, follow these steps:
- Open Equipment Set Up:
- Open the app on the WizarPOS terminal.
- Navigate to Configuration > Set Up Options > Equipment Set Up.
- Connecting the Device:
- If the card reader or printer is not connected, the system will display Peripheral Device Not Configured.
- Tap Card Reader or Printer to begin the connection process.
- You will be prompted to Choose Device Type.
- Reconnecting an Existing Device (If Necessary):
- If the device (Card Reader or Printer) is already connected but not functioning as expected, you must reconnect it.
- Tap Card Reader or Printer, and a dialog box will appear stating, Device already connected! Do you want to remove this device?
- Select OK to disconnect the device.
- Tap Card Reader or Printer again to restart the connection process.
- You will be prompted to Choose Device Type.
- Select Connection Type:
- You will see a dialog box asking you to select the connection type:
- Bluetooth
- USB
- Local
- Select Local to establish a local connection.
- You will see a dialog box asking you to select the connection type:
- Remote Key Injection (RKI):
- The Remote Key Injection (RKI) process is initiated automatically (once only), during the first successful connection of the device (Card Reader or Printer).
- To Perform RKI Manually:
- Navigate to the Equipment Set Up screen.
- Tap the three dots menu in the top-right corner of the screen.
- Select Perform RKI from the dropdown menu.
Miura Devices
Supported Models
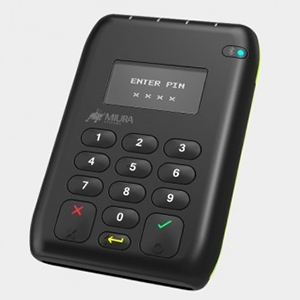
PTS3
1. Access Equipment Setup
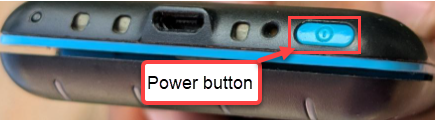
- Power on the Miura PTS3 device by pressing the power button. Bluetooth will be enabled automatically.
- Ensure the QuickSale 2.0 application is installed on your WizarPOS or mobile device.
- Open the QuickSale 2.0 application and navigate to Configuration > Set Up Options > Equipment Set Up.
2. Select the Card Reader
- Tap on Card Reader.

- Note: If no device is connected, the status will show Peripheral Device Not Configured.
- In the Choose Device Type pop-up window, select Bluetooth.

3. Prepare the Device (Pairing Mode)
- Switch on the Miura PTS3 device.
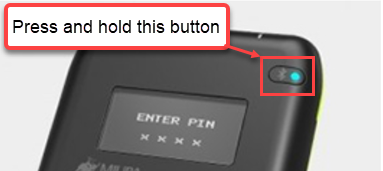
- Press and hold the Bluetooth button on the device for 3-5 seconds until it starts blinking.
- The device is now discoverable and ready to pair.
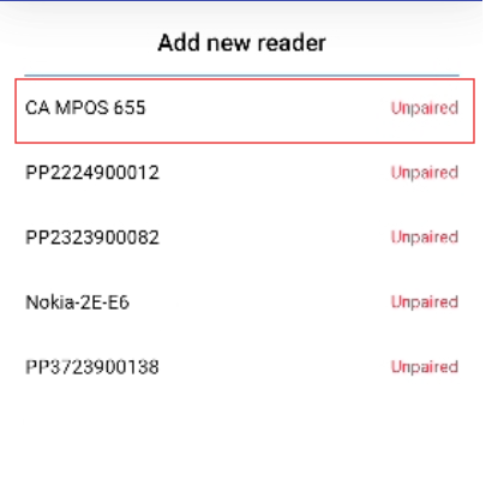
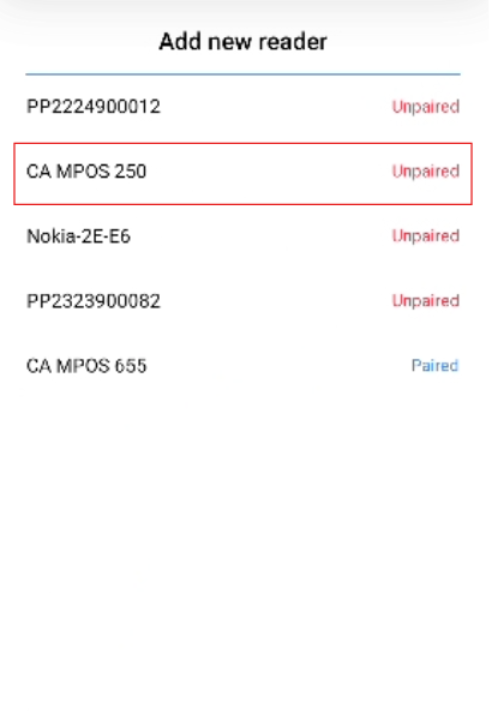
4. Discover and Select Device
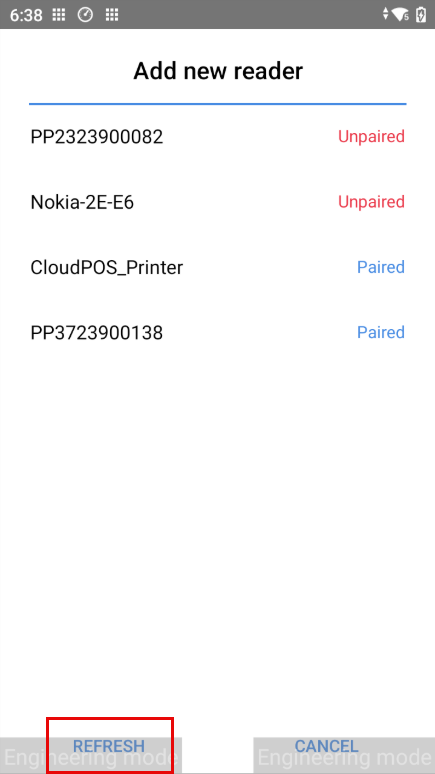
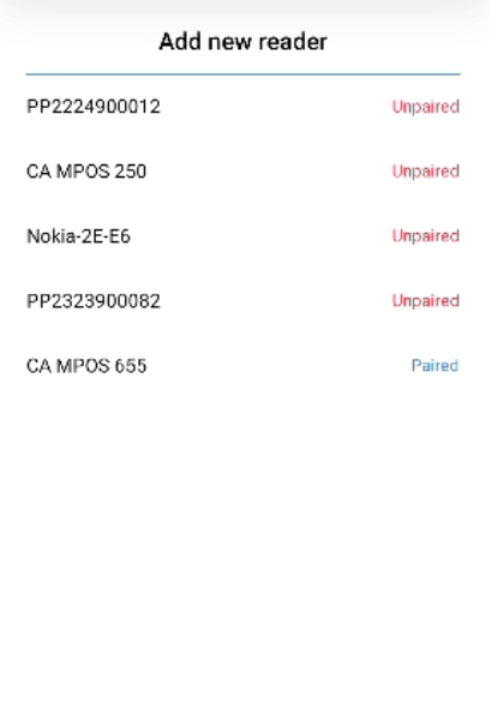
- The application will display a list of devices. If the device is not listed, tap the Refresh button.
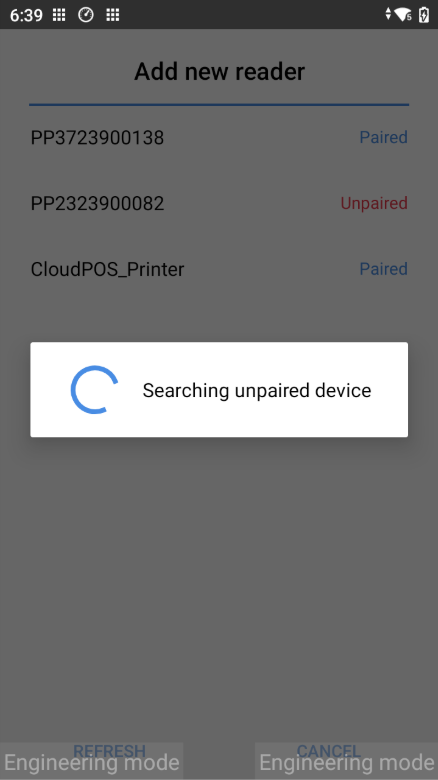
- The app will display Searching unpaired device.
- Once the search is complete, your device (e.g., CA MPOS 655) will appear in the list with the status Unpaired.
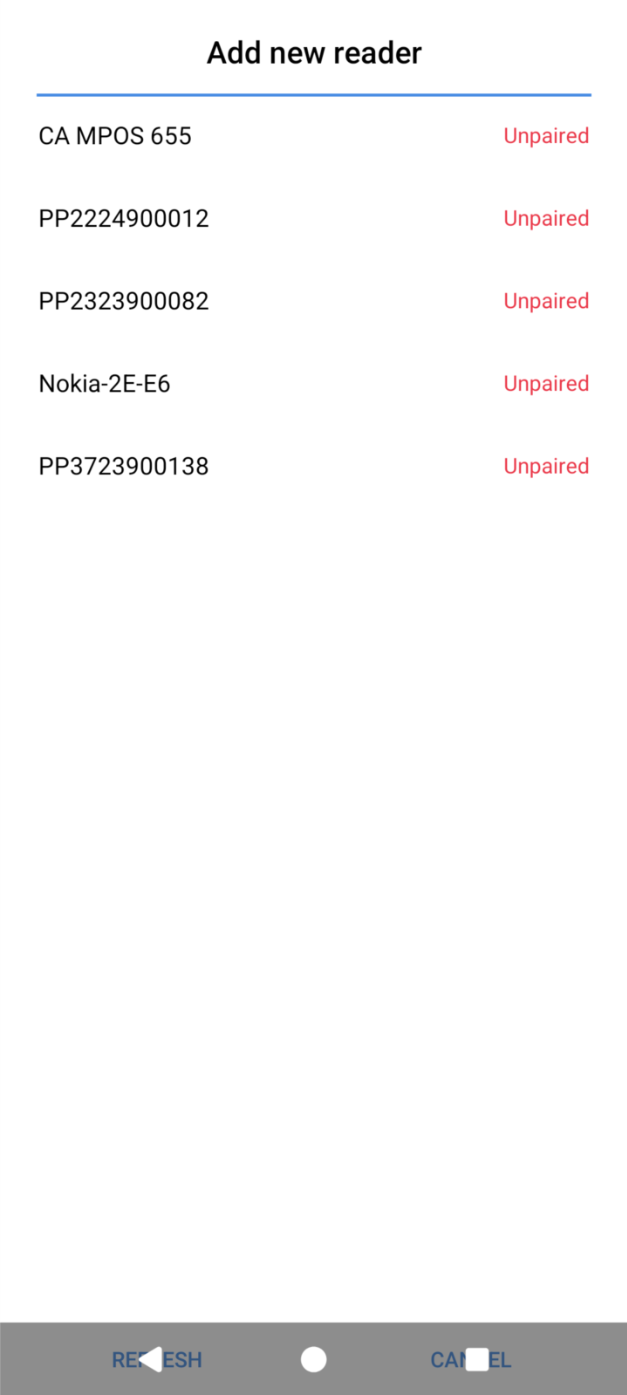
- Tap on the Miura PTS3 (CA MPOS 655) device name to proceed.
5. Pair the Device
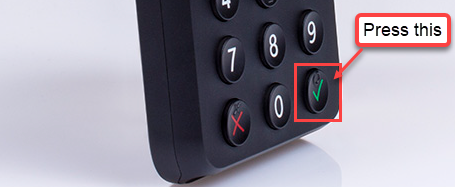
- A Pairing Device loader will appear.
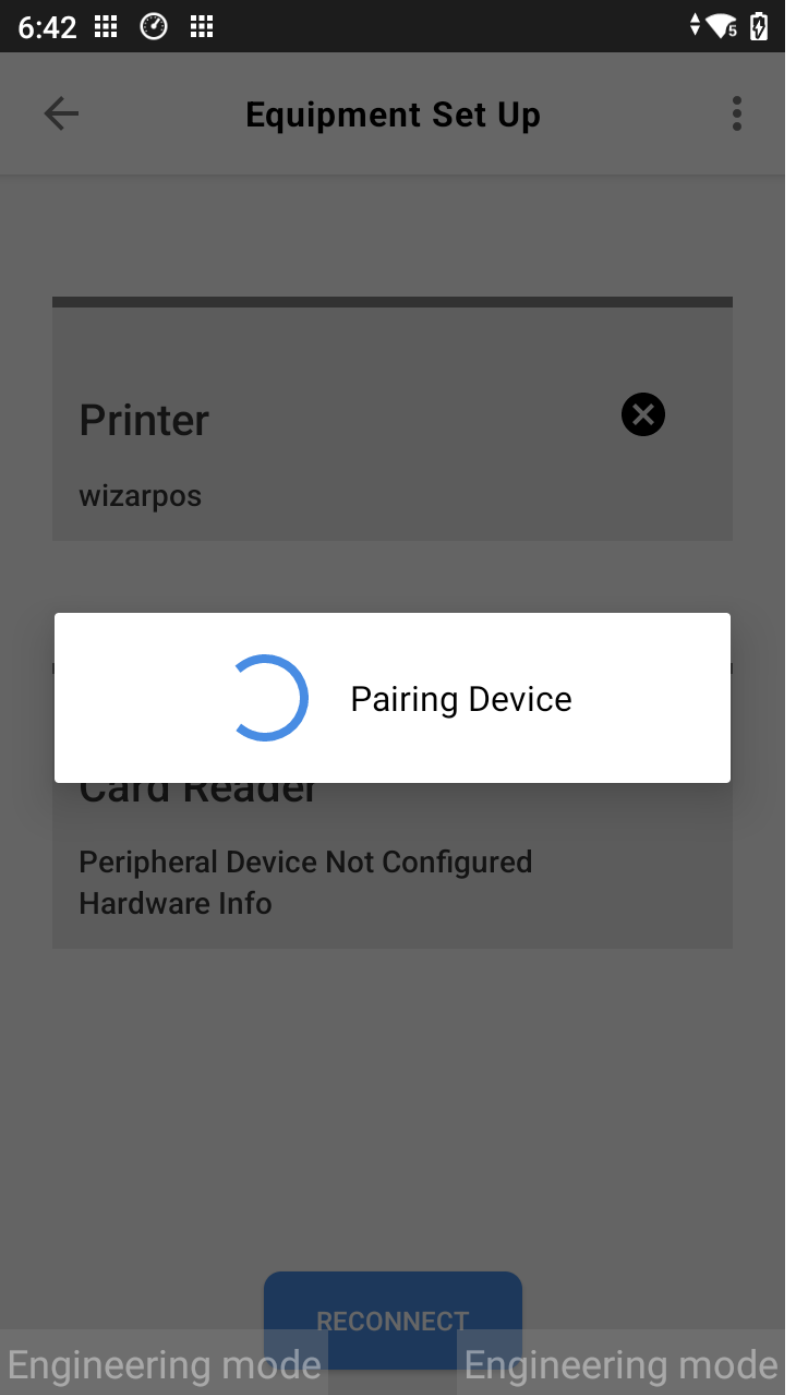
- A Bluetooth pairing request will appear on the application screen displaying a numeric code (e.g., 135234). Click Pair.
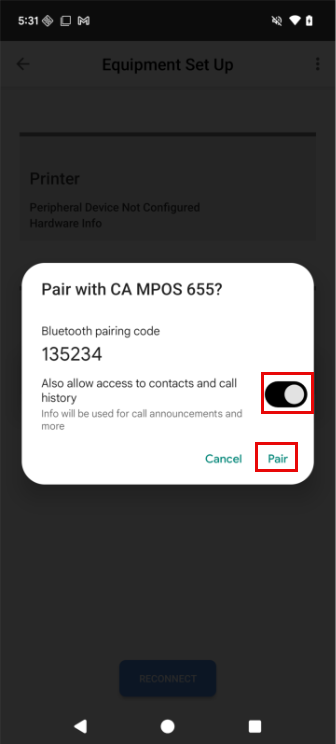
- Action Required: Verify the code and press the pairing button (typically the green check) on the Miura PTS3 device to confirm the connection.

6. Automatic Configuration & Reboot
- Immediately after pairing, the device will automatically initiate a setup sequence.
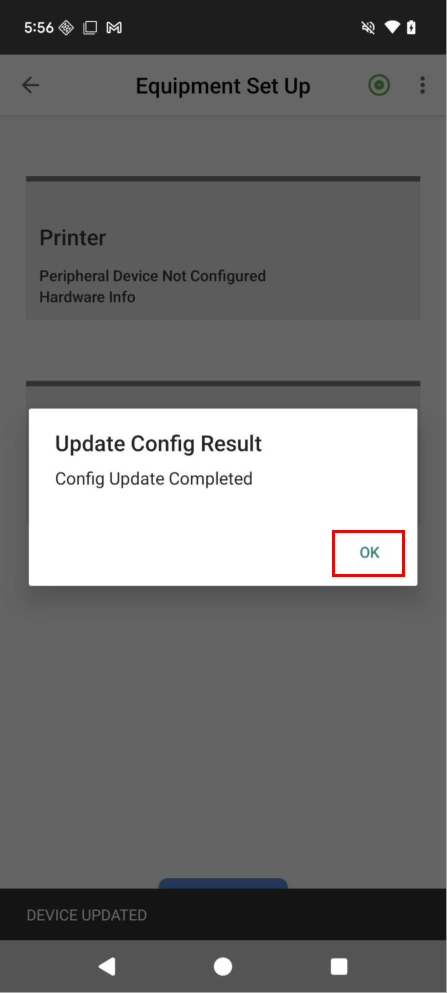
- You will see a prompt saying “Updating Config Files…“.
- A confirmation pop-up “Update Config Result: Config Update Completed” may appear; click OK.
- The device will then reboot. The app will display “Please wait while the device reboots…”.
7. Verification & Advanced Options
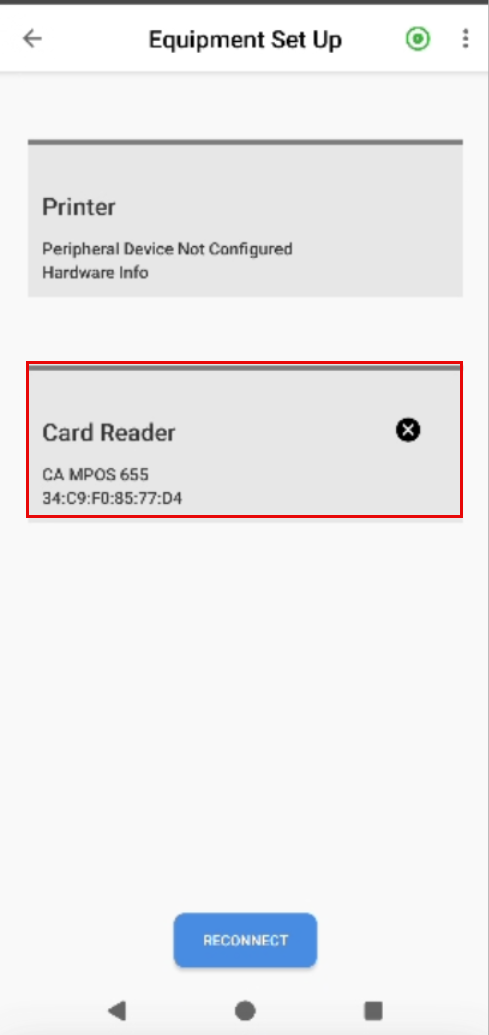
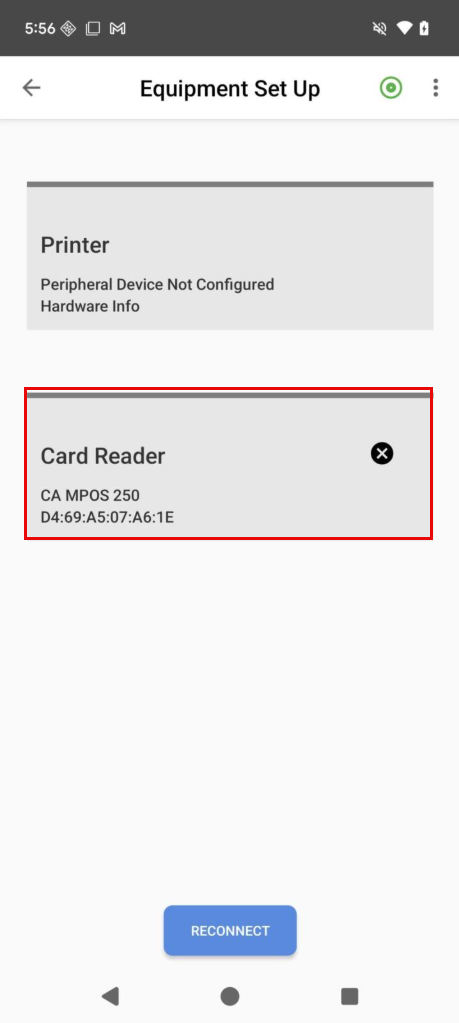
- After the successful reboot, the Equipment Set Up screen will show the connected device details and MAC address.
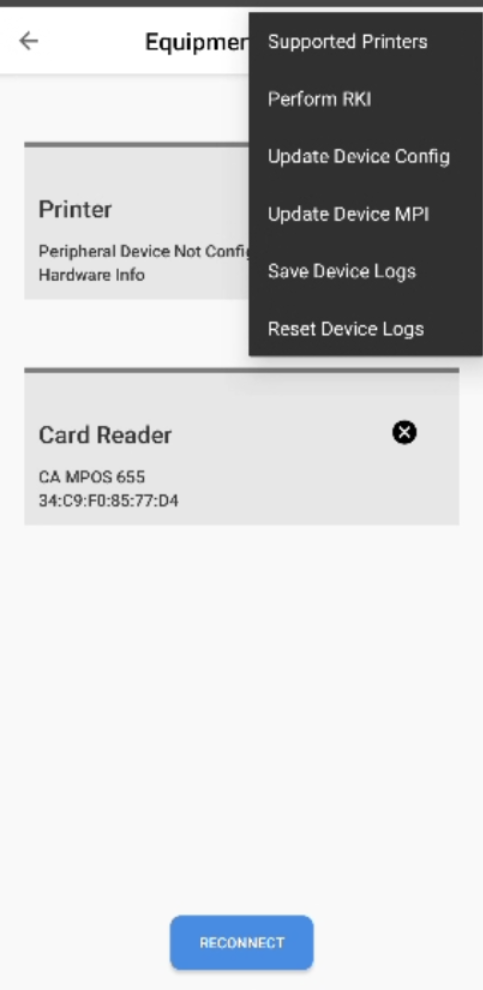
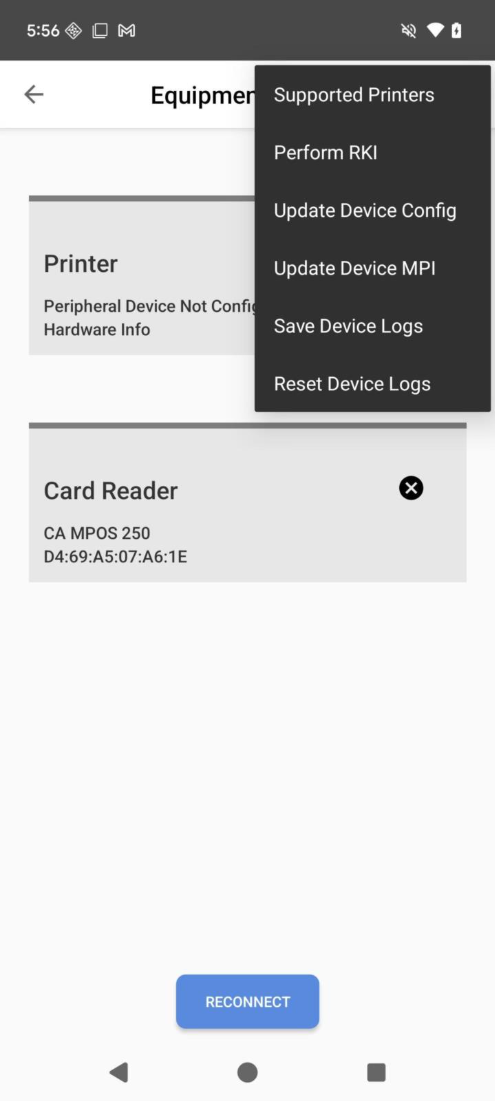
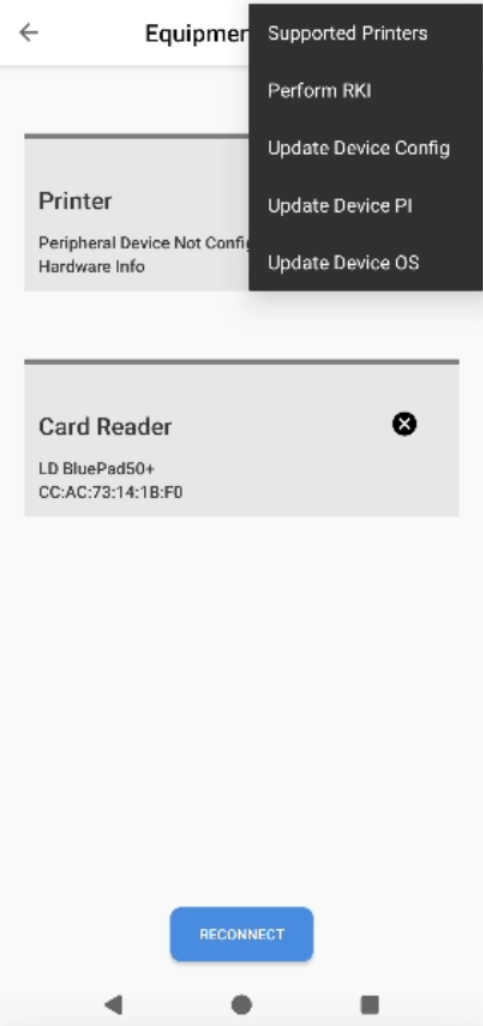
- Optional: You can tap the three dots menu in the top-right corner to access advanced options such as Perform RKI, Update Device Config, or Update Device OS.
- The Remote Key Injection (RKI) process is initiated automatically (once only), during the first successful connection of the device.
- To Perform RKI Manually:
- Navigate to the Equipment Set Up screen.
- Tap the three dots menu in the top-right corner of the screen.
- Select Perform RKI from the dropdown menu.
PTS5
1. Access Equipment Setup
- Power on the Miura PTS5 device by pressing the power button. Bluetooth will be enabled automatically.
- Ensure the QuickSale 2.0 application is installed on your WizarPOS or mobile device.
- Open the QuickSale 2.0 application and navigate to Configuration > Set Up Options > Equipment Set Up.
2. Select the Card Reader
- Tap on Card Reader.
- Note: If no device is connected, the status will show Peripheral Device Not Configured.
- In the Choose Device Type pop-up window, select Bluetooth.
3. Prepare the Device (Pairing Mode)
- Switch on the Miura PTS5 device.
- Press and hold the Bluetooth button on the device for 3-5 seconds until it starts blinking.
- The device is now discoverable and ready to pair.
4. Discover and Select Device
- The application will display a list of devices. If the device is not listed, tap the Refresh button.
- The app will display Searching unpaired device.
- Once the search is complete, your device (e.g., CA MPOS 250) will appear in the list with the status Unpaired.
- Tap on the Miura PTS5 (CA MPOS 250) device name to proceed.
5. Pair the Device
- A Pairing Device loader will appear.
- A Bluetooth pairing request will appear on the application screen displaying a numeric code (e.g., 664930). Click Pair.

- Action Required: Verify the code and press the pairing button (typically the green check) on the Miura PTS5 device to confirm the connection.
6. Automatic Configuration & Reboot
- Immediately after pairing, the device will automatically initiate a setup sequence.
- You will see a prompt saying “Updating Config Files…“.
- A confirmation pop-up “Update Config Result: Config Update Completed” may appear; click OK.
- The device will then reboot. The app will display “Please wait while the device reboots…”.
7. Verification & Advanced Options
- After the successful reboot, the Equipment Set Up screen will show the connected device details and MAC address.
- Optional: You can tap the three dots menu in the top-right corner to access advanced options such as Perform RKI, Update Device Config, or Update Device OS.
- The Remote Key Injection (RKI) process is initiated automatically (once only), during the first successful connection of the device.
- To Perform RKI Manually:
- Navigate to the Equipment Set Up screen.
- Tap the three dots menu in the top-right corner of the screen.
- Select Perform RKI from the dropdown menu.
Datecs Devices
Supported Models
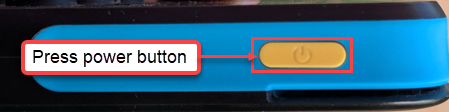
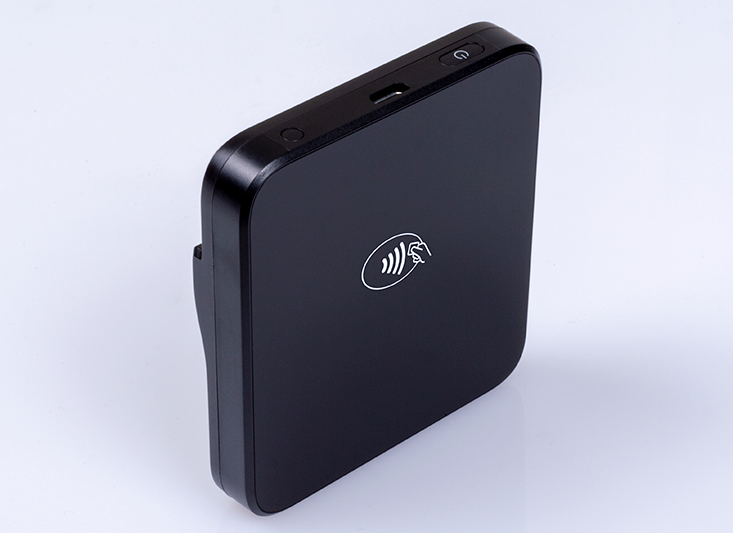
BluePad 50 Plus
Bluetooth Connection
1. Access Equipment Setup
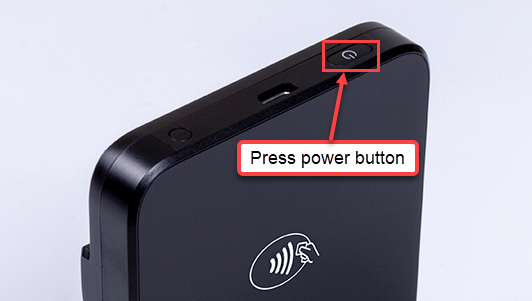
- Power on the BluePad 50 Plus device by pressing the power button. Bluetooth will be enabled automatically.
- Ensure the QuickSale 2.0 application is installed on your WizarPOS or mobile device.
- Open the QuickSale 2.0 application and navigate to Configuration > Set Up Options > Equipment Set Up.
2. Select the Card Reader
- Tap on Card Reader.
- Note: If no device is connected, the status will show Peripheral Device Not Configured.
- In the Choose Device Type pop-up window, select Bluetooth.
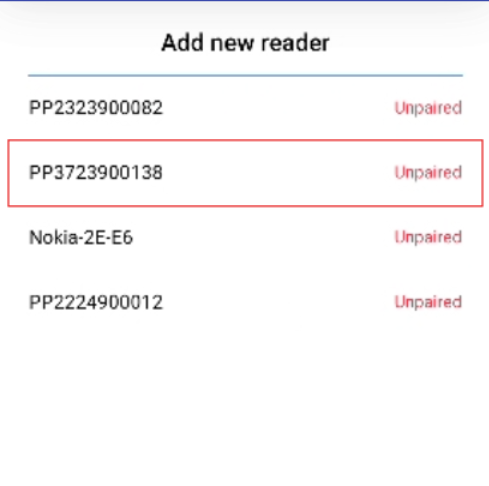
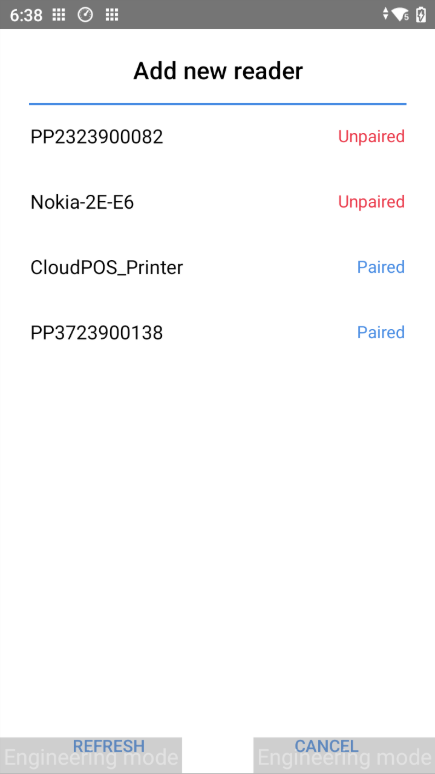
3. Discover and Select Device
- The application will display a list of devices. If the device is not listed, tap the Refresh button.
- The app will display Searching unpaired device.
- Once the search is complete, locate your device in the list (e.g., PP3723900138). It will show the status as Unpaired.
- Tap on the Bluepad 50+ device name to proceed.
4. Pair the Device
- A Pairing Device loader will appear.
- A Bluetooth pairing request will appear on the application screen displaying a numeric code (e.g., 248093). Click Pair.

- Action Required: Verify the code and press the pairing button (typically the green check) on the Bluepad 50 Plus device to confirm the connection.
5. Verification & Advanced Options
- After the successful reboot, the Equipment Set Up screen will show the connected device details and MAC address.
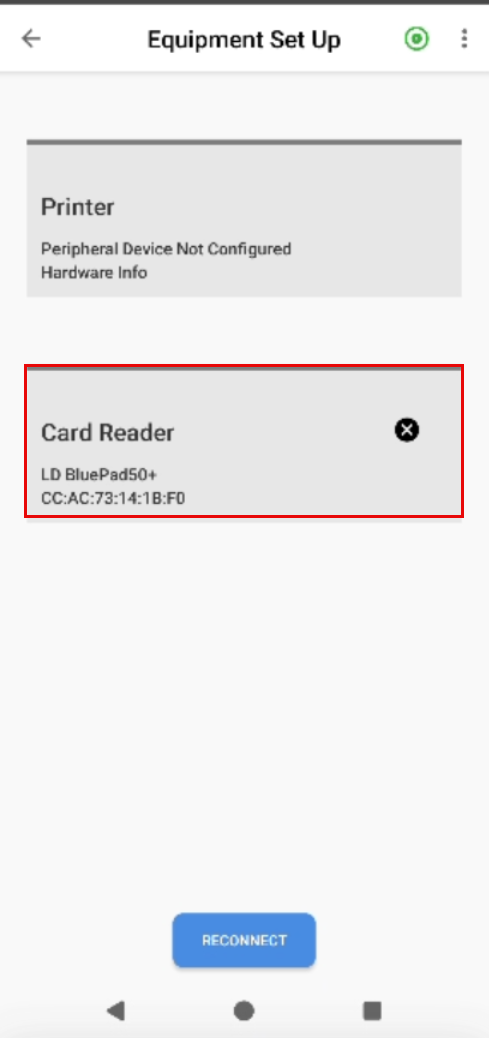
- Optional: You can tap the three dots menu in the top-right corner to access advanced options such as Perform RKI, Update Device Config, or Update Device OS.
- The Remote Key Injection (RKI) process is initiated automatically (once only), during the first successful connection of the device.
- To Perform RKI Manually:
- Navigate to the Equipment Set Up screen.
- Tap the three dots menu in the top-right corner of the screen.
- Select Perform RKI from the dropdown menu.
USB Connection
- Connect via USB:
- Use a compatible USB cable to connect the BluePad 50 Plus device to your Android phone.
- Ensure the device is powered on.
- App Configuration:
- Open the Charge Anywhere app on your phone.
- Navigate to Configuration > Set Up Options > Equipment Set Up.
- If the card reader is not configured, it will display Peripheral Device Not Configured. Tap Card Reader, and you will be prompted to Choose Device Type.
- You will see a dialog box asking you to select the connection type:
- Bluetooth
- USB
- Local
- Select USB to connect the card reader.
- Connecting the Device:
- The app displays PinPad in the device list.
- Select PinPad from the list to start the connection process.
- You will see a Connecting Device prompt while the device is being connected.
- Remote Key Injection (RKI):
- The Remote Key Injection (RKI) process is initiated automatically (once only), during the first successful connection of the device.
- To Perform RKI Manually:
- Navigate to the Equipment Set Up screen.
- Tap the three dots menu in the top-right corner of the screen.
- Select Perform RKI from the dropdown menu.
BlueLite v2
Bluetooth Connection
1. Access Equipment Setup
- Power on the BlueLite v2 device by pressing the power button. Bluetooth will be enabled automatically.
- Ensure the QuickSale 2.0 application is installed on your WizarPOS or mobile device.
- Open the QuickSale 2.0 application and navigate to Configuration > Set Up Options > Equipment Set Up.

2. Select the Card Reader
- Tap Card Reader.
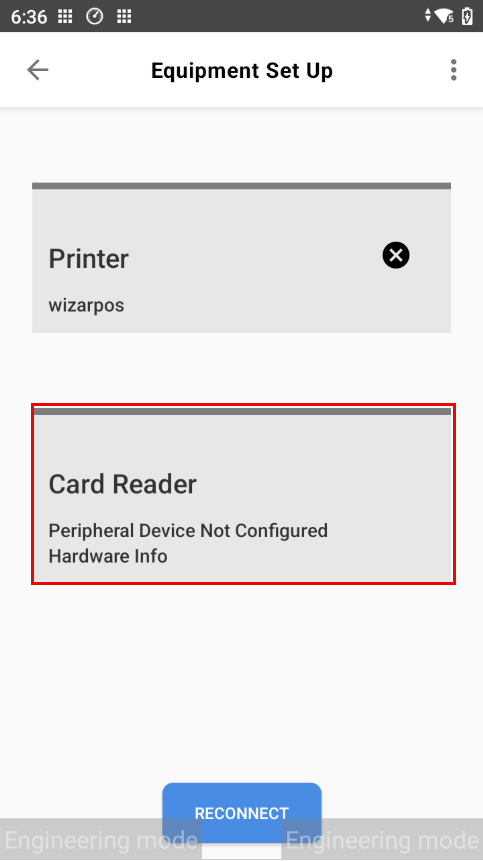
- Note: If no device is configured, the status will show Peripheral Device Not Configured. If a device was previously connected locally, it may display the default local connection status.
- In the Choose Device Type pop-up window, select Bluetooth.
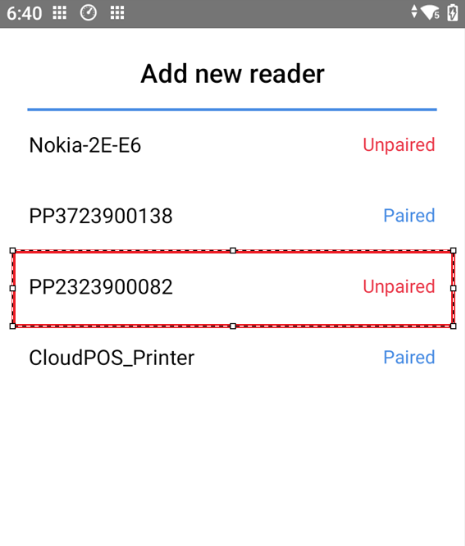
3. Discover the Device
- The application will display a list of devices. If the BlueLite v2 is not listed, tap the Refresh button.
- The app will display Searching unpaired device.
- Once the search is complete, locate your BlueLite v2 device in the list (for example, PP2323900082). It should be listed with a status of Unpaired.
4. Pair the Device
- Tap on the Unpaired BlueLite v2 device name to initiate the connection.
- A Pairing Device loader will appear on the screen.
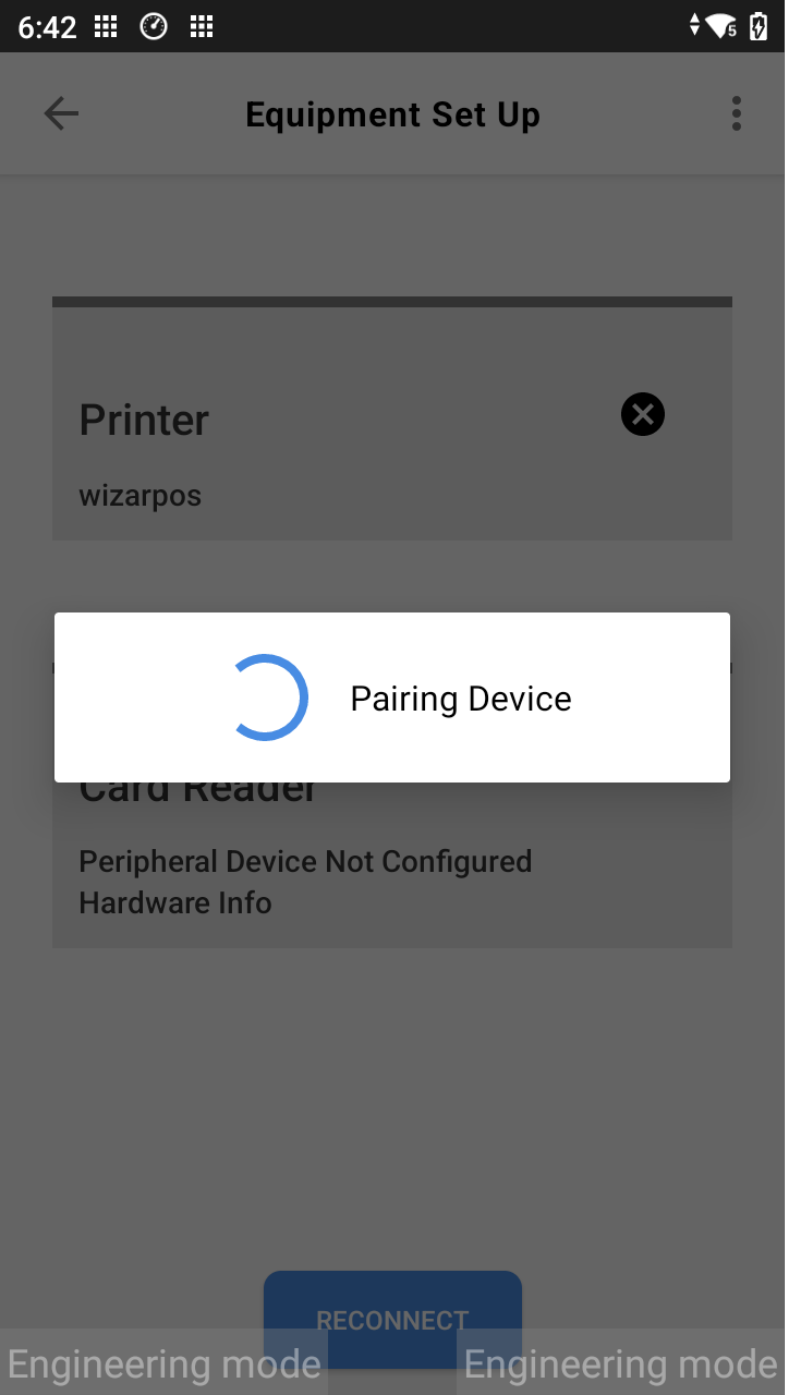
- A Bluetooth pairing request will appear on the application screen displaying a numeric code (for example, 773119). Click Pair.
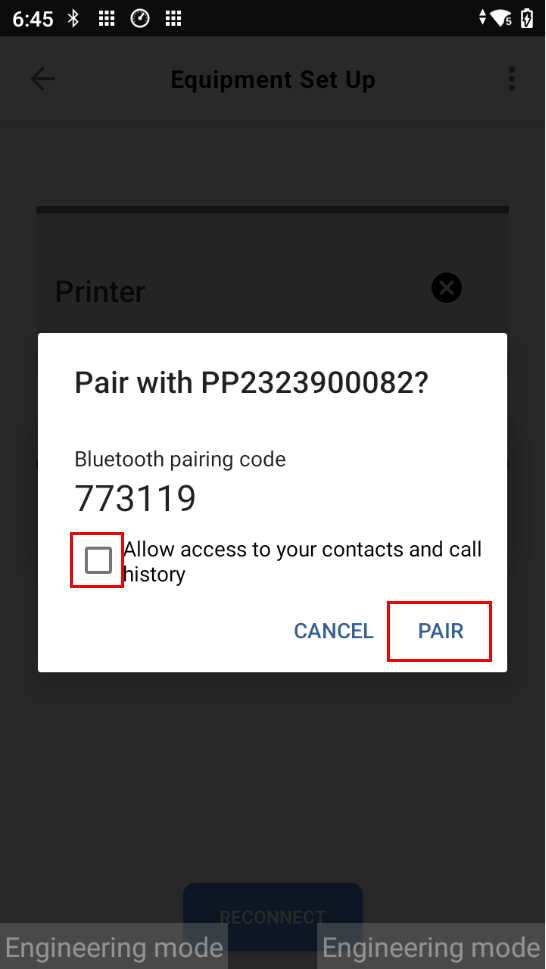
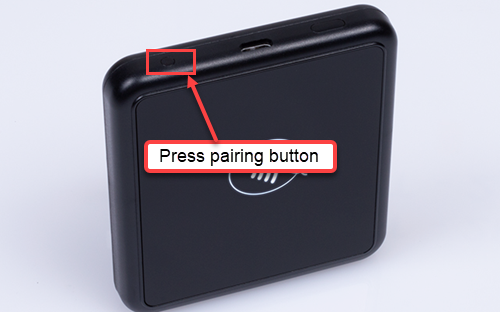
- Action Required: Press the physical Pairing Button on the BlueLite v2 device to confirm the connection.

5. Verification
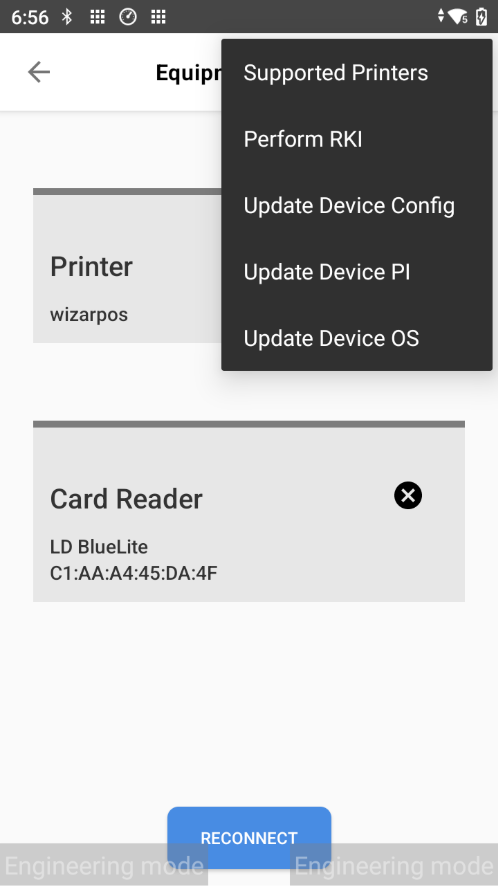
- After successful pairing, the Equipment Set Up screen will update to show the connected device details (for example, LD BlueLite) and its MAC address under the Card Reader section.

- Optional: You can tap the three dots menu in the top-right corner to access advanced options such as Perform RKI, Update Device Config, or Update Device OS.
- The Remote Key Injection (RKI) process is initiated automatically (once only), during the first successful connection of the device.
- To Perform RKI Manually:
- Navigate to the Equipment Set Up screen.
- Tap the three dots menu in the top-right corner of the screen.
- Select Perform RKI from the dropdown menu.
USB Connection
- Connect via USB:
- Use a compatible USB cable to connect the BlueLite v2 device to your Android phone.
- Ensure the device is powered on.
- App Configuration:
- Open the Charge Anywhere app on your phone.
- Navigate to Configuration> Set Up Options > Equipment Set Up.
- If the card reader is not configured, it will display Peripheral Device Not Configured. Tap Card Reader, and you will be prompted to Choose Device Type.
- You will see a dialog box asking you to select the connection type:
- Bluetooth
- USB
- Local
- Select USB to connect the card reader.
- Connecting the Device:
- The app displays PinPad in the device list.
- Select PinPad from the list to start the connection process.
- You will see a Connecting Device prompt while the device is being connected.
- Remote Key Injection:
- The Remote Key Injection (RKI) process is initiated automatically (once only), during the first successful connection of the device.
- To Perform RKI Manually:
- Navigate to the Equipment Set Up screen.
- Tap the three dots menu in the top-right corner of the screen.
- Select Perform RKI from the dropdown menu.
BlueLite v4
Bluetooth Connection
1. Access Equipment Setup
- Power on the BlueLite v2 device by pressing the power button. Bluetooth will be enabled automatically.

- Ensure the QuickSale 2.0 application is installed on your WizarPOS or mobile device.
- Open the QuickSale 2.0 application and navigate to Configuration > Set Up Options > Equipment Set Up.
2. Select the Card Reader
- Tap on Card Reader.
- Note: If no device is currently connected, it will typically show Peripheral Device Not Configured or a default local connection.
- A Choose Device Type dialog will appear. Select Bluetooth.
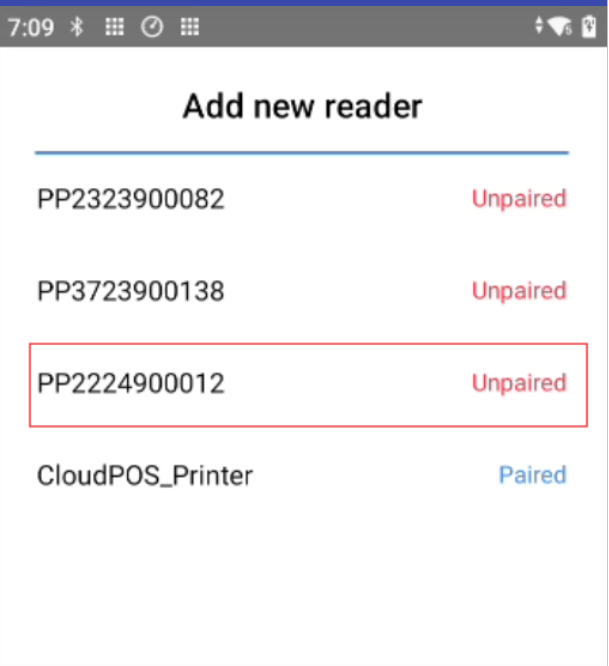
3. Discover the Device
- The application will initially display a list of devices already paired with the application.
- Tap the Refresh button. The app will display status Searching Unpaired Device.

- Once the search is complete, locate your BlueLite v4 device in the list (for example, PP2224900012). It will be listed with the status Unpaired.
4. Pair the Device
- Tap on the Unpaired BlueLite v4 device to initiate the connection.
- A pairing request will appear on the application screen displaying a numeric code (for example, 257251). Click Pair.
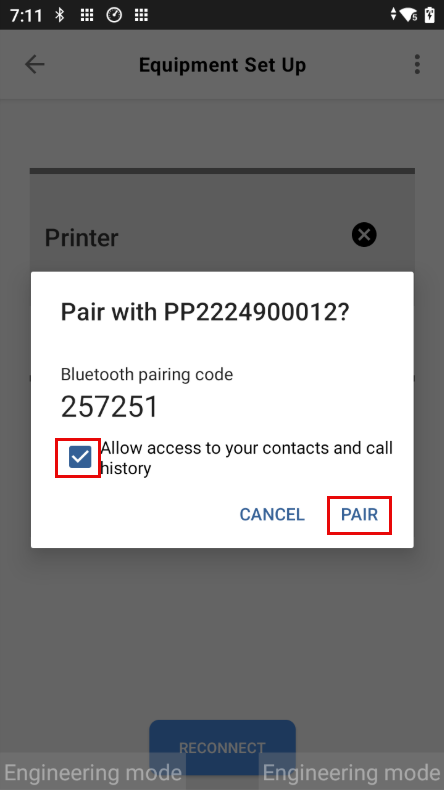
- Action Required: Press the physical Pairing Button on the BlueLite v4 device to confirm the connection.
5. Verification & Advanced Options
- After successful pairing, the Equipment Set Up screen will update to show the connected device details (for example, LD BlueLite) and its MAC address.

- Optional: To perform advanced operations, tap the three dots menu in the top-right corner. From here, you can select options such as Perform RKI, Update Device Config, or Update Device OS.
- The Remote Key Injection (RKI) process is initiated automatically (once only), during the first successful connection of the device.
- To Perform RKI Manually:
- Navigate to the Equipment Set Up screen.
- Tap the three dots menu in the top-right corner of the screen.
- Select Perform RKI from the dropdown menu.

USB Connection
- Connect via USB:
- Use a compatible USB cable to connect the BlueLite v4 device to your Android phone.
- Ensure the device is powered on.
- App Configuration:
- Open the Charge Anywhere app on your phone.
- Navigate to Configuration> Set Up Options > Equipment Set Up.
- If the card reader is not configured, it will display Peripheral Device Not Configured. Tap Card Reader, and you will be prompted to Choose Device Type.
- You will see a dialog box asking you to select the connection type:
- Bluetooth
- USB
- Local
- Select USB to connect the card reader.
- Connecting the Device:
- The app displays PinPad in the device list.
- Select PinPad from the list to start the connection process.
- You will see a Connecting Device prompt while the device is being connected.
- Remote Key Injection:
- The Remote Key Injection (RKI) process is initiated automatically (once only), during the first successful connection of the device.
- To Perform RKI Manually:
- Navigate to the Equipment Set Up screen.
- Tap the three dots menu in the top-right corner of the screen.
- Select Perform RKI from the dropdown menu.
BlueCash 50
- Local Connection Setup:
- Ensure the BlueCash 50 is powered on.
- Connecting Terminal Devices:
- Open the Charge Anywhere app on BlueCash 50.
- Navigate to Configuration> Set Up Options > Equipment Set Up.
- If the card reader is not configured, it will display Peripheral Device Not Configured. Tap Card Reader, and you will be prompted to Choose Device Type.
- You will see a dialog box asking you to select the connection type:
- Bluetooth
- USB
- Local
- Select Local to connect the device locally.
- Remote Key Injection (RKI):
- The Remote Key Injection (RKI) process is initiated automatically (once only), during the first successful connection of the device.
- To Perform RKI Manually:
- Navigate to the Equipment Set Up screen.
- Tap the three dots menu in the top-right corner of the screen.
- Select Perform RKI from the dropdown menu.
BluePad 5500 Plus
- Local Connection Setup:
- Ensure the BluePad 5500 Plus is powered on.
- Connecting Terminal Devices:
- Open the Charge Anywhere app on BluePad-5500 Plus.
- Navigate to Configuration> Set Up Options > Equipment Set Up.
- If the card reader is not configured, it will display Peripheral Device Not Configured. Tap Card Reader, and you will be prompted to Choose Device Type.
- You will see a dialog box asking you to select the connection type:
- Bluetooth
- USB
- Local
- Select Local to connect the device locally.
- Remote Key Injection (RKI):
- The Remote Key Injection (RKI) process is initiated automatically (once only), during the first successful connection of the device.
- To Perform RKI Manually:
- Navigate to the Equipment Set Up screen.
- Tap the three dots menu in the top-right corner of the screen.
- Select Perform RKI from the dropdown menu.
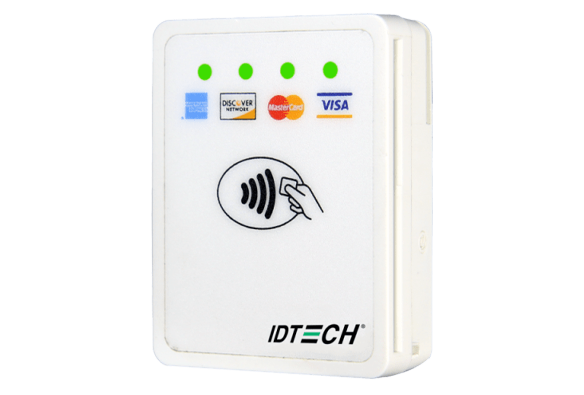
IDTECH Devices
VP3300
- USB Connection:
- Use a micro-USB to Type-C cable to connect the VP3300 device to your phone.
- Ensure the device is powered on.
- App Configuration:
- Open the Charge Anywhere app on your phone.
- Navigate to Configuration> Set Up Options > Equipment Set Up.
- If the card reader is not configured, it will display Peripheral Device Not Configured. Tap Card Reader, and you will be prompted to Choose Device Type.
- You will see a dialog box asking you to select the connection type:
- Bluetooth
- USB
- Local
- Select USB to connect the card reader.
- Connecting the Device:
- The app displays VP3300 USB in the device list.
- Select VP3300 USB from the list to start the connection process.
- You will see a Connecting Device prompt while the device is being connected.
- Remote Key Injection (RKI):
- The Remote Key Injection (RKI) process is initiated automatically (once only), during the first successful connection of the device.
- To Perform RKI Manually:
- Navigate to the Equipment Set Up screen.
- Tap the three dots menu in the top-right corner of the screen.
- Select Perform RKI from the dropdown menu.
Change Log
| Date | Update Summary |
| December 30, 2025 | Implemented a fix to ensure the page automatically scrolls to the specific device section when using external hyperlinks. |
| December 11, 2025 | Instructions for the following devices were updated: Miura Devices: • PTS3 • PTS5 Datecs Devices: • BluePad 50 Plus • BlueLite v2 • BlueLite v4 |