1. Getting Started
Welcome to the comprehensive guide for getting started with the QuickSale POS QSR application. This section will walk you through the initial steps, from downloading the app to logging in for the first time. Whether you’re setting up a new cash register or managing user accounts, we’ve got you covered.
Explore the QuickSale 2.0 Release Notes for a detailed breakdown of the latest features, system enhancements, bug fixes, feature deprecations, and much more.
Quick Navigation: To see a chronological history of all recent changes, please view the Change Log at the bottom of this document.
Downloading the app
Your activation email will contain a link to download the application. Please click the link and select Install when prompted. If you cannot access your activation email, please contact customer support by phone for assistance.
2. Registering your software license
To ensure each cash register application is operational and linked to your account, you must register your software license. Upon opening the app, you will be prompted for the software license key and phone number associated with your account and cash register. You can access your software licenses in the Cash Register section of the Portal.
3. Logging In
Each user must have a unique username and password. You can create and modify usernames and passwords in the Manage Employee section of the Portal.
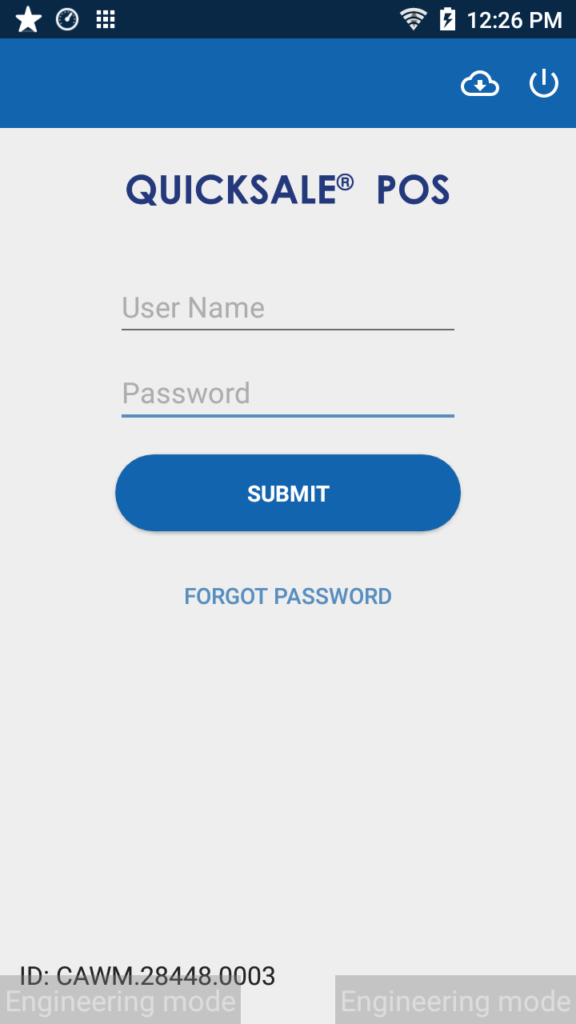
4. Cash Register (Opening Shift)
Enable the Cash Register that you desire to open a shift for. Then click Next.
Select Users
Enable the users that will work the shift. Each employee can select their user and enter their PIN to start and manage orders.
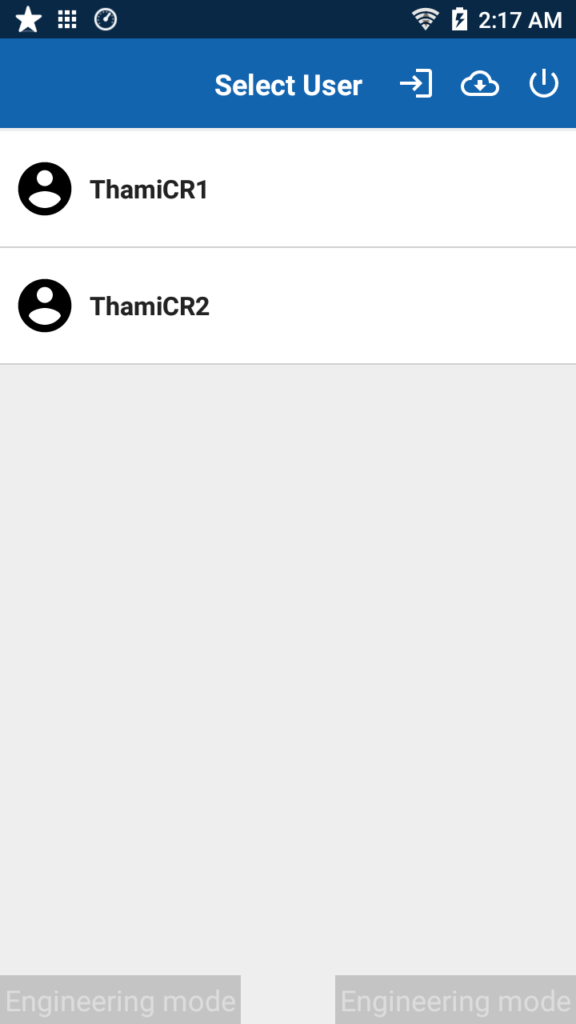
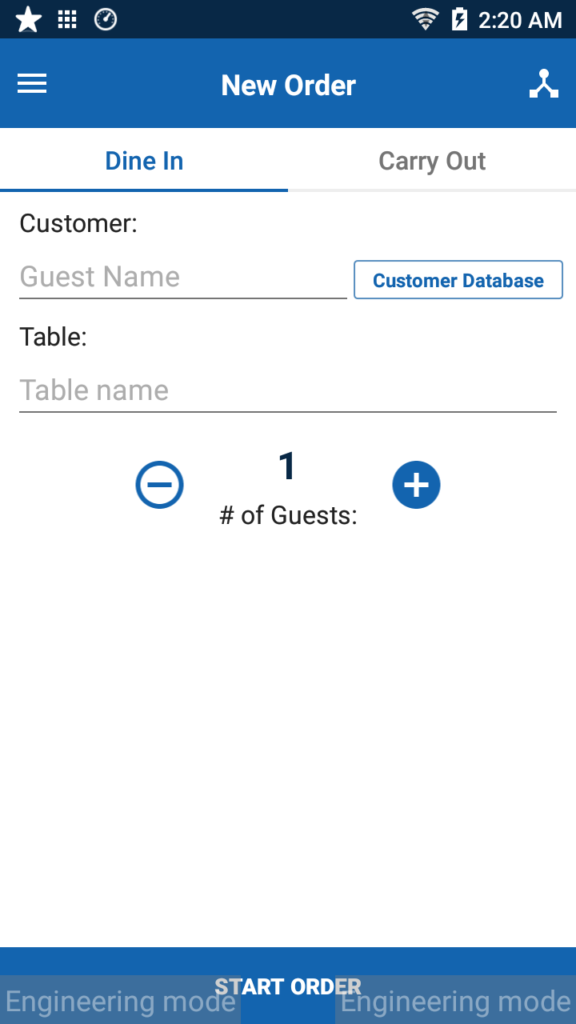
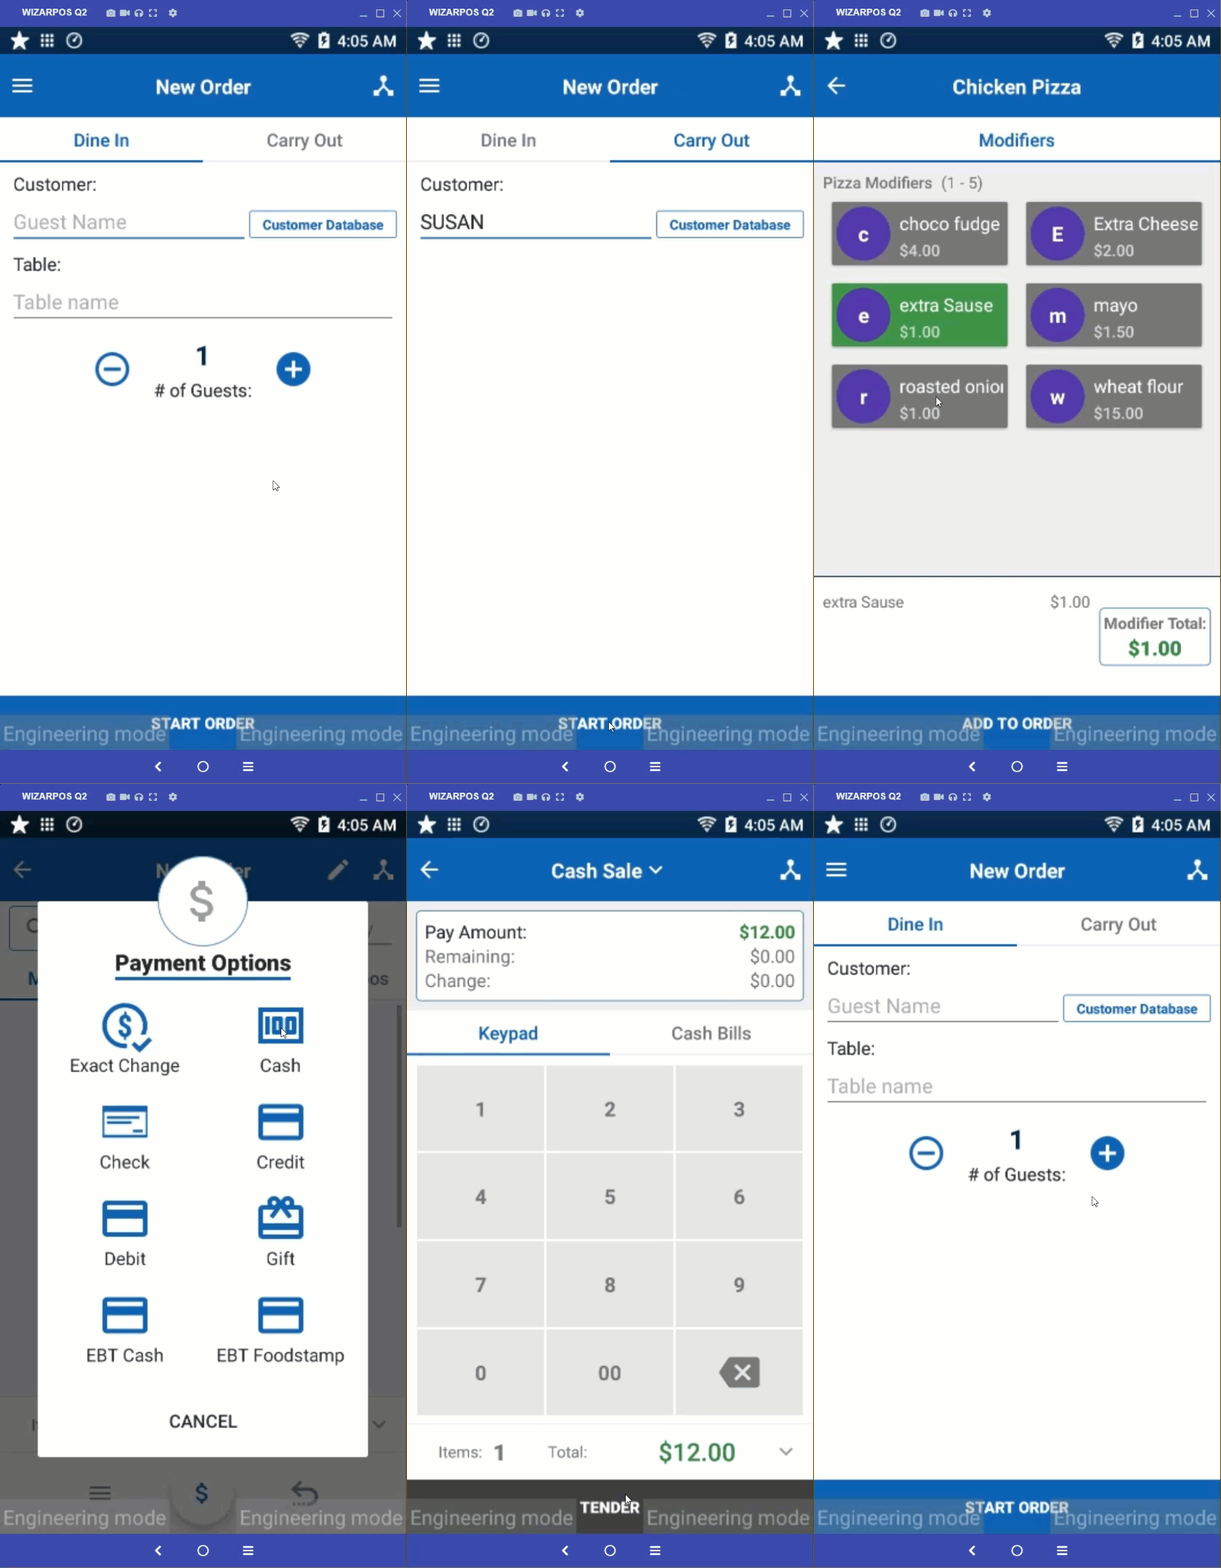
Starting a New Order
Dine In:
- Select Dine In
- Enter Customer Name. You can also select customer from the Customer Database
- Enter Table Name
- Enter number of Guests
- Click Start Order
Carry Out:
- Select Carry Out
- Enter Customer Name. You can also select customer from the Customer Database
- Click Start Order
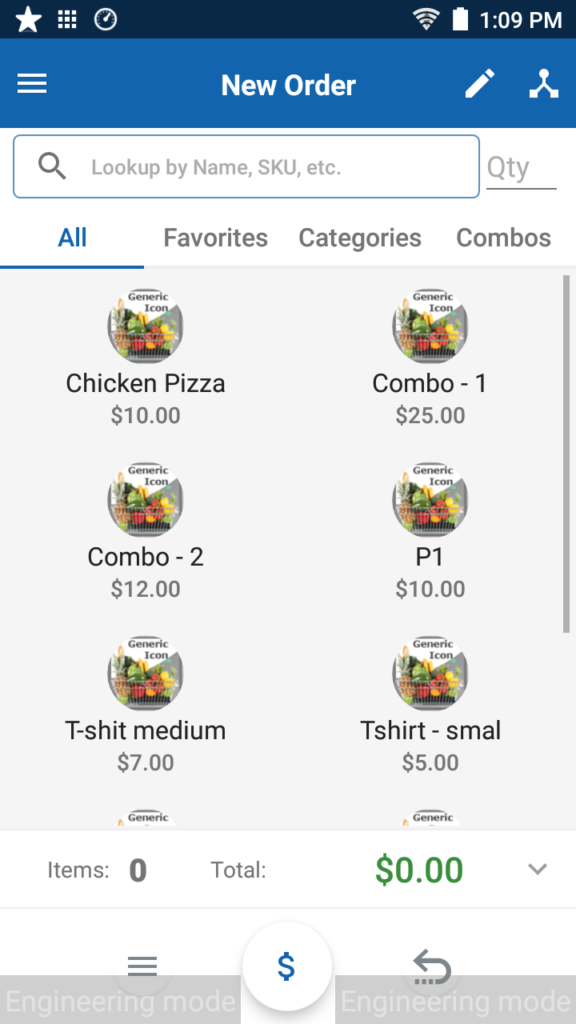
5. Cash Register Layout
Setting up Hardware Peripherals
Miura EMV Card Reader
Note: There may be slight differences in setup depending on your tablet
- Turn on your EMV card reader
- Go to the Settings menu on your device
- Ensure that Bluetooth is turned ON and select Search for Devices
- The device will search the area for all Bluetooth devices in range and display all available devices.
- Select the CA MPOS XXX (the last three digits of the Miura serial number)
- The Miura EMV reader will display a passkey. Verify that the passkey on your tablet matches the passkey of the EMV reader. If so, click OK on the tablet and the green check mark on the EMV reader.
- Once the device is paired, log into the cash register app
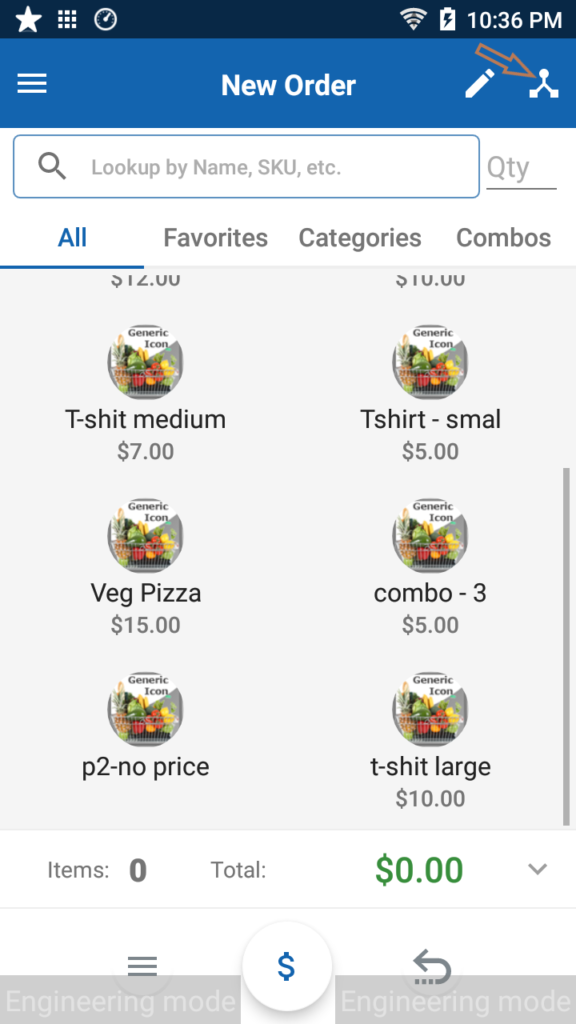
- Select the peripheral symbol at the top right corner
- Select Card Reader
- Select Bluetooth
- Select CA MPOS
Please wait while the EMV reader initializes Point-to-Point Encryption (P2PE) and updates configuration
files. Once complete, the EMV reader will reboot.
Network Printer
- Ensure that the power button is in the off position. Plug in the Star TSP 650 power cord and an Ethernet cable from the printer to a port on your router.
- Press and hold Feed while turning on the printer.
- A TSP650 version sheet will print and a network card sheet will print a few seconds later. On the bottom of the network card sheet (2nd print out) locate the IP Address listed under Current IP Parameters Status.
- Log into the cash register app,
- Select the peripheral symbol at the top right corner
- Select Printer
- Select Networked
- Enter the IP address found on the printer’s network card sheet and click Ok
- Once paired, the printer name and IP address will be listed in the Printer field.
Kitchen Printer
- Select the peripheral symbol at the top right corner
- Select Kitchen Printer
- Select Device Type
- Select Device
Bar Printer
- Select the peripheral symbol at the top right corner
- Select Bar Printer
- Select Device Type
- Select Device
Scanners and Cash Drawers
ID Tech BT Scan Wireless Barcode Scanner
- Press and hold the scan button on your wireless scanner. A flashing green light indicates that it is
ready to be paired - Go to the Settings menu on your device
- Ensure that Bluetooth is turned ON and select Search for Devices
- The device will search the area for all Bluetooth devices in range and display all available devices.
- Select Wireless Scanner and enter the PIN code
- Once the wireless scanner is paired, log into the cash register app
- Select the peripheral symbol at the top right corner
- Select Peripheral Devices
- Select Scanner
- Select Bluetooth
- Select the appropriate scanner
Socket Cordless Hand Scanner 7Ci/7Xi
- Press and hold the smaller button on your wireless scanner to power on the device
- A flashing blue light indicates that it is ready to be paired
- Go to the Settings menu on your device
- Ensure that Bluetooth is turned ON and select Search for Devices
- The device will search the area for all Bluetooth devices in range and display all available
devices
- The device will search the area for all Bluetooth devices in range and display all available
- Select Socket CHS and enter the PIN code (1234)
- Once the wireless scanner is paired, log into the cash register app
- Select the peripheral symbol at the top right corner
- Select Peripheral Devices
- Select Scanner
- Select Bluetooth
- Select Socket CHS
Note: ELO PayPoint devices have an integrated bar code scanner, it will be recognized as “Same as
printer” under Scanner in the peripheral devices area. To scan a product using the ELO PayPoint
integrated Scanner click on the Scanner toggle located right next to the toggle and the scanner will be
initiated, click on it again to turn it off.
Automatic Cash Drawer
Note: An automatic cash drawer can only be used in conjunction with the Star TSP650 printer.
- Configure the Star TSP650 with the application. (Refer to the Network Printers section if necessary)
- Use the APG MultiPRO 320 Cable Kit (included with the cash drawer) to connect the Star TSP650 with the cash drawer.
Note: ELO PayPoint devices have an integrated Cash Drawer, no setup is required.
6. Processing Orders
Note: To know the list of predefined trigger values that can be used to test various transaction responses within Charge Anywhere, refer to the Trigger Values for Testing Transactions guide.
For a comprehensive guide on all valid response codes (including AVS and CVV), transaction types, and a detailed explanation of Transaction Reversal reasons, please see our master list of Transaction Responses and Codes.
To process a sale:
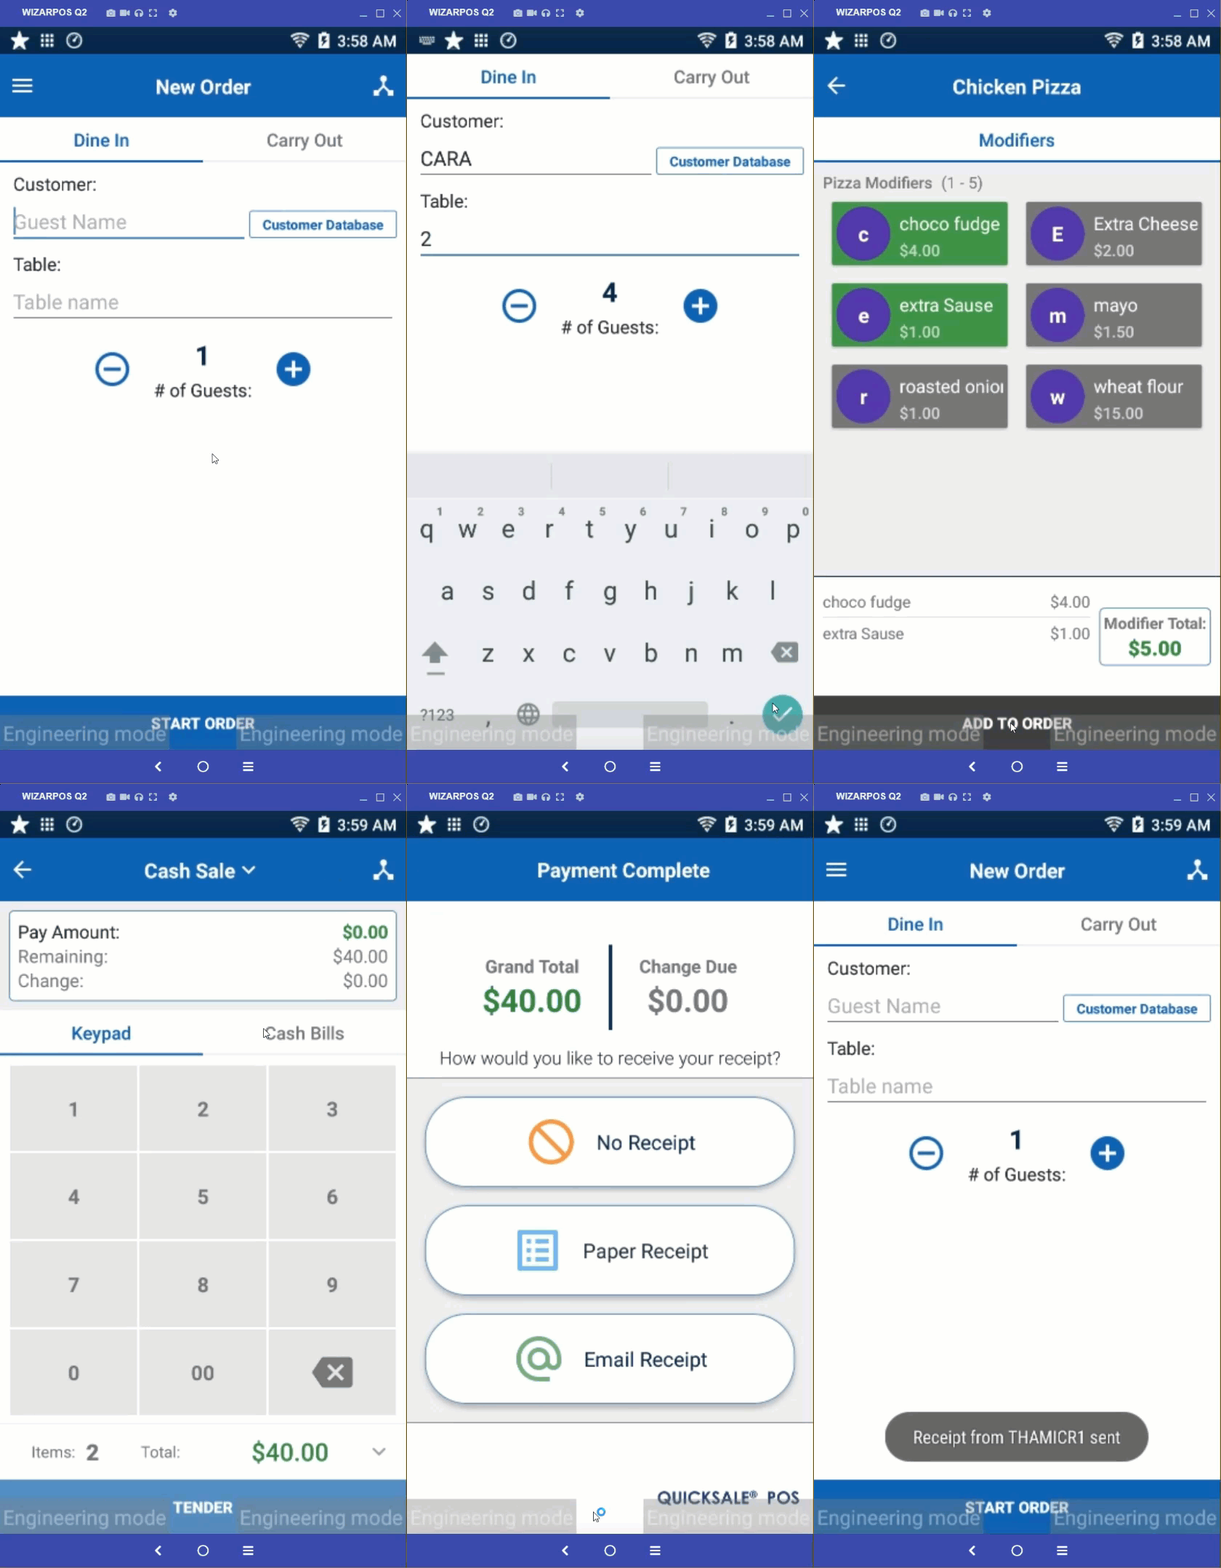
- Start a New Order
- Select Service Type: Dine In or Carry On
- Enter Customer Name. You can also select customer from the Customer Database
- Enter Table Name (only for Dine In)
- Enter number of Guests (only for Dine In)
- Click Start Order
- Product Selection
- Select the product(s) you wish to sell by touching desired product(s)
- If the product has a modifier the next screen will prompt the options for that product
- If the product has a variable price, you will be prompted to enter the price after selection
- You can add Notes to the Kitchen or Bar receipt if needed
- Checkout
- Selected product(s) will be listed as line items in the checkout panel. You can touch and hold a line item to:
- Change quantities
- Apply discounts or promos to the product
- Remove product from order
- To apply a promo to an entire order, select Promo from the menu bar and select the promo code (See Discounts and promotions section for details)
- To hold the order, select Hold Order from the menu bar and enter a name for the held order to be retrieved later (See hold orders section for details)
- Selected product(s) will be listed as line items in the checkout panel. You can touch and hold a line item to:
4. Accept Payment
- Select ‘$‘ in the present at the bottom menu
- Select the tender type
- Enter any necessary payment information and click Submit
- Cash: Use the keypad or cash bills to enter the amount received
- Debit: Swipe card and enter PIN number
- Credit: Swipe card or key credit card details
- EBT: Swipe card and enter PIN number
- Check: Use the keypad to enter the Check#
5. Completed order options
- Signature Capture: After an approved credit card sale, the customer will be prompted to sign on the screen (Signature Capture must be enabled in the Portal).
- Print Receipt(s): If you have a receipt printer connected, receipt(s) will automatically print. (Print receipt options are configured in the Portal)
- Email Receipt: You will be prompted to enter the customer’s email address (Email Customer Receipt must be enabled in the Portal).
7. Processing Refunds
To process a refund
- Production Selection
- From customer receipt: If a customer returns the product(s) with the original receipt, you can quickly recall all items in the original order. To do so:
- Scan receipt barcode or key-in order number
- OR Select the products being refunded by touching the desired product(s) or scanning the product barcode. You have the option to do a full or partial refund.
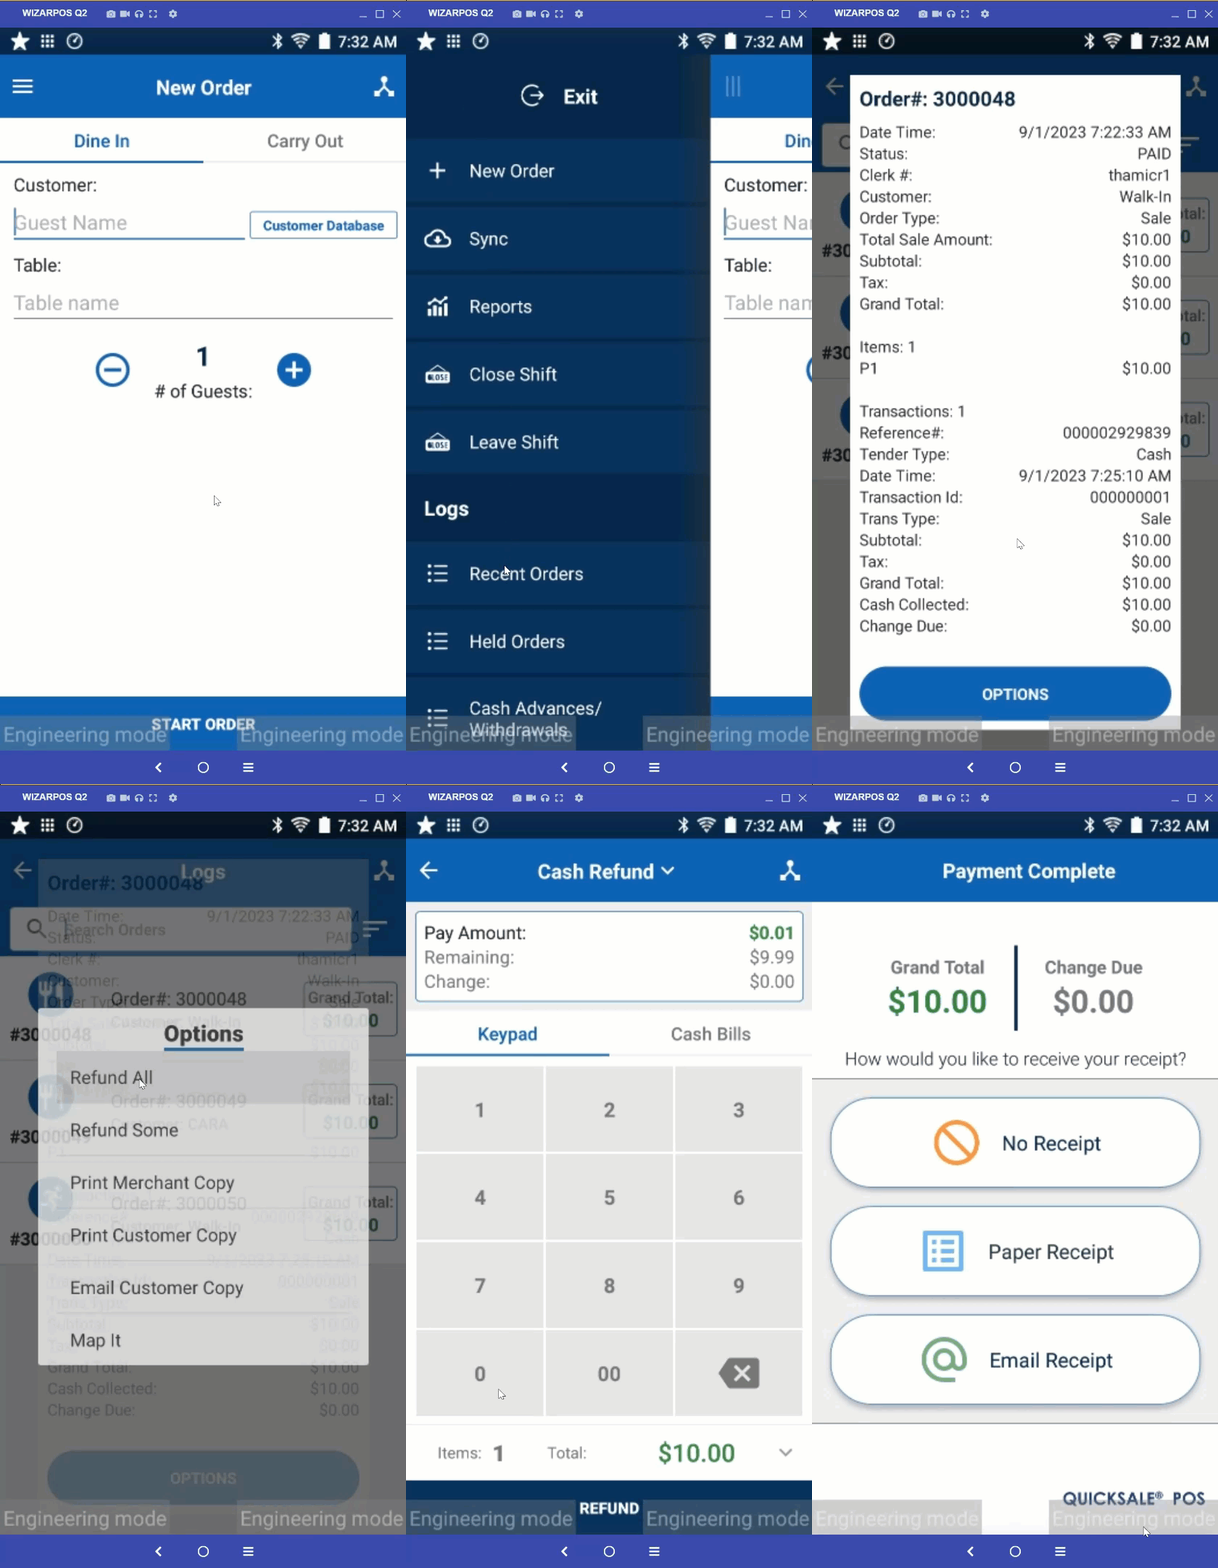
- From the menu option
- Select the top left menu
- Select Recent Orders
- Select Refund for the Order#
- Pop-up will appear with order details. Tap Options.
- Select Refund Some or Refund All
- Select Refund
- From customer receipt: If a customer returns the product(s) with the original receipt, you can quickly recall all items in the original order. To do so:
- Refund Payment
- Select Options
- Select Refund All or Refund Some and confirm
- Select the tender type
- Enter any necessary payment information and click Submit
- Cash: No additional information is needed
- Credit: Swipe card or key credit card details
- Debit: Swipe the card and enter PIN
- EBT: Swipe the card and enter the PIN
8. Comp Order
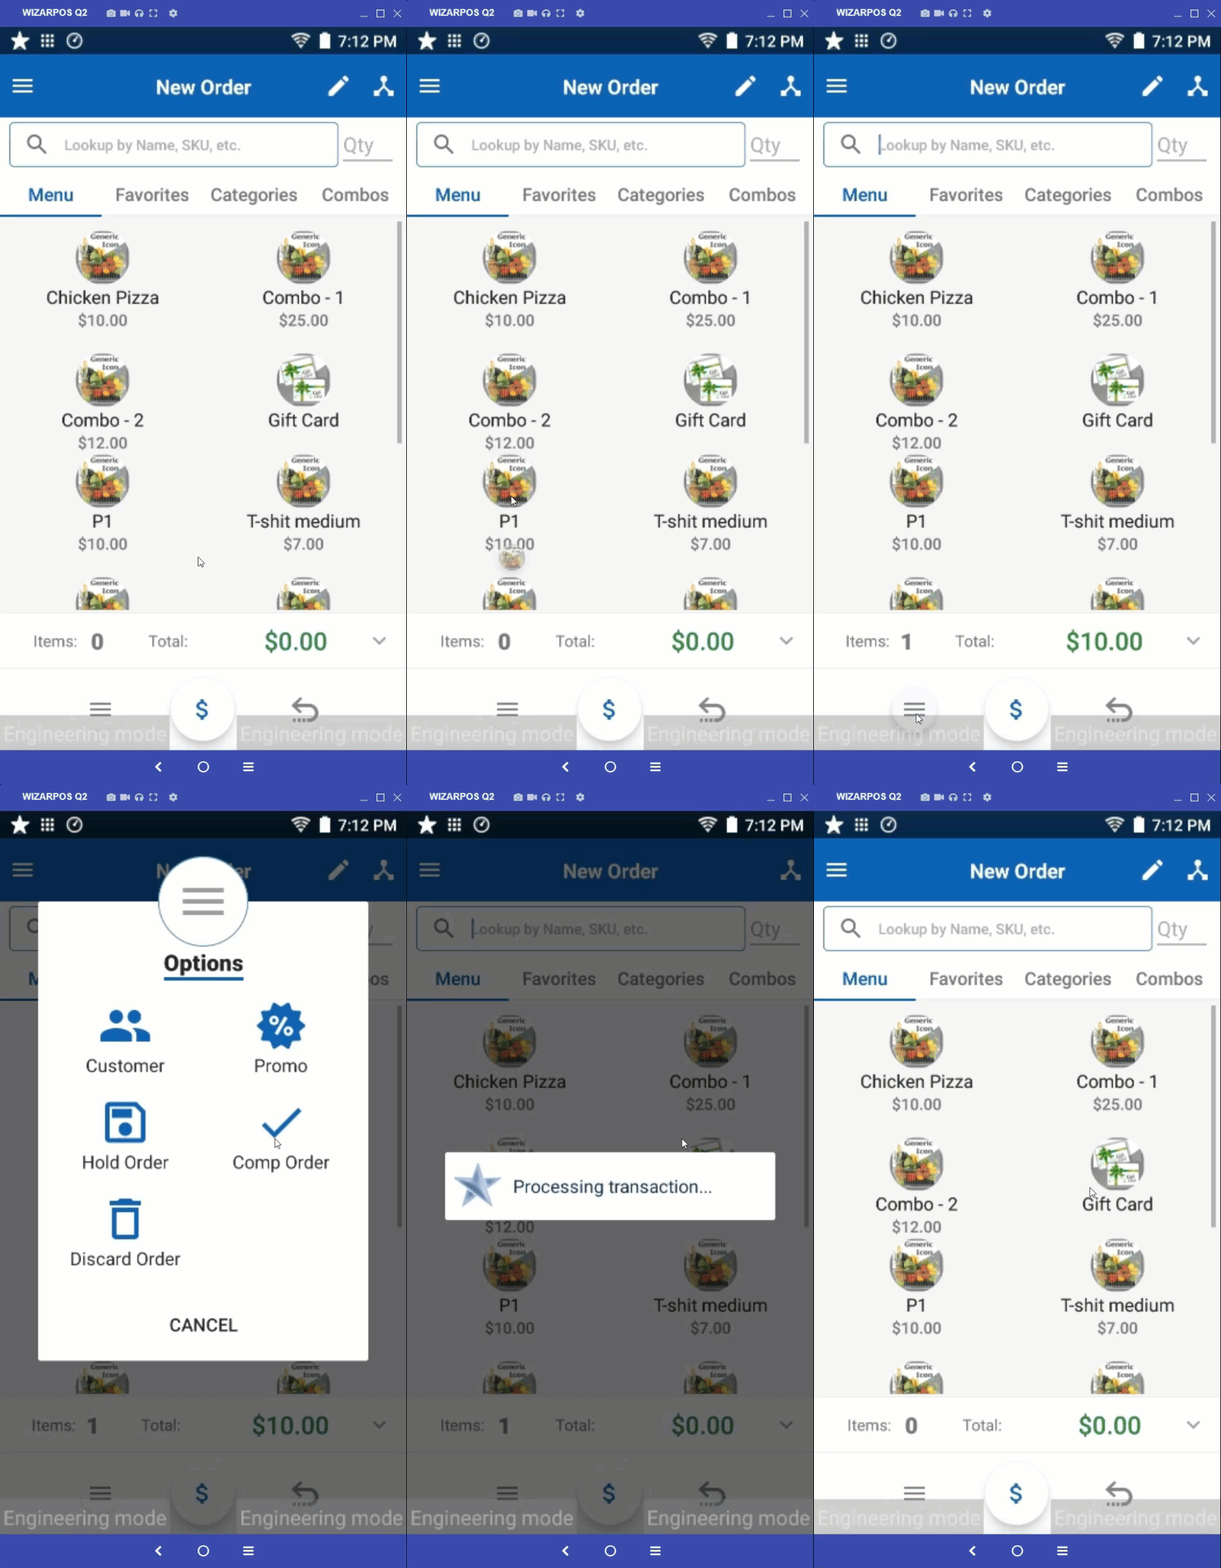
Allows you to set the order to 0.00 as a complimentary service. To apply comp to an order:
Start a New Order -> Dine In or Carry Out. You can select the customer here from the Customer Database or later using Customer Walk-in- Select the products.
- Click three horizontal lines at the bottom left corner
- Select Comp Order
9. Discard Order
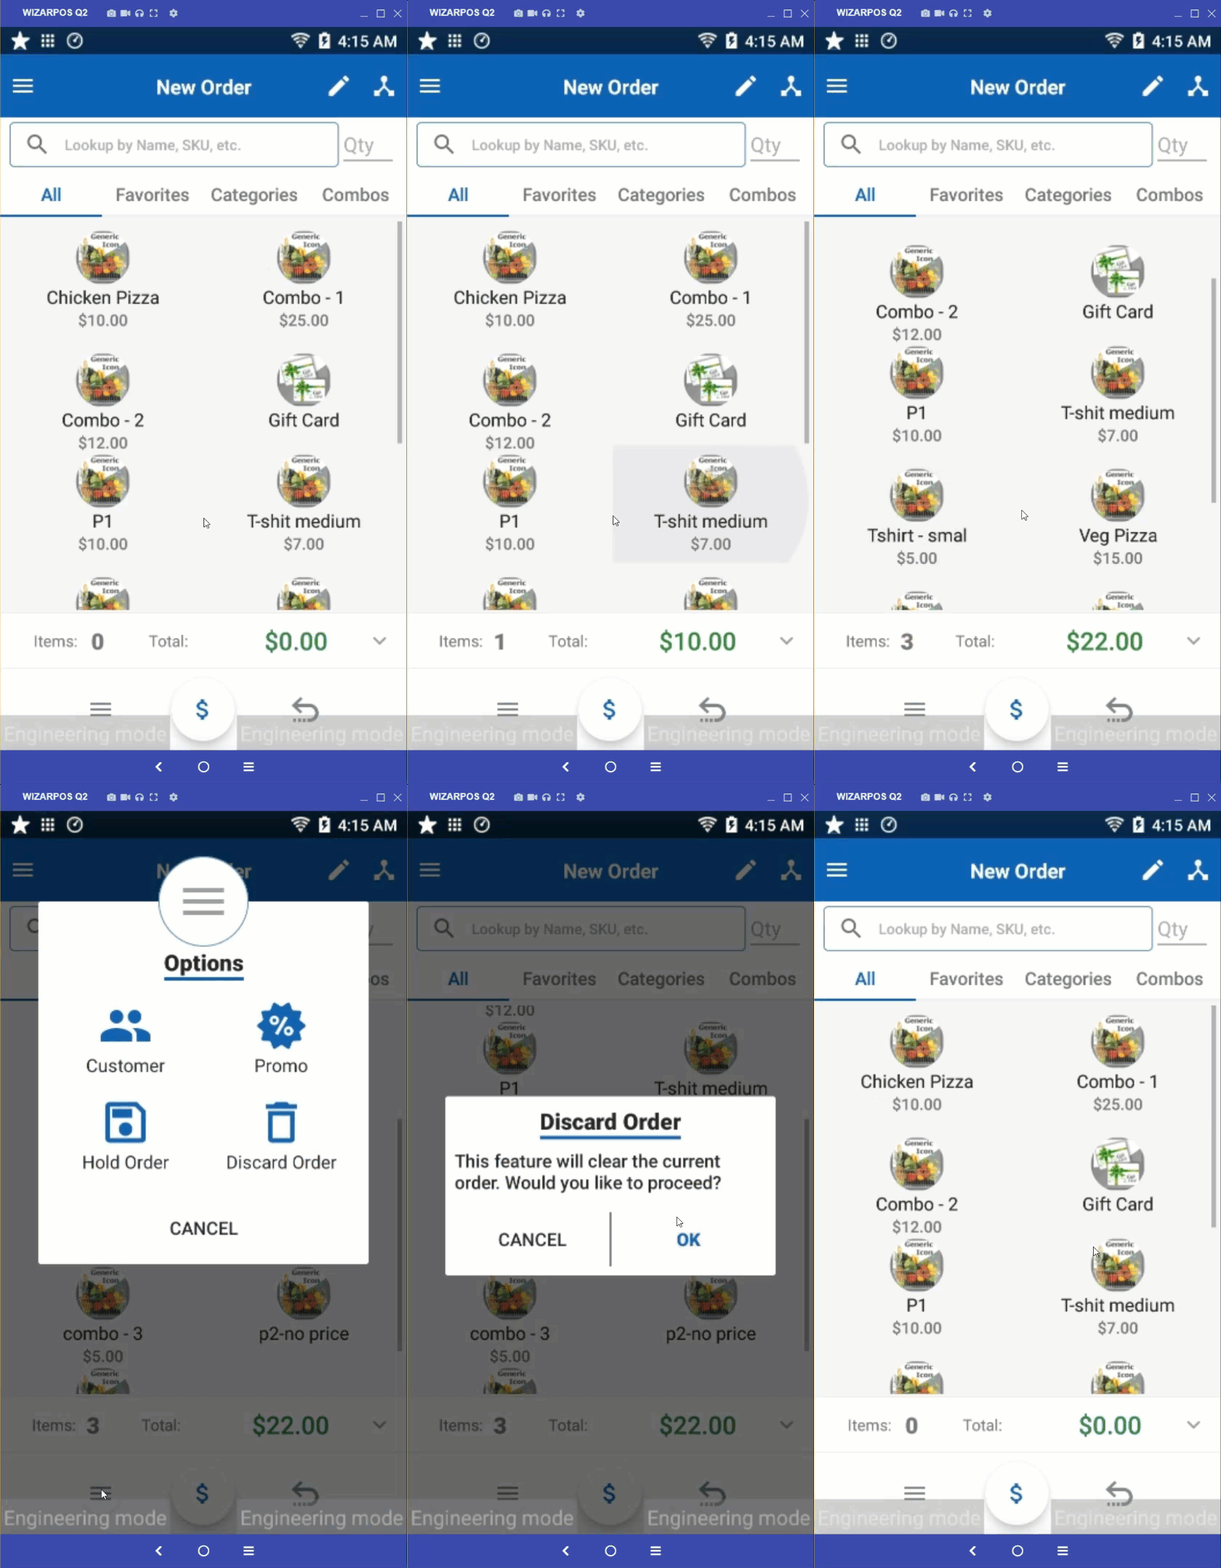
Allows you to discard a transaction.
- Click three horizontal lines at the bottom left corner
- Select Discard Order
- Click OK to discard the order
10. Balance Inquiry for EBT
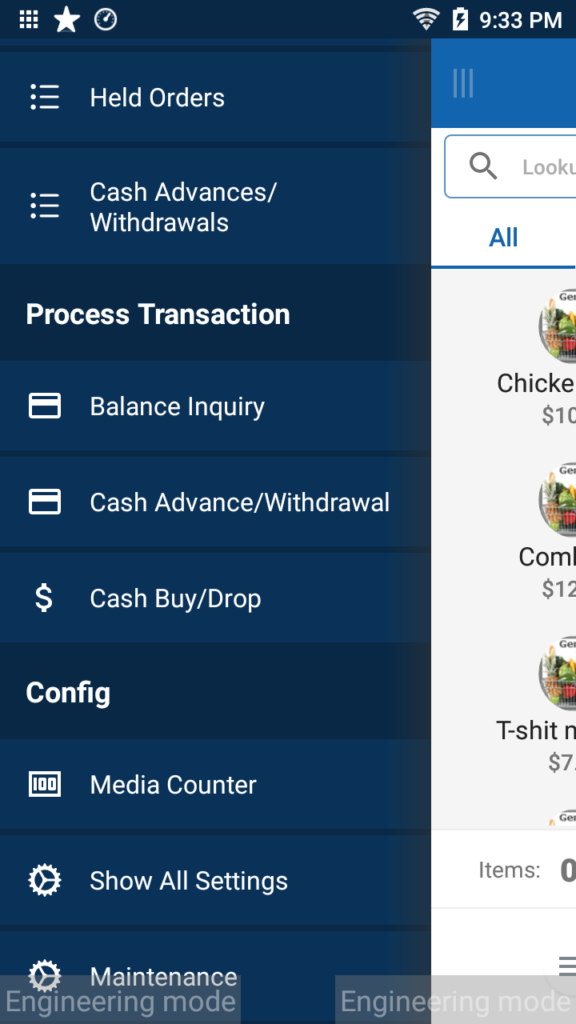
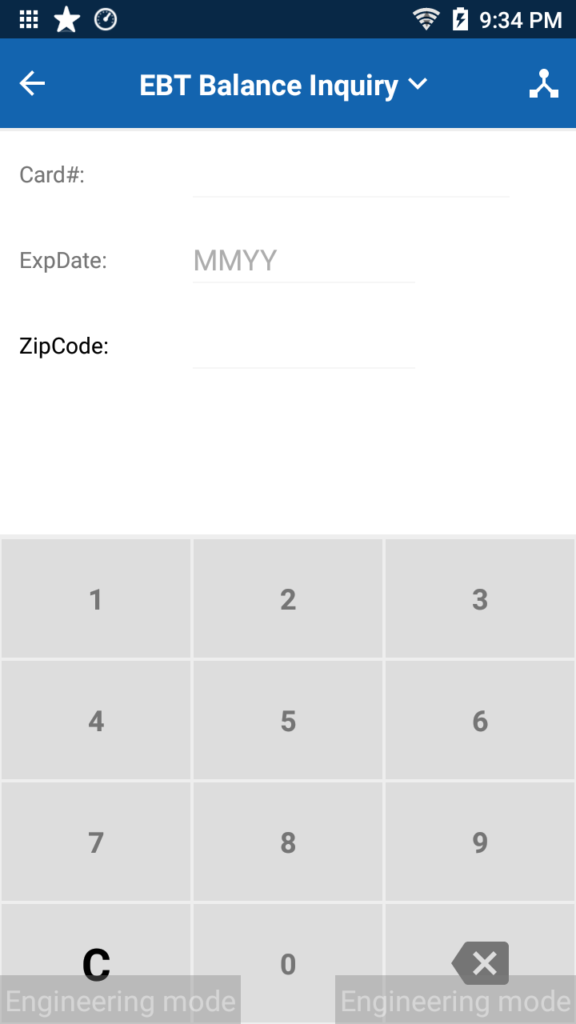
For EBT Balance inquiry
- Select the left-side menu by clicking on the three horizontal lines at the top left corner
- Select Balance Inquiry
- Swipe the EBT Card
- The customer will need to enter the PIN and press the checkmark on the card reader
- To print the receipt for the customer and/or enter the customer’s email to send the receipt
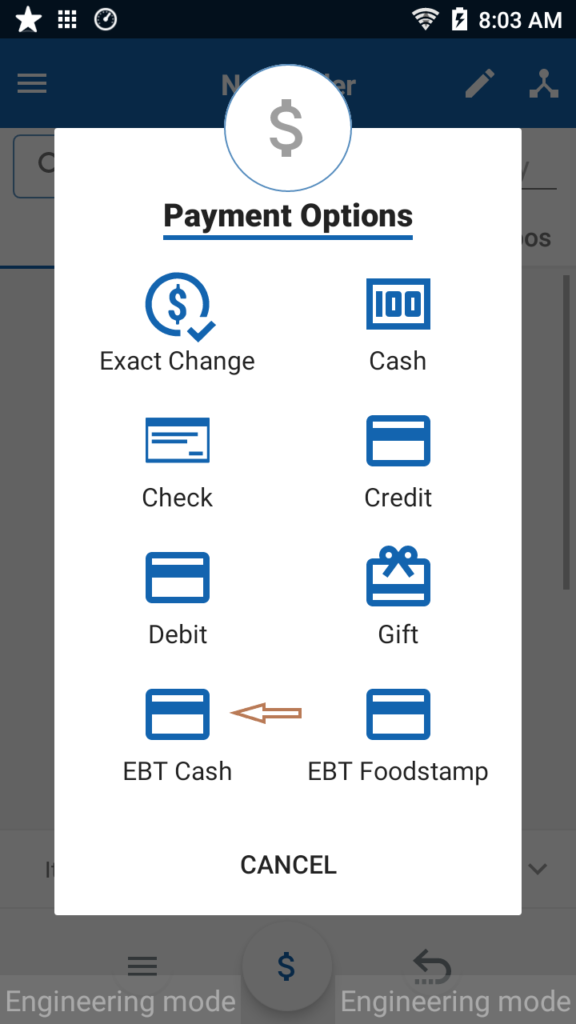
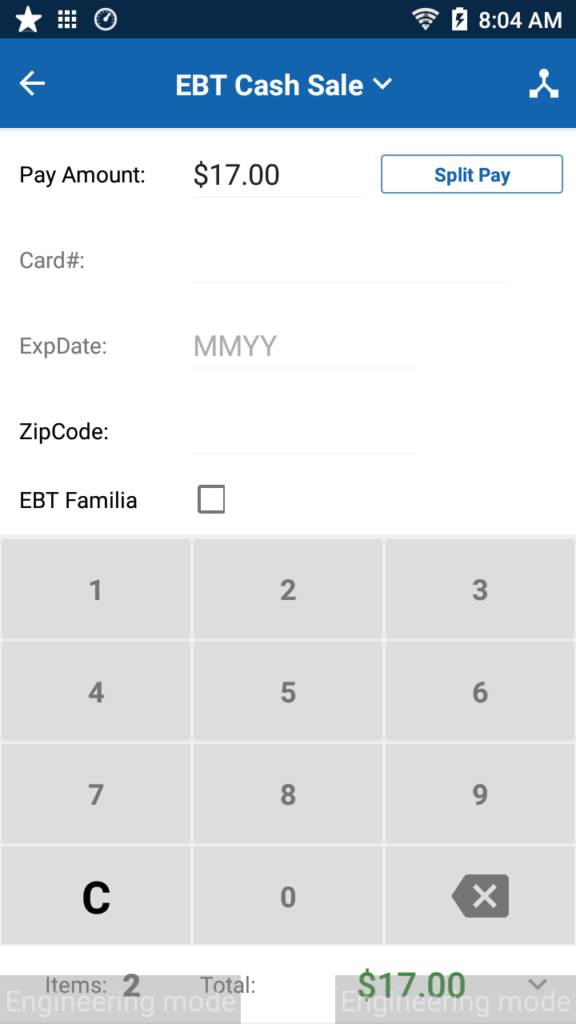
11. Cash Sale with EBT
To process a Cash Sale with EBT
- Select ‘$‘
- Select EBT Cash
- Swipe the Card
- The customer will need to enter the PIN and press the checkmark on the card reader
- Print the receipt for the customer and/or enter the customer’s email to send the receipt
12. Refund-Cash Advance
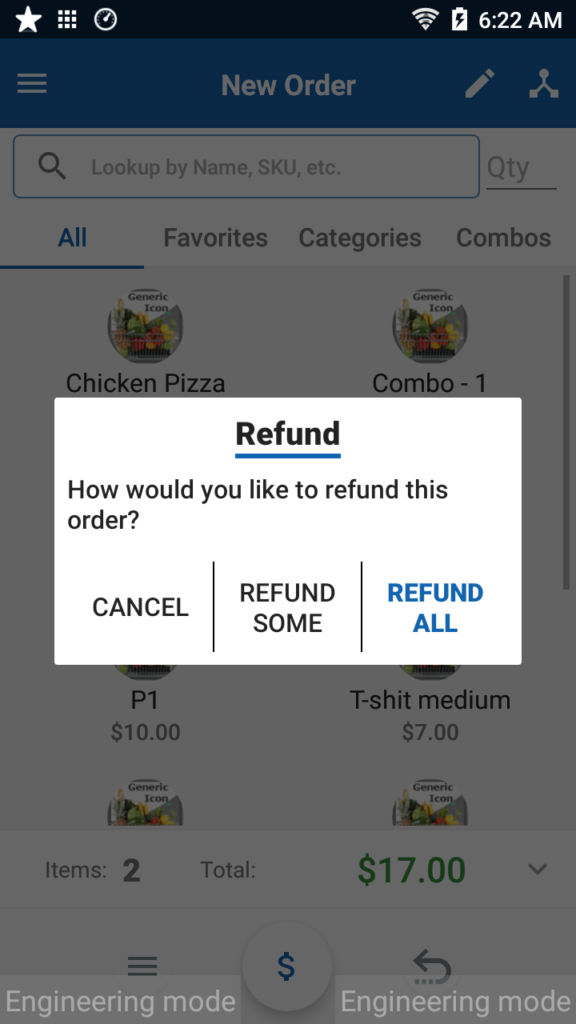
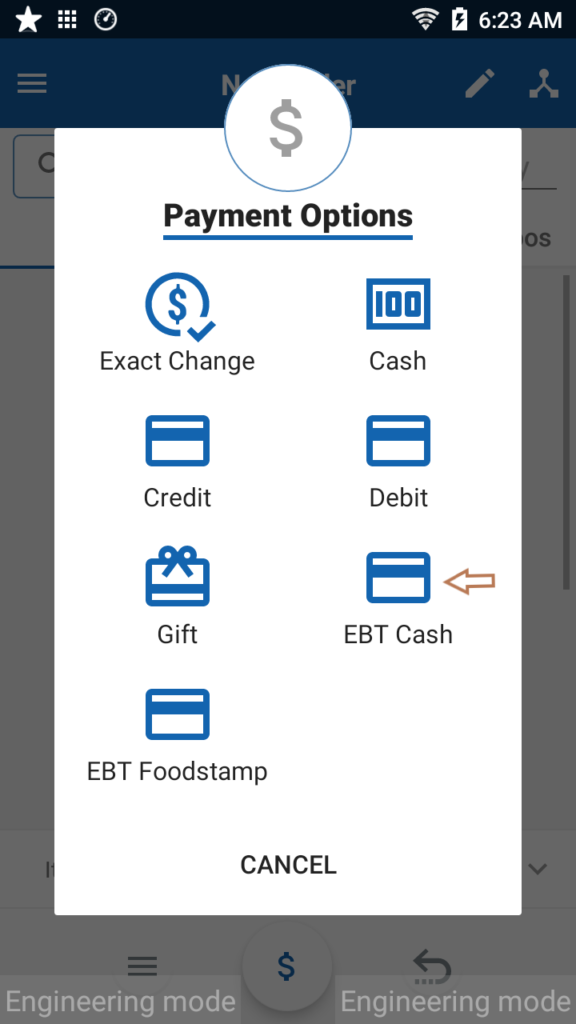
To process a Refund with Cash Advance
- Select the back button present at the bottom right corner
- Select Refund Some or Refund All
- Select EBT Cash
- Swipe the Card
- The customer will need to enter the PIN number and press the checkmark on the card reader
- Print the receipt for the customer and/or enter the customer’s email to send the receipt
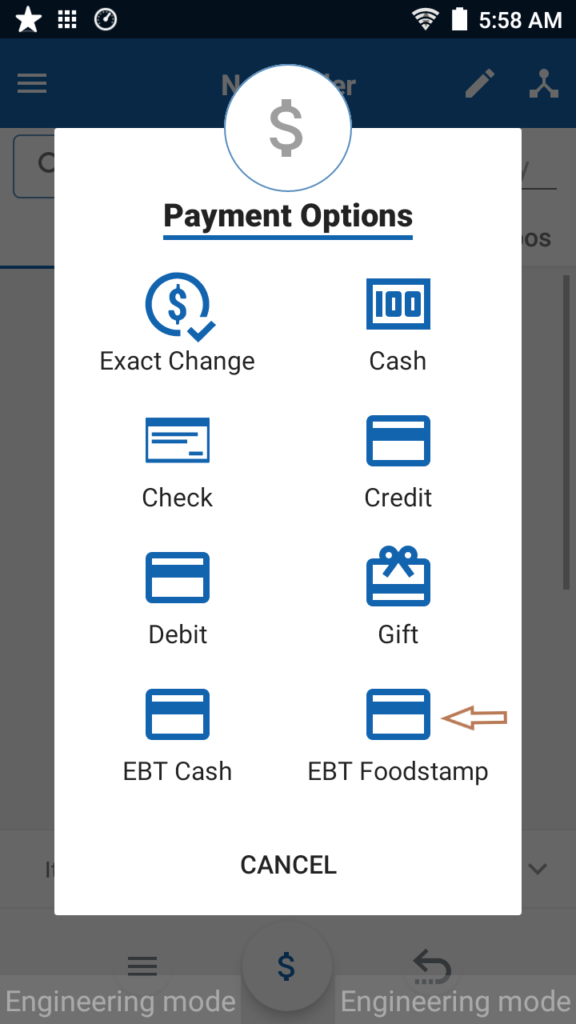
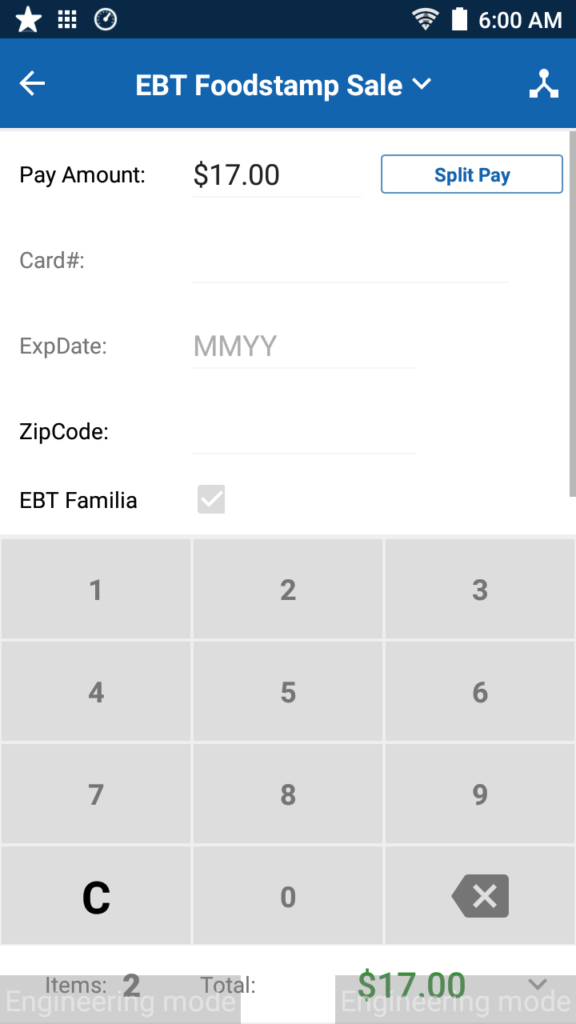
13. EBT Food stamp sale
To process a Food stamp sale
- Select EBT Food stamp
- Swipe the Card
- The customer will need to enter the PIN and press the checkmark on the card reader
- Print the receipt for the customer and/or enter the customer’s email to send the receipt
14. EBT Foodstamp Refund
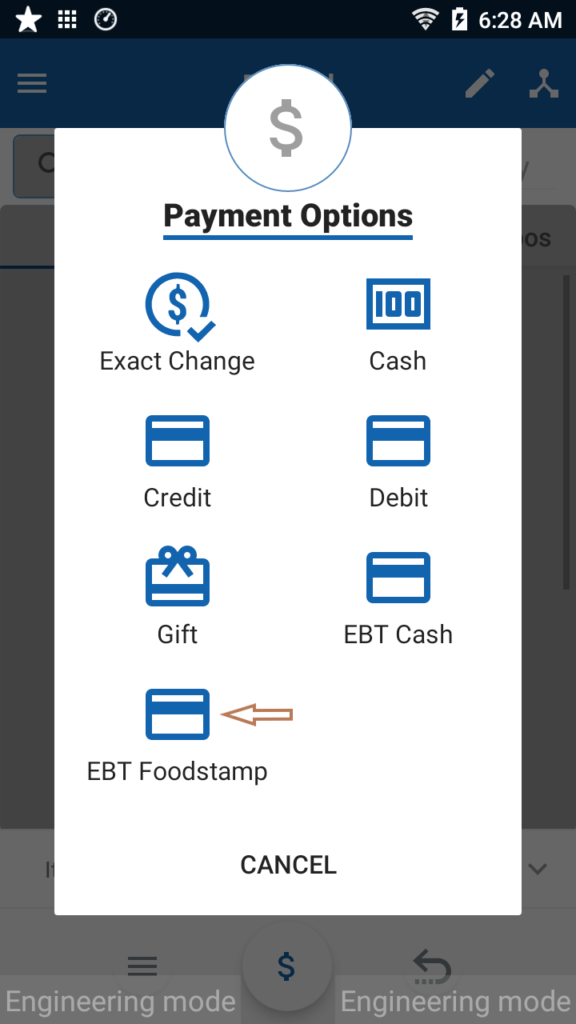
To process a Foodstamp Refund
- Select the back button present at the bottom right corner
- Select Refund Some or Refund All
- Select EBT Cash
- Swipe the Card
- The customer will need to enter the PIN and press the checkmark on the card reader
- Print the receipt for the customer and/or enter the customer’s email to send the receipt

15. Applying Discounts and Promotions
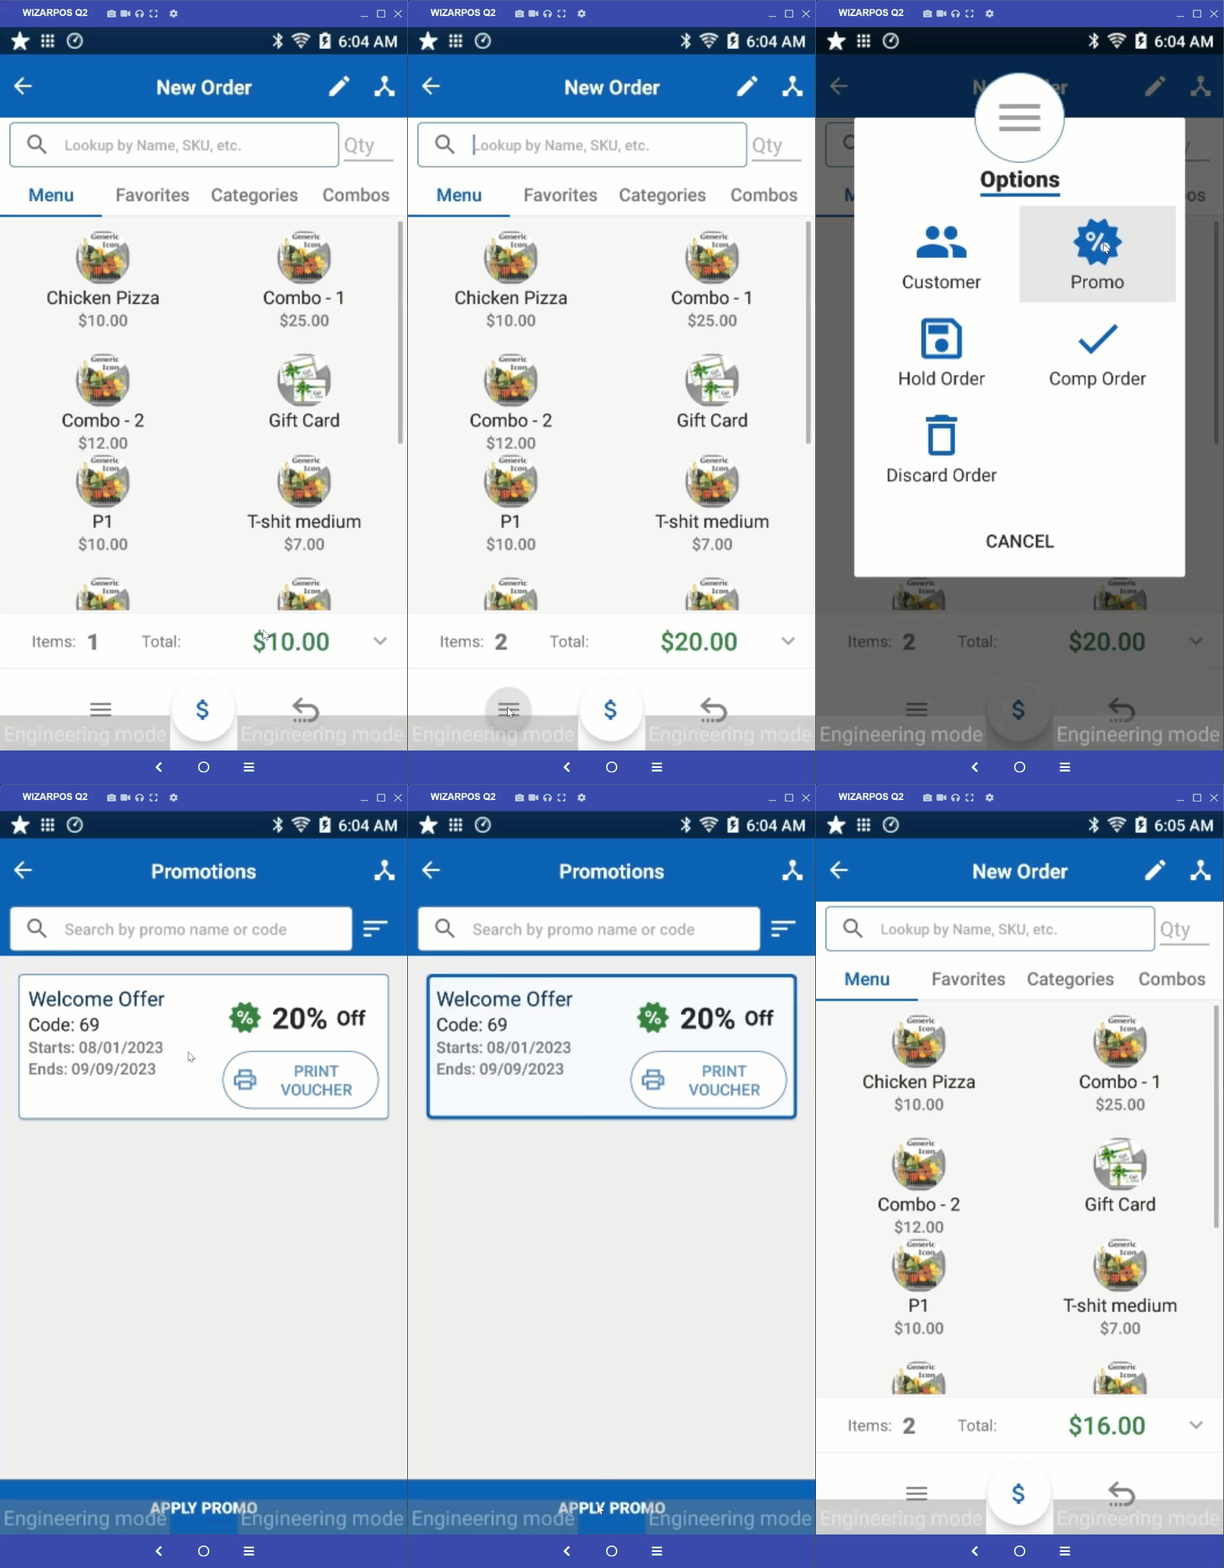
Discounts and promos are the two ways you can deduct from the order amounts to create customer savings. Discounts can be applied to a product. Promotions are predefined discounts for an entire order and need a promo code to be applied.
To apply a promo to an order:
- Click three horizontal lines at the bottom left corner
- Select Promo from the menu bar
- Select the Promotion and select Apply Promo
- After the promo is applied, the discounted amount will appear in the checkout summary in red.
16. Assigning Customers
You can save customer information, associate customers with orders, and assign customer discounts. All orders will be associated with the default customer, Walk-In until another customer is selected.
To add a new customer:
- Click Customer Database
- Click the + icon at the bottom right corner of the screen
- Enter the customer’s first name, last name, phone number, and email address.
- Tap Submit
- The added customer will automatically be assigned to the next order.
- The customer number will automatically be assigned by the Portal after added.
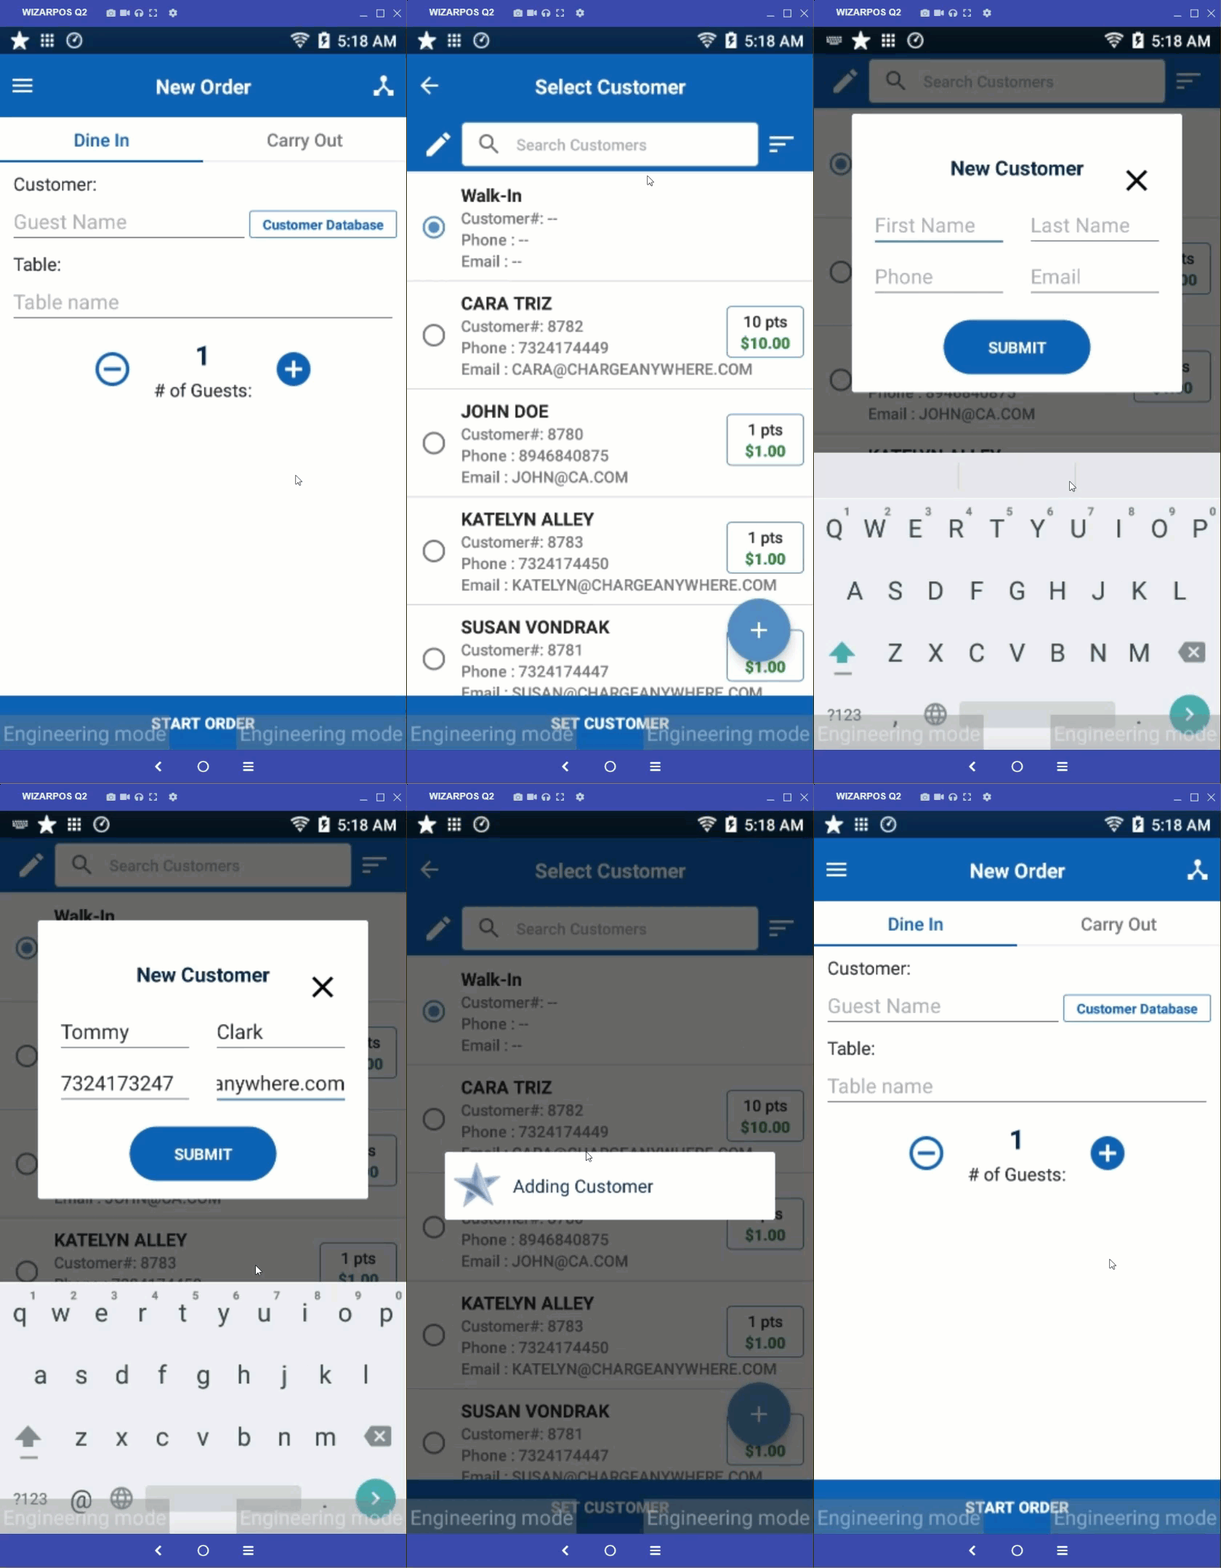
To assign a customer to an order:
- Click Customer Database
- Locate and select the desired customer. (You can search for customers by their customer
number, first name, last name, phone number, or email address.) - Tap Set Customer
- Once a customer is selected, you will see the customer’s name under the
customer button in Cashier Options. - If the customer has been assigned a customer discount in Portal, the customer
discount will automatically be applied to the entire order
- Once a customer is selected, you will see the customer’s name under the
17. Loyalty Program
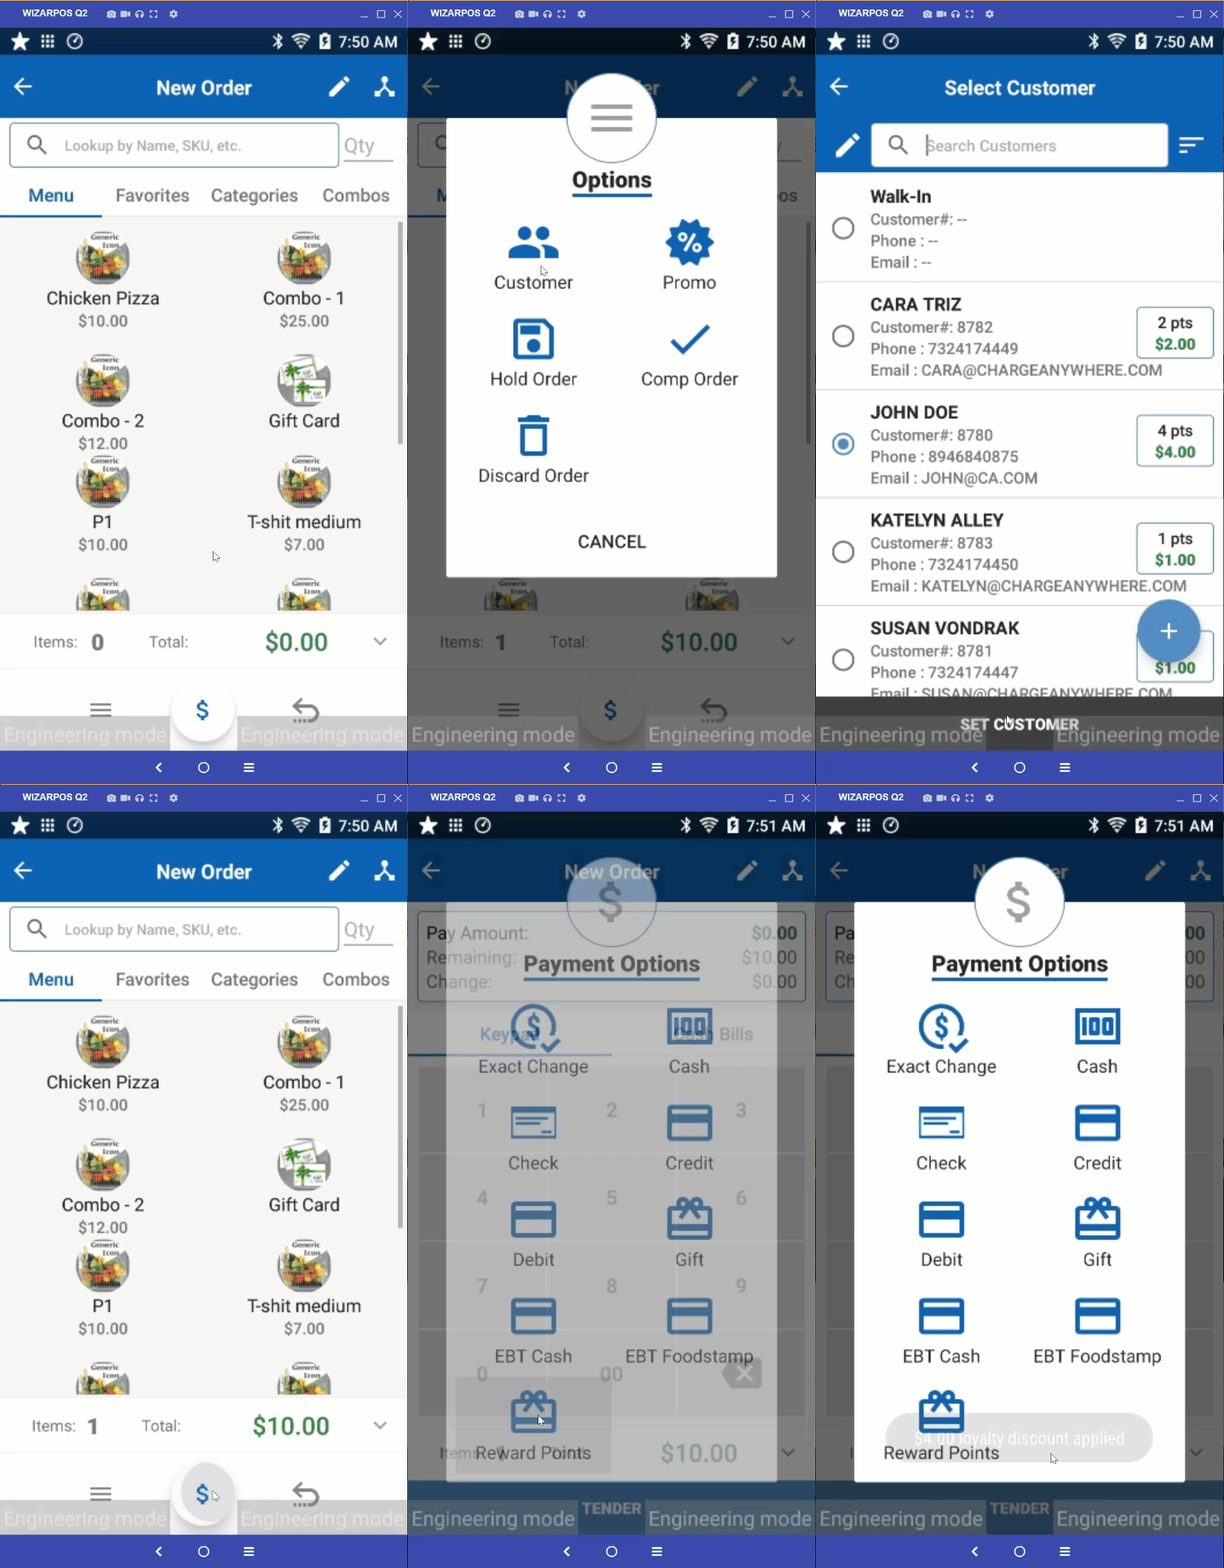
Loyalty Program allows you to offer your customers to pay their bills with Loyalty Points. To view how many points a customer has simply click on three horizontal lines at the bottom left corner, then on Customer from the New Order Screen.
Applying Loyalty Points:
Start a New Order -> Dine In or Carry Out. You can select the customer from the Customer Database- Select the products
- Click the ‘$‘ sign at the bottom center of the screen
- Click Reward Points to redeem the reward points
Note: The option to redeem reward points will only appear if the customer has a sufficient number of reward points in their account. If a customer does not have enough reward points, the option to redeem them will not appear. - Proceed to make the payment with a suitable tender type
18. Holding Orders
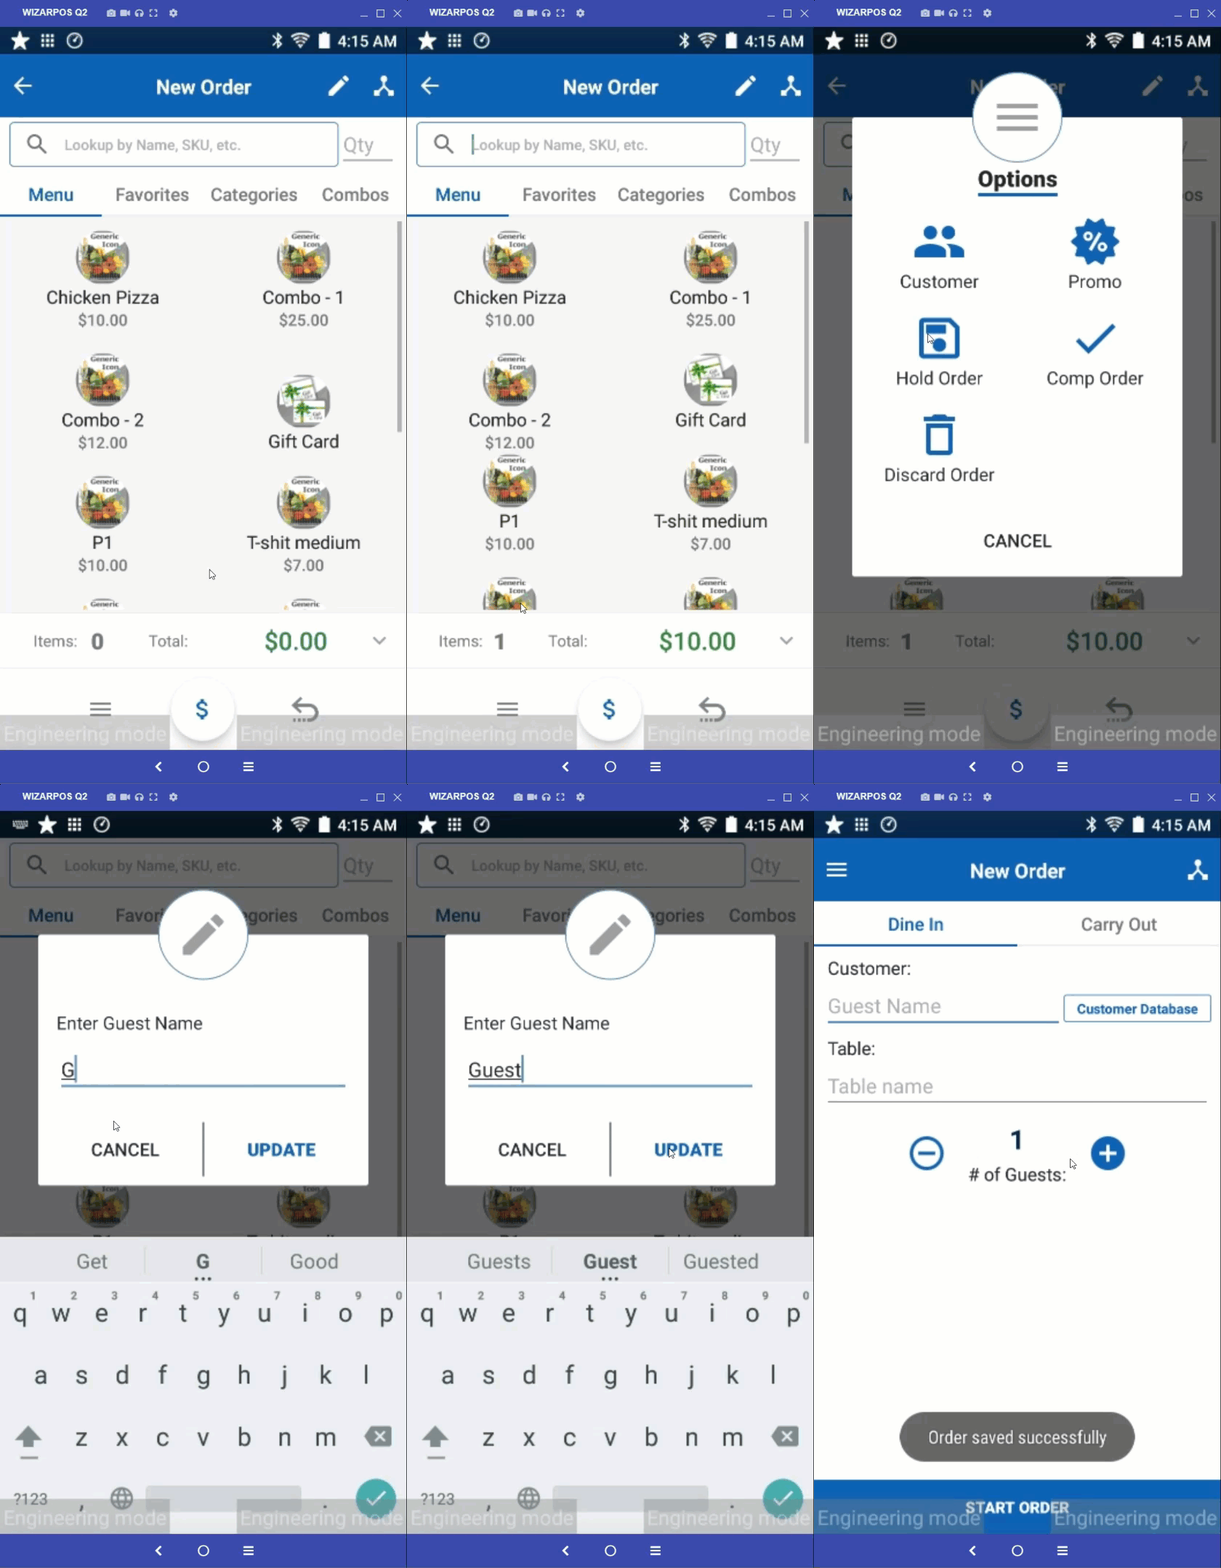
Holding orders allows a cashier to save an unfinished order and retrieve it at a later time. Once items have been placed in the checkout, you will have the option to Hold Order in the menu bar. If no items are in checkout, that option will allow you to retrieve Held Orders.
To hold an order:
Start a New Order -> Dine In or Carry Out. You can select the customer from the Customer Database- Select the product(s) you wish to sell from the product selection panel or scan the
product(s) barcode. Change quantities and apply promos and/or discounts as necessary. - Select Hold Order
- Enter a name for the order
- Select Update
To retrieve a held order:
- Ensure that there are no items in the checkout panel and click Held Orders from the menu bar
- From the New Order screen, select the Menu option at the top left corner
- Select Held Orders
- Select the desired order, and click on ‘$‘ to pay or Discard as correspond
- Once the order is recalled, you can make any necessary edits to the order or process the
payment
19. Peripherals Menu
Peripheral Devices
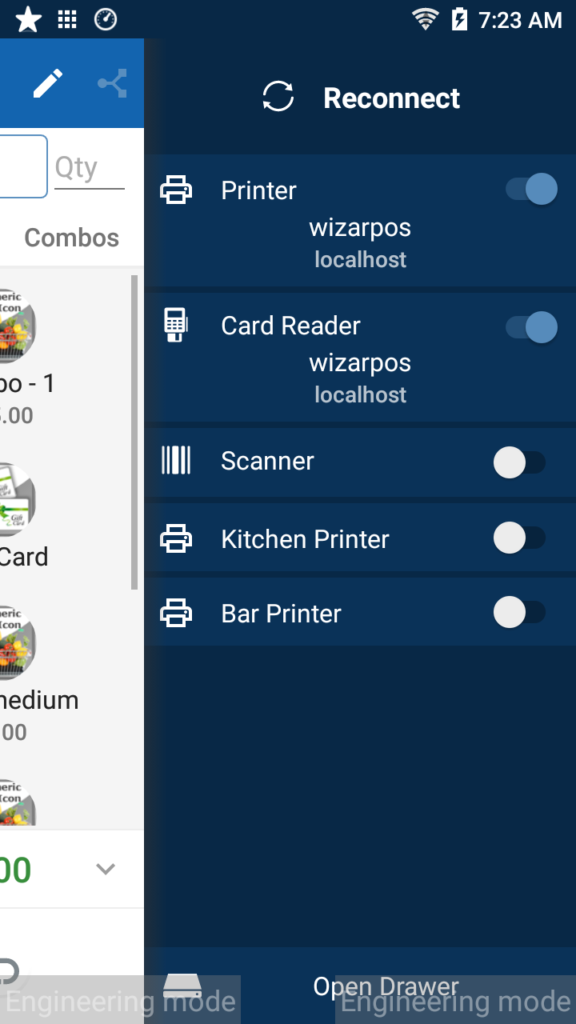
You can connect a variety of peripheral devices to assist in daily cashier operations, such as printers, card readers, and barcode scanners. The Peripheral Devices option allows you to connect new devices and lists the devices that are currently connected to your tablet. For more information on setting up a peripheral, refer to the Setting up Hardware Peripherals section.
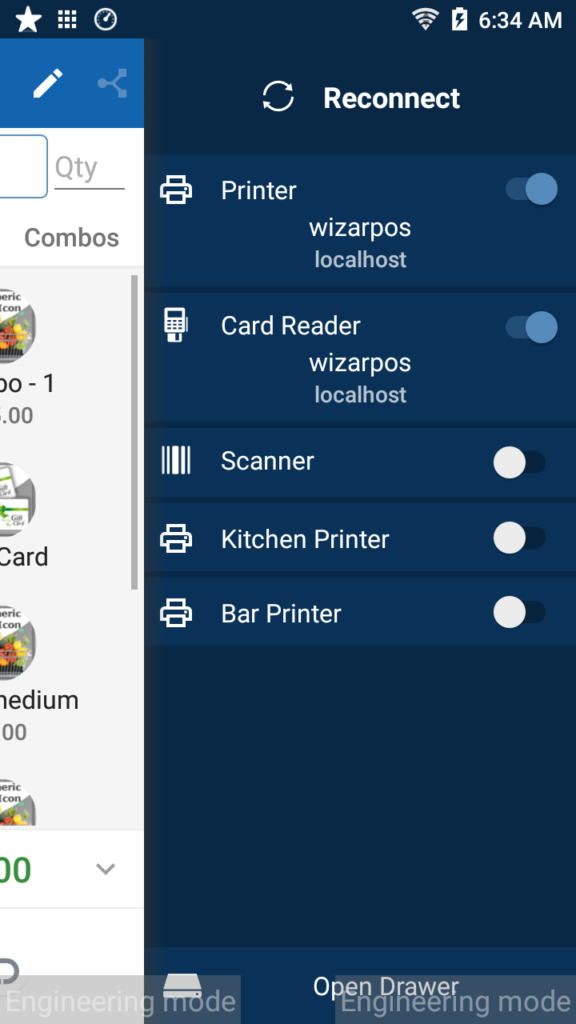
Reconnect
During extended periods of inactivity, Bluetooth devices may disconnect from the cash register. To re-establish the connection, ensure that the previously paired peripheral is turned on and tap Reconnect.
Drawer
The Drawer option will open an automatic cash drawer that is connected to a paired network printer.
Note: ELO PayPoint has an integrated automatic drawer
20. The Menu Bar
Exit
- To close the application, tap the three horizontal lines at the top left corner.
- Select Exit
Sync
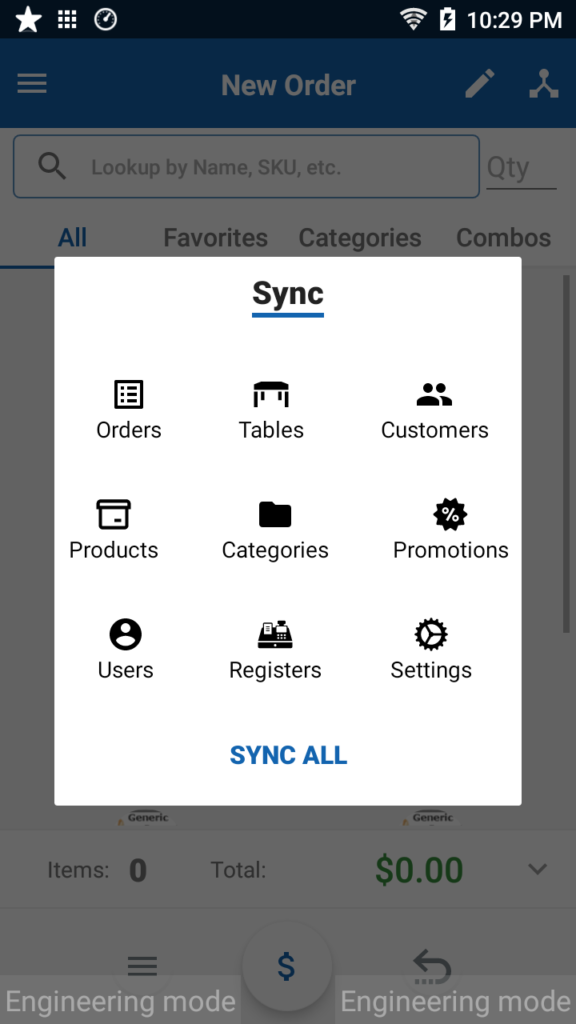
Syncing allows the app to download the information configured in the Portal. Cash registers sync all settings automatically upon login. However, if changes have been made to the Portal while a user is currently logged in, that user can update the cash register through the Options menu.
A user can sync:
- All Settings
- Device Settings
- Categories
- Products
- Promotions
- User Permissions
- Customers
Reports
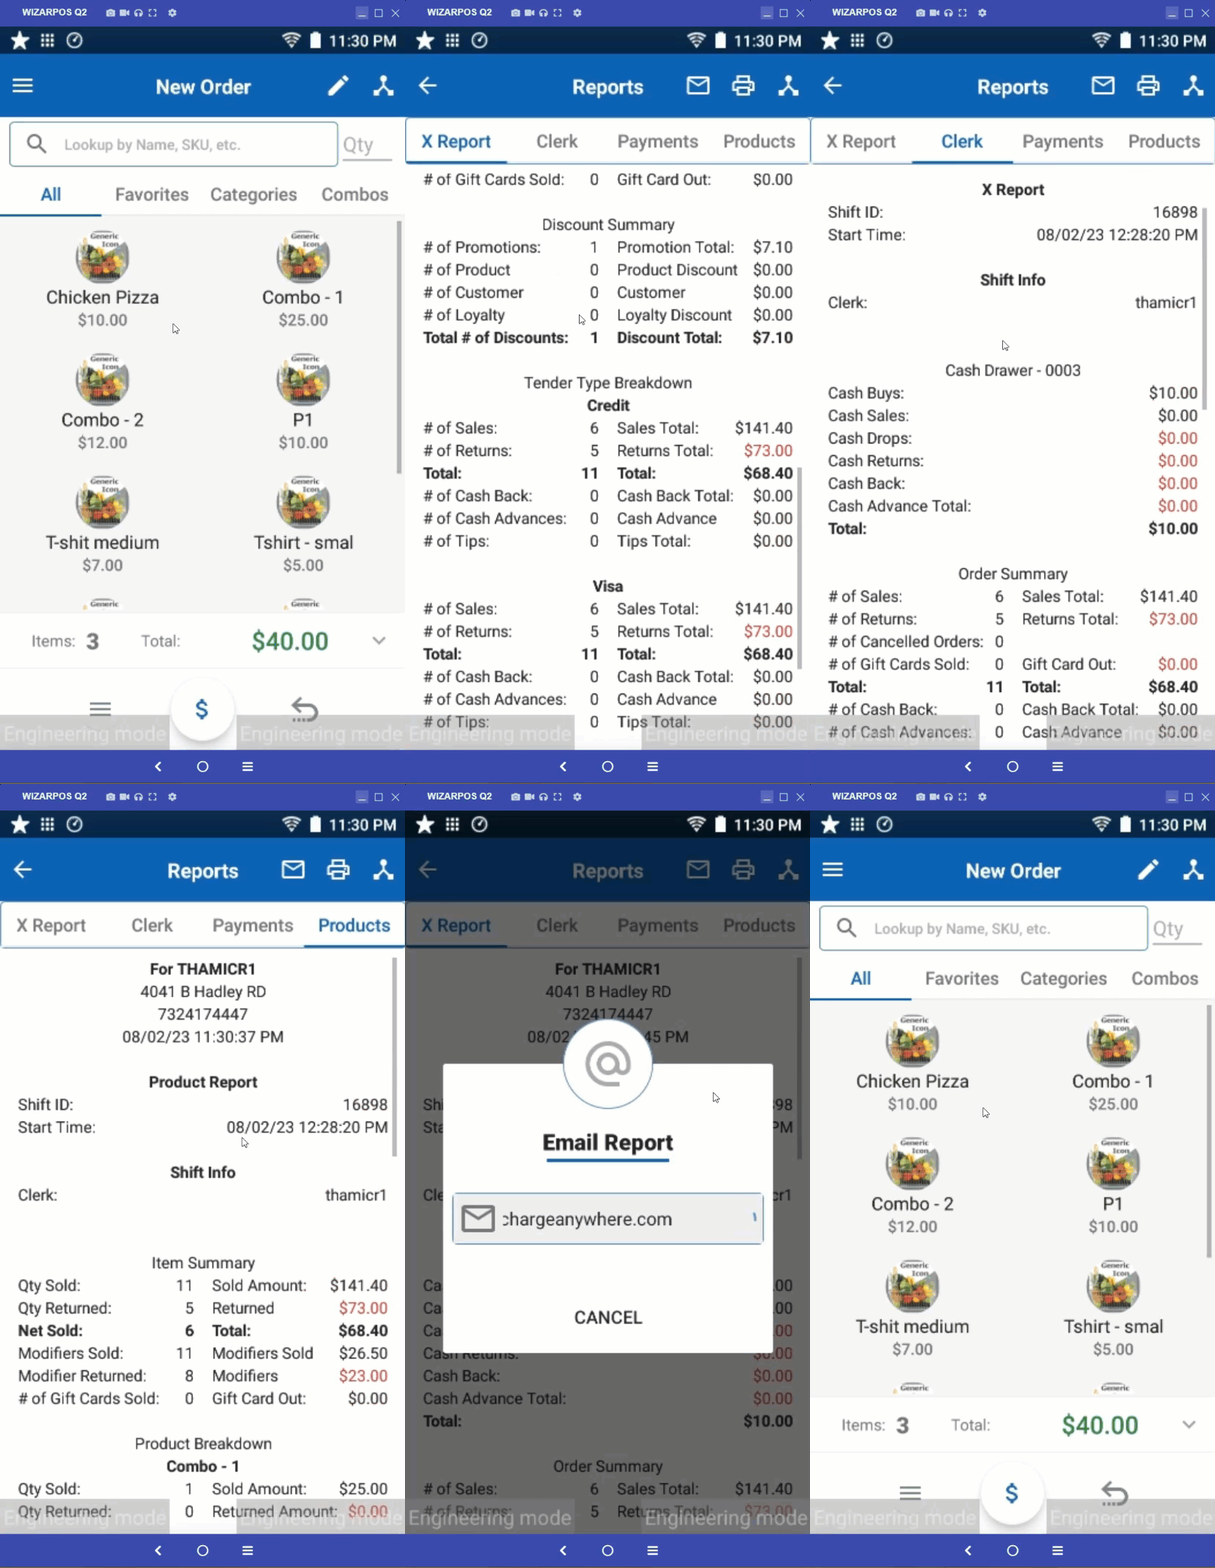
Logs and Reports store current-day order details which can assist with cashier reconciliation. Logs and Reports are both accessible from the menu bar.
Logs: Lists every order completed in the current shift displaying the order #, transaction type, amount, and time stamp. Click a transaction for all details including items in the order. You may process a refund or print/email receipt of a specific order by selecting options
Reports: There are four reports available to cashiers:
- X Report: View current shift statistics including sales activity, receipt counts, and payment listings.
- Payment Summary: View payments taken by tender type.
- Product Summary: View the quantity and sales amounts of products you have sold
Users have the option to print totals and can also use the Report Options feature to filter the data.
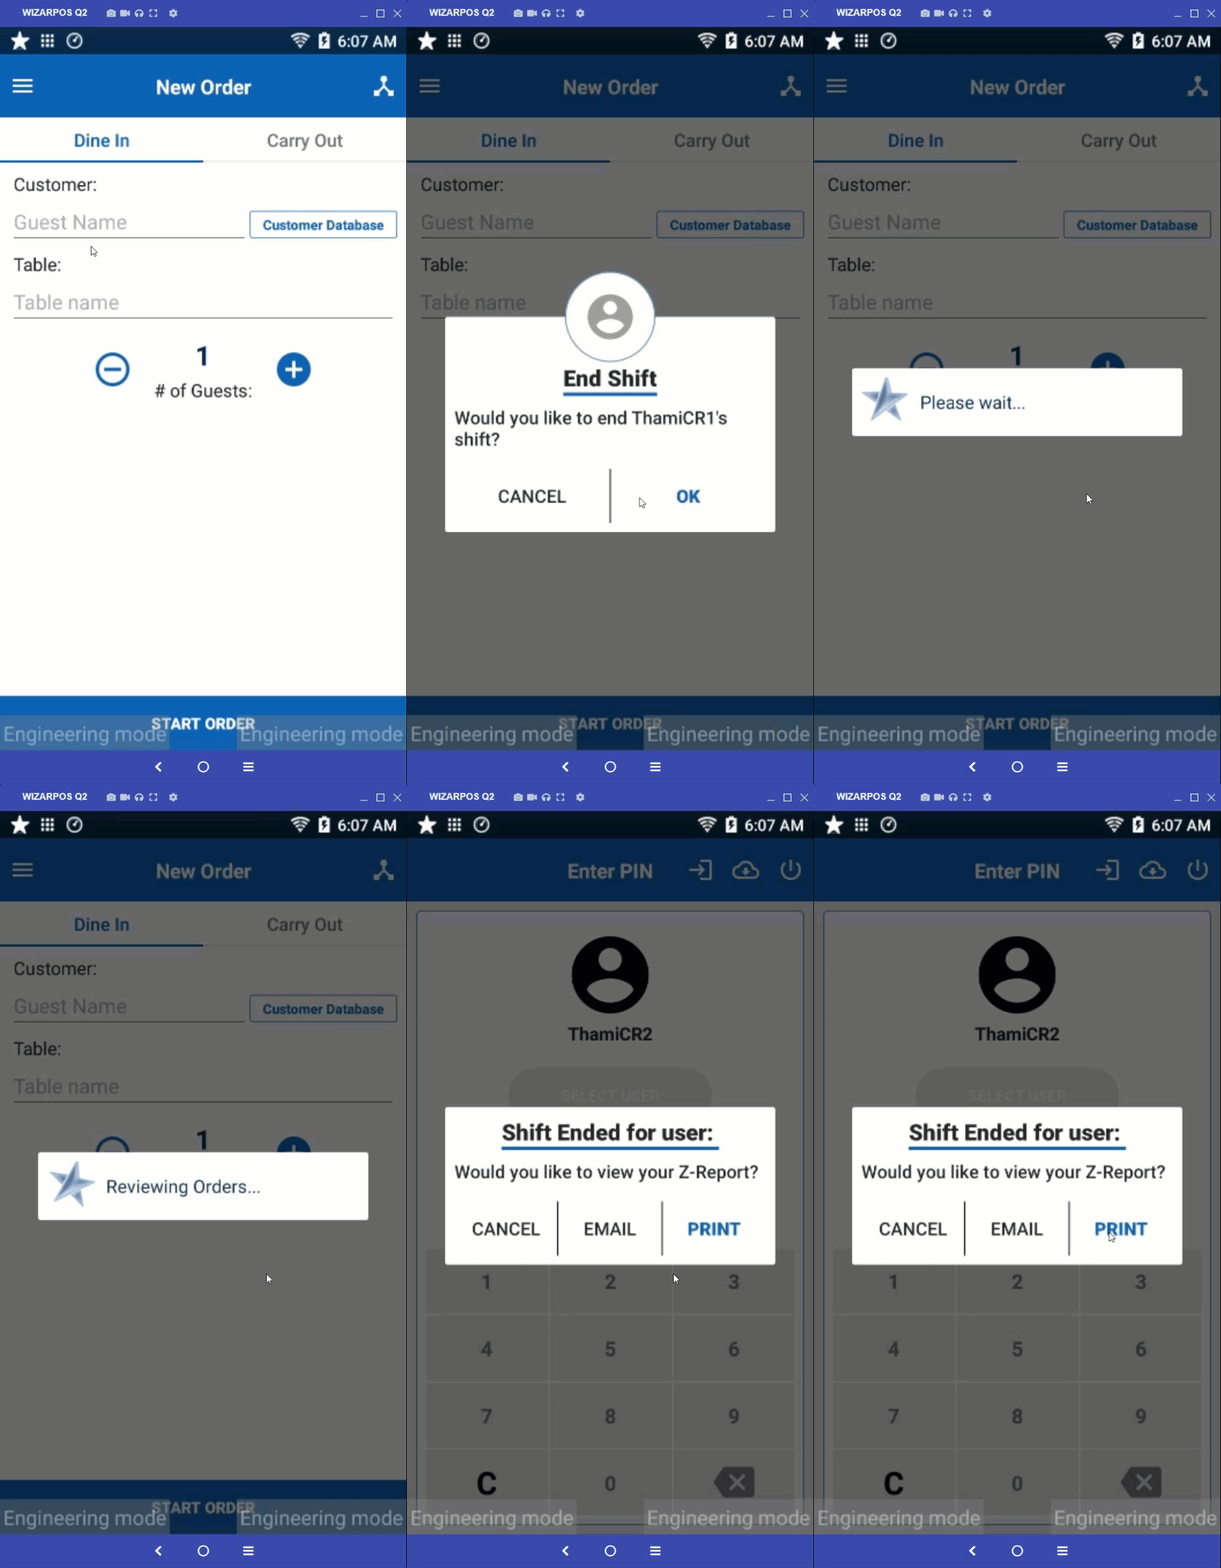
Close Shift
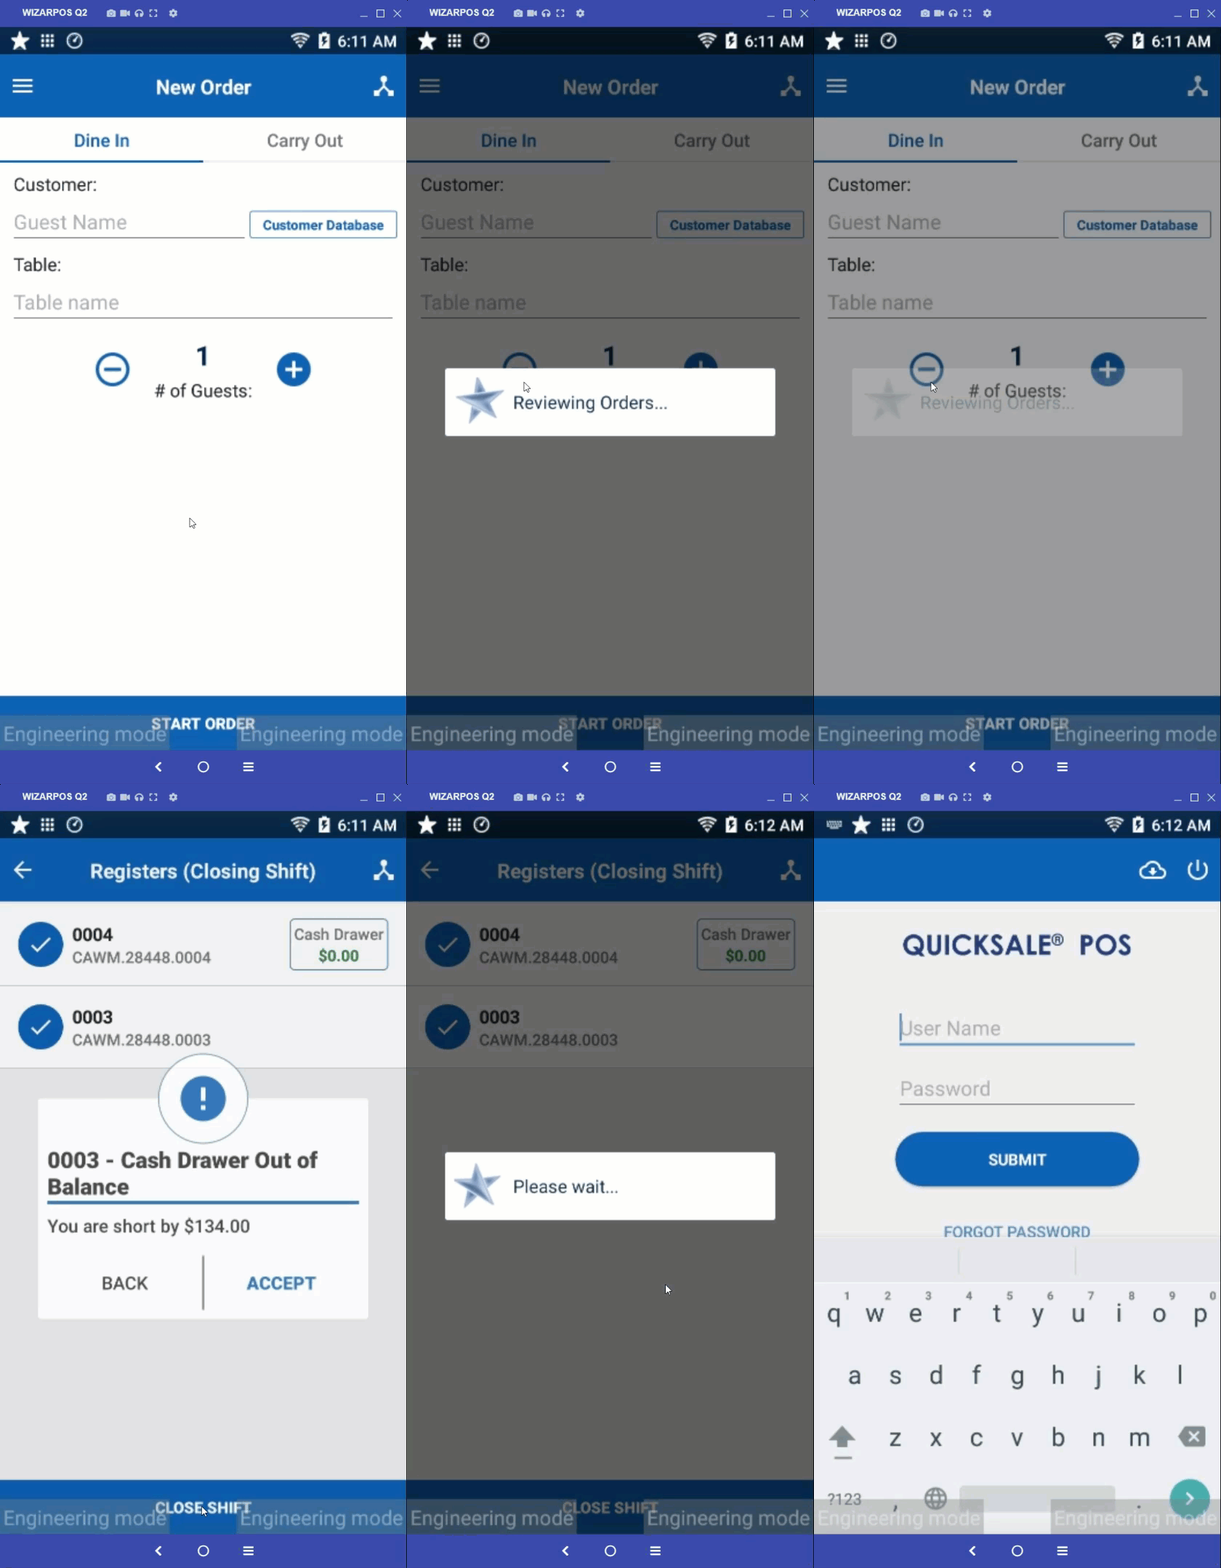
The close shift option enables you to view your closing balances, print daily reports, and close your shift.
To Close a Shift:
- Click three horizontal lines present at the top left menu
- Select Close Shift
- The app will review the orders and display all the cash registers
- Click Close Shift
- The app will display the closing balance and out-of-balance prompt (if applicable)
- Click Accept to proceed
- Select Print Reports (if applicable)
Note: If you have any open orders, it will show a warning message, so you can make sure to adjust the tip if needed (refer to untipped order section), and/or close the open orders (refer to open orders section). - Click Exit
Leave Shift
The leave shift option enables you to print daily reports, and leave your shift.
Note: Leave shift will remove the currently logged-in user from the shift.
To Leave a Shift:
- Click three horizontal lines present at the top left menu
- Select Leave Shift
- Select Yes
- If there are any Open/Untipped Orders, then the app will prompt you to resolve those orders before leaving the shift. Check held orders and complete or discard the order to proceed. Once the orders are resolved, you can leave the shift.
- Select Print Reports (if applicable)
Note: If you have any open orders, it will show a warning message, so you can make sure to adjust the tip if needed (refer to untipped order section), and/or close the open orders (refer to open orders section). - Click Exit
21. Cash Buys & Cash Drops
If you are utilizing a cash drawer, then there may be times that you need to add or remove money from
the drawer. The cash buy and cash drop feature allows you to record changes to cash drawer balances
that weren’t caused by a sale or refund.
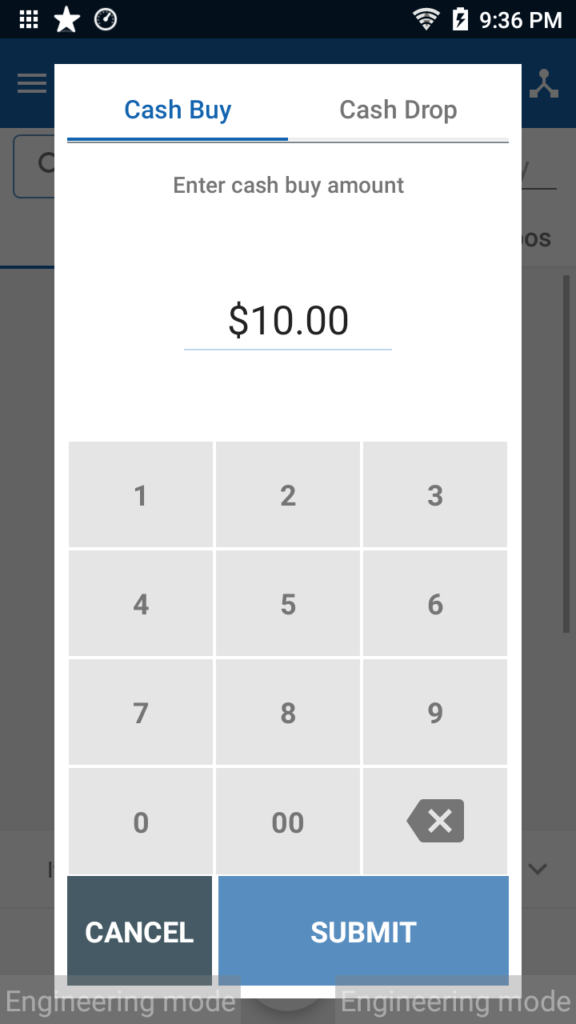
- Cash Buy – Indicates that money has been added to a cash drawer. (A cashier may need to add money to effectively disperse change to customers.)
- Cash Drop – Indicates that money has been removed from a cash drawer. (Some businesses remove excess funds from cash drawers for security reasons)
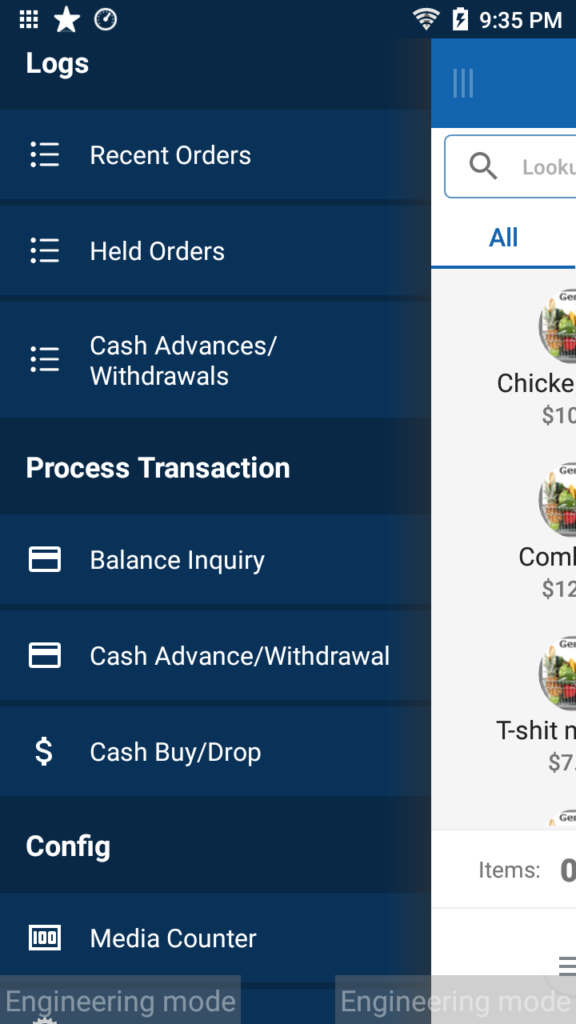
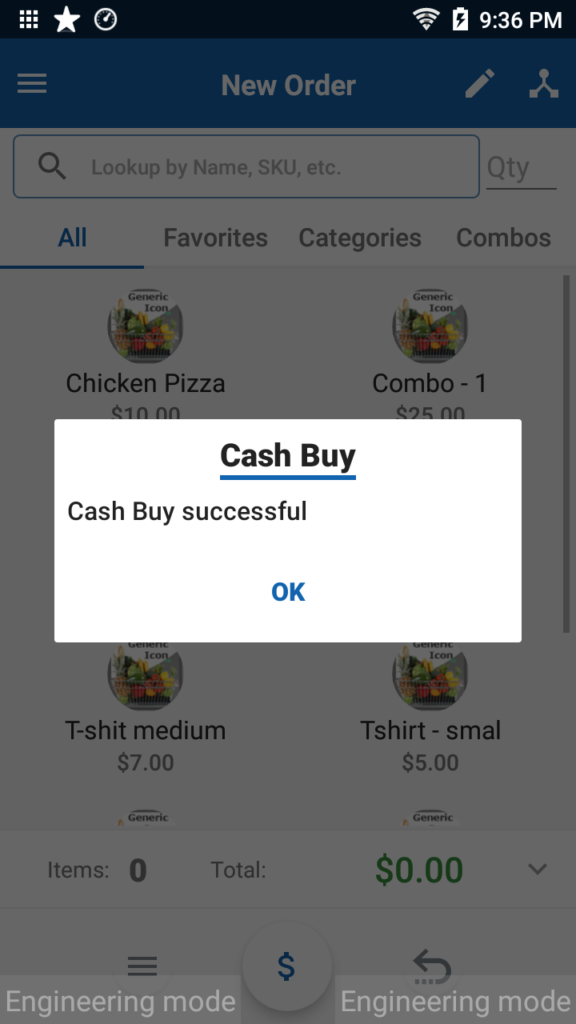
To record a cash buy or cash drop:
- Click three horizontal lines present at the top left menu
- Select Cash Buy/Drop
- Enter the amount being added or removed
- Tap Submit
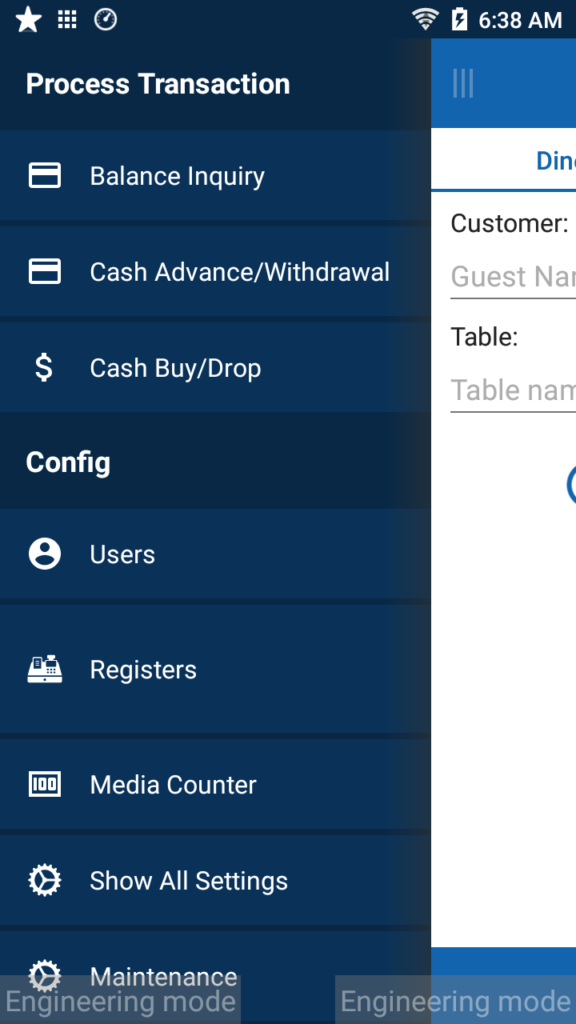
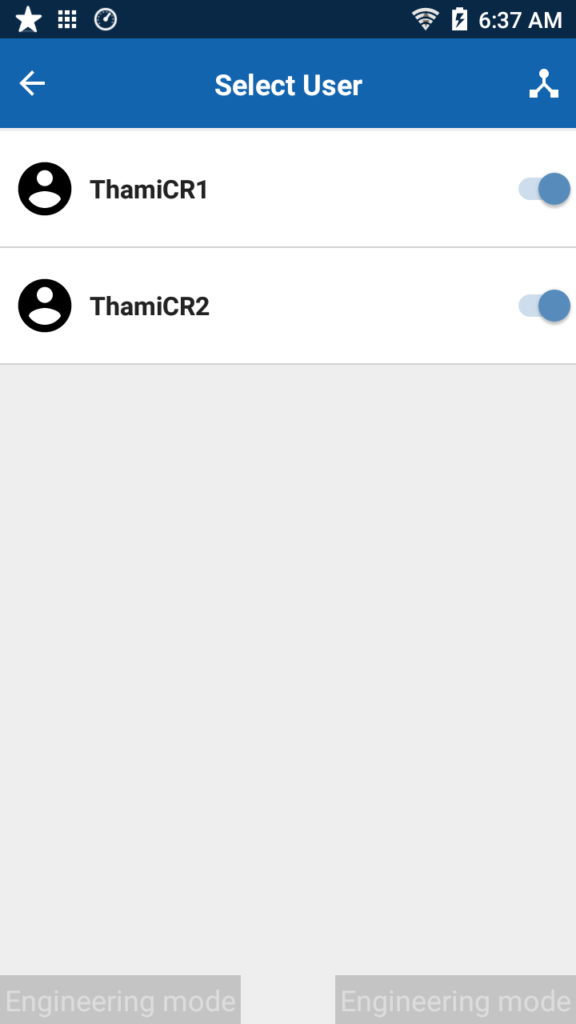
22. Users
You can enable/disable users and close the shift of a particular user from here.
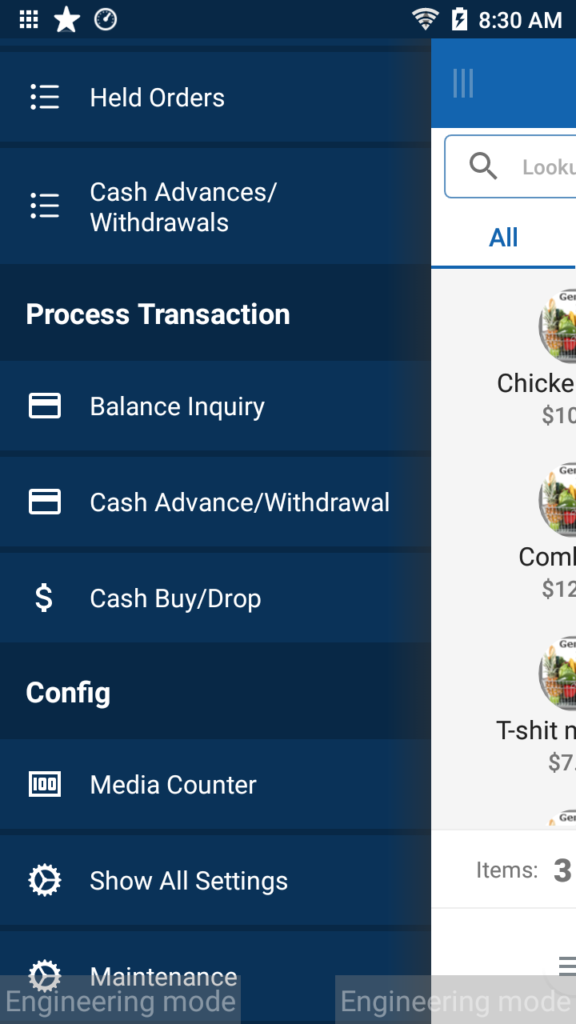
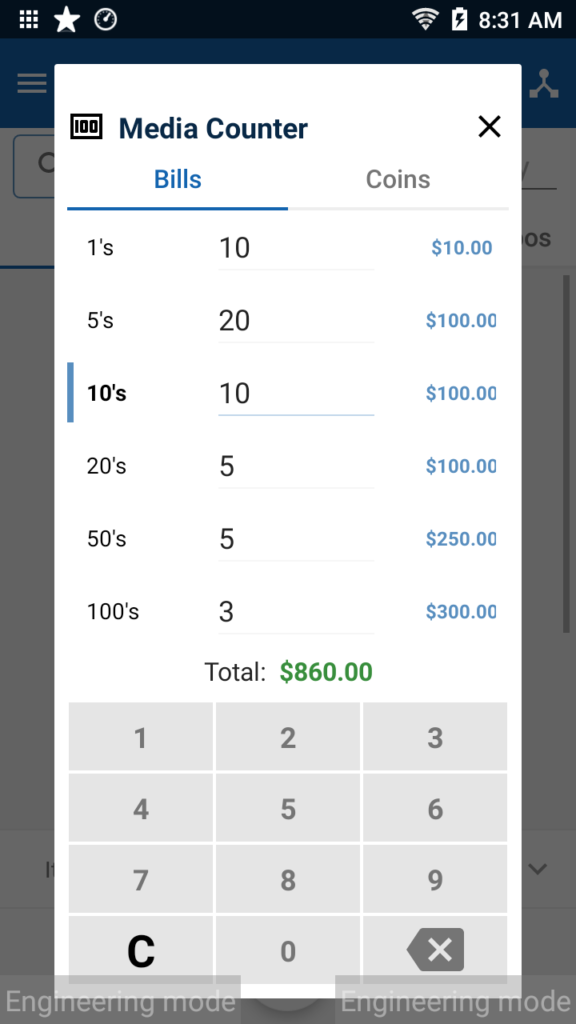
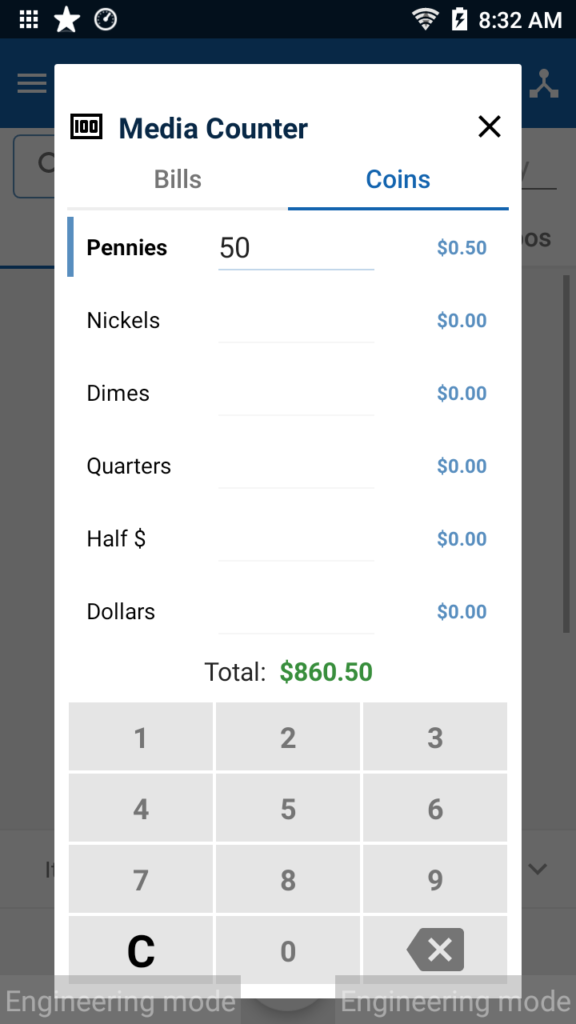
23. Media Counter
The Media Counter allows a user to enter the amount of each bill and coin denomination in the cash
drawer. The total amount of cash in the drawer will be displayed along with any detected cash
discrepancies.
24. Show All Settings
Displays or prints the various app settings, including the version #, device ID, and software license key
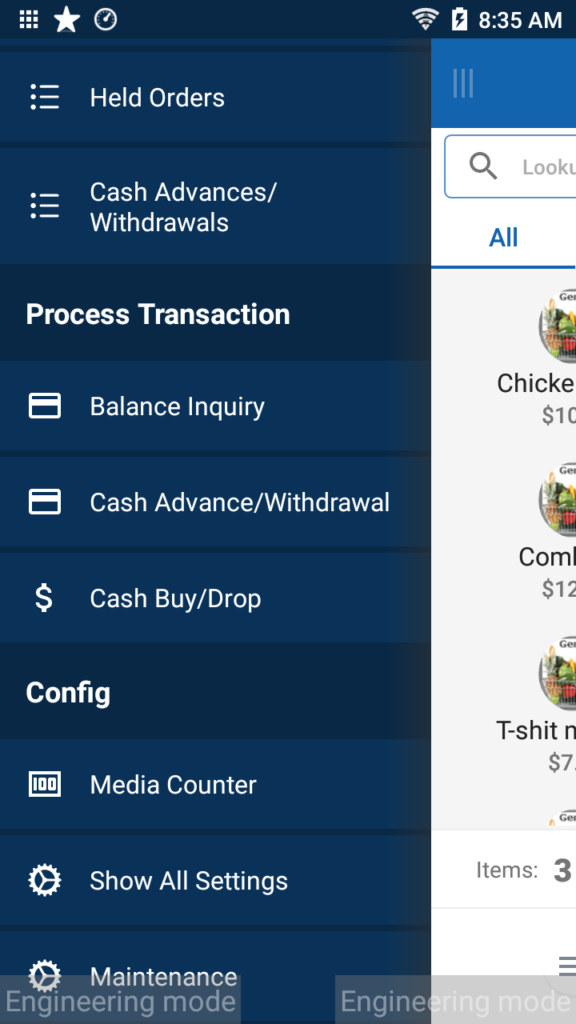
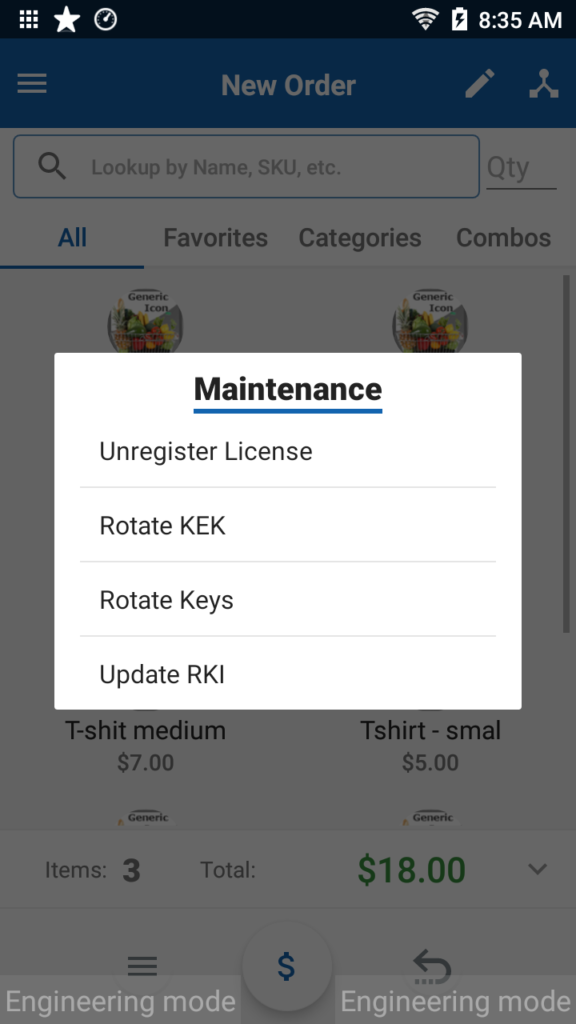
25. Maintenance
Maintenance holds the administrative functionalities of the cash register.
- Rotate Keys: Changes the encryption key for security. It is recommended to rotate keys a minimum of once annually.
- Unregister: Unregisters your software license key. (Necessary before transferring the app to another tablet or ELO PayPoint POS)
26. Cashier Options
Payment
To complete an order after all items have been selected for checkout, press the “$” button at the bottom of the screen. The payment screen will populate with all available tender types.
Cash
You can complete a cash transaction by using either the Keypad or Show Bills tab.
- Keypad: Enter the amount collected and press Tender. Selecting Tender with no amount entered will submit the exact amount of the order’s balance.
- Cash Bills: Select the bills collected. Once the amount collected is greater than or equal to the remaining balance, the payment will be submitted automatically. Selecting Tender with no amount entered will submit the exact amount of the order’s balance.
Debit
To complete a debit card payment, swipe your card, enter your PIN and press Submit. To accept a partial payment, tap the Total field and enter the new payment amount.
Credit
To complete a credit card payment, swipe your card or enter your credit card information and press Submit. To accept a partial payment, tap the Total field and enter the new payment amount.
EBT
To complete an EBT Transaction, swipe your card, enter your PIN and press Submit. To accept a partial payment, tap the Total field and enter the new payment amount.
Quick Cash
Pressing the Quick Cash option will complete an order with a cash payment equal to the order total.
Promo
Select the Promo option to apply a promotion discount to an entire order. All promotions must be configured from the Portal. You can scan a promo barcode, enter the promo code, or select from the list of all available promotions. Once a promo is applied, the promo name and discount amount will appear in the checkout summary.
New Order
Selecting a New Order will discard all information in a current order to quickly start a new one.
Hold Order / Held Orders
Holding orders allows a cashier to save an unfinished order and retrieve it at a later time. Once items have been placed in the checkout, you will have the option to Hold Order.
27. Additional Features
Note: To know the list of predefined trigger values that can be used to test various transaction responses within Charge Anywhere, refer to the Trigger Values for Testing Transactions guide.
Manager Overrides
Managers and administrators must create an override code in the Portal. If a user tries to perform a function that they do not have permission to perform, a manager or admin may enter his/her override code for a one-time authorization of that function.
Cash Drawer Reconciliation
When logging into a cash register to start a shift, the user can collect the starting balance of the cash drawer. During a shift, all cash transactions and the amount that should be in a cash drawer at any time are tracked. When a user is ready to close a shift, the user is notified if there is a discrepancy in the cash balance (shortage or overage). The application will prompt you to print a report and will give you the option to print it or skip it.
Note: The options that control the cash drawer settings are configured in the Portal. Refer to the Register Settings section for more details.
28. Change Log
| Date | Update Summary |
| December 19, 2025 | Added a link to the QuickSale 2.0 Release Notes in the Getting Started section. |
Receive a monthly summary of new and updated technical documents.