Charge Anywhere is a leading provider of payment gateway solutions for businesses of all sizes. Their payment gateway for WooCommerce is a powerful solution designed to streamline payment processing and improve the bottom line for WooCommerce users.
Why use Charge Anywhere WooCommerce Extension:
Charge Anywhere’s payment gateway for WooCommerce offers several benefits that can help improve your business’s bottom line. Here are a few:
- Security: Charge Anywhere takes security seriously and offers advanced fraud protection measures to protect your business and your customers. It securely processes credit cards without redirecting your customers to the gateway website.
- Easy Setup: Charge Anywhere’s payment gateway for WooCommerce is easy to set up and can be integrated with your WooCommerce store quickly and efficiently.
- Authorize Now, Capture Later: Optionally choose only to authorize transactions, and capture at a later date.
- Gateway Receipts: Optionally choose to send receipts from your Charge Anywhere merchant account.
- Customizable: Charge Anywhere’s payment gateway for WooCommerce is customizable, allowing you to tailor the system to your specific business needs.
- Compatibility: Charge Anywhere’s payment gateway for WooCommerce is compatible with a wide range of payment methods, including credit and debit cards.
- No PCI required
Features of Charge Anywhere WooCommerce Extension
Charge Anywhere’s payment gateway for WooCommerce offers a range of features that can help improve the payment processing experience for both you and your customers.
Here are a few:
- Dual Mode: Configurable for sandbox and production accounts for easy mode switching.
- Gateway Email: We have provided a gateway that provides an option for sending separate emails to vendors and customers.
- Refund: A refund Option is available. Here users can also customize the status.
- Capture: Capture Option is available, customize the status.
- Recurring Payments: Charge Anywhere’s payment gateway for WooCommerce allows you to set up recurring payments for subscriptions or other recurring services.
- Customer Profiles: Charge Anywhere’s payment gateway for WooCommerce allows you to save customer profiles, making it easier to process future transactions.
- Fraud Protection: Charge Anywhere’s payment gateway for WooCommerce offers advanced fraud protection measures, including AVS and CVV verification, to protect your business and your customers.
- Customizable: Charge Anywhere’s payment gateway for WooCommerce allows you to customize payment forms with your branding and design. There is also a Capture option available that allows users to customize the status.
- Payment Tokenization: Charge Anywhere’s payment gateway for WooCommerce offers payment tokenization, which allows you to securely store customer payment information without storing sensitive data on your servers.
- Transaction Type: Both Auth and Capture transaction types are supported.
- SSL: No need for private SSL.
- Gutenberg Compatibility: Charge Anywhere’s payment gateway for WooCommerce is compatible with Gutenberg blocks, offering a more intuitive and modern way to build and manage your online store.
Note: For using shortcodes instead of Gutenberg blocks, refer to the WooCommerce Plugin Version 1.13.
Steps to install Charge Anywhere WooCommerce Extension
Method 1: Search for the plugin in WordPress Repository
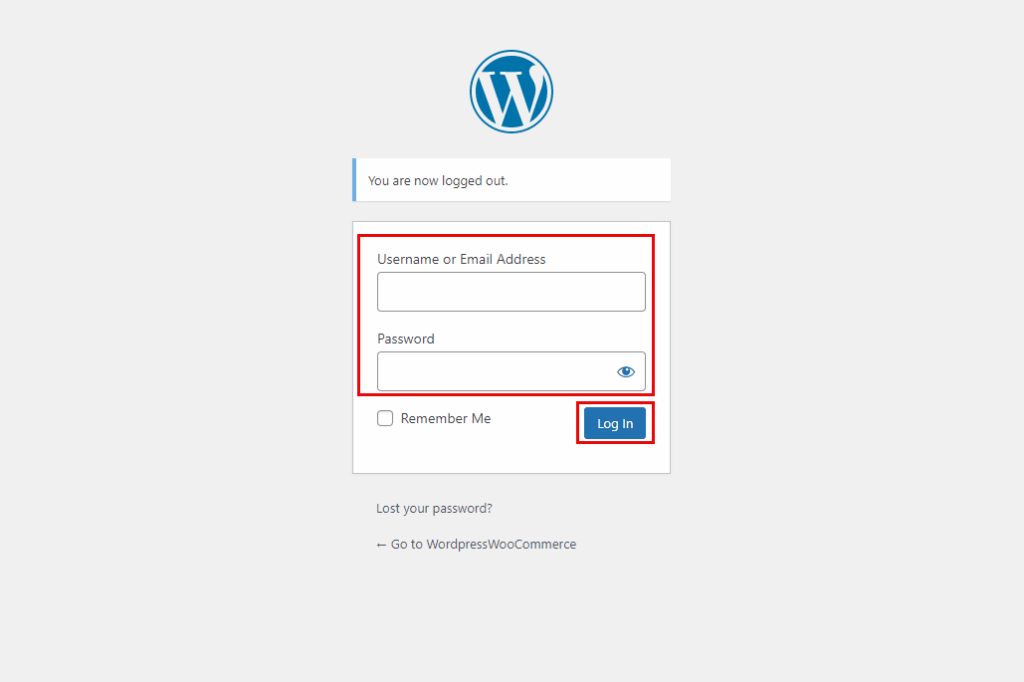
Step 1: Log in to the WordPress dashboard
- To search and install the Charge Anywhere plugin, you need to log in to the WordPress dashboard. You can do this by entering your WordPress admin username and password on the login page.
Step 2: Go to the Plugins section
- Once you are logged in, go to Plugins on the left-hand menu.
- Click Add New to go to the plugin search page.

Step 3: Search for the plugin
- On the plugin search page, you can search
Charge Anywherein the search bar.

Step 4: Install and Activate the plugin
- After you have found the plugin you want to install, click Install Now next to the plugin name. WordPress will then download and install the plugin automatically.

- After the plugin is installed, you need to activate it.
- To do this, click Activate, which appears after the plugin is installed.
- The plugin will now be active on your website, and you can start using its features.

Method 2: Download the plugin externally.
Step 1: Download the Plugin
- The latest version of the plugin can be downloaded free from the WordPress repository or directly from Charge Anywhere’s download link.
Step 2: Install the Plugin
- After you have downloaded the plugin, it’s time to install it on your WordPress site.
- Log in to your WordPress dashboard and navigate to the Plugins menu.
- Click Add New, and then select Upload Plugin.

- Next, click Choose File and select the plugin file you downloaded in step 1.
- Click Install Now to start the installation process.
Step 3: Activate the Plugin
- After the plugin has been installed successfully, you will see a confirmation message. Click Activate Plugin to activate the plugin.
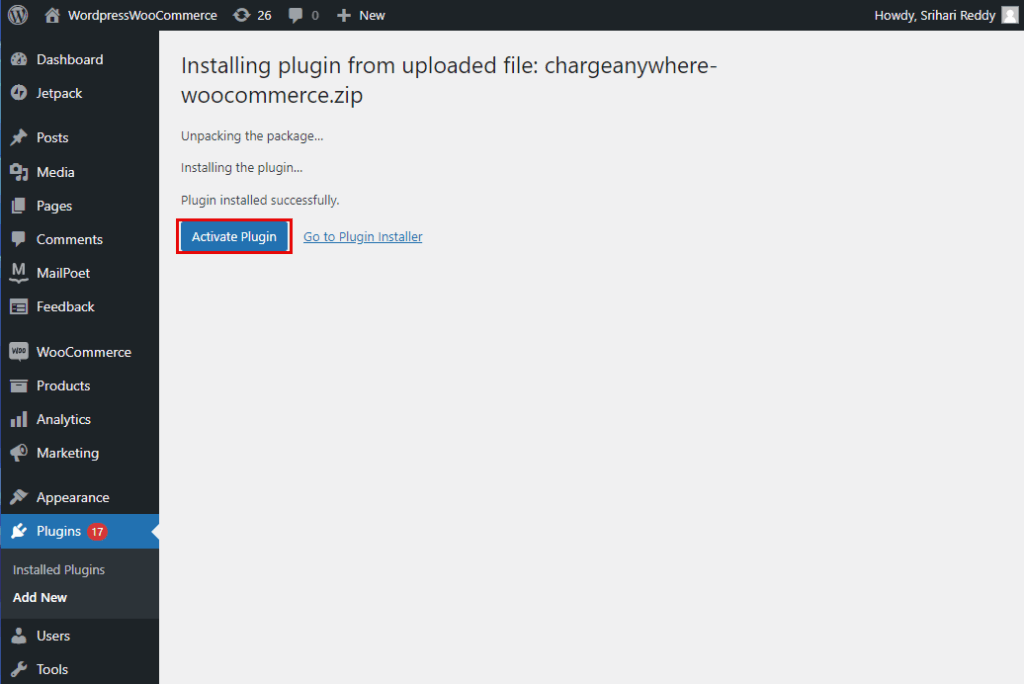
- Once activated, the plugin will appear in the Installed Plugins list, and you can configure its settings according to your needs.
Configuring the Charge Anywhere WooCommerce Extension
To configure Charge Anywhere Payment Gateway for WooCommerce, follow these simple steps:
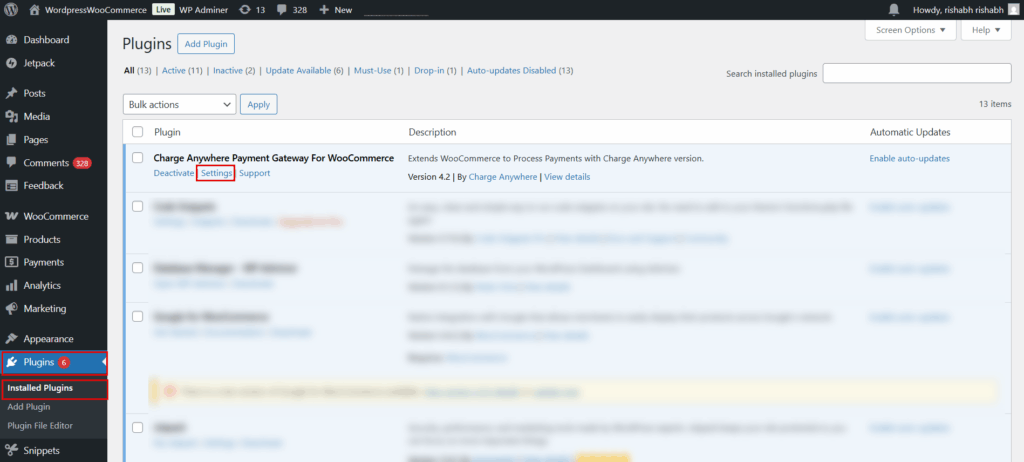
- Go to your WordPress dashboard and click
WooCommerce -> Settings. - Alternatively, navigate to the Installed Plugins list and find the Charge Anywhere plugin. Click Settings.
- The Payments tab is displayed. Here, enter your API details, including the
Merchant ID, Terminal ID, and Secret, in the appropriate fields.
Note: If you don’t have the necessary API credentials, refer to how to retrieve Merchant ID, Terminal ID, and Secret for obtaining Charge Anywhere Plugin credentials.
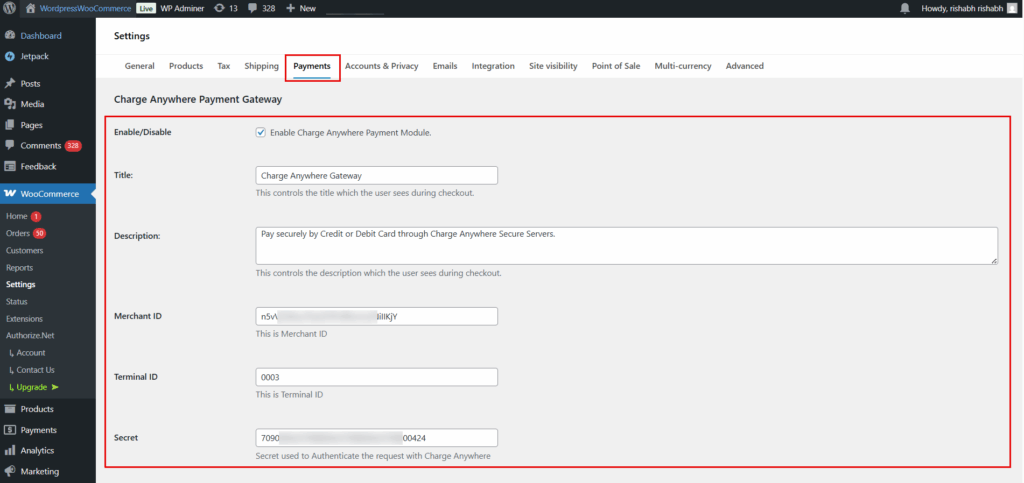
By following these configuration steps, you can easily set up the Charge Anywhere Payment Gateway for WooCommerce and start accepting payments on your online store. Remember to test the payment gateway before going live to ensure that everything is working correctly.
Charge Anywhere Payment Gateway Form Attributes
The table below describes the various form attributes available in the Charge Anywhere Payment Gateway. These attributes control the behavior and customization options for the payment gateway and are used during the checkout process on your website.
| Attribute | Description |
|---|---|
| Enable/Disable | This option enables or disables the Charge Anywhere Payment Module. You must enable this option to use the Charge Anywhere Payment Gateway. |
| Title | This attribute controls the title that the user sees during checkout. You can customize the title to provide better clarity to the user. |
| Description | This attribute allows you to enable the logging of requests and responses for the Charge Anywhere Payment Gateway. |
| Merchant ID | This attribute requires you to enter the Merchant ID provided by Charge Anywhere. This is a unique identification number provided to you by Charge Anywhere. |
| Terminal ID | This attribute requires you to enter the Terminal ID provided by Charge Anywhere. This is a unique identification number provided to you by Charge Anywhere. |
| Secret | This attribute requires you to enter the Secret used to Authenticate the request with Charge Anywhere. This is a secret key used for secure communication between your website and Charge Anywhere. |
| Transaction Success Message | This attribute allows you to customize the message that will be displayed to the user after a successful transaction. |
| Transaction Failed Message | This attribute allows you to customize the message that will be displayed to the user after a failed transaction. |
| Transaction Redirect Message | This attribute allows you to customize the message that will be displayed to the user during payment redirection. |
| API Mode | This attribute allows you to select the API Mode. You can choose between Sandbox/Developer API Mode and Live/Production API Mode. If you want to test the payment gateway before going live, you can choose Sandbox Mode (which requires Sandbox Account API). |
| Transaction Mode | This attribute allows you to enable the logging of requests and response for the Charge Anywhere Payment Gateway. |
| Auto Complete Orders | When enabled, it automatically marks an order as ‘Completed’ after a successful payment. This option should only be used with the ‘Authorize and Capture’ transaction mode. |
| Email To Customer | This attribute allows you to enable or disable sending a default email to the customer from Charge Anywhere. |
| Email To Merchant | This attribute allows you to enable or disable sending a default email to the merchant from Charge Anywhere. |
| Enable Log request and response | This attribute allows you to enable the logging of requests and responses for the Charge Anywhere Payment Gateway. |
| Accept Credit | This attribute allows you to enable or disable accepting credit cards as a payment method. |
| Accept ACH | This attribute allows you to enable or disable accepting ACH payments as a payment method. |
If credit card payments are enabled, you will see the following options:
| Attribute | Description |
|---|---|
| Add Service Fee | This attribute allows you to enable or disable adding a service fee to the payment amount. |
| Service Fee Label | This attribute allows you to set the label for the service fee. |
| Service Fee Percentage (%) | This attribute allows you to set the service fee percentage for a specific transaction. |
| Include Tax Amount in Service Fee Calculation | This attribute allows you to include the tax amount in the service fee calculation. |
| Refund Service Fee on a Return | This attribute allows you to enable or disable refunding the service fee in case of a return. |
| Add Convenience Fee | This attribute allows you to enable or disable adding a convenience fee to the payment amount. |
| Convenience Fee Label | This attribute allows you to set the label for the convenience fee. |
| Convenience Fee Amount ($) | This attribute allows you to set the convenience fee amount for a specific transaction. |
| Refund Convenience Fee on a Return | This attribute allows you to enable or disable refunding the convenience fee in case of a return. |
If ACH payments are enabled, you will see the following options:
| Attribute | Description |
|---|---|
| Add Service fee | This attribute allows you to add a service fee for ACH payments. |
| Service Fee Label | This attribute requires you to enter the label for the Service Fee. |
| Service Fee Percentage (%) | This attribute requires you to enter the percentage amount of the Service Fee for ACH payments. |
| Include Tax Amount in Service Fee Calculation | This attribute allows you to include the tax amount in the Service Fee calculation. |
| Refund Service Fee on a Return | This attribute allows you to enable or disable refunding the Service Fee when a return is made. |
| Add Convenience Fee | This attribute allows you to add a convenience fee for ACH payments. |
| Convenience Fee Label | This attribute requires you to enter the label for the Convenience Fee. |
| Convenience Fee Amount ($) | This attribute requires you to enter the fixed amount of the Convenience Fee for ACH payments. |
| Refund Convenience Fee on a Return | This attribute allows you to enable or disable refunding the Convenience Fee when a return is made. |
Requirements
| PHP | version 8.0 or higher |
| WordPress | version 3.0.1 or higher |
Manage Orders
Managing transactions within WooCommerce is straightforward. You can capture authorized payments or process refunds directly from the order details page.
Filtering Orders
WooCommerce provides powerful options to help you locate specific orders quickly. You can filter by status, date, or customer directly from the main orders screen.
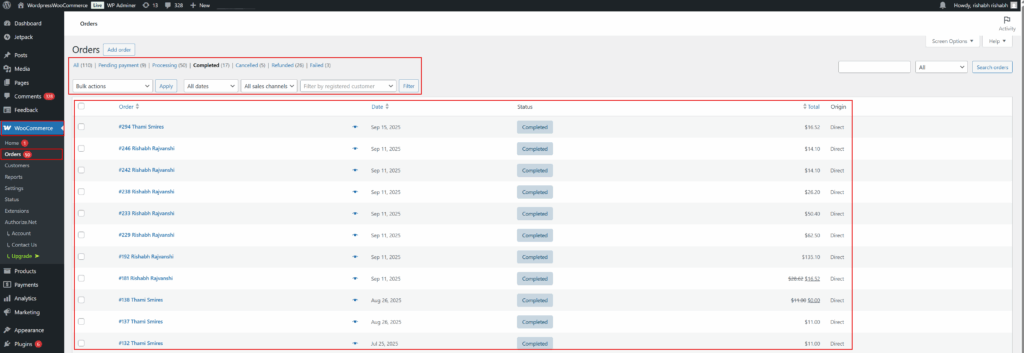
- From your WordPress dashboard, navigate to WooCommerce > Orders.
- On this page, you have several ways to filter your orders:
- Filter by Status: At the top of the list, you can click on status links like Completed, Processing, Pending payment, Refunded, or Cancelled to view only the orders with that specific status.
- Filter by Date or Customer: Use the dropdown menus to filter all orders by a specific month. You can also search for a specific customer by typing their name into the “Filter by registered customer” field. Click the Filter button to apply these selections.
- Search Orders: For a more general search, use the Search orders box at the top right to find an order by its number, a customer’s name, or email address.
Capture a Payment
When a transaction is successfully authorized but not yet captured, its status in WooCommerce will typically be “Processing.” To finalize the transaction and transfer the funds, you must capture the payment by changing the order status to “Completed.”
1. From your WordPress dashboard, navigate to WooCommerce > Orders. Find the order you wish to capture, which will have a “Pending Payment” status.
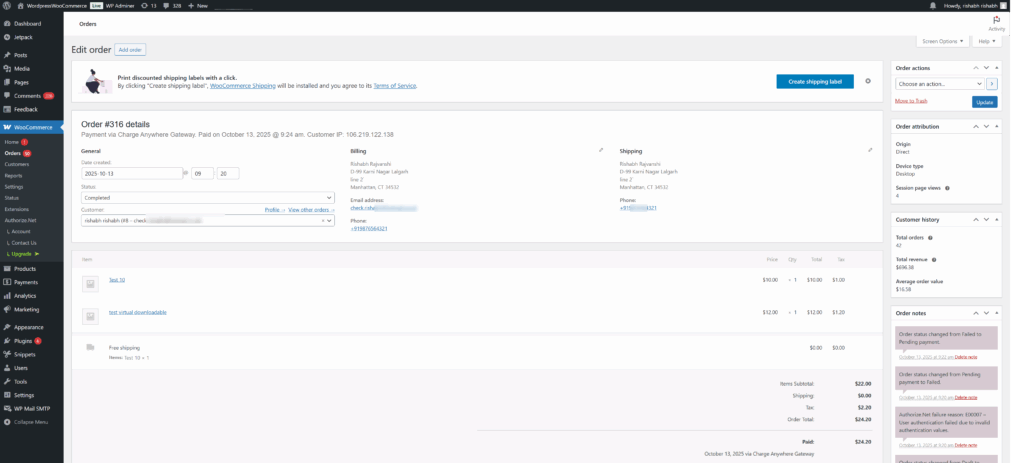
2. Click on the order number or customer name to open the Edit order page.

3. Locate the Status dropdown menu. Click on it and select Completed from the list of options.
4. Click the blue Update button located in the Order actions box at the top right of the page.

Once updated, the order status will change to “Completed.” This action triggers the Charge Anywhere gateway to capture the funds. You can see a confirmation of the status change in the Order notes.
Important: A payment must be captured before it can be refunded. You cannot process a refund on a transaction that has only been authorized.
Process a Refund
You can issue a full or partial refund directly through the Charge Anywhere gateway from within the order details screen.
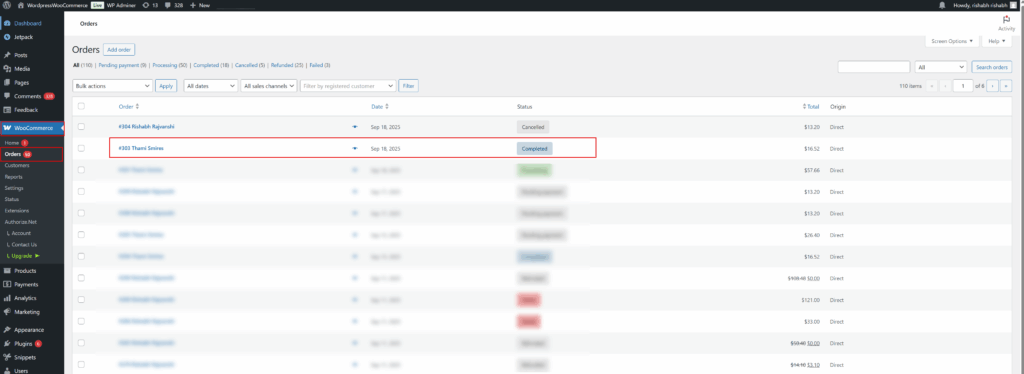
1. Navigate to WooCommerce > Orders and select the completed order you wish to refund.
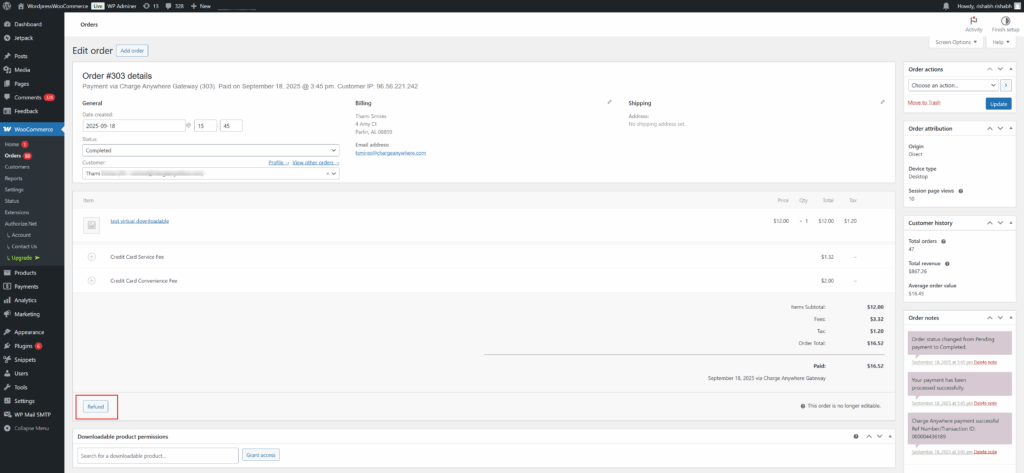
2. Scroll down to the order items section and click the Refund button located below the items.
3. Enter the amount to be refunded in the Refund amount field. You can also specify the quantity of items being returned, and the amount will adjust automatically. Optionally, add a note in the Reason for refund field.
4. To process the transaction back to the customer’s card, click the Refund $xx.xx via Charge Anywhere button. Do not use the “Refund manually” button, as this will only update the order status in WooCommerce without returning any funds to the customer.
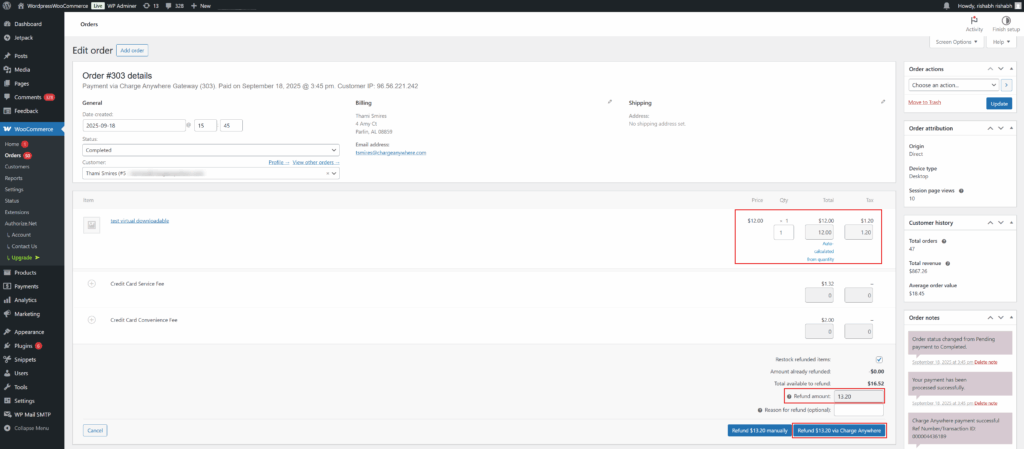
5. A confirmation pop-up will appear to prevent accidental refunds. Click OK to proceed.

6. After a successful transaction, the order status will update to “Refunded”. A confirmation and transaction details will be added to the Order notes section on the right.

Important: Please note that payments that are only authenticated (not yet captured) cannot be refunded. You must first capture the payment by changing the order status to “Completed” before a refund can be processed.
Charge Anywhere Add-On
With the Charge Anywhere Add-On, you can take your online shopping experience to the next level by offering versatile payment options and enhanced shipping and billing functionalities.
Swap Shipping and Billing form placements
The Charge Anywhere Add-On streamlines the checkout process by enabling customers to input shipping details before billing information, making it more user-friendly.
Option to add a separate shipping phone and email
The Charge Anywhere Add-On takes this into account by offering the option to add separate shipping phone numbers and email addresses. This feature is particularly valuable for businesses that rely on timely delivery updates and order confirmations. By collecting separate contact information for shipping, you ensure that customers receive accurate shipping notifications and can be easily reached in case of any issues with their orders.
How it works
To enable the features mentioned above, begin by downloading the add-on using the provided download link:
Once you’ve downloaded the zip file, proceed to Step 2 outlined in Method 2. After successfully activating the plugin, the features will activate automatically.
Please keep in mind that this add-on is compatible exclusively with the Charge Anywhere Payment Gateway for WooCommerce plugin.
Changelog
| 1.0 | First Version |
| 1.1 | Added the option for Email customer and email Merchant and fixed a spelling mistake |
| 1.2 | Plugin text changes |
| 1.4 | Added validation for data Sanitized, Escaped and Validated |
| 1.5 | Missed some data Sanitized, Escaped, and Validated |
| 1.6 | Charge Anywhere live URL changed, Text field labels changed |
| 1.7 | Enabled CREDIT & ACH service and convenience charges |
| 1.8 | Enabled Request and response log |
| 1.9 | Fixed some validation issues |
| 1.10 | Fixed issues in tax & shipping amount at the refund stage |
| 1.11 | Fixed refund service fee issue |
| 1.12 | Added conditions for transaction capture & return, service fee label made dynamic |
| 1.13 | Removed additional fees sort. Convenience Fee will always come after Service Fee. |
| 2.0 | Added support to WooCommerce Blocks. |
| 3.0 | Updated payment flow. |
| 3.1 | Added Amex support. |
| 3.2 | Fixed a discount coupon bug. Fixed an issue with spaces in credit card entry. |
| 3.3 | Added compatibility with WooCommerce High-Performance Order Storage (HPOS). |
| 4.0 | Complete rewrite with a modern React architecture. Added full WooCommerce Blocks checkout support. Improved payment form UI/UX with React components. Enhanced security with updated tokenization. Unified build system for better performance. Improved mobile responsiveness. Added comprehensive error handling. Updated for WordPress 6.6 compatibility. |
| 4.1 | Enhanced order completion workflow for successful transactions. Improved transaction status handling. Updated payment processing reliability. Minor bug fixes and improvements. |
| 4.2 | Complete refund system overhaul with enhanced fee handling. Implemented pro-rata fee refund calculations for partial refunds. Added double-refund prevention and race condition protection. Enhanced refund validation with item-level tracking. Improved admin UI with real-time refund amount validation. Added settings validation and default value handling for upgrades. Tax-aware fee refund processing for accurate calculations. Better error handling and logging throughout the refund process. |