1. Overview
The Recurring Database in Transaction Manager allows merchants to create, search, manage, and monitor recurring payment transactions. It is used when a customer needs to be billed repeatedly on a defined schedule, such as daily, weekly, monthly, quarterly, semi-annually, or yearly.
Using the Recurring Database, merchants can:
- Add individual recurring transactions.
- Search existing recurring payment records.
- Edit recurring transaction details.
- View recurring transaction history.
- Manually process a recurring transaction.
- Suspend or delete a recurring transaction.
- Import recurring or installment records in bulk.
- Export recurring data for reporting or backup.
- Review expired credit card reports.
- View recurring transaction status reports.
The Recurring Database is useful for merchants who manage subscriptions, membership payments, installment plans, or any payment schedule that repeats over time.
2. Accessing Recurring Database
- Log in to Transaction Manager using your username and password.
- Navigate to: Virtual Terminal > Recurring Database
- The Recurring Database page opens.
From this page, you can search recurring records, add a new recurring transaction, import recurring data, export records, review reports, and manage existing recurring transactions.
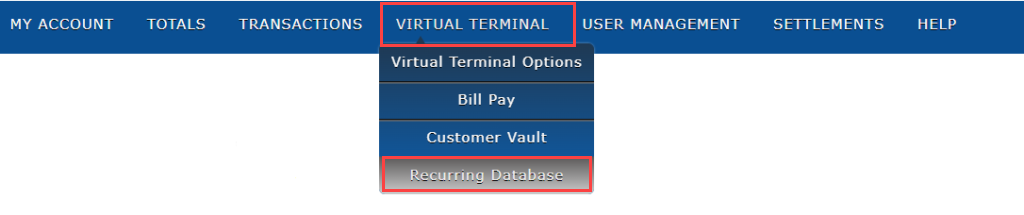
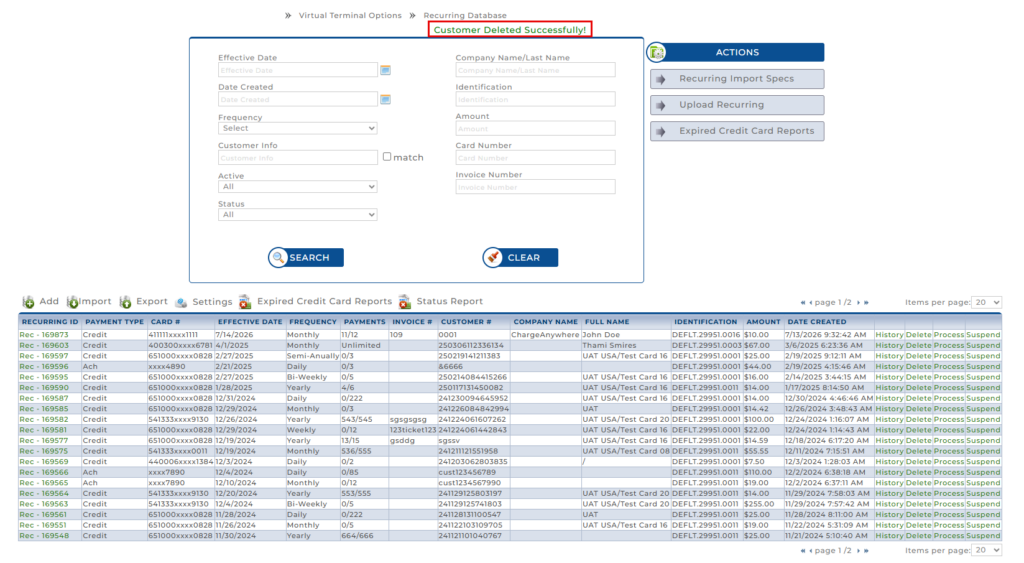
The recurring database stores data about transactions that occur regularly. You can manage, add, delete, process, suspend, import, or export the recurring transaction.
3. Recurring Database Search Fields
The Recurring Database page includes search filters that allow you to locate existing recurring transactions.
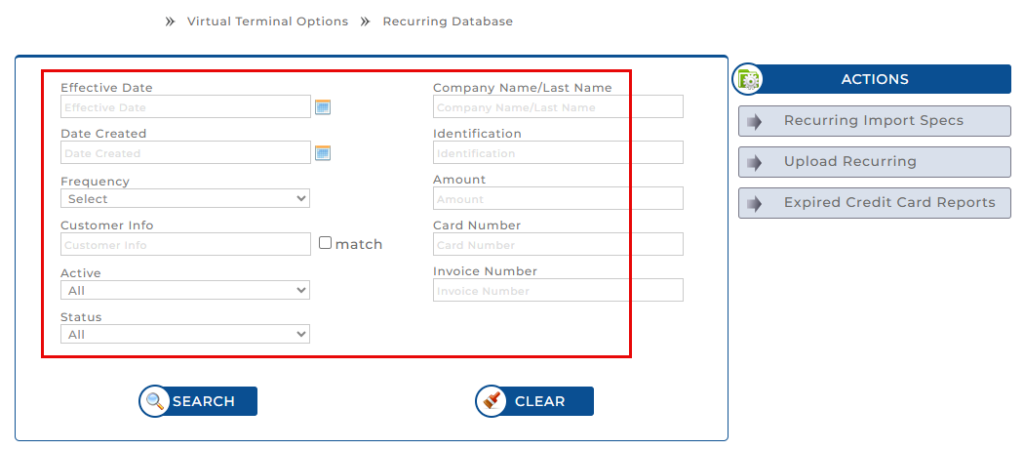
| Field | Description |
|---|---|
| Effective Date | Search for recurring transactions based on the date when the recurring payment sequence starts. |
| Date Created | Search based on the date when the recurring record was created. |
| Frequency | Filter recurring records by payment frequency, such as daily, weekly, monthly, quarterly, or yearly. |
| Customer Info | Search using customer-related information, such as customer name, email, customer number, or other available customer details. |
| Active | Filter records based on whether the recurring transaction is active or inactive. |
| Status | Filter recurring transactions based on their current status. |
| Company Name / Last Name | Search using the customer’s company name or last name. |
| Identification | Search using the identification value associated with the recurring record, if available. |
| Amount | Search by recurring payment amount. |
| Card Number | Search using available card-related information, where applicable. |
| Invoice Number | Search by invoice number associated with the recurring transaction. |
4. Searching for a Recurring Transaction
- Go to Virtual Terminal > Recurring Database.
- Enter one or more search criteria.
- Click Search.
- Matching recurring records are displayed in the results grid.
- Review the search results to locate the required recurring transaction.
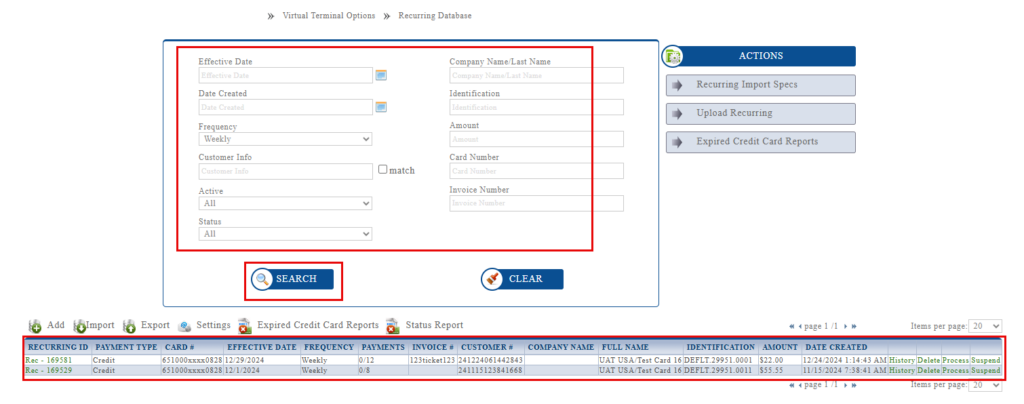
The results grid may include details such as Recurring ID, payment type, card number, effective date, frequency, number of payments, invoice number, customer number, company name, full name, identification, amount, and date created.
5. Adding an Individual Recurring Transaction
Use Add to manually create a recurring payment for a single customer.
Before you begin, make sure the customer exists in Customer Vault and has a saved Payment Profile. A recurring transaction cannot be added without a payment profile.
1. Navigate to Virtual Terminal > Recurring Database.
2. Click Add.
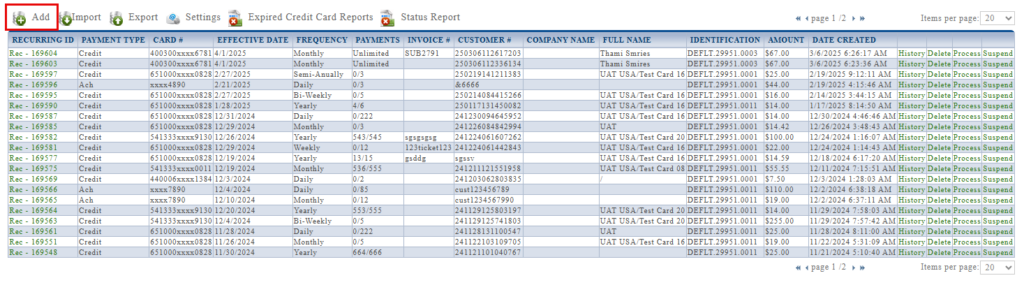
3. Select the required Device.
4. In Customer Info, enter the customer name, customer number, or other customer details.
5. Click Search.
6. Select the required customer from the Customer dropdown.
Note: If the customer does not exist, click +Add New Customer to create the customer record first.
7. Select the Payment Type, such as Credit Card or ACH.
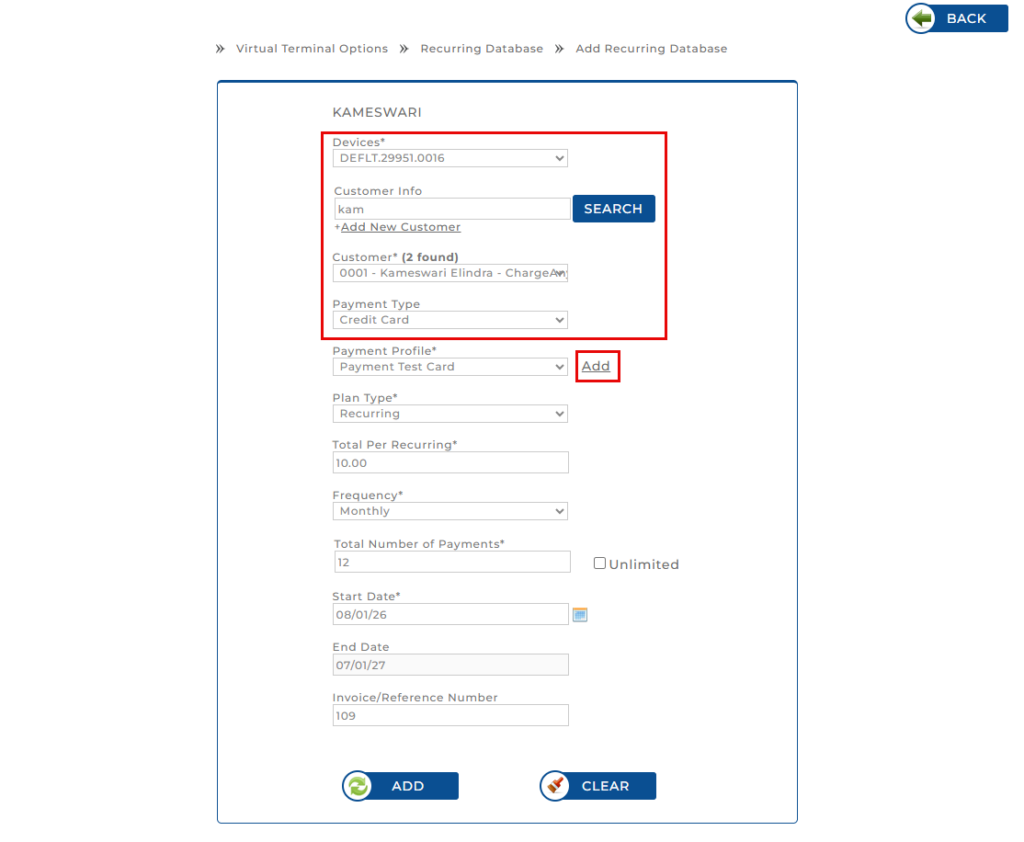
8. Select the customer’s Payment Profile.
Note: If no payment profile is available, click Add next to the Payment Profile field.
9. In the Payment Profile window, enter the required payment details, such as:
- Description
- Full Name
- Card Number
- Expiration Date
- Address
- Zip Code
- CVV, if required
10. Click Add to save the payment profile.
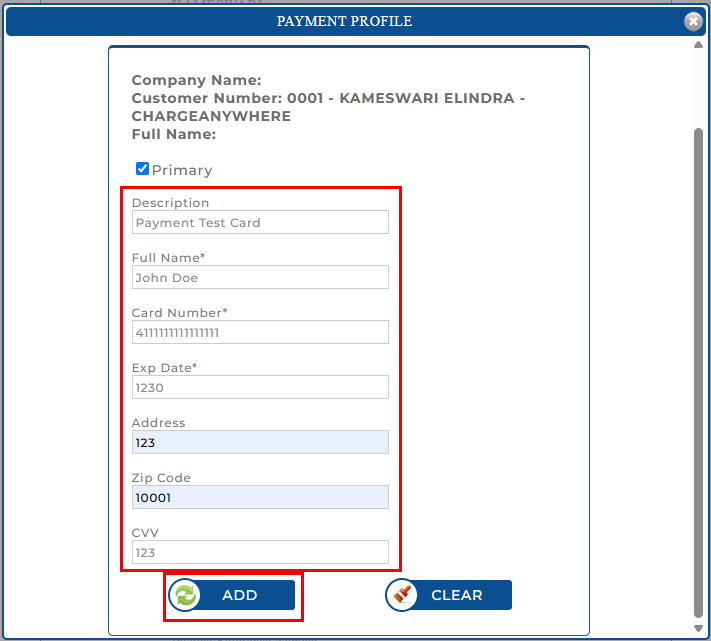
11. Return to the Add Recurring Database page and select the saved Payment Profile.
12. Select the Plan Type.
13. Enter the Total Per Recurring amount.
14. Select the Frequency.
15. Enter the Total Number of Payments, or select Unlimited, if applicable.
16. Enter the Start Date.
17. Enter an Invoice/Reference Number, if applicable.
18. Click Add.
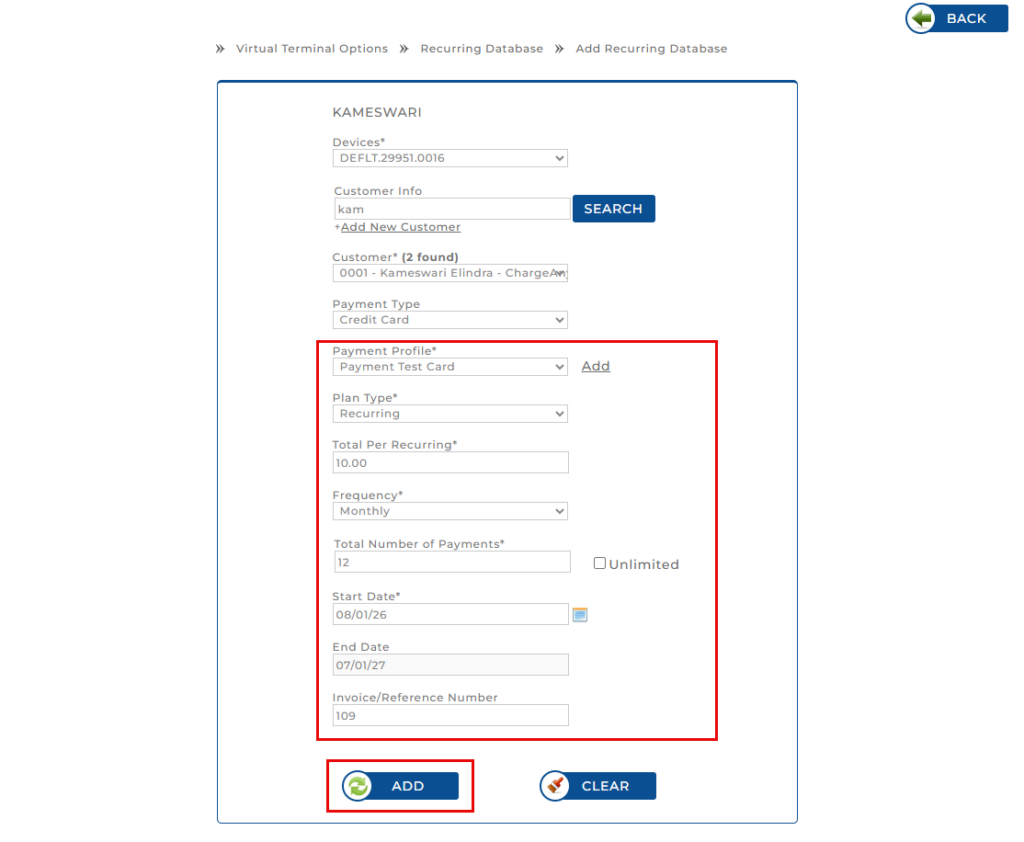
A confirmation message appears, and the recurring transaction is added to the Recurring Database

Note: The exact fields displayed on the Add Recurring screen may vary based on the merchant configuration, payment type, and available customer/payment method details.
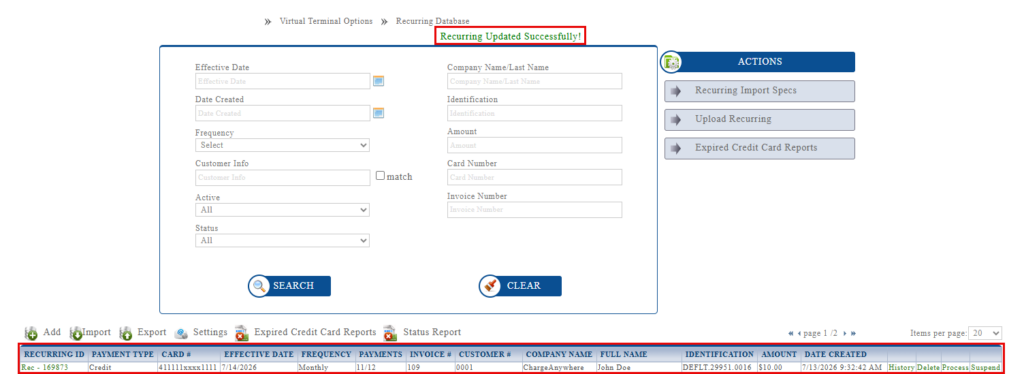
6. Editing a Recurring Transaction
You can update an existing recurring transaction when details such as amount, frequency, effective date, payment method, or invoice information need to be changed.
1. Go to Virtual Terminal > Recurring Database.
2. Search for the recurring transaction.
3. In the search results, select the corresponding Recurring ID.

4. The Edit Recurring Database page opens.
5. Update the required fields.
6. Click Update to save the changes.
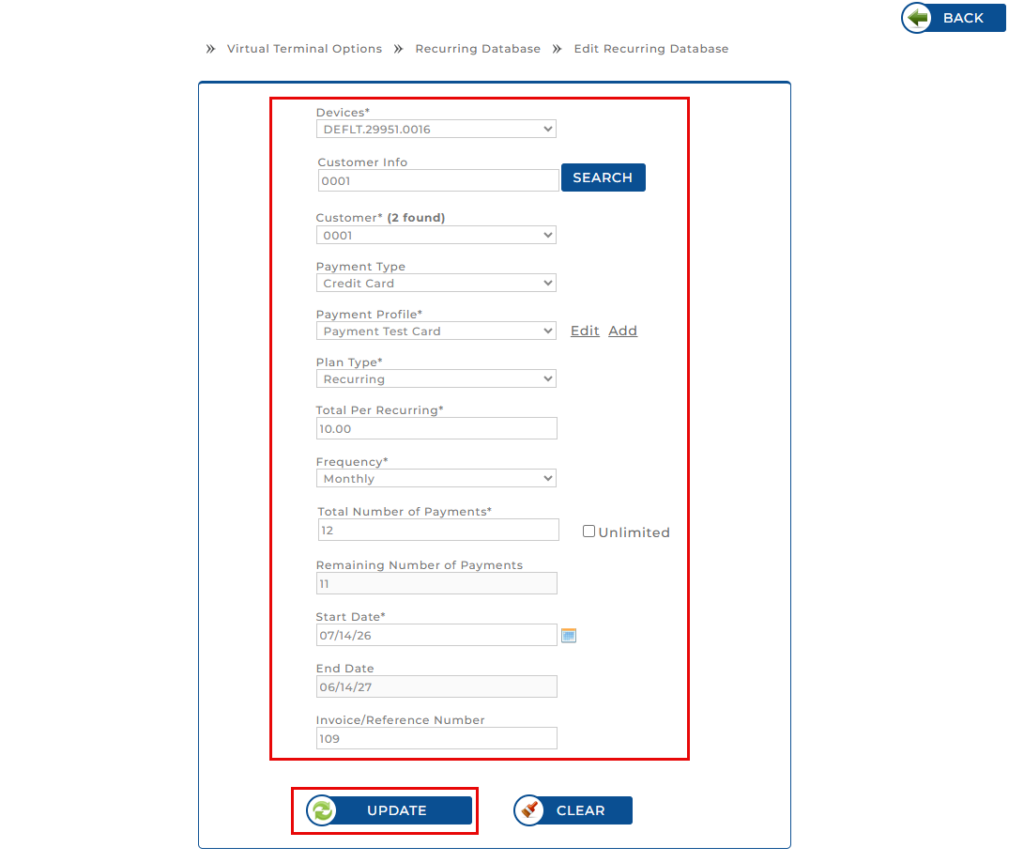
The recurring transaction is updated with the latest information.
7. Managing Recurring Transactions
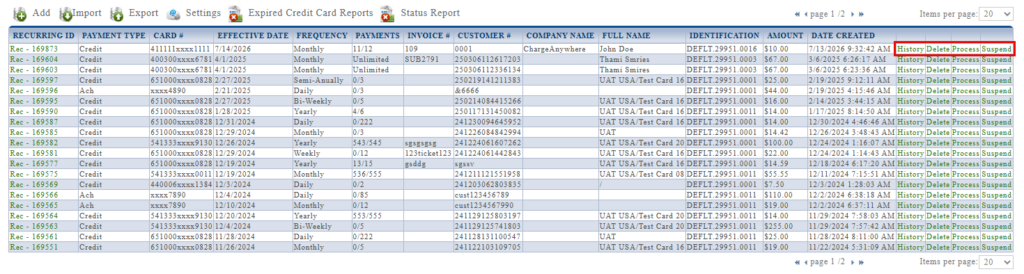
After searching for a recurring transaction, you can perform several actions depending on the available options.
| Action | Description |
|---|---|
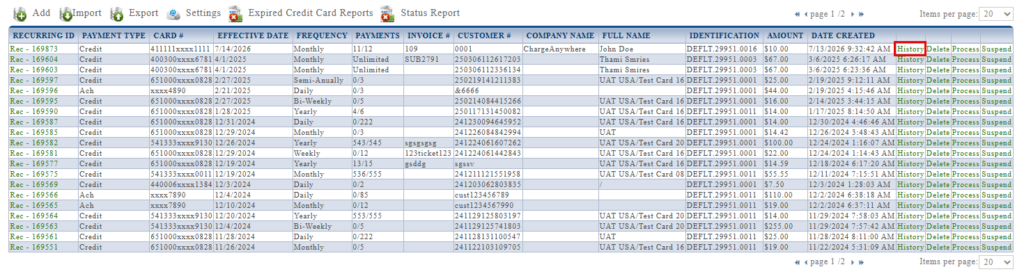
| History | View the transaction history associated with the selected recurring record. This helps review previous recurring payment activity. |
| Delete | Remove a recurring transaction from the Recurring Database when it is no longer required. |
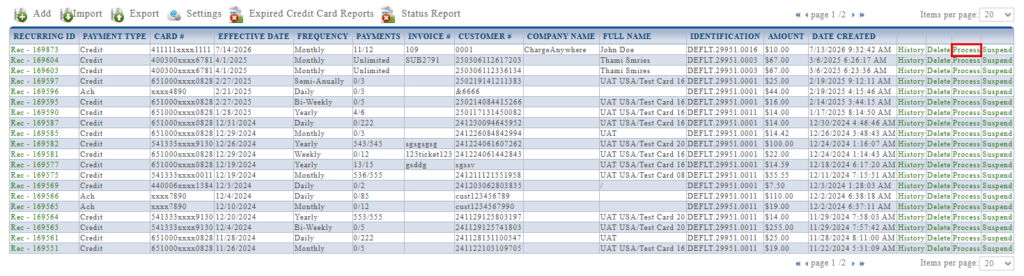
| Process | Manually process the recurring transaction outside its regular schedule. |
| Suspend | Temporarily pause the recurring transaction without deleting the record. |
8. Viewing Recurring Transaction History
1. Search for the recurring transaction.
2. Select History for the required record.
3. Review the previous transaction activity associated with the recurring payment.

Use this option to verify past processing attempts, payment activity, or recurring transaction behavior.
9. Processing a Recurring Transaction Manually
The Process option allows you to manually trigger a recurring transaction.
1. Search for the recurring transaction.
2. Select Process for the required record.
3. Confirm the action, if prompted.
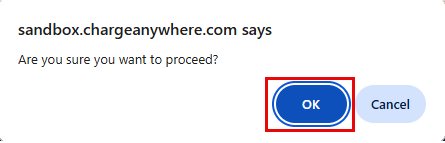
4. Review the processing result.
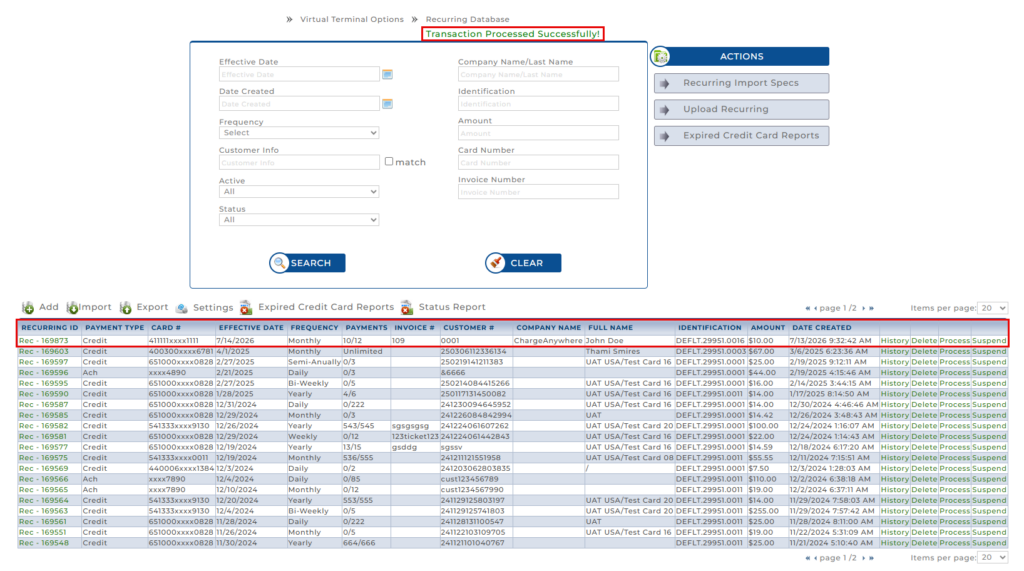
This option is useful when a payment needs to be processed immediately instead of waiting for the next scheduled date.
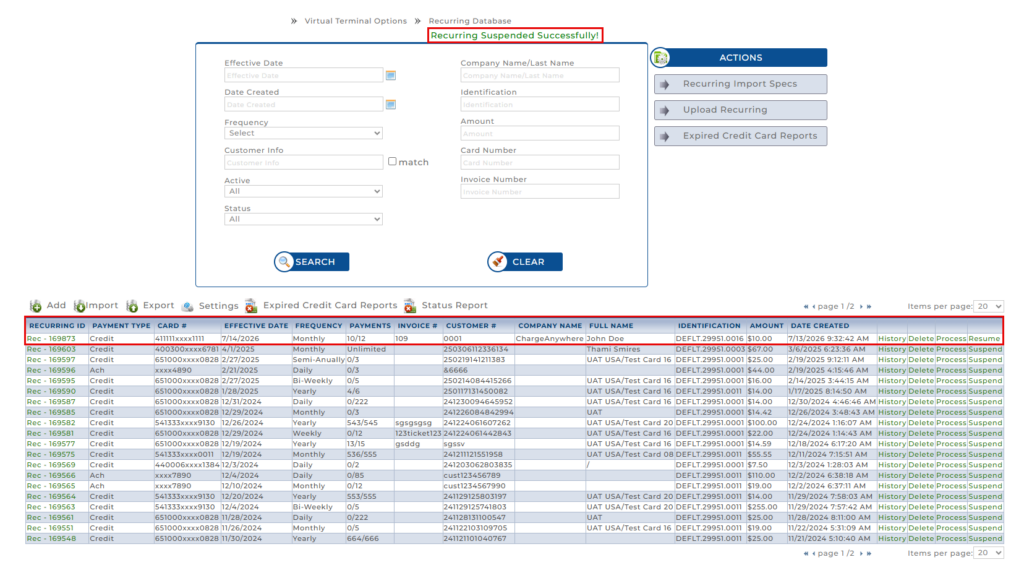
10. Suspending a Recurring Transaction
Use Suspend when a recurring transaction needs to be paused temporarily.
1. Search for the recurring transaction.
2. Select Suspend for the required record.
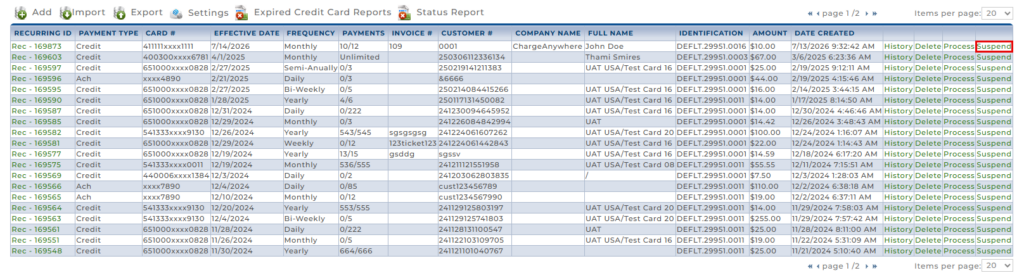
3. Confirm the action, if prompted.
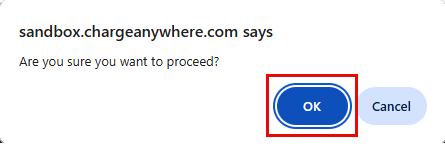
The recurring transaction is suspended and will not continue processing until it is reactivated, where applicable.
11. Resuming a Recurring Transaction
Use Resume when a suspended recurring transaction needs to be resumed.
1. Search for the recurring transaction.
2. Select Resume for the required record.
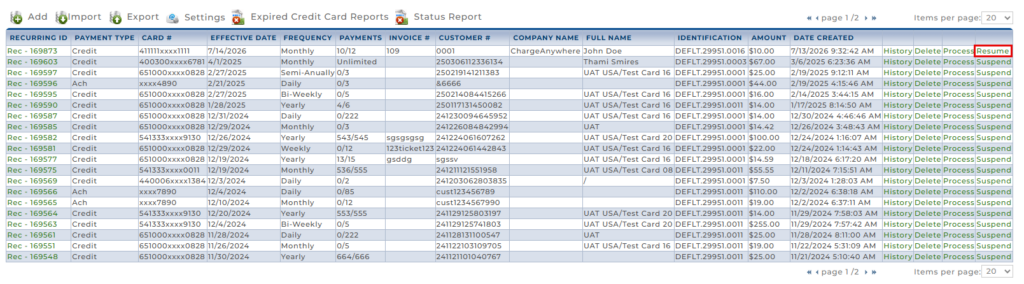
3. Confirm the action, if prompted.
The recurring transaction is resumed and will continue processing until it is deactivated, where applicable.
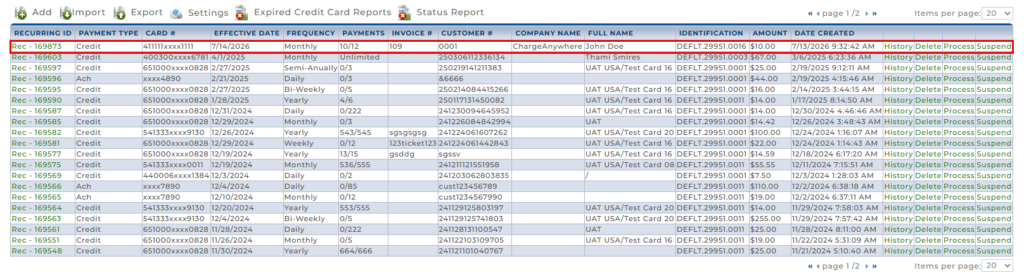
12. Deleting a Recurring Transaction
Use Delete when a recurring transaction is no longer required.
1. Search for the recurring transaction.
2. Select Delete for the required record.
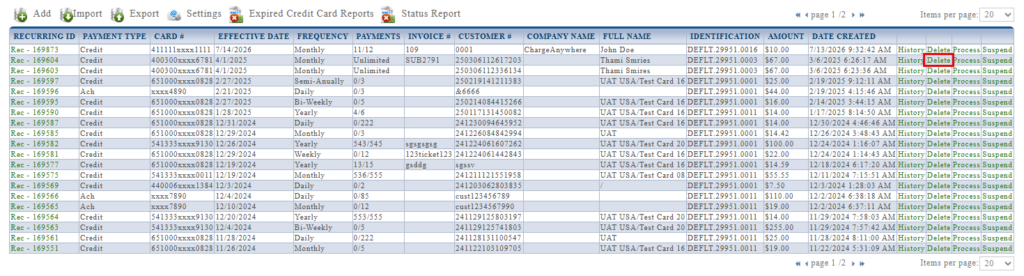
3. Confirm the deletion, if prompted.
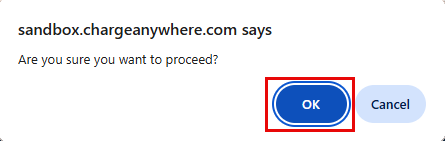
The selected recurring transaction is removed from the Recurring Database.
13. Importing Recurring or Installment Records
Use Import when you need to upload multiple recurring or installment records in bulk.
1. Navigate to Virtual Terminal > Recurring Database.
2. Click Import or Upload Recurring.
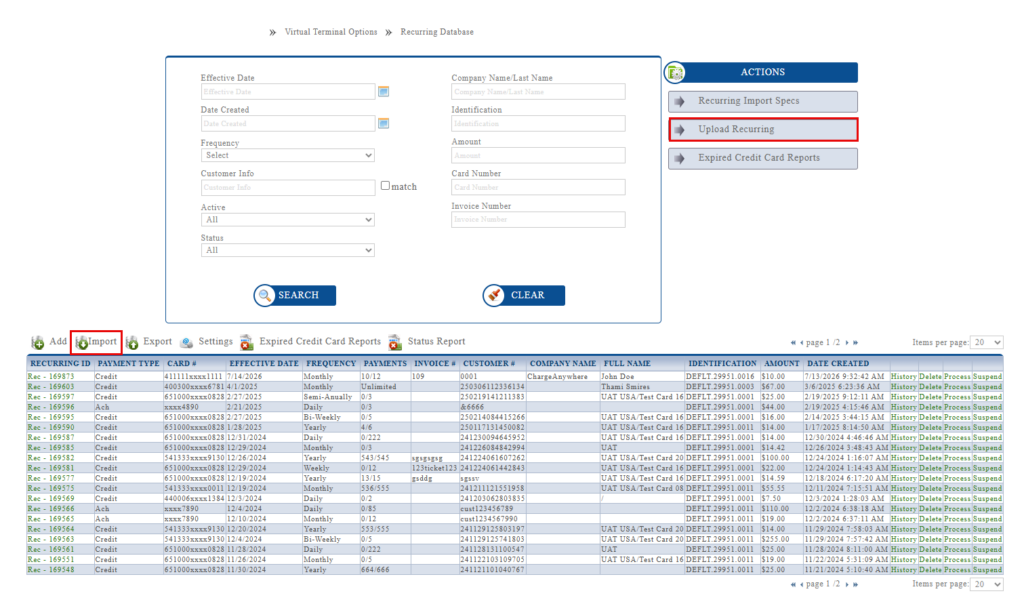
3. Download the recurring import template, if needed.
4. Prepare the file according to the required import format.
5. Upload the completed file.
6. Click Import.
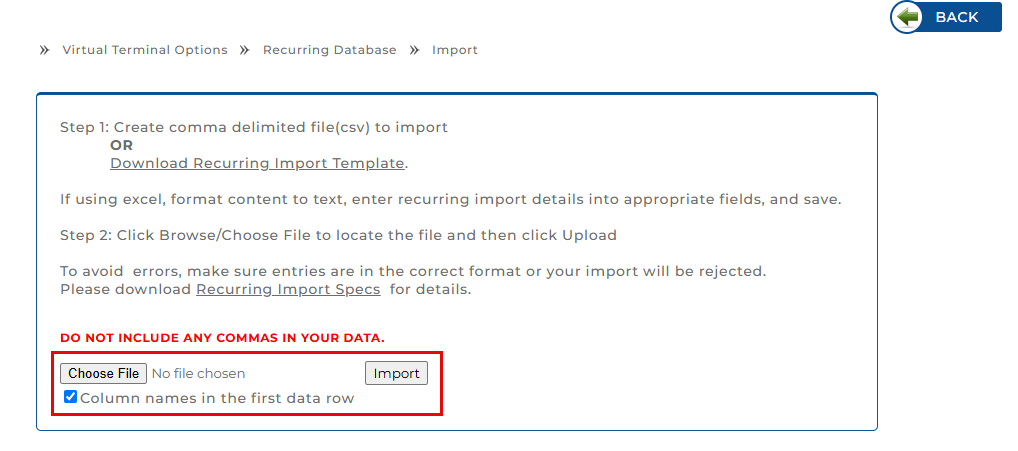
For complete file format details, field requirements, and import rules, refer to the Recurring and Installment Import Specifications guide.
Note: The import process is intended for bulk upload. To create one recurring transaction manually, use the Add option.
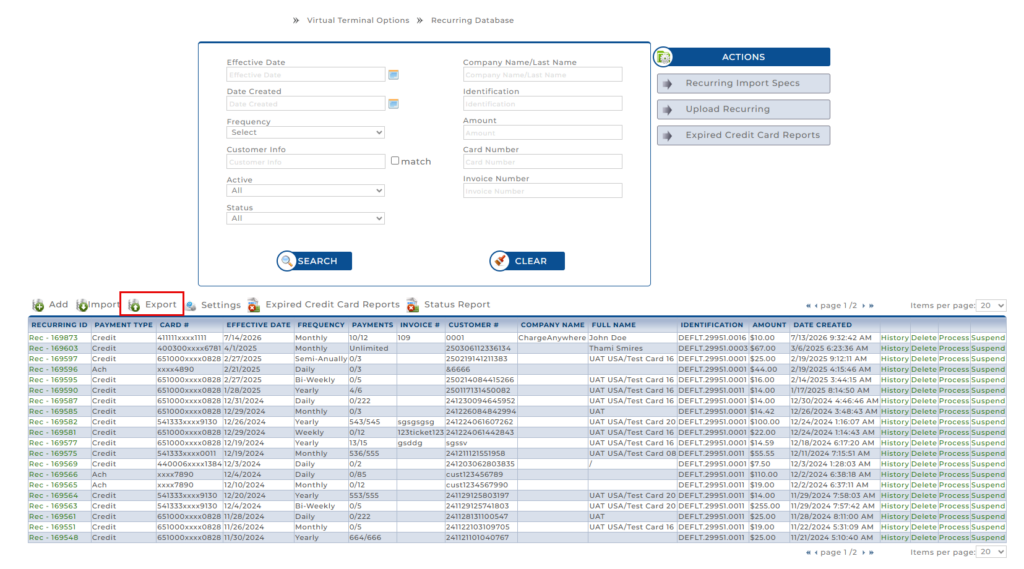
14. Exporting Recurring Records
Use Export to download recurring transaction data for reporting, analysis, backup, or reconciliation.
- Navigate to Virtual Terminal > Recurring Database.
- Search or filter the recurring records, if required.
- Click Export.
- Download or save the exported file.
15. Recurring Settings
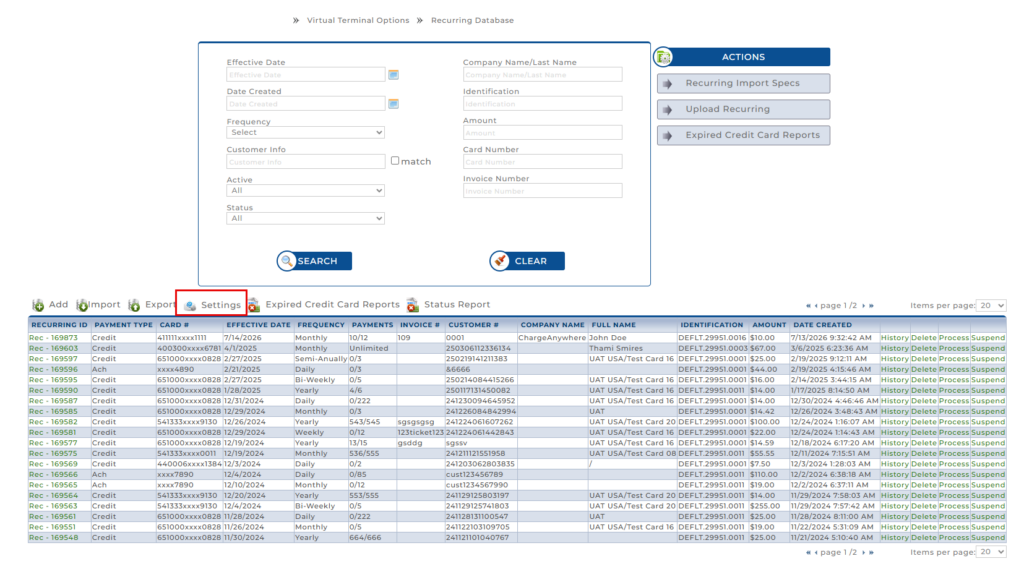
Use Settings to configure recurring payment email reminders, payment result notifications, branding details, customer support details, and retry settings.
1. Navigate to Virtual Terminal > Recurring Database.
2. Click Settings. The Recurring Email Settings page opens.
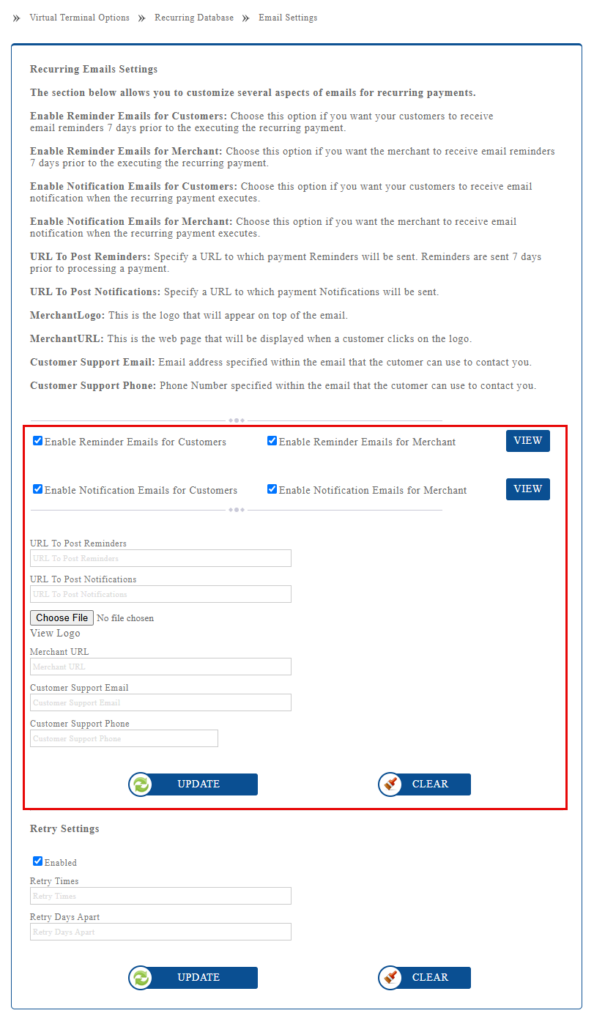
3. Configure the required email options:
- Enable Reminder Emails for Customers: Sends a reminder email to the customer before the recurring payment is processed.
- Enable Reminder Emails for Merchant: Sends a reminder email to the merchant before the recurring payment is processed.
- Enable Notification Emails for Customers: Sends a payment result email to the customer after the recurring payment is processed.
- Enable Notification Emails for Merchant: Sends a payment result email to the merchant after the recurring payment is processed.
4. Click View next to the reminder email options to preview the Recurring Reminder Email. The preview displays the reminder email format, including payment overview details such as card number, amount due, and payment date.
5. Click View next to the notification email options to preview the Recurring Result Email. The preview displays the result email format, including payment amount, payment date, and transaction result details.
6. Enter the required URL and branding details, if applicable:
- URL To Post Reminders: Enter the URL where recurring reminder details should be posted.
- URL To Post Notifications: Enter the URL where recurring payment notification details should be posted.
- Merchant Logo: Upload the logo that should appear in recurring emails.
- Merchant URL: Enter the webpage that opens when the customer clicks the logo.
- Customer Support Email: Enter the support email displayed in recurring emails.
- Customer Support Phone: Enter the support phone number displayed in recurring emails.
7. Click Update to save the recurring email settings or click Clear to reset the entered details before saving.
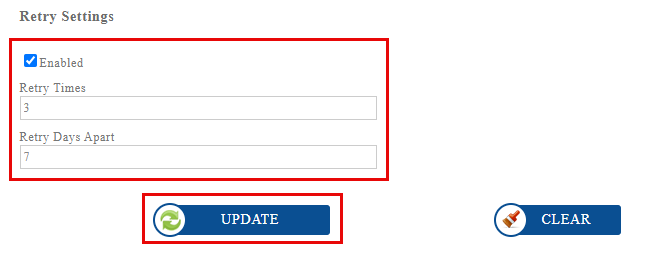
Retry Settings
Use Retry Settings to configure whether failed recurring payments should be retried.
- Select Enabled to enable retry attempts.
- Enter the Retry Times.
- Enter the Retry Days Apart.
- Click Update to save the retry settings.
- Click Clear to reset the retry settings before saving.
Note: Available settings may vary based on merchant configuration.
16. Expired Credit Card Reports
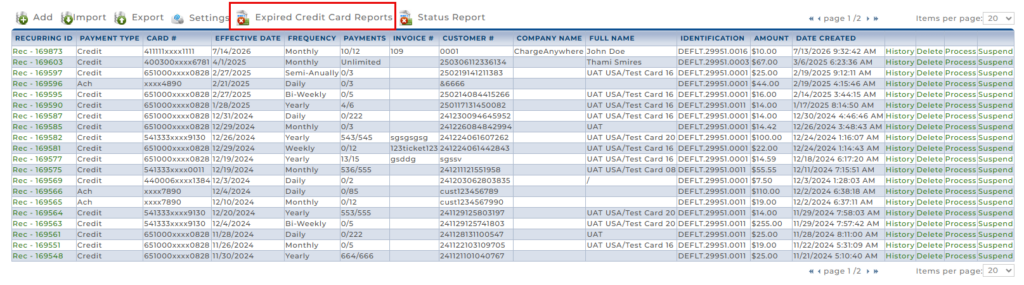
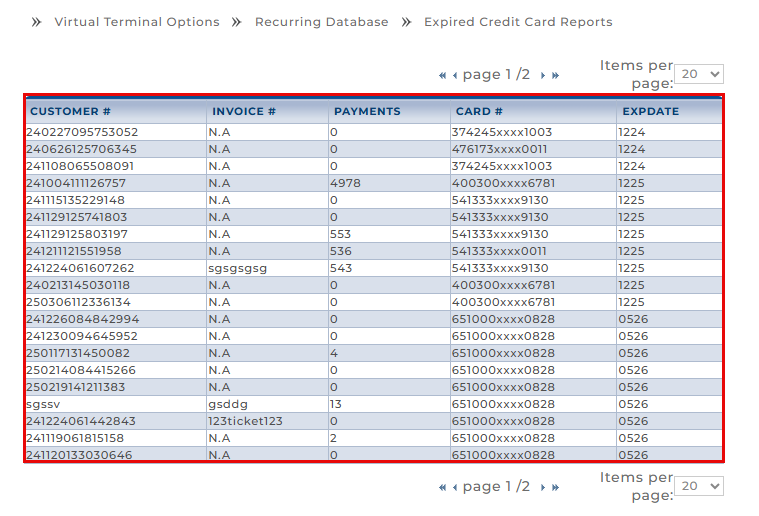
Use Expired Credit Card Reports to identify recurring transactions linked to expired or soon-to-expire credit cards. This helps merchants update customer payment methods before future recurring payments fail.
1. Navigate to Virtual Terminal > Recurring Database.
2. Click Expired Credit Card Reports.
3. Review the report details and update the customer’s payment method from Customer Vault or Manage Payment Methods, where applicable.
17. Status Report
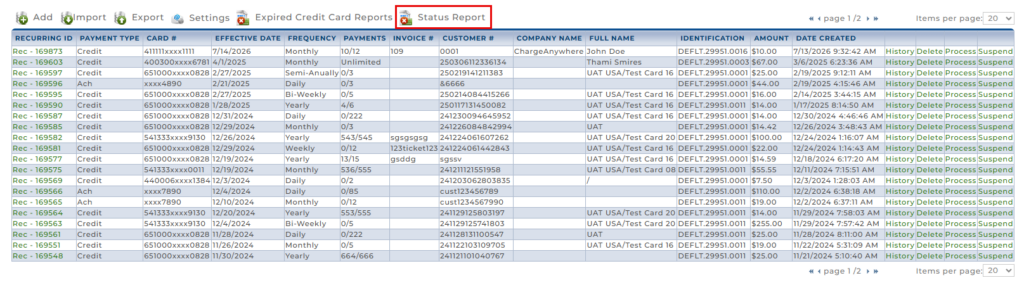
Use Status Report to search and review recurring payment processing results. This report helps merchants track approved, failed, or errored recurring payment attempts.
1. Navigate to Virtual Terminal > Recurring Database.
2. Click Status Report.
3. Enter or select the required search criteria, such as:
- Payment Type
- Error
- Company Name
- Identification
- Customer #
- Amount
- Date From
- Date To
4. Click Search.
5. Review the recurring status results.
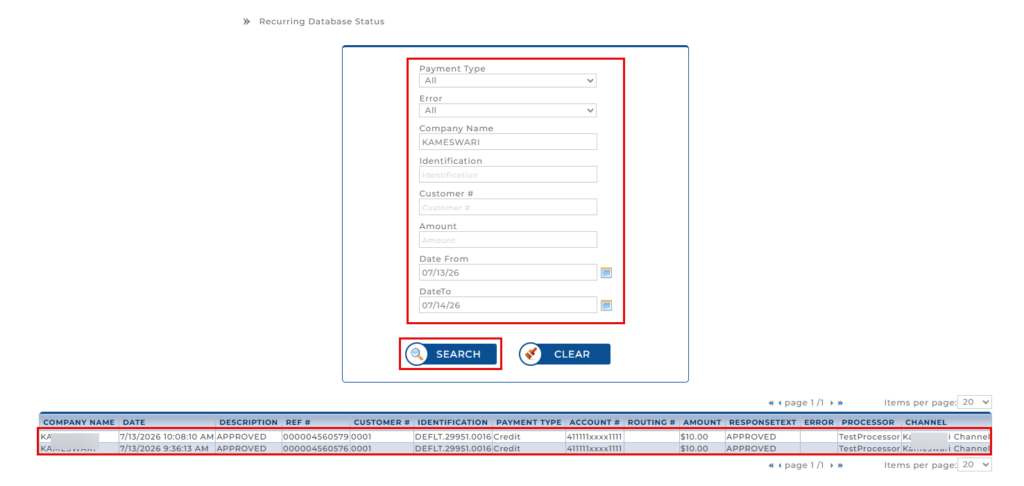
Use the report to verify whether recurring payments were approved, failed, or returned an error. Click Clear to reset the search filters, if required.
18. Important Notes
- A recurring transaction requires a customer and saved Payment Profile.
- A recurring transaction cannot be created directly from a hosted Payment Form transaction.
- Hosted Payment Form transactions do not automatically create Customer Vault records.
- Hosted Payment Form transactions do not automatically save or tokenize payment methods as Payment Profiles.
- Use Add to manually create one recurring transaction.
- Use Upload Recurring when importing multiple recurring or installment records in bulk.
- Use Customer Vault to create customers and manage saved credit card or bank account details.
- Use Expired Credit Card Reports to identify pa yment profiles that may need to be updated before future recurring payments fail.
- Use Status Report to review recurring payment results, approvals, errors, or failed attempts.
- Deleting a recurring record permanently removes it from the Recurring Database.
- Suspended recurring transactions can be reactivated, where the option is available.
19. Recommended Workflow for Recurring Billing
Use the following workflow when a merchant wants to bill a customer on a recurring schedule:
Create or locate the customer in Customer Vault
↓
Add or confirm a saved credit card/bank account Payment Profile
↓
Go to Recurring Database > Add
↓
Select Device, Customer, and Payment Profile
↓
Enter Plan Type, Total Per Recurring, Frequency, Number of Payments, and Start Date
↓
Click Add
↓
Manage the recurring transaction from Recurring Database
20. FAQs
Q: Can I create a recurring transaction directly from a hosted Payment Form transaction?
Ans: No. A hosted Payment Form transaction does not automatically create a recurring transaction. The customer and saved Payment Profile must first exist in Customer Vault.
Q: Does a hosted Payment Form transaction automatically create a Customer Vault record?
Ans: No. Hosted Payment Form transactions do not automatically create Customer Vault or Customer Database records.
Q: Does a hosted Payment Form transaction automatically save the customer’s card or bank account?
Ans: No. The payment method is not automatically saved as a Payment Profile. To use the payment method for recurring billing, add it under the customer’s saved payment methods in Customer Vault.
Q: What is required to manually add a recurring transaction?
Ans: The required fields include:
- Device
- Customer
- Payment Profile
- Plan Type
- Total Per Recurring
- Frequency
- Total Number of Payments
- Start Date
Q: When should I use Add instead of Import?
Ans: Use Add when creating one recurring transaction manually. Use Import when uploading multiple recurring or installment records in bulk.
Q: Can I use a saved credit card or bank account for recurring billing?
Ans: Yes. Saved payment methods from Customer Vault can be selected as the Payment Profile when creating a recurring transaction.
Q: Can I add a new Payment Profile while adding a recurring transaction?
Ans: Yes. If a Payment Profile is not available, click Add next to the Payment Profile field and enter the required card or bank account details.
Q: Can I suspend a recurring transaction?
Ans: Yes. Use Suspend to temporarily pause a recurring transaction.
Q: Can a suspended recurring transaction be reactivated?
Ans: Yes. Suspended recurring transactions can be reactivated, where the option is available.
Q: What does Delete do?
Ans: Delete permanently removes the recurring record from the Recurring Database.
Q: Where can I check recurring payment results?
Ans: Use Status Report to search and review recurring payment results, including approved, failed, or errored payment attempts.
Q: Where can I find expired cards used for recurring payments?
Ans: Use Expired Credit Card Reports to identify recurring records linked to expired or soon-to-expire cards.
21. Related Virtual Terminal Guides
| If you want to… | See this guide |
| Configure hosted payment forms | Payment Form Guide |
| Integrate Payment Forms using API fields | Payment Form Specifications |
| Manage customer records and saved payment methods | Customer Vault User Guide |
| Import customer records in bulk | Customer Import Specifications |
| Send invoice payment links to customers | Bill Pay User Guide |
| Import recurring or installment records in bulk | Recurring and Installment Import Specifications |
| Manage authorization-only records | Auth Only Database User Guide and Specifications |
| Process multiple transactions together | Batch Transactions for Merchants Guide |
| Build batch files using technical file format | Batch Processing Specifications for Merchants |
22. Support
If you encounter any issues while using the Recurring Database, contact Charge Anywhere Support at: support@chargeanywhere.com.
Get a monthly summary of technical document updates.