1. Introduction
Merchants with an existing customer database can import customer records into Customer Vault in Transaction Manager. This helps reduce manual data entry and keeps customer billing, shipping, and payment information available for future transactions.
Use this guide when you want to upload multiple customer records using a .txt or .csv file.
For manually adding or managing individual customer records, refer to the Customer Vault User Guide.
Relationship with Customer Vault
Customer Import is part of the Customer Vault workflow. After the import is complete, the uploaded customers appear in Customer Vault, where merchants can search customer records, edit customer details, manage saved payment methods, and create recurring transactions where applicable.
Use Customer Import for bulk upload. Use Customer Vault > Add when creating a single customer manually.
2. Customer Import Settings
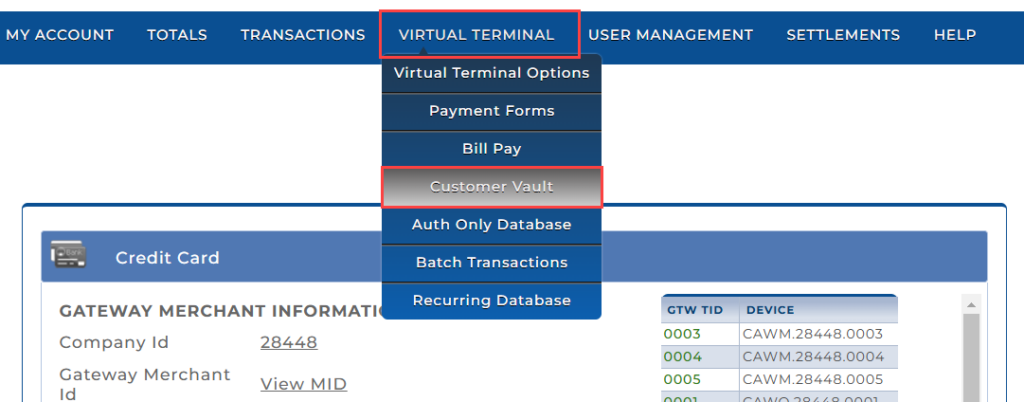
2.1 The Customer Import option will allow you to upload a text (.txt) or comma-separated value (.csv) file into your customer database. This can be done by going to Virtual Terminal -> Customer Vault.
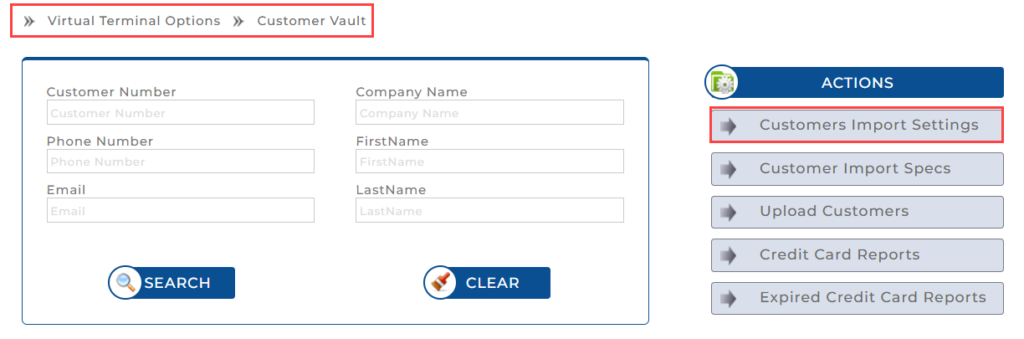
2.2 From there click the Customer Import Settings option to set the fields you want to import.
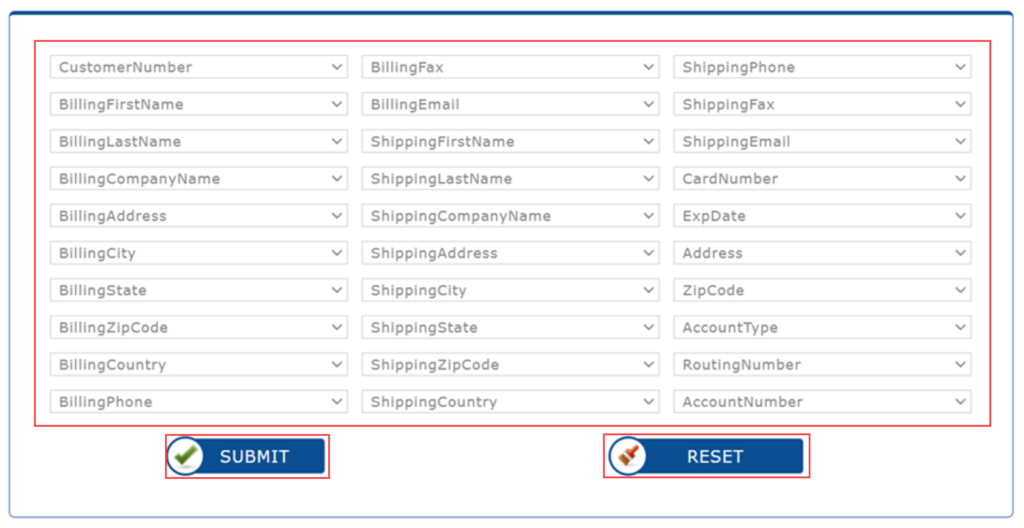
2.3 Configure the fields as required. For any fields you don’t want to use, simply select Skip, the first option under each pulldown menu. Click Submit to save the import settings or click Reset to reset the fields.
2.4 After the fields are set, you will see the Customers import setup saved successfully message.

2.5 You then have the option to either download our Customer Import Template in Excel or create a comma-separated values (CSV) file to import – whatever is easiest for you.
Note: Make sure that the Import Settings you have flagged to use match the field columns of the information you have available to import.
3. Download Our Customer Import Template
3.1 Navigate to Virtual Terminal -> Customer Vault. Click Upload Customers.
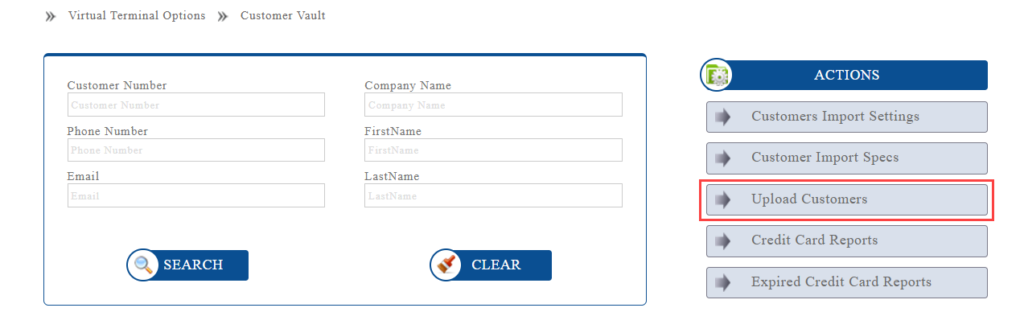
3.2 Click Download Customer Import Template after you have configured the Customer Import Settings.
Note: Any change to your Import Settings will impact your Import Template.
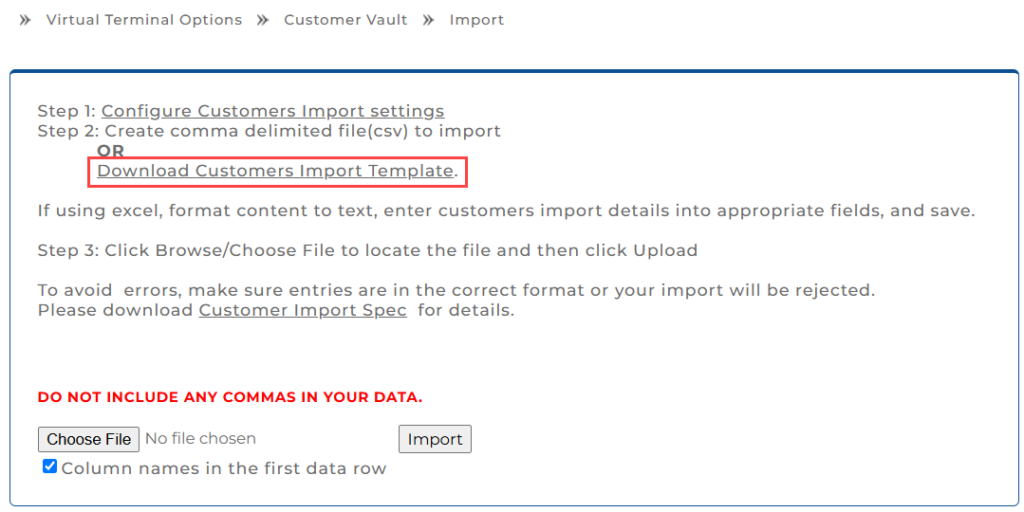
3.3 Customer Import Data Fields for Creating a CSV File:
| Field Name | Format | Required | Description |
| Customer Number | Varchar(50) | Not Required | Customer Number for the transaction |
| BillingFirstName | Varchar(50) | Required | First Name for Billing Information |
| BillingLastName | Varchar(50) | Required | Last Name for Billing Information |
| BillingCompanyName | Varchar(50) | Required | Company name for Billing Information |
| BillingAddress | Varchar(50) | Required | Address for Billing Information |
| BillingCity | Varchar(50) | Required | City for Billing Information |
| BillingState | Varchar(2) | Required | State for Billing Information |
| BillingZipCode | Varchar(9) | Required | Zip code for Billing Information |
| BillingCountry | Varchar(50) | Required | Country for Billing Information |
| BillingPhone | Varchar(50) | Required | Phone number for Billing. No Space or Dashes |
| BillingFax | Varchar(50) | Required | Fax number for Billing. No Space or Dashes |
| BillingEmail | Varchar(50) | Required | Email Address for Billing. |
| ShippingFirstName | Varchar(50) | Required | First Name for Shipping Information |
| ShippingLastName | Varchar(50) | Required | Last Name for Shipping Information |
| ShippingCompanyName | Varchar(50) | Required | Company name for Shipping Information |
| ShippingAddress | Varchar(50) | Required | Address for Shipping Information |
| ShippingCity | Varchar(50) | Required | City for Shipping Information |
| ShippingState | Varchar(2) | Required | State for Shipping Information |
| ShippingZipCode | Varchar(9) | Required | Zip code for Shipping Information |
| ShippingCountry | Varchar(50) | Required | Country for Shipping Information |
| ShippingPhone | Varchar(50) | Required | Phone number for Shipping. No Space or Dashes |
| ShippingFax | Varchar(50) | Required | Fax number for Shipping. No Space or Dashes |
| ShippingEmail | Varchar(50) | Required | Email Address for Shipping |
| DateTime | datetime | Not Required | Date & Time the customer was added into the Database |
| CardNumber | Varchar(19) | Not Required | Credit card number with no dashes or spaces (ex. 4446661234567892) |
| ExpDate | Varchar(4) | Not Required | Expiration Date (MMYY) |
| AccountNumber | Varchar(19) | Not Required | Bank Account number with no dashes or spaces (ex. 123456789) |
| RoutingNumber | Varchar(19) | Not Required | Routing number of the ACH Account |
3.4 Example of a File to Import:

4. Uploading Your Customers
4.1 Once you’ve followed the above steps, you are ready to upload your customers. Simply click the Upload Customers action.
4.2 Then select Choose File followed by Import to import the customer data.
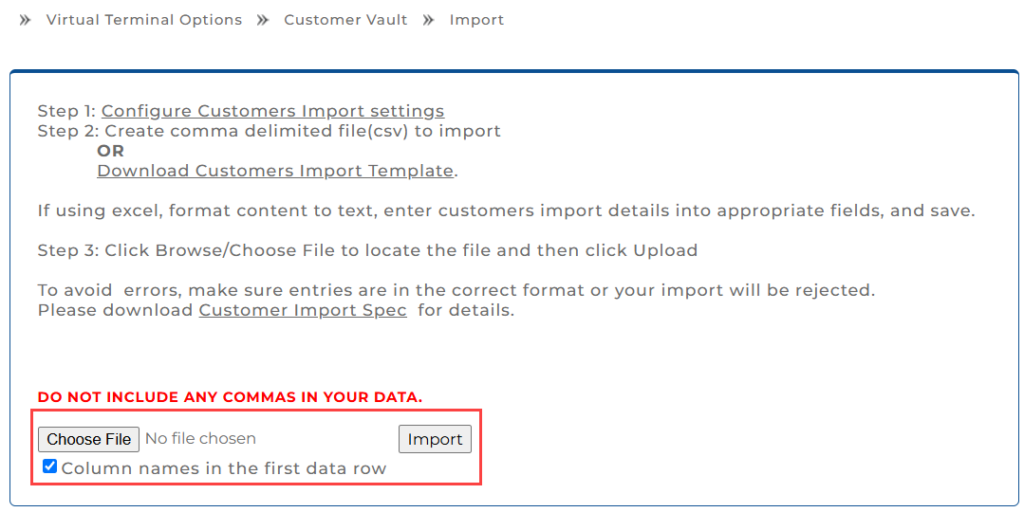
4.3 After the import is complete the customers will show up in your Customer Database and any included card numbers will be encrypted for use in future transactions.
After Import
After the import is complete:
- Imported customers appear in Customer Vault.
- Customer records can be searched and edited from Virtual Terminal > Customer Vault.
- Included card numbers are encrypted for future transactions, where applicable.
- Saved customer/payment information can be used for future transactions or recurring billing, if the required Customer Vault and Recurring Database features are enabled.
5. Add Customer vs Import Customers
| Option | Use this when… | Where to go |
|---|---|---|
| Add Customer | You want to manually create one customer record. | Virtual Terminal > Customer Vault > Add |
| Customer Import | You want to upload multiple customer records in bulk. | Virtual Terminal > Customer Vault > Upload Customers |
| Customer Import Settings | You want to configure which fields are included in the import file. | Virtual Terminal > Customer Vault > Customers Import Settings |
| Customer Vault User Guide | You want to search, edit, or manage individual customer records and payment methods. | Customer Vault User Guide |
6. FAQs
Q: What is Customer Import used for?
Ans: Customer Import is used to upload multiple customer records into Customer Vault using a .txt or .csv file.
Q: When should I use Customer Import instead of Add Customer?
Ans: Use Customer Import when uploading multiple customers in bulk. Use Add in Customer Vault when creating one customer manually.
Q: Where do imported customers appear?
Ans: Imported customers appear in Customer Vault after the import is complete.
Q: Do I need to configure Customer Import Settings before uploading a file?
Ans: Yes. The import settings determine which fields are expected in the import file.
Q: What happens if the import file columns do not match the Customer Import Settings?
Ans: The import may fail or return errors. Make sure the import file columns match the configured import settings.
Q: Can payment details be included in the import file?
Ans: Yes, payment-related fields such as card number, expiration date, account number, and routing number can be included, where applicable.
Q: Are imported card numbers saved for future use?
Ans: If card numbers are included and the import is successful, they are encrypted for future transactions, where applicable.
Q: Is Customer Import the same as Customer Vault?
Ans: No. Customer Vault is where customer records are stored and managed. Customer Import is the bulk upload process used to add customer records to Customer Vault.
7. Related Virtual Terminal Guides
| If you want to… | See this guide |
| Configure hosted payment forms | Payment Form Guide |
| Integrate Payment Forms using API fields | Payment Form Specifications |
| Manage customer records and saved payment methods | Customer Vault User Guide |
| Send invoice payment links to customers | Bill Pay User Guide |
| Add or manage individual recurring payments | Recurring Database User Guide |
| Import recurring or installment records in bulk | Recurring and Installment Import Specifications |
| Manage authorization-only records | Auth Only Database User Guide and Specifications |
| Process multiple transactions together | Batch Transactions for Merchants Guide |
| Build batch files using technical file format | Batch Processing Specifications for Merchants |
8. Support
If you need assistance with Customer Vault, saved payment methods, or recurring payment setup, contact Charge Anywhere Support at: support@chargeanywhere.com
9. Change Log
| Date | Update Summary |
| July 14, 2026 | Added FAQ, Add Customer vs Import Customers, and Related Virtual Terminal Guides sections. |
Get a monthly summary of technical document updates.