1. Overview
The Bill Pay feature in Transaction Manager allows merchants to create bills, manage bill status, and send bill payment links to customers. This detailed user guide will walk you through the process of using Bill Pay effectively for creating bills, sending payment links via email, checking bill status, and managing bills.
Note: To know the list of predefined trigger values that can be used to test various transaction responses within Charge Anywhere, refer to the Trigger Values for Testing Transactions guide.
For a comprehensive guide on all valid response codes (including AVS and CVV), transaction types, and a detailed explanation of Transaction Reversal reasons, please see our master list of Transaction Responses and Codes.
2. Bill Pay Setup
1. Start by logging in to the Transaction Manager using your username and password.
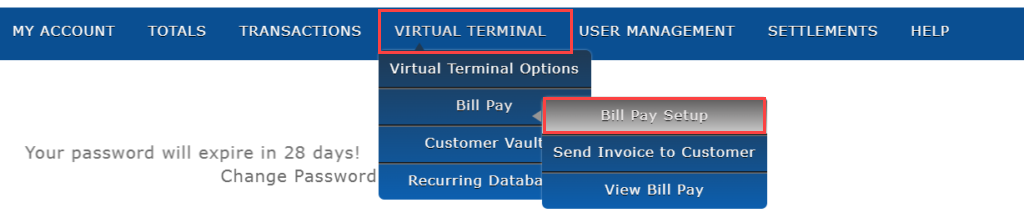
2. Navigate to the Virtual Terminal by selecting Bill Pay and then Bill Pay Setup.
3. From the dropdown menu, select the device for which you want to set up the bill.
4. Click Configuration Form and enter the following required details:
- Merchant DBA (Doing Business As): The name under which a business operates.
- Merchant Email: Email address associated with the merchant’s account for communication.
- Email Supported: Check this to send the invoice to the email.
- Phone Supported: Check this to send the invoice to the phone number.
- Show Invoice Number: Enable this option to display the invoice number on the bill for easy tracking and reference.
- Auto Generate Invoice Number: Select this to have the system automatically generate a unique invoice number for each transaction.
- Show Description: Check this to include a description field on the bill, allowing for additional transaction details.
- Description Text: Enter a brief description of the bill or transaction here for clarity and context.
- Copy Merchant: Use this option to send a copy of the bill to the merchant’s email for record-keeping.
- Auth Only Supported: Tick this if you want to process the transaction as ‘Authorization Only’, which reserves funds but does not complete the transaction immediately.
- Transaction Type: Choose between ‘Sale’ for immediate transaction processing or ‘Auth Only’ for authorization without immediate fund capture.
- Do Not Allow Convenience Fee Edits: Activate this option to prevent modifications to the convenience fee settings, ensuring consistent additional charges across transactions.
- Apply Convenience Fee to Credit: Enable this to add a fee for transactions made using a credit card.
- Convenience Type: Select the type of convenience fee you wish to apply to transactions from the dropdown menu. You can choose between “Amount” or “Percentage” based on your preference.
- Convenience Fee Label: Enter the label or name that you want to display for the convenience fee on the bill. This will provide clarity to the customer regarding the additional charge.
- Convenience Fee: Specify the amount or percentage of the convenience fee that will be added to the transaction. If you selected “Amount” as the convenience type, enter the fixed fee amount. If you chose “Percentage,” enter the percentage of the transaction amount to be applied as the convenience fee.
- Email Message: Personalized message sent to the customer along with the bill.
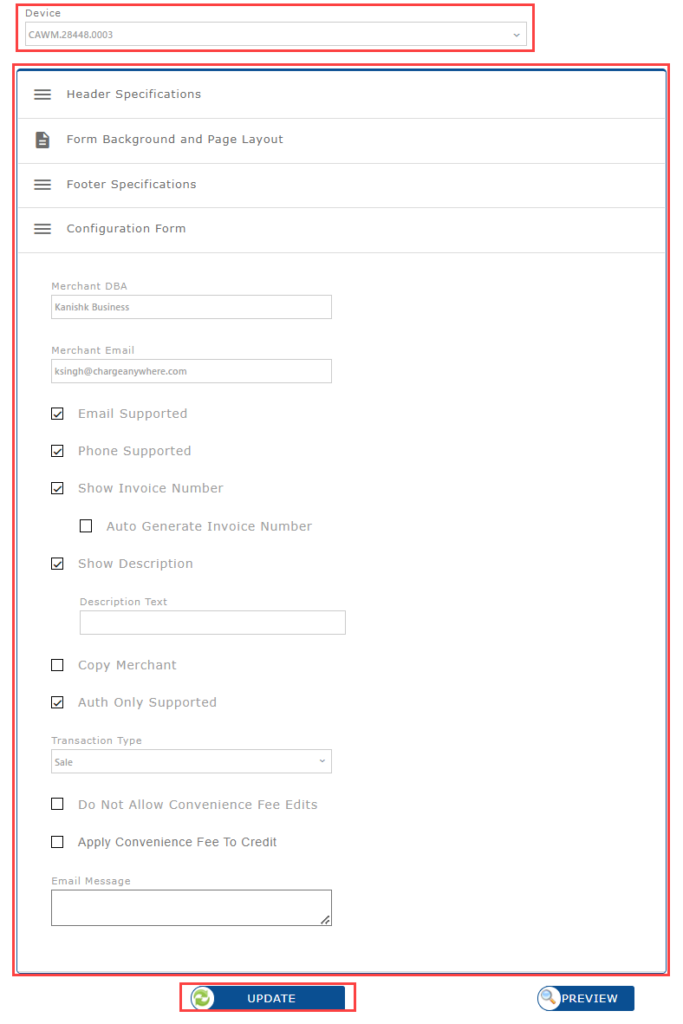
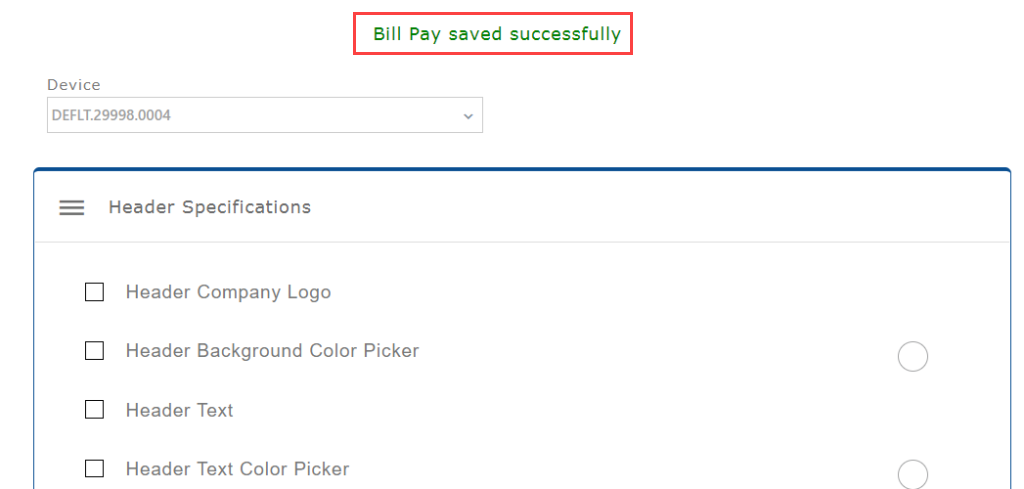
5. Click Update to save the information. If the Bill Pay setup is successful, you will see a message at the top saying Bill Pay saved successfully.
3. Send Invoice to Customer
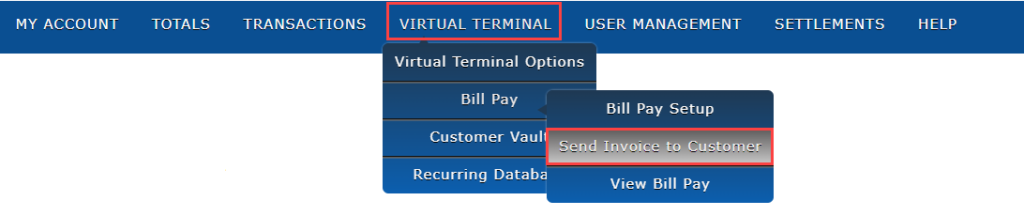
To create a bill for a customer, go to Virtual Terminal -> Bill Pay -> Send Invoice to Customer.
Complete the Send Invoice to Customer form by entering the required billing and customer information. You can search for an existing customer or manually enter the details for a new customer.
3.1 Customer Information
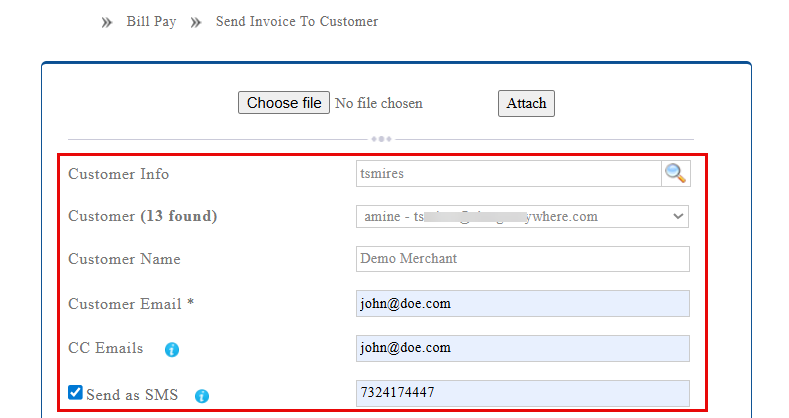
- Customer Info: Use this field to search for an existing customer by entering their name, email address, or phone number. Click the search icon to view matching records.
- Customer: Select the appropriate customer from the dropdown list. When an existing customer is selected, their information is automatically populated in the relevant fields.
- Customer Name: Displays or allows entry of the customer’s name for whom the invoice is being created.
- Customer Email *: Enter the customer’s primary email address where the invoice and payment link will be sent.
- CC Emails: Enter additional email addresses to receive a copy of the invoice.
- Send as SMS: Enable this option to send the payment link via SMS in addition to email. When selected, the customer’s phone number must be provided.
3.2 Invoice Details
- Invoice Number: Enter a unique identifier for the invoice.
- Description: Provide a brief description of the goods or services being billed.

3.3 Itemization (Optional)
The Itemize option allows you to include detailed line items in the invoice.
When Itemize is enabled, the system displays the Add Items section where you can add products or services to the invoice.
Option 1: Add Existing Products
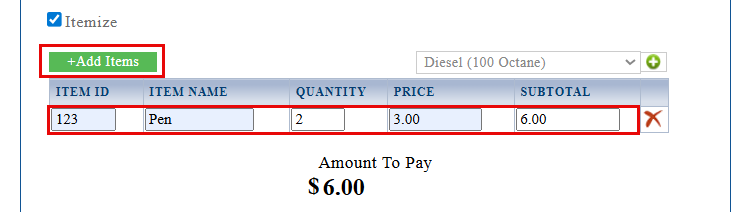
- Click + Add Items.
- Select a product from the Select A Product dropdown list.
- Click the + icon to add the product to the invoice.
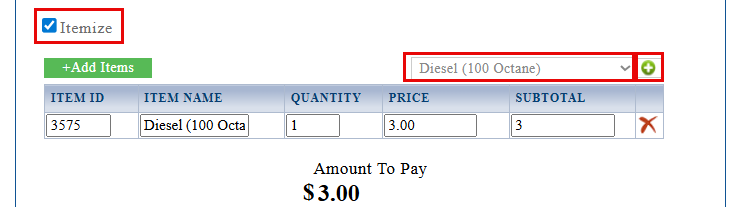
Once added, the system automatically populates the following details:
- Item ID
- Item Name
- Quantity
- Price
- Subtotal
The Amount To Pay field is automatically updated based on the items added.
Multiple products can be added to the invoice. Individual items can be removed using the delete (X) icon.

Option 2: Add Custom Items
If the product does not exist in the predefined list, you can manually enter item details in the table:
- Item ID
- Item Name
- Quantity
- Price
The Subtotal and total Amount To Pay are calculated automatically.
3.4 Payment Options
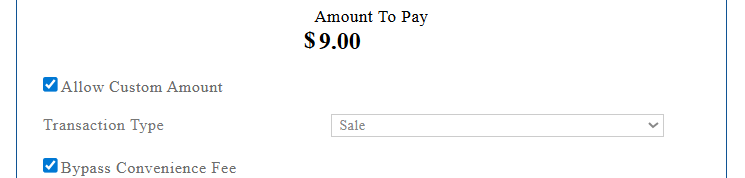
- Amount To Pay: Displays the total invoice amount based on the items entered.
- Allow Custom Amount: Enable this option to allow the customer to enter a different payment amount when completing the payment.
- Transaction Type: Select the transaction type associated with the invoice (for example, Sale).
- Bypass Convenience Fee: Enable this option if the convenience fee should not be applied to this transaction.
3.5 Merchant Information
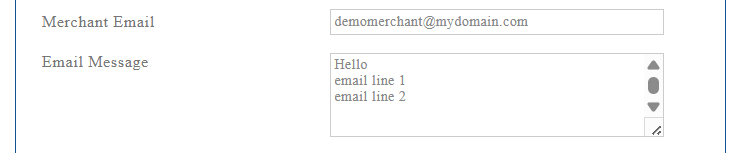
- Merchant Email: Displays the merchant email associated with the account for record-keeping.
- Email Message: Enter a custom message that will be included in the invoice email sent to the customer.
3.6 Attach Supporting Files (Optional)
You can attach supporting documents (such as invoices, receipts, or order details):
- Click Choose File.
- Select the file from your device.
- Click Attach to upload it.

3.7 Submit the Invoice
After completing the form:
- Click Submit to send the invoice and payment link to the customer.
- Click Clear to reset the form and remove all entered data.

4. View Bill Pay
Note: For a comprehensive guide on all valid response codes (including AVS and CVV), transaction types, and a detailed explanation of Transaction Reversal reasons, please see our master list of Transaction Responses and Codes.
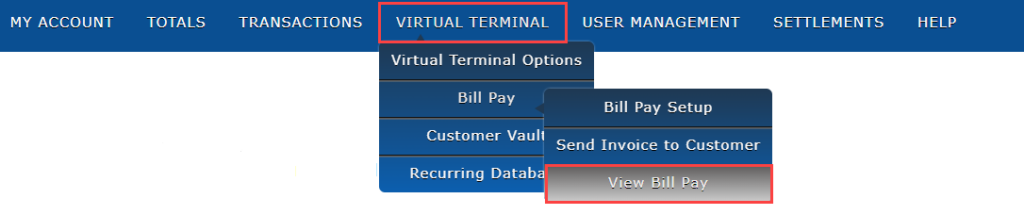
1. To view the bill, go to Virtual Terminal -> Bill Pay -> View Bill Pay.
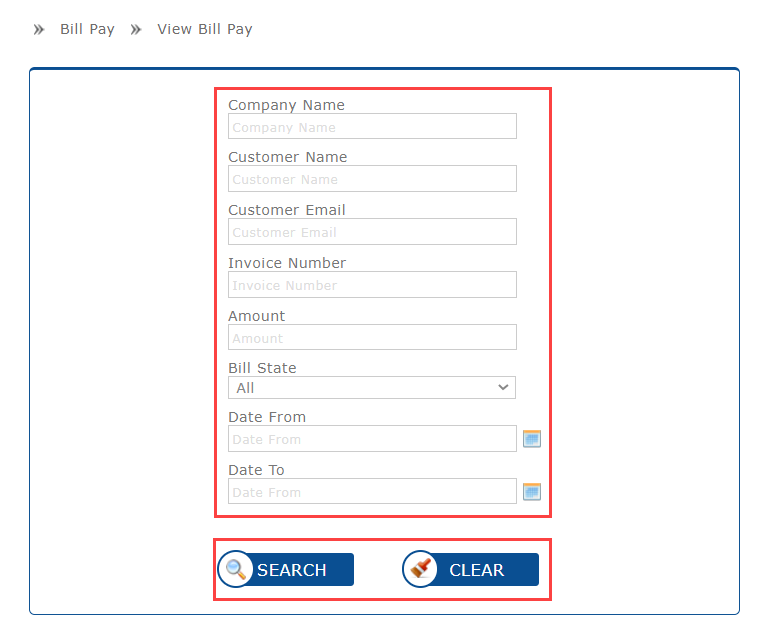
2. Utilize the search functionality to find bills based on parameters such as Company Name, Customer Name, Customer Email, Invoice Number, Amount, Bill State, Date From, and Date to.
3. You can check the status of a bill in the STATE column.
- Sent: The bill has been successfully created and sent to the customer’s email.

- Viewed: The customer has clicked the payment link in the email but has not yet completed the payment.

4. The customer will receive the bill at their email address. They can click the Click here to Process Payment link to view the invoice and pay.

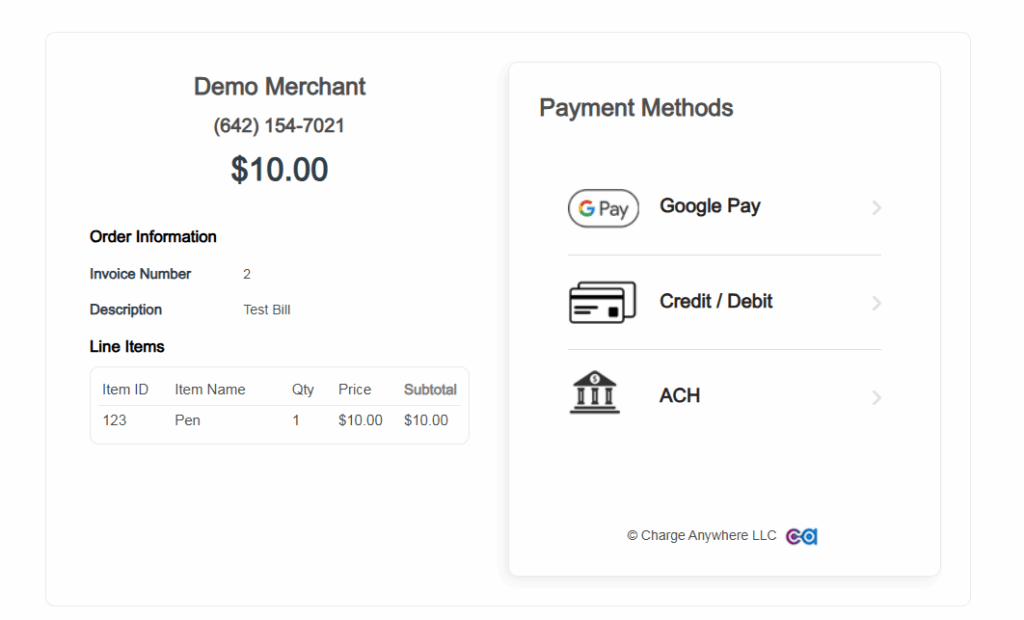
5. The payment page displays the order information, line items, and available Payment Methods. The customer can choose from options such as Google Pay, Credit/Debit, or ACH to complete the payment.
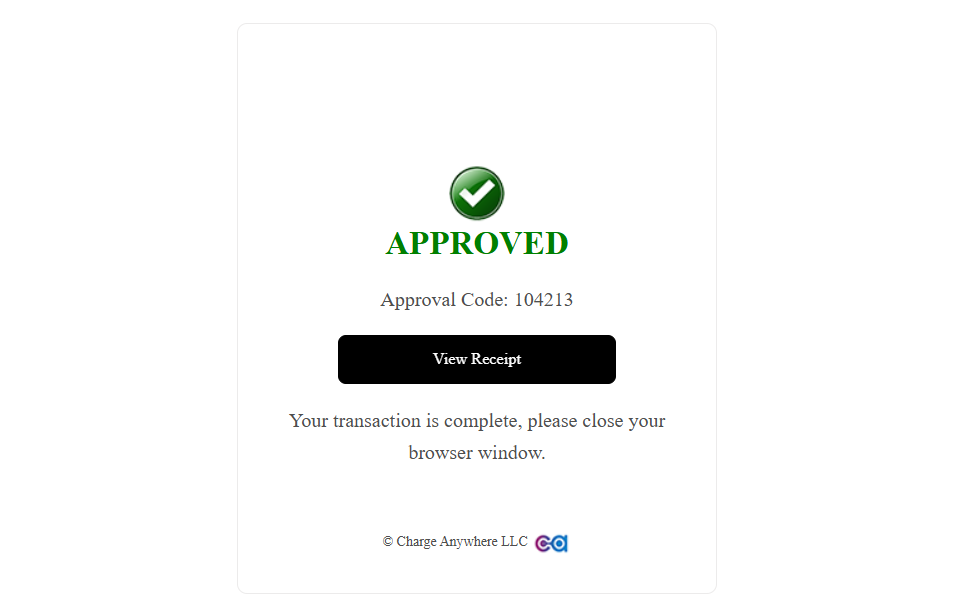
6. After the bill is paid successfully, the customer will see an APPROVED message with an Approval Code. They can click View Receipt to get a copy of the transaction receipt.
7. After a successful payment, the bill’s status in the View Bill Pay screen will update to Paid – Online.

8. Click Details next to any bill to view more detailed information about the transaction.

This page provides a comprehensive summary of the bill, including:
- Customer Name and Email
- CC’d email addresses
- The phone number used for SMS notifications,
- Invoice Number
- Description
- An itemized list of the products or services
- Total Amount
- Transaction Type
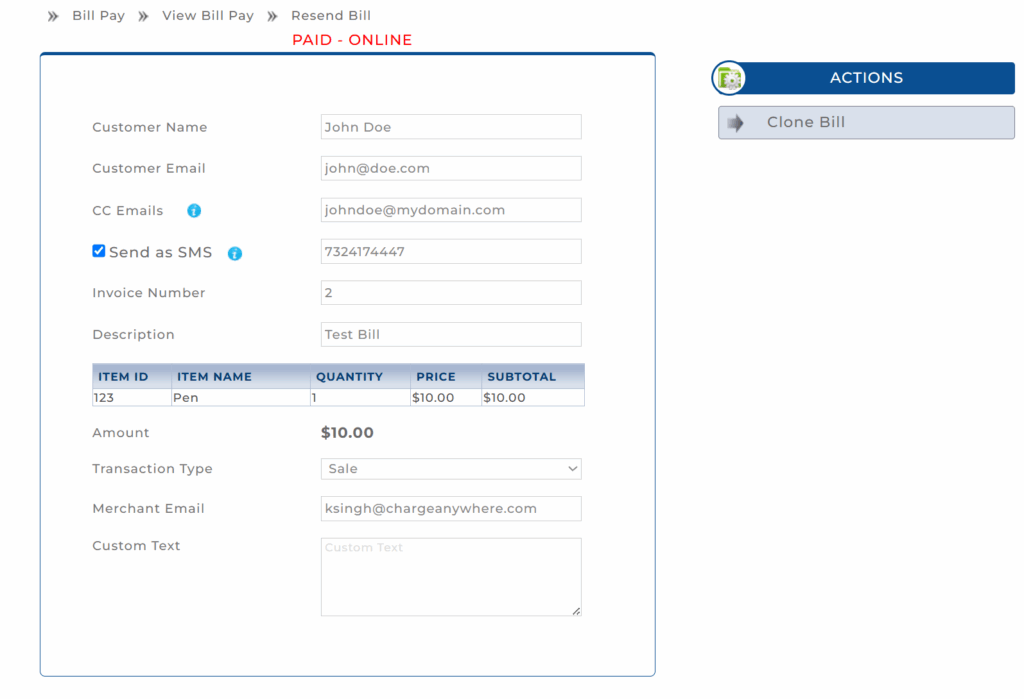
From the ACTIONS menu on this page, you can also Clone Bill to quickly create a new, identical invoice.
That’s it! You can follow the same process to create new bills for other customers and check their status.
5. Recommended Workflow
Use Bill Pay when you want to create a bill or invoice and send a payment link to a customer by email or SMS. Depending on your workflow, you may use Bill Pay by itself or along with Customer Vault and Recurring Database.
| Scenario | Recommended Workflow |
|---|---|
| Send a one-time invoice/payment link | Configure Bill Pay, create the invoice, send the payment link, and track the bill status from View Bill Pay. |
| Send a bill to an existing customer | Search and select the customer while creating the bill. Customer details are populated from Customer Vault, where applicable. |
| Create a new customer before billing | Add the customer in Customer Vault first, then create the bill from Bill Pay. |
| Save customer payment methods for future use | Add or manage the customer’s payment methods in Customer Vault. |
| Set up recurring billing | Create or locate the customer in Customer Vault, add a saved Payment Profile, and then create the recurring transaction from Recurring Database. |
| Upload many customers or recurring records | Use Customer Import Specifications or Recurring and Installment Import Specifications for bulk upload. |
Typical Bill Pay Flow
Configure Bill Pay
↓
Create invoice/payment link
↓
Send to customer by email or SMS
↓
Customer opens the payment link
↓
Customer completes payment
↓
Track status from View Bill Pay
6. Customer Vault
Customer Vault is used to store and manage customer records, billing and shipping information, and saved payment methods such as credit cards or bank accounts. In the Bill Pay workflow, you can search for and select an existing customer from Customer Vault when creating an invoice or payment link. This helps reduce manual entry and keeps customer details consistent across Virtual Terminal features.
For complete steps to add customers, edit customer details, manage payment methods, and use saved payment profiles, see the Customer Vault User Guide.
7. Recurring Database
The Recurring Database is used to create and manage recurring payment transactions for customers who need to be billed on a scheduled basis. While Bill Pay is used to send individual invoices or payment links, recurring payments should be managed through the Recurring Database or from a saved payment method in Customer Vault.
For complete steps to add individual recurring transactions, edit recurring records, view history, process, suspend, delete, configure settings, and review recurring reports, see the Recurring Database User Guide.
If you encounter any issues with the Bill Pay feature, please reach out to Charge Anywhere support at support@chargeanywhere.com. They will provide troubleshooting tips and FAQs to assist you.
8. FAQs
Q: What is Bill Pay used for?
Ans: Bill Pay is used to create bills or invoices and send payment links to customers by email or SMS, where enabled.
Q: Is Bill Pay the same as Payment Form?
Ans: No. Payment Form is typically used for hosted website payment acceptance. Bill Pay is used to send a specific bill or invoice payment link to a customer.
Q: Can I send a bill to an existing customer?
Ans: Yes. When creating a bill, you can search for and select an existing customer, if available.
Q: Can I manually enter customer details when sending a bill?
Ans: Yes. You can manually enter customer information if the customer is not selected from existing records.
Q: Can the customer pay the bill online?
Ans: Yes. The customer receives a payment link and can use it to view and pay the bill online.
Q: Can bills be sent by SMS?
Ans: Yes, if SMS support is enabled and the customer’s phone number is provided.
Q: Can I add itemized products or services to a bill?
Ans: Yes. You can add existing products or manually enter custom line items, where the Itemize option is available.
Q: What do the bill statuses mean?
Ans: Common statuses may include:
- Sent: The bill was created and sent to the customer.
- Viewed: The customer opened the payment link.
- Paid – Online: The customer completed the payment online.
Q: Can I clone an existing bill?
Ans: Yes. Use Clone Bill from the bill details page to create a new bill using details from an existing bill.
Q: Does Bill Pay automatically create recurring payments?
Ans: No. Bill Pay is used for sending bills/payment links. Recurring payments should be created and managed from Customer Vault or Recurring Database, where applicable.
9. Related Virtual Terminal Guides
| If you want to… | See this guide |
| Configure hosted payment forms | Payment Form Guide |
| Integrate Payment Forms using API fields | Payment Form Specifications |
| Manage customer records and saved payment methods | Customer Vault User Guide |
| Import customer records in bulk | Customer Import Specifications |
| Add or manage individual recurring payments | Recurring Database User Guide |
| Import recurring or installment records in bulk | Recurring and Installment Import Specifications |
| Manage authorization-only records | Auth Only Database User Guide and Specifications |
| Process multiple transactions together | Batch Transactions for Merchants Guide |
| Build batch files using technical file format | Batch Processing Specifications for Merchants |
10. Support
If you need assistance with creating bills, managing bill status, and sending bill payment links to customers, contact Charge Anywhere Support at: support@chargeanywhere.com
11. Change Log
| Date | Update Summary |
| July 14, 2026 | Updated Customer Vault and Recurring Database sections. Added FAQ, Recommended Workflow, and Related Virtual Terminal Guides sections. |
| March 6, 2026 | Updated the Send Invoice to Customer section. |
Get a monthly summary of technical document updates.