Introduction
The Text to Pay app allows merchants to send payment links to customers via SMS and email for quick and secure payments. This helps merchants save time, reduce manual errors, and provide customers with flexible and convenient payment options. This guide walks through the detailed steps for using the Text to Pay app, explaining each option so merchants can offer seamless payments to customers via text message.
Getting Started
1. Installation
To begin, download and install the Text to Pay app on your Android device. Contact your salesperson to obtain your license number, if you don’t have that already, as you will need to enter that in the app to complete setup. Alternatively, you’re welcome to contact our support team at support@chargeanywhere.com to obtain your license number.
2. Welcome Screens
When you first open the Text to Pay app, a series of introductory screens guide you through its key features and initial setup. Follow the steps below to navigate and complete the onboarding process:
- Create Bills Fast
The first screen highlights the app’s ability to streamline bill creation with a quick and efficient process. Tap Next to proceed. - Itemize Your Bills
The second screen showcases the app’s feature for itemizing bills and simplifying expense management through the itemized billing feature. Tap Next to continue. - Track Status of Your Bills
The third screen demonstrates the tracking feature, enabling effortless monitoring of bill statuses such as Sent, Paid, or Viewed. Tap Next to proceed. - Visualize Insights
The final introduction screen highlights the app’s data-driven insights with the intuitive reports feature, offering valuable analytics at your fingertips. Tap Next to complete the overview.
Registration
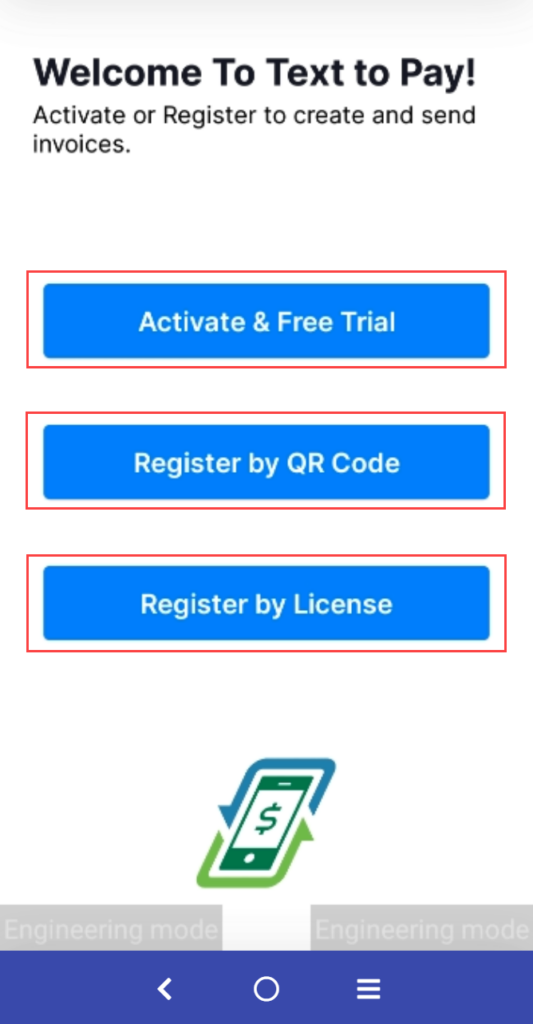
After the introductory screens, you will reach the Welcome to Text to Pay page, where you can activate or register the app to start creating and managing invoices. The available registration options are:
1. Activate & Free Trial
Choose this option to start a free trial and explore the app’s features without an immediate license.
- Introduction to Text to Pay: The first screen welcomes you to the Text to Pay app, introducing its key functionalities.
- Fees and Terms of Use: The second screen provides detailed information about the app’s fee structure, including the $2.50 convenience fee per payment billed to the customer.
- Acknowledgment: Agree to the fee arrangement and terms by tapping the Activate button.
- Terms & Conditions: A link to the full Terms and Conditions is provided for review.
2. Register by QR Code
Use this option to quickly register by scanning a QR code containing your registration credentials. This feature simplifies the registration process by auto-filling your details and automatically submitting them without the need for further action.
3. Register by License
Enter your license and phone numbers in the respective fields and press Submit to register and access the app.
Home Screen Overview
When you log into the Text to Pay app, the Home screen displays the most recent bills under the Last Bills section. Here, you can track payments that are:
- Due Today: View bills that are due for payment by the end of today.
- This Week: View bills that need to be paid within the current week.
- This Month: View bills with a payment deadline within the current month.
Each bill shows the customer name, total due, creation date, and current status (e.g., Sent, Canceled, Paid, etc).

Creating a Bill
The Text to Pay app allows you to create and send bills to customers in just a few easy steps. Whether you need to collect payment for a specific service or product, the app provides two billing options: Non-Itemized and Itemized bills. This flexibility allows you to customize your billing process based on your business needs and the level of detail required.
Note: To know the list of predefined trigger values that can be used to test various transaction responses within Charge Anywhere, refer to the Trigger Values for Testing Transactions guide.
For a comprehensive guide on all valid response codes (including AVS and CVV), transaction types, and a detailed explanation of Transaction Reversal reasons, please see our master list of Transaction Responses and Codes.
In this section, we will guide you through the process of creating both types of bills:
- Non-Itemized Bill: A simple bill where only the total amount is charged without specifying individual items or services.
- Itemized Bill: A more detailed bill that includes a breakdown of each product or service along with pricing and quantity.
Follow the steps below to create each type of bill and send it to your customers for quick and easy payments.
Creating a Non-Itemized Bill
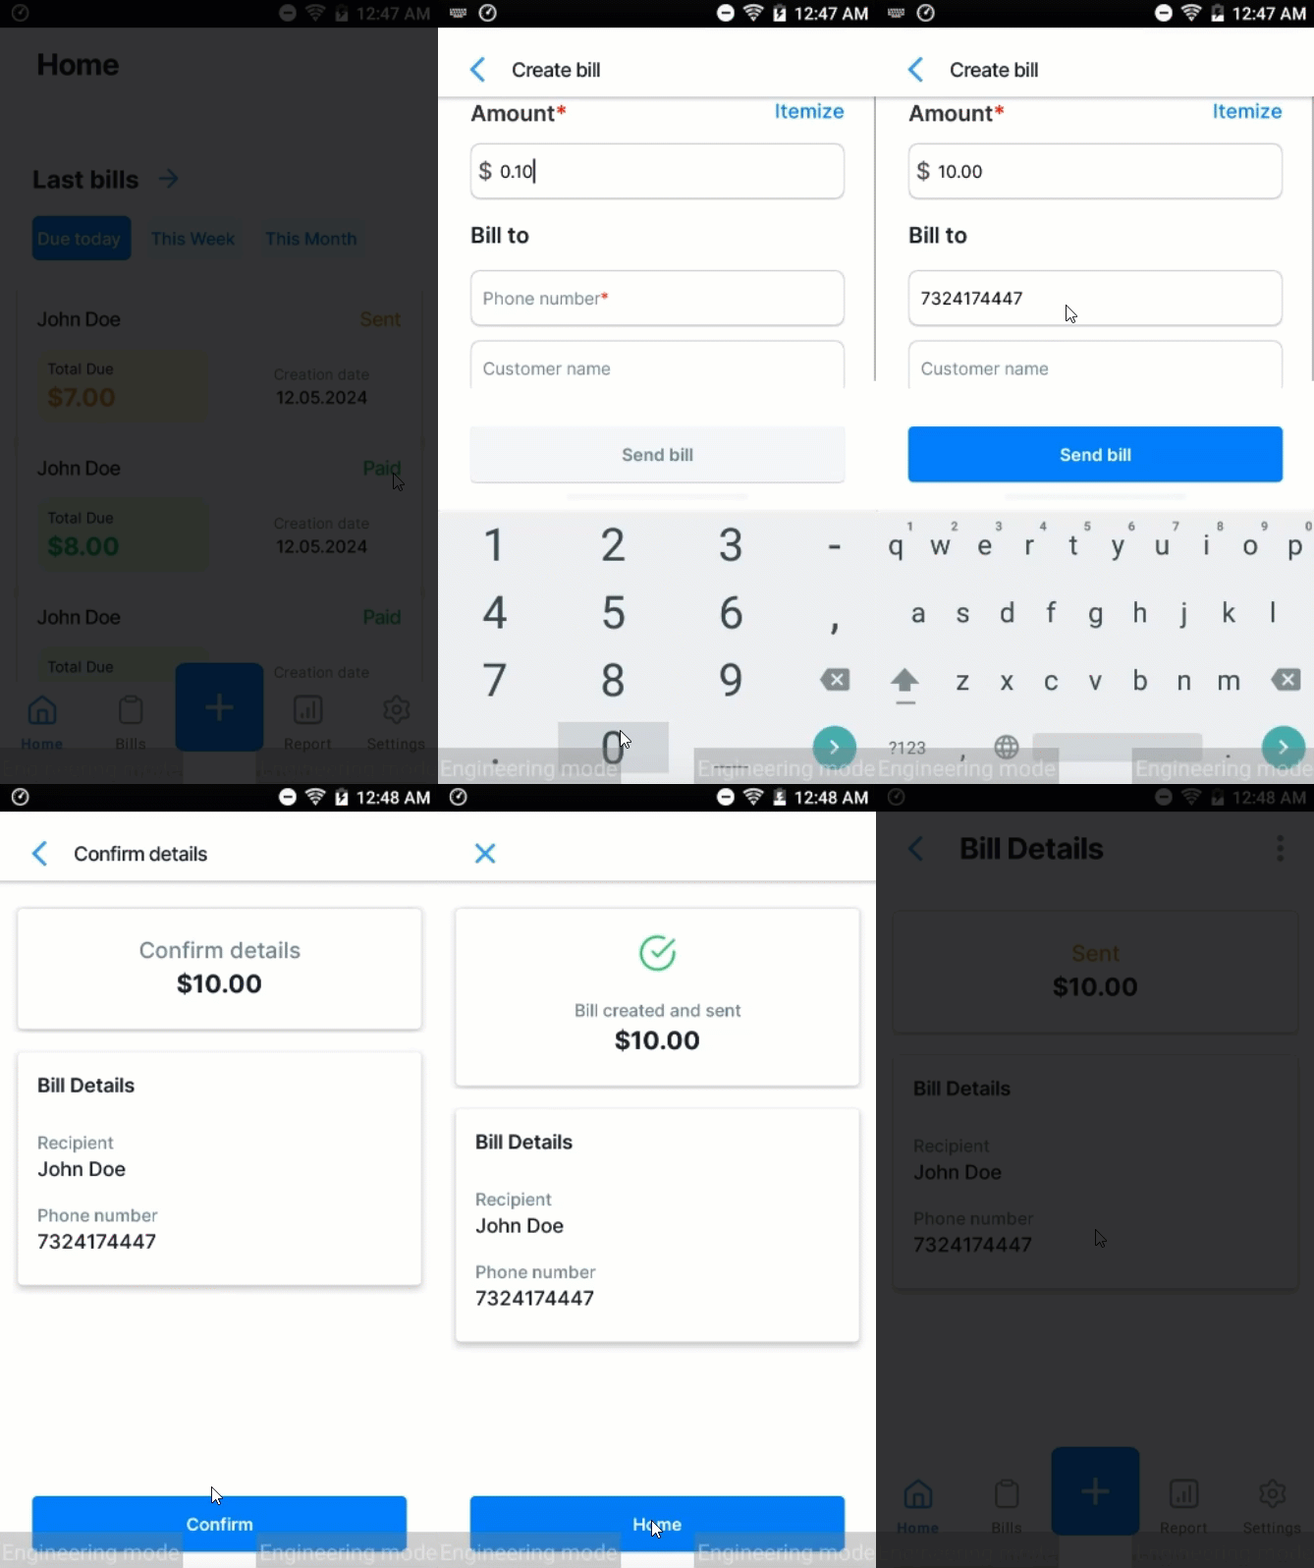
- Open the Text to Pay app.
- Tap the Plus (+) button at the center of the bottom navigation bar.
- Enter the total payment amount (e.g., $10.00) in the Amount field.
Note: Do not select the Itemize option if creating a non-itemized bill. - Enter the customer’s phone number (e.g., 7324174447). Optionally, you can add the customer’s name (e.g., John Doe) for easier tracking.
- Tap Send Bill to generate the payment link and send it via SMS.
- You will be prompted to review the bill details (e.g., amount, customer information). Tap Confirm to send the bill.
- A message will pop up confirming the bill was successfully created and sent. You can then view the bill details, including the amount, the recipient name, and the phone number as they were entered.
Creating an Itemized Bill
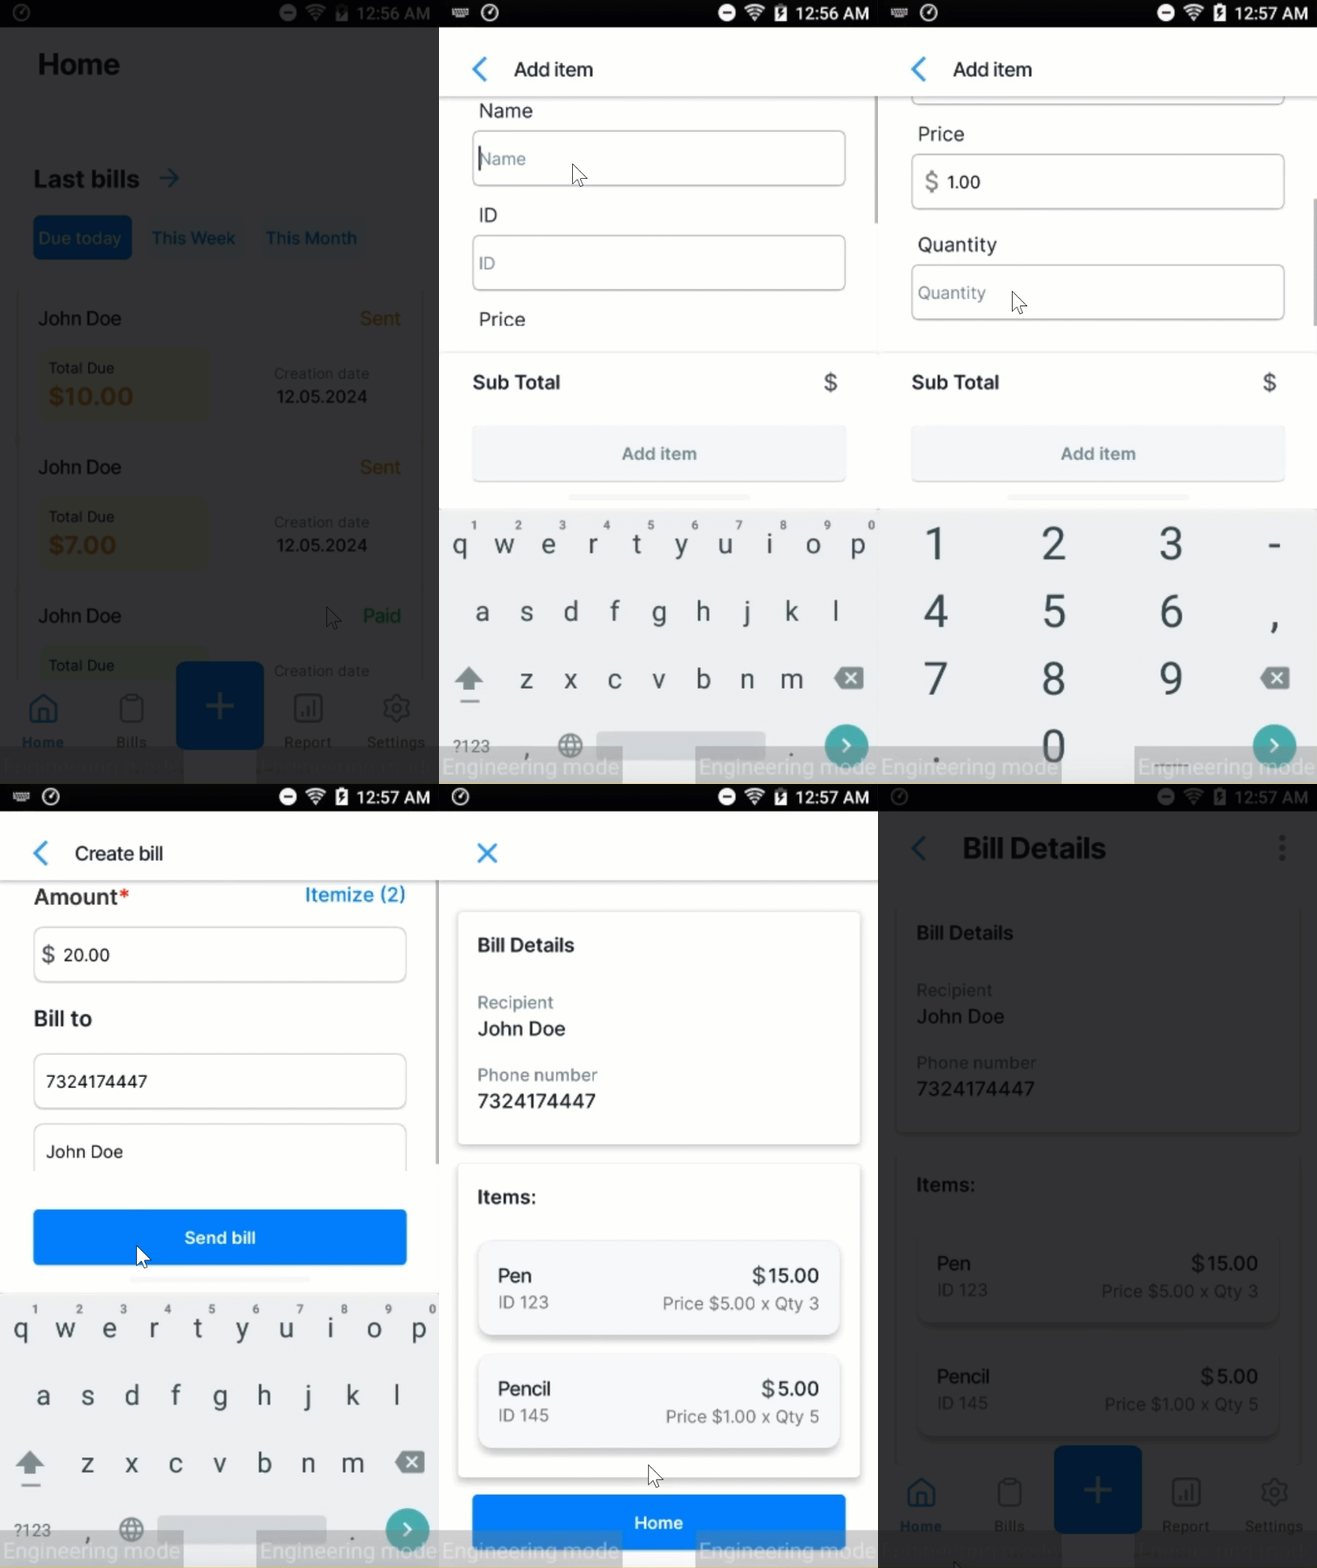
- Tap the Plus (+) button and select Create Bill.
- Tap the Itemize option to break the bill down into individual line items.
- Add Item Details
In the Itemize screen, tap Add Item to enter item details:- Name: Item or service name (e.g., John Doe).
- ID: Unique identifier (e.g., 1206).
- Price: Unit price (e.g., $5.00).
- Quantity: Number of items (e.g., 2).
- Tap Add Item after entering each item.
- After adding items, review them in the Itemize screen. If needed, you can Edit or Delete items. Tap Continue once the itemized list is complete.
- Enter the customer’s phone number (e.g., 7324174447) and name (optional).
- After reviewing the total amount and customer details, tap Send Bill to proceed.
- The app will display a confirmation screen showing the Bill Details, including the itemized list. Tap Confirm to send the bill.
- A confirmation message will appear, confirming that the itemized bill has been created and sent.
Customer Notifications
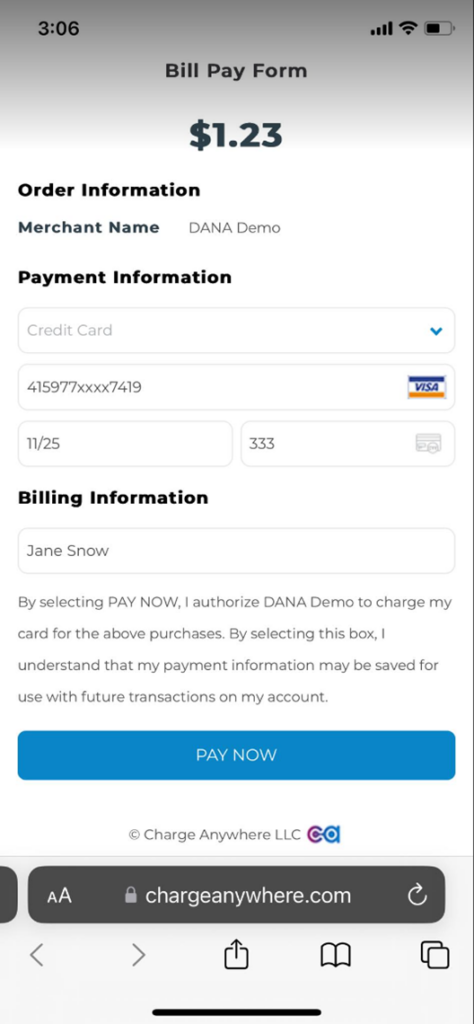
When the customer receives the payment link via SMS, they click the link to open a secure payment page. The page will display the total bill amount and a prompt for them to enter their payment details (credit card or ACH).

Payment Receipts
After the customer makes a payment, they can choose how to receive their receipt:
- Email: The receipt will be sent to the email provided during the payment process.
- SMS Text: The receipt can also be sent as a text message.
- Printed: If they prefer a physical copy, the receipt can be printed.
These options provide flexibility and convenience for the cardholder.

Bills
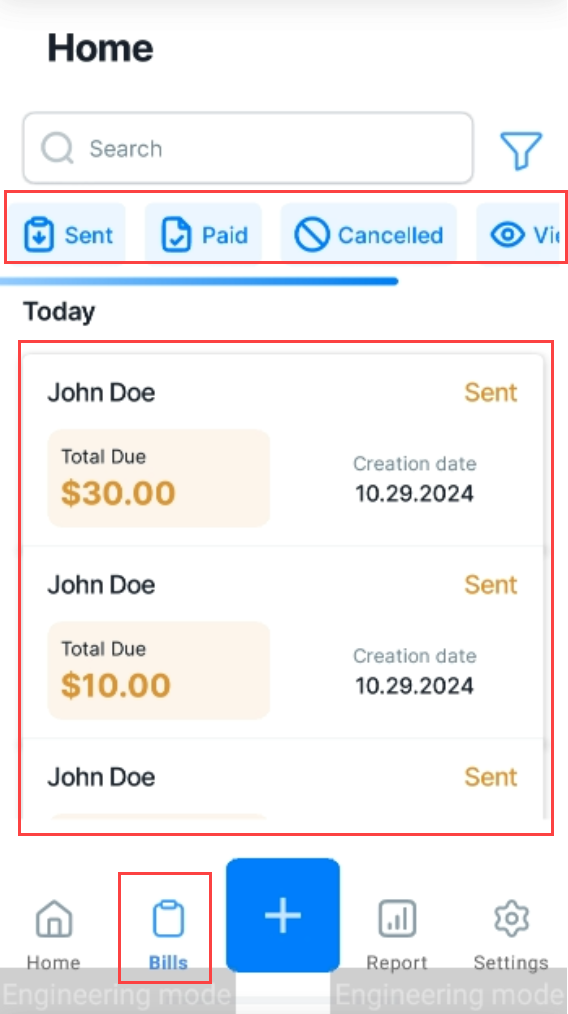
The Bills section is where you can track and manage all bills you’ve created. It provides an overview of your recent bills and allows you to filter and manage them based on their statuses.
1. Accessing the Bills Section
From the home screen, tap the Bills icon located in the bottom navigation bar. You’ll see a list of all the bills, including details such as:
- Customer Name (e.g., John Doe)
- Total Due (e.g., $10.00)
- Creation Date (e.g., 10.26.2024)
- Status (e.g., Sent, Paid, etc.)
2. Bill Statuses
Each bill in the list will have one of the following statuses:
- Sent: The payment link has been sent, but the customer has not yet viewed or paid.
- Viewed: The customer has opened the payment link but hasn’t paid yet.
- Paid: The customer has completed the payment.
- Canceled: The bill has been voided and is no longer valid.
Bill Management
Once you’ve created bills, you can manage them using various actions provided in the Bill Details screen.
1. Viewing Bill Details
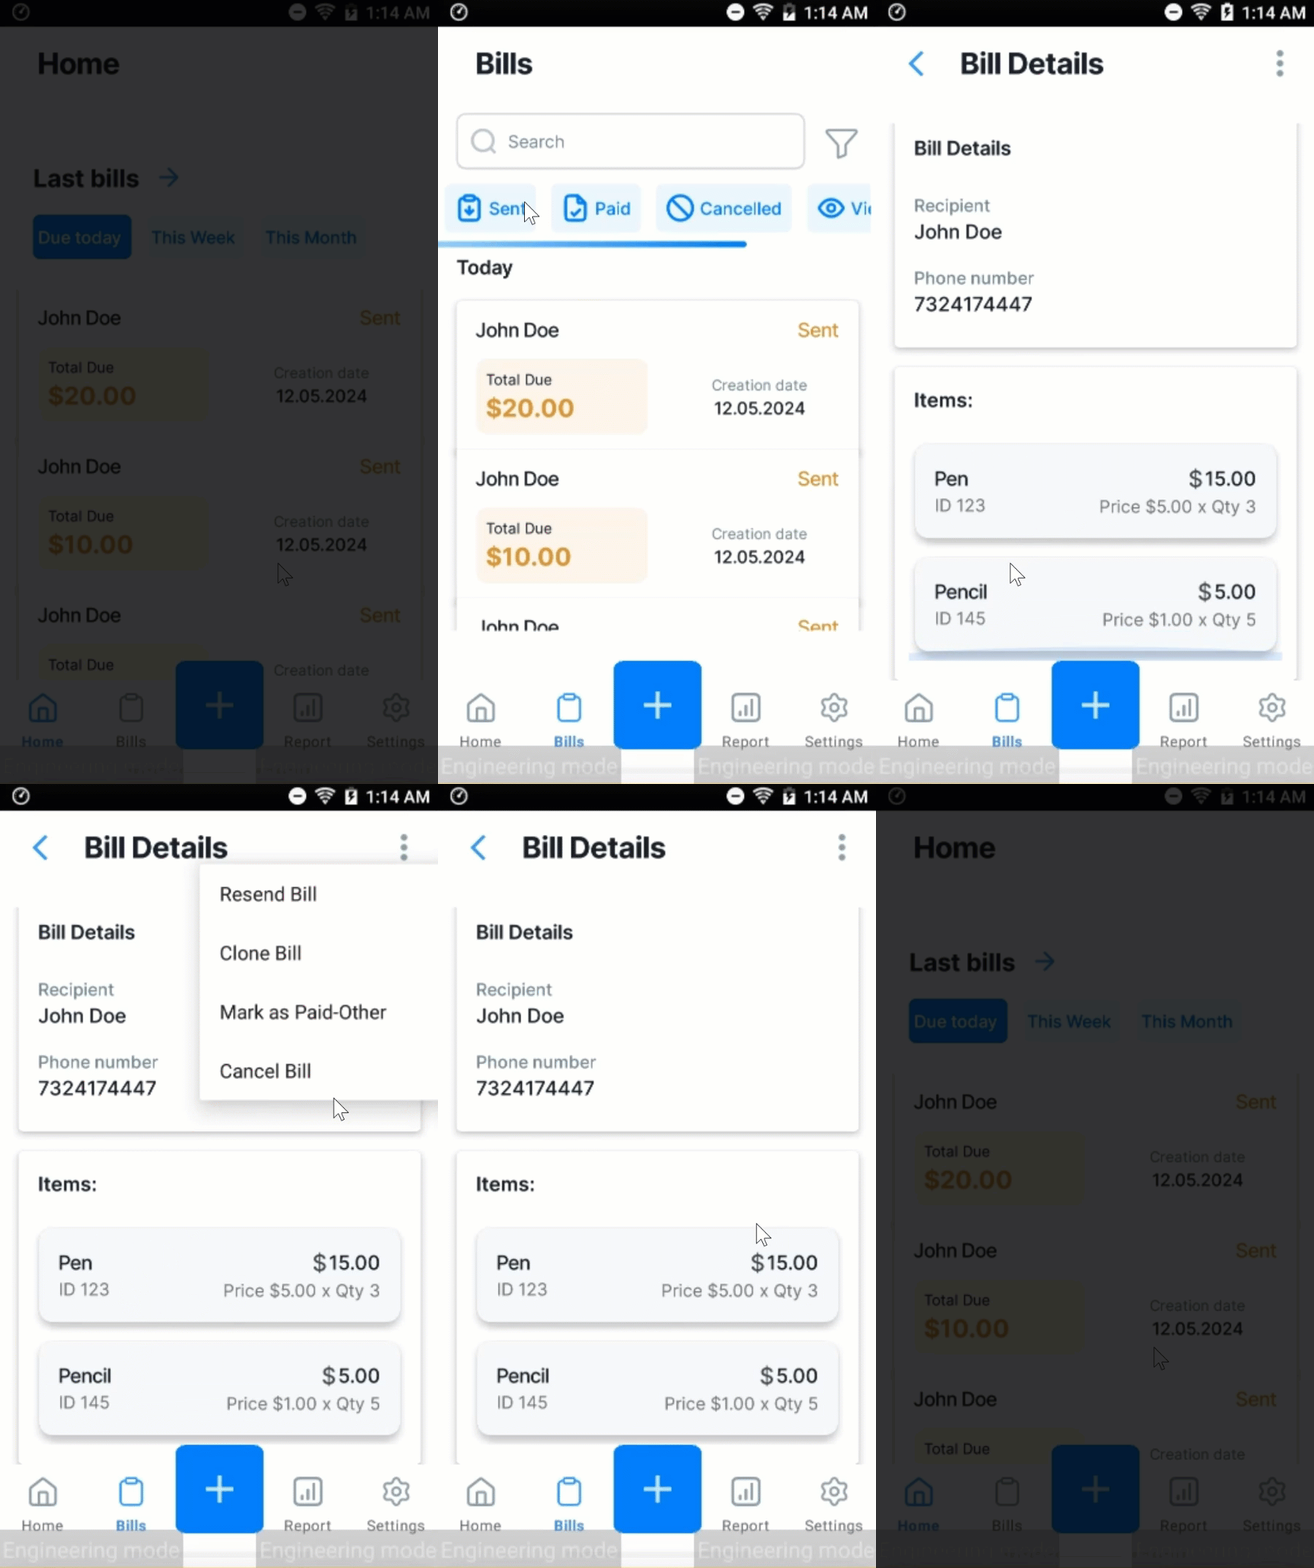
Tap on any bill from the list in the Bills section to open the Bill Details screen. This screen displays:
- Total Due (e.g., $10.00)
- Status (e.g., Sent, Paid, etc.)
- Recipient Name (e.g., John Doe)
- Phone Number
- Items (if it’s an itemized bill, it shows the item name, ID, price, and quantity).
2. Managing Bills (Three-Dot Menu Actions)
In the Bill Details screen, tap the three dots in the top-right corner to view the following actions:
- Resend Bill: Resend the payment link to the customer if they haven’t received or misplaced it.
- Clone Bill: Clone an existing bill to quickly create a similar bill for another customer or for recurring payments.
- Mark as Paid-Other: Mark the bill as paid if the customer has completed the payment through another method (e.g., cash).
- Cancel Bill: Cancel the bill if payment is no longer required or if you’ve made an error.
Filtering and Searching Bills
The Bills section includes powerful filtering and search options to help you quickly find and manage specific bills.
1. Using the Filter Option
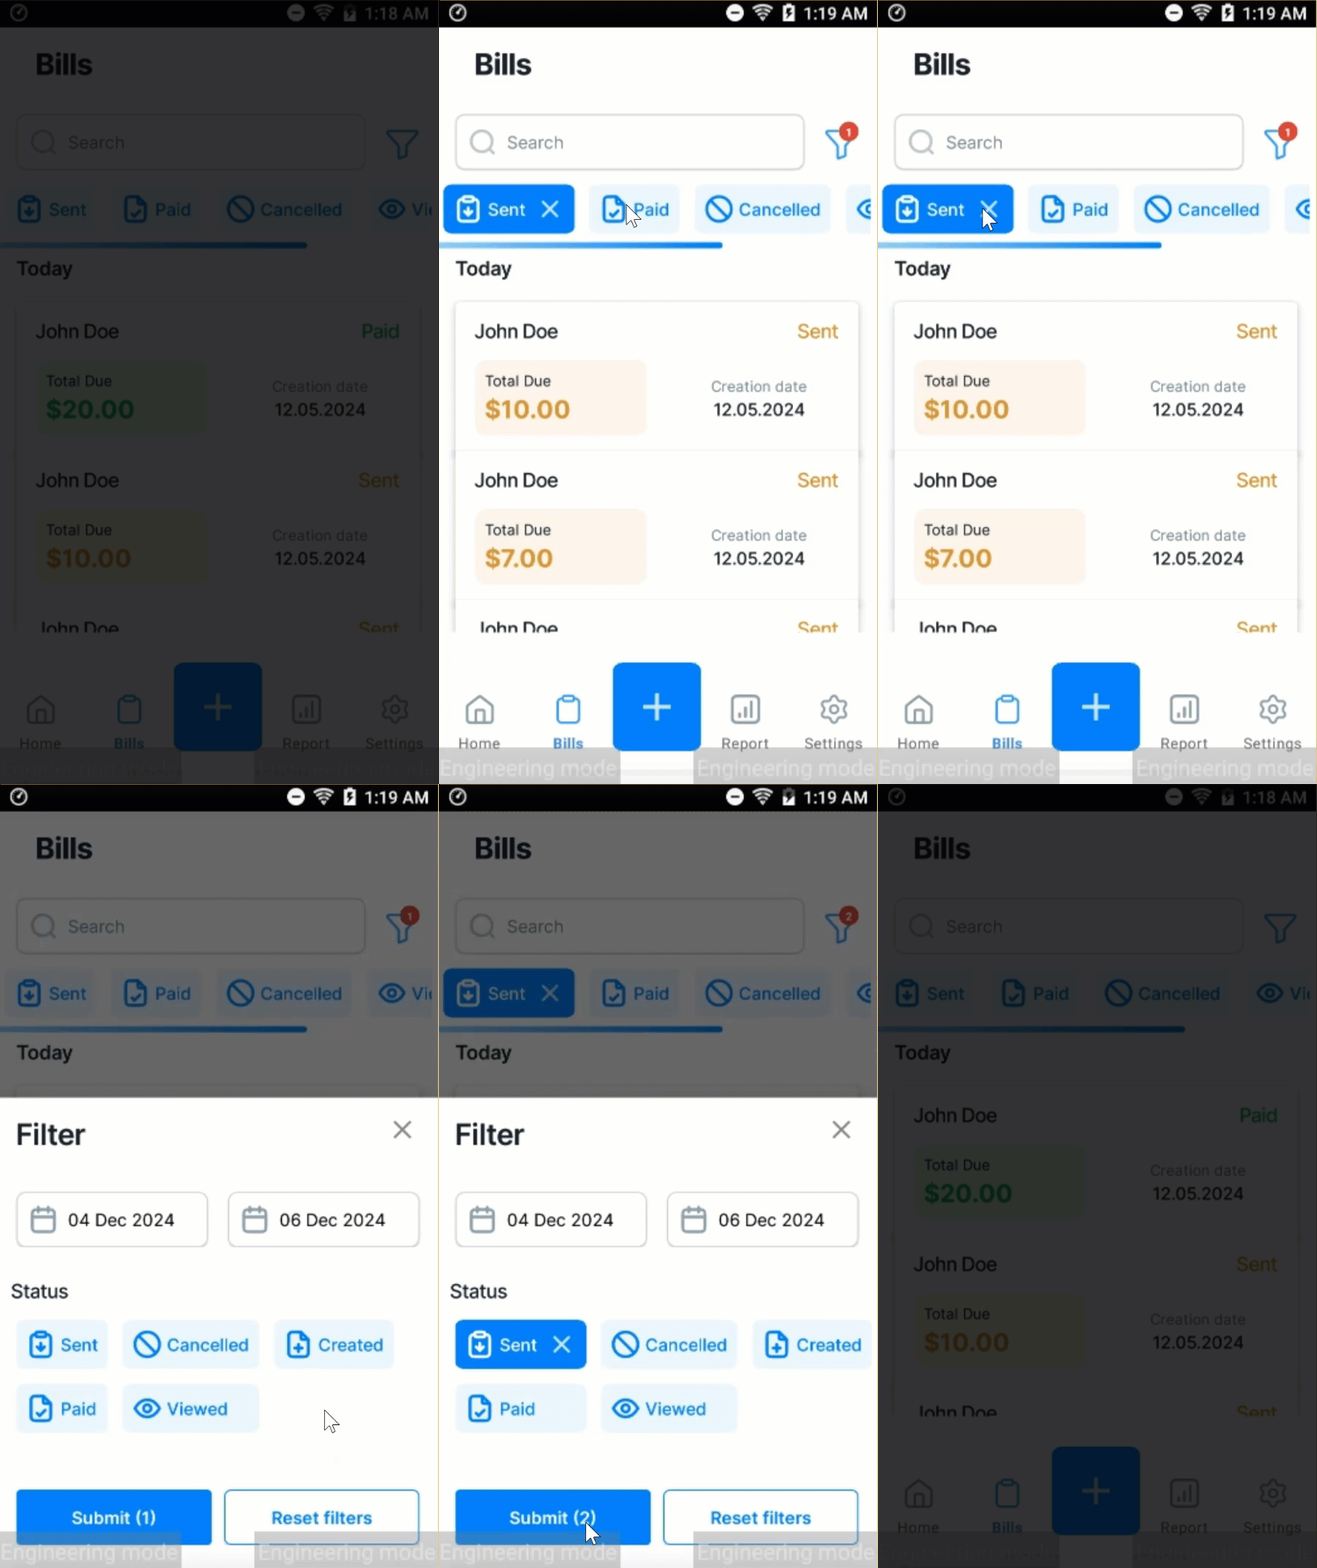
- Tap the Filter icon (funnel symbol) in the top-right corner of the Bills screen.
- The Filter menu allows you to:
- Select a date range (e.g., 26 Oct 2024 to 27 Oct 2024).
- Filter by status, including:
- Sent: Bills that have been sent but not paid.
- Viewed: Bills that have been opened by the customer.
- Paid: Bills that have been fully paid.
- Canceled: Bills that have been voided.
2. Applying Filters
After selecting the date range and statuses, tap Submit to apply the filter. This will narrow down the list of bills shown based on your selected criteria, helping you focus on specific bills.
3. Searching for Bills
Use the Search bar at the top of the Bills screen to search for bills by:
- Customer Name (e.g., John Doe)
- Phone Number
- Bill Amount
This is useful if you need to find a specific bill quickly without browsing through the entire list.
Reports
The Reports section allows merchants to monitor their billing performance by viewing total payments collected over different time periods. It also provides a list of individual bills that can be further examined.
1. Accessing the Reports Section
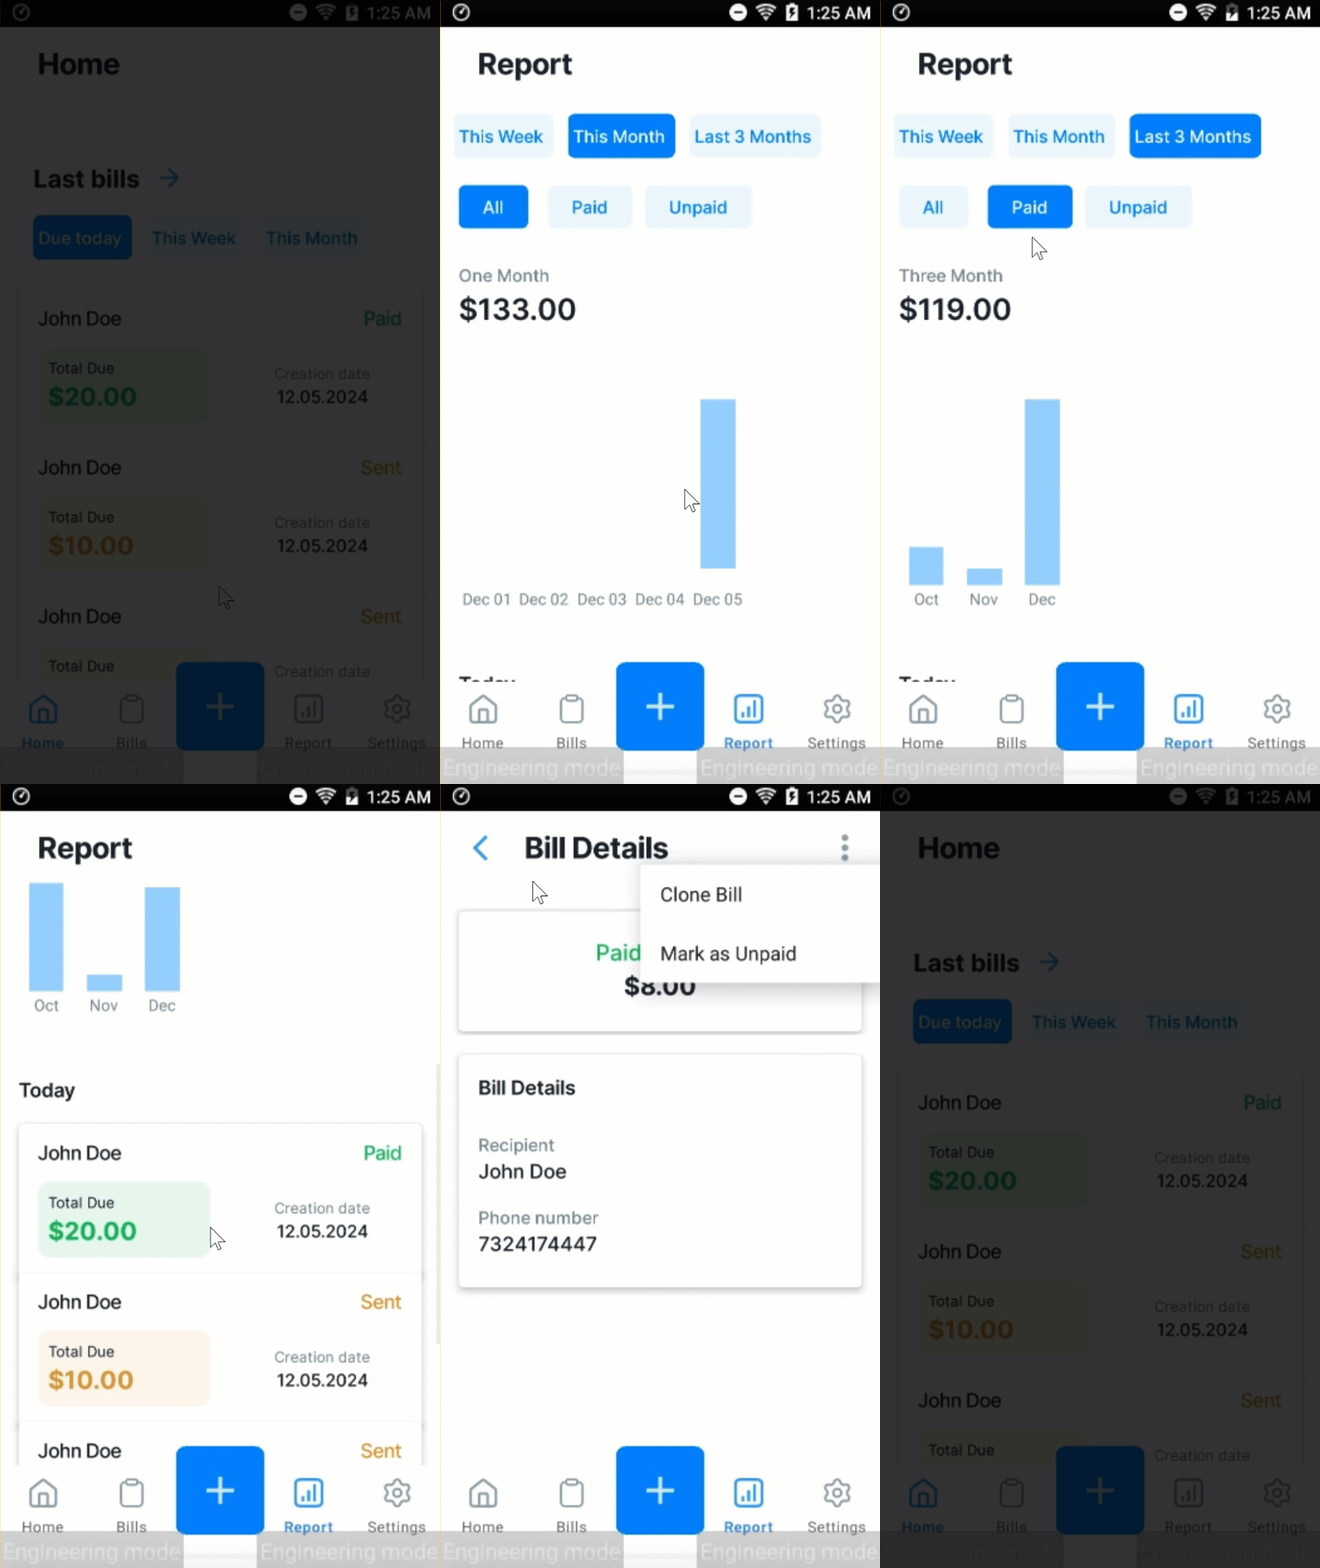
From the home screen, tap the Report icon in the bottom navigation bar. The Reports dashboard provides an overview of your collected payments over various timeframes.
2. Timeframe Options
You can view reports for the following periods:
- This Week: Displays total bills for the current week.
- This Month: Shows bills collected during the current month.
- Last 3 Months: Allows you to see bills over the past three months.
3. Filtering by Payment Status
In addition to timeframes, you can filter the report by payment status:
- All: View all bills, regardless of their payment status.
- Paid: View only bills that have been successfully paid by the customer.
- Unpaid: View bills that are still pending payment.
4. Total Billed Amount
At the top of the Reports section, you’ll see the total amount of bills during the selected period (e.g., $34.00 for the week), with a breakdown of bills created on different days.
5. Viewing Specific Totals in the Graph
In the report graph, users can click on any bar representing a specific duration (day or month) to view the total billed amount for that period.
6. Scrollable List of Bills
Below the graph, you will find a scrollable list of all bills created for the selected period. Each entry in the list shows:
- Customer Name (e.g., John Doe)
- Total Due (e.g., $10.00)
- Bill Creation Date (e.g., 10.26.2024)
- Status (e.g., Sent)
You can scroll through this list to review the bills created in the selected timeframe.
7. Viewing Bill Details
Tap on any bill in the list to view its details. The Bill Details screen will display all relevant information about the bill, including:
- Total Due
- Bill Status
- Recipient’s Name and Phone Number
- Itemized details (if applicable, such as name, price, and quantity for each item)
This feature allows you to quickly access detailed information about individual bills from the report, making it easier to manage and follow up on unpaid or pending bills.
Settings
The Settings section of the Text to Pay app provides options to view app and system information, refresh merchant configuration, unregister from the app, or exit the application. Here’s a detailed guide to each option available in this section.
1. Accessing the Settings Section
Tap the Settings icon on the bottom right of the navigation bar to access various system and application settings.
2. Available Settings Options
- About: Tap the About option to view detailed information about the app, gateway, processor, and hardware:
- App Info: Displays the app name, version number, and app ID (e.g., TEXT TO PAY, Version: 1.0.0.14, App ID: 1).
- Gateway Info: Shows the company ID, company name, identification number, license number, and terminal ID.
- Processor Info: Lists the merchant ID, terminal number, and industry type (e.g., ECommerce).
- Hardware Info: Displays information about the hardware manufacturer (e.g., Samsung).
- Refresh: Tap Refresh to manually refresh the merchant configuration.
- Unregister: Select Unregister if you wish to deregister from the app. The Unregister screen will display the license number and phone number linked to your registration. Tap the Unregister button to confirm and complete the process. After deregistration, you will no longer be associated with the current terminal and will need to re-register if you wish to use the app again.
- Exit App: Tap Exit App to close the Text to Pay application. This will log you out and close the app completely. Use this option when you have finished using the app and want to securely exit the session.

Frequently Asked Questions (FAQs)
1. What happens if the SMS doesn’t reach the customer?
If the SMS payment link doesn’t reach the customer, first verify that the phone number entered is correct. You can also check the customer’s phone settings to ensure they can receive SMS messages. If the problem persists, you can use the Resend Bill option to send the payment link again.
Steps to Resend:
- Go to the Bills section.
- Select the bill you want to resend.
- Tap the three dots in the upper-right corner of the Bill Details screen.
- Select Resend Bill.
2. Can I resend a bill?
Yes, you can resend a bill to a customer if they didn’t receive the payment link or need another reminder. This feature is available in the Bill Details screen under the three-dot menu.
To Resend a Bill:
Select Resend Bill to send the payment link again.
- Navigate to the Bills section.
- Tap on the bill you want to resend.
- Tap the three dots in the top-right corner of the screen.
- Select Resend Bill to send the payment link again.
3. What if I need to edit a bill after sending it?
Once a bill has been sent, it cannot be edited. However, you can cancel the bill and create a new one with the updated information.
To cancel a bill:
- Open the Bills section and tap on the bill you want to cancel.
- Tap the three dots in the upper-right corner of the Bill Details screen.
- Select Cancel Bill.
After canceling the incorrect bill, follow the steps to create a new bill with the correct details.
4. What payment methods does Text to Pay support?
The Text to Pay app supports two primary payment methods:
- Credit/Debit Cards: Customers can securely enter their card details to complete the payment.
- ACH Transfers: Customers can also make payments via Automated Clearing House (ACH), which is a direct bank transfer method.
When the customer clicks the payment link, they’ll be prompted to choose their preferred payment method.
5. What if Text to Pay only reflects Credit/Debit card acceptance and not ACH? How do I request to add ACH services?
Contact your salesperson to request this additional payment method to be added to your setup.
6. How long are bills valid after sending?
Bills remain valid until they are either paid or canceled by the merchant. There is no automatic expiration date for a bill, allowing customers to pay at their convenience. However, it is good practice to follow up with the customer if a bill remains unpaid for an extended period.
Note: To know the list of predefined trigger values that can be used to test various transaction responses within Charge Anywhere, refer to the Trigger Values for Testing Transactions guide.
Conclusion
The Text to Pay app simplifies billing and payment processes for both merchants and customers. By following the steps outlined in this guide, merchants can efficiently manage payments, track bills, and provide customers with flexible payment and receipt options. This app ensures that businesses can save time, reduce errors, and provide an improved payment experience for their customers.