1. Introduction
QuickSale 1.0 by Charge Anywhere is a payment app designed to help businesses simplify their payment processing. The software offers a range of features and benefits that help businesses streamline their operations and enhance customer experience.
Explore the QuickSale Semi Release Notes for a detailed breakdown of the latest features, system enhancements, bug fixes, feature deprecations, and much more.
Quick Navigation: To see a chronological history of all recent changes, please view the Change Log at the bottom of this document.
1.2 System Requirements
To use QuickSale 1.0 by Charge Anywhere (Android App), the following system requirements must be met:
- Operating system: Android 5.0 or higher
- Processor: 1 GHz or higher
- Memory: 1 GB RAM or higher
- Hard drive space: 10 MB or higher
- Screen resolution: 800 x 480 or higher
- Internet connectivity: Broadband recommended for cloud-based solutions.
2. Registration
2.1 Getting Started
Open the app on your device. You will see a screen with a submit button and a prompt to enter your credentials to register.
2.2 Credentials
If you already have an account, enter your credentials to register and log into the production account. This typically includes a license number and your phone number. To ensure a successful registration process, please ensure that the credentials you enter are accurate, as incorrect information may prevent you from accessing the app.
Contact support at support@chargeanywhere.com to get the license number if you don’t have the license number already.
2.3 Submit
Click Submit to register and log into your account.
3. QuickSale


QuickSale 1.0 provides a user-friendly point-of-sale interface that allows users to process transactions quickly and easily. The basic layout and functionality of the interface include the following elements:
- Name: The cardholder’s name as it appears on the payment card.
- Card#: The unique number assigned to the payment card.
- ExpDate: The expiration date of the payment card, indicating the month and year when the card will expire and can no longer be used for transactions.
- CVVI: This further has 3 options, Want to Bypass, Value illegible, and Not On Card, which doesn’t require entering the CVVI code. However apart from fore mentioned options, to enter a value, the user can select Value Entered.
- Clerk#: Identification number of the employee processing the sale.
- Amount: Total cost of purchased items, excluding discounts.
- Tax Amount: Additional amount based on the tax rate.
- Grand Total: Total amount to be paid, including taxes and fees.
With these elements, users can quickly and easily process transactions, enter customer information, and process payments with a high degree of accuracy and efficiency. The interface is designed to be intuitive and user-friendly, making it easy for even novice users to get up and running quickly.
3.1 Steps to process a Quick Sale
- Open the Charge Anywhere QuickSale 1.0 app on your device.
- Select Quick Sale.
- Enter the amount to be charged, and other information, and click the Submit button.
- Tap the card on the machine to process the transaction.
- Review the transaction details on the confirmation screen and click Yes to proceed.
- Once the payment is approved, you will receive a confirmation message Transaction Approved.
- Click OK.
- A pop-up screen will appear with the following options:
- Print Merchant Copy
- Print Customer Copy
- SMS
- Click Print Options to print the receipt and enter the customer’s email and phone to send the receipt to the customer.
Note: If desired, you can customize the header and footer of the receipt by going toConfiguration > Set Up Options > Optional Prompts > Receipt Options. - Finally, click Done to complete the transaction.
4. Transactions
QuickSale 1.0 supports a variety of payment types, including cash, checks, credit and debit cards, gift and loyalty cards, ACH/eCheck, EBT cash, and EBT food stamps. To process a payment, users can select the appropriate payment type from the point of sale interface, enter the payment amount, and complete the transaction. QuickSale 1.0 also includes features for processing refunds and returns, as well as voiding transactions that were not completed. With these capabilities, users can manage a wide range of payment scenarios, ensuring that transactions are completed quickly and accurately, and providing customers with the flexibility and convenience they expect in today’s fast-paced retail environment.
Note: To know the list of predefined trigger values that can be used to test various transaction responses within Charge Anywhere, refer to the Trigger Values for Testing Transactions guide.
For a comprehensive guide on all valid response codes (including AVS and CVV), transaction types, and a detailed explanation of Transaction Reversal reasons, please see our master list of Transaction Responses and Codes.
4.1 Cash
Cash is the physical currency used as a medium of exchange for goods and services. It is the most traditional and widely accepted form of payment.
4.1.1 Sale
Sale refers to a cash transaction where a customer purchases goods or services from a business.
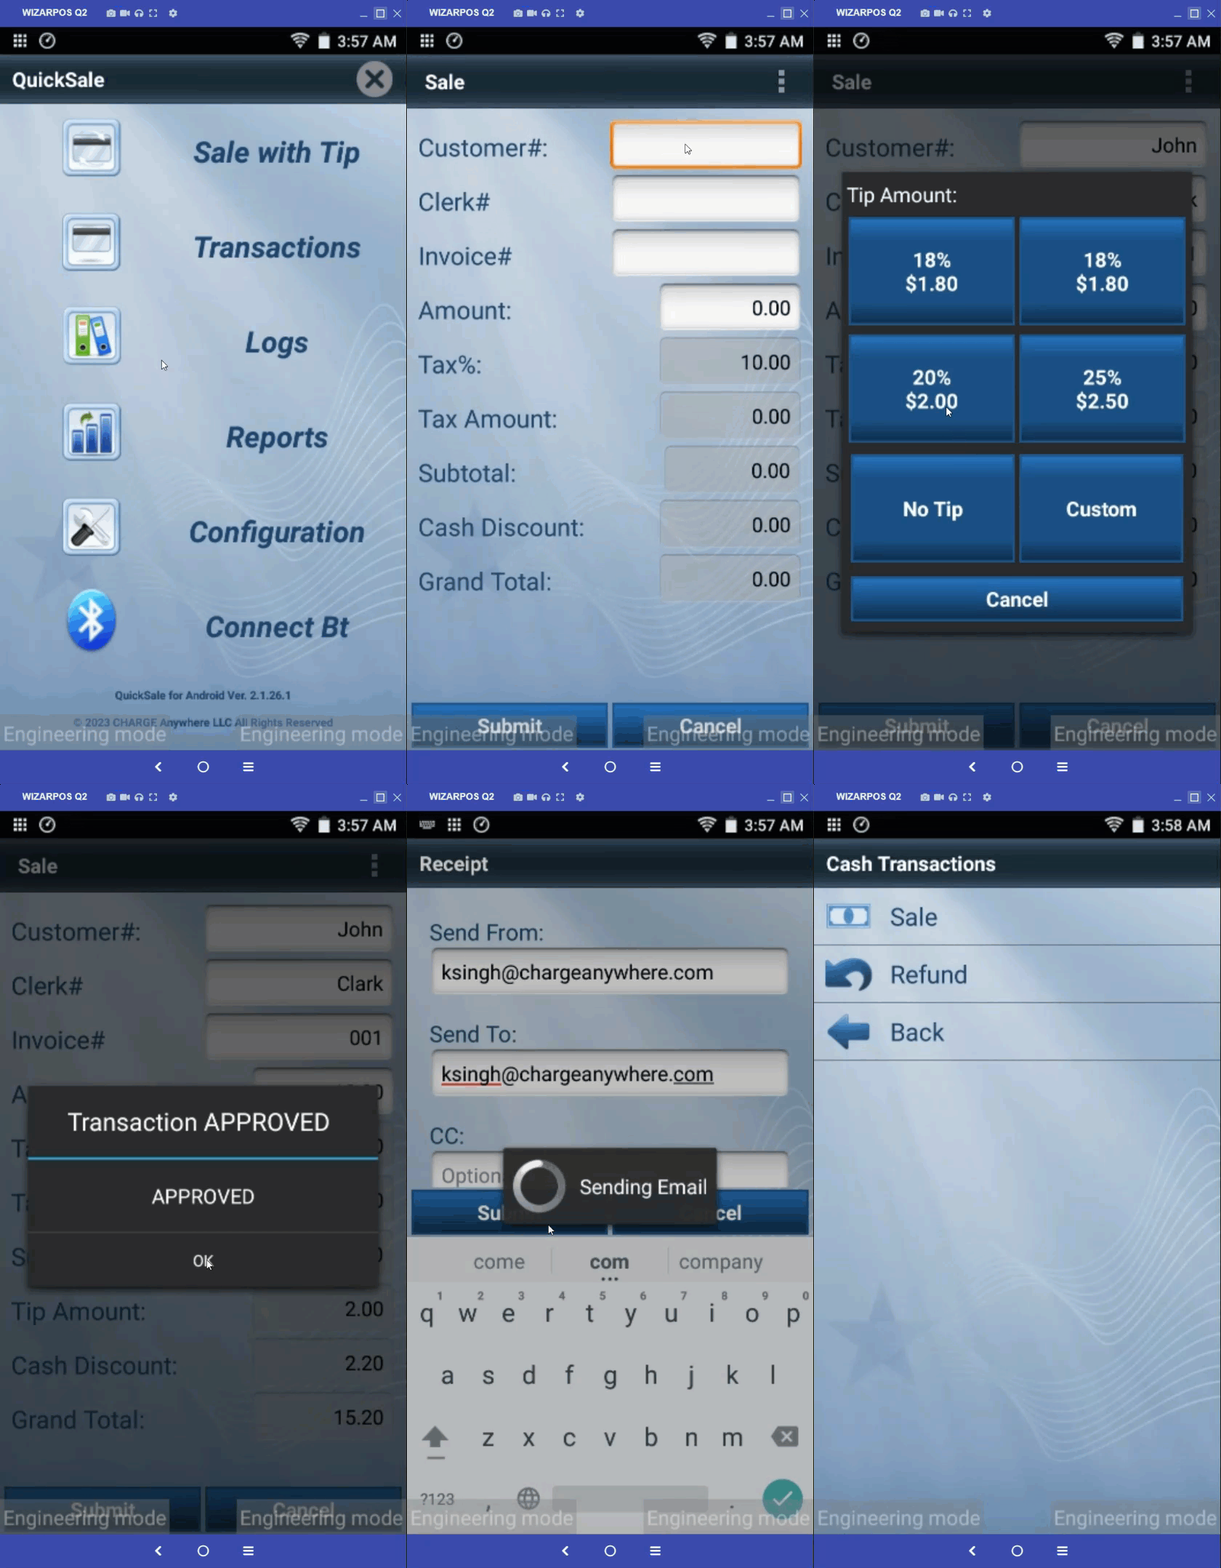
- Navigate to the Transactions section and choose Cash from the menu.
- Select Sale from the menu.
- After entering the amount to be charged and other details, click the Submit button.
- Select the Tip Amount if applicable.
Note: You can enable/disable the Tip Amount by going to Configuration. - Review the transaction details on the confirmation screen and click Yes to proceed.
- Once the payment is approved, you will receive a confirmation message Transaction Approved.
- Click OK.
- A pop-up screen will appear with the following options:
- Print Merchant Copy
- Print Customer Copy
- SMS
- Click Print Options to print the receipt and enter the customer’s email and phone to send the receipt to the customer.
Note: If desired, you can customize the header and footer of the receipt by going toConfiguration > Set Up Options > Optional Prompts > Receipt Options. - Finally, click Done to complete the transaction.
4.1.2 Refund
A transaction where the customer returns a previously purchased item and receives a reimbursement.
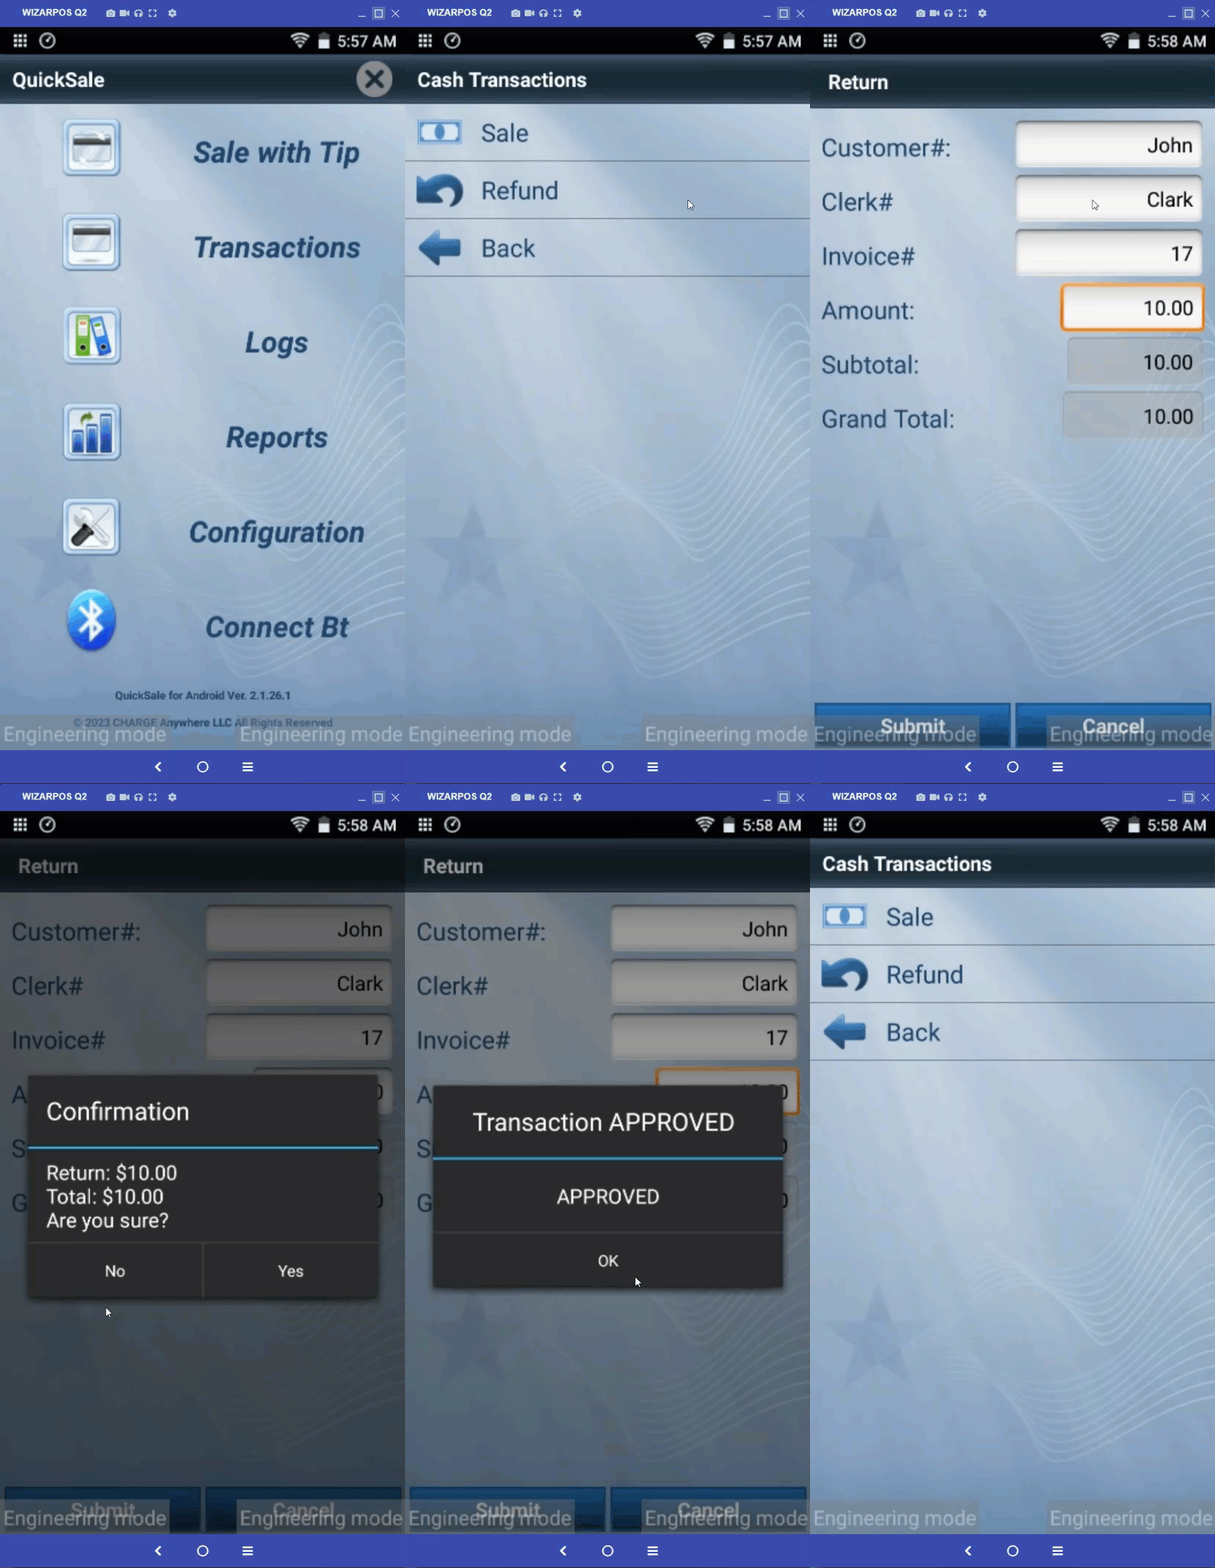
- Navigate to the Transactions section and choose Cash from the menu.
- Select Refund from the menu.
- After entering the amount to be refunded and other details, click Submit.
- Select the Tip Amount if applicable.
- Review the transaction details on the confirmation screen and click Yes to proceed.
- Once the return is approved, you will receive a confirmation message Transaction Approved.
- Click OK.
- A pop-up screen will appear with the following options:
- Print Merchant Copy
- Print Customer Copy
- SMS
- Click Print Options to print the receipt and enter the customer’s email and phone to send the receipt to the customer.
- Finally, click Done to complete the transaction.
4.2 Check
A check is a written document that instructs a bank or credit union to pay a specific amount of money to the person or entity named on the check. The person writing the check must have sufficient funds in their account to cover the amount written on the check.


- Check#: A unique number assigned to a check for identification and tracking purposes.
- Clerk#: Identification number of the employee processing the sale.
- Amount: Total cost of purchased items, excluding discounts.
- Tax Amount: Additional amount based on the tax rate.
- Grand Total: Total amount to be paid, including taxes and fees.
4.2.1 Steps to process a Transaction through Check
- Navigate to the Transactions section and choose Check from the menu.
- Enter Check#, Clerk#, Amount, and Tax; and click the Submit button.
- Review the transaction details on the confirmation screen and click Yes to proceed.
- Once the payment is approved, you will receive a confirmation message Transaction Approved.
- Click OK and ask the customer to enter their email.
- Finally, click the Submit button to send the sale receipt directly to the customer’s email. If desired, you can customize the header and footer of the receipt by going to
Configuration > Set Up Options > Optional Prompts > Receipt Options.
4.3 Credit
A credit card is a plastic card issued by a financial institution that allows the cardholder to borrow money to make purchases. The cardholder must pay back the borrowed amount plus interest to the financial institution.
4.3.1 Sale
Sale refers to a credit card transaction where a customer purchases goods or services from a business.
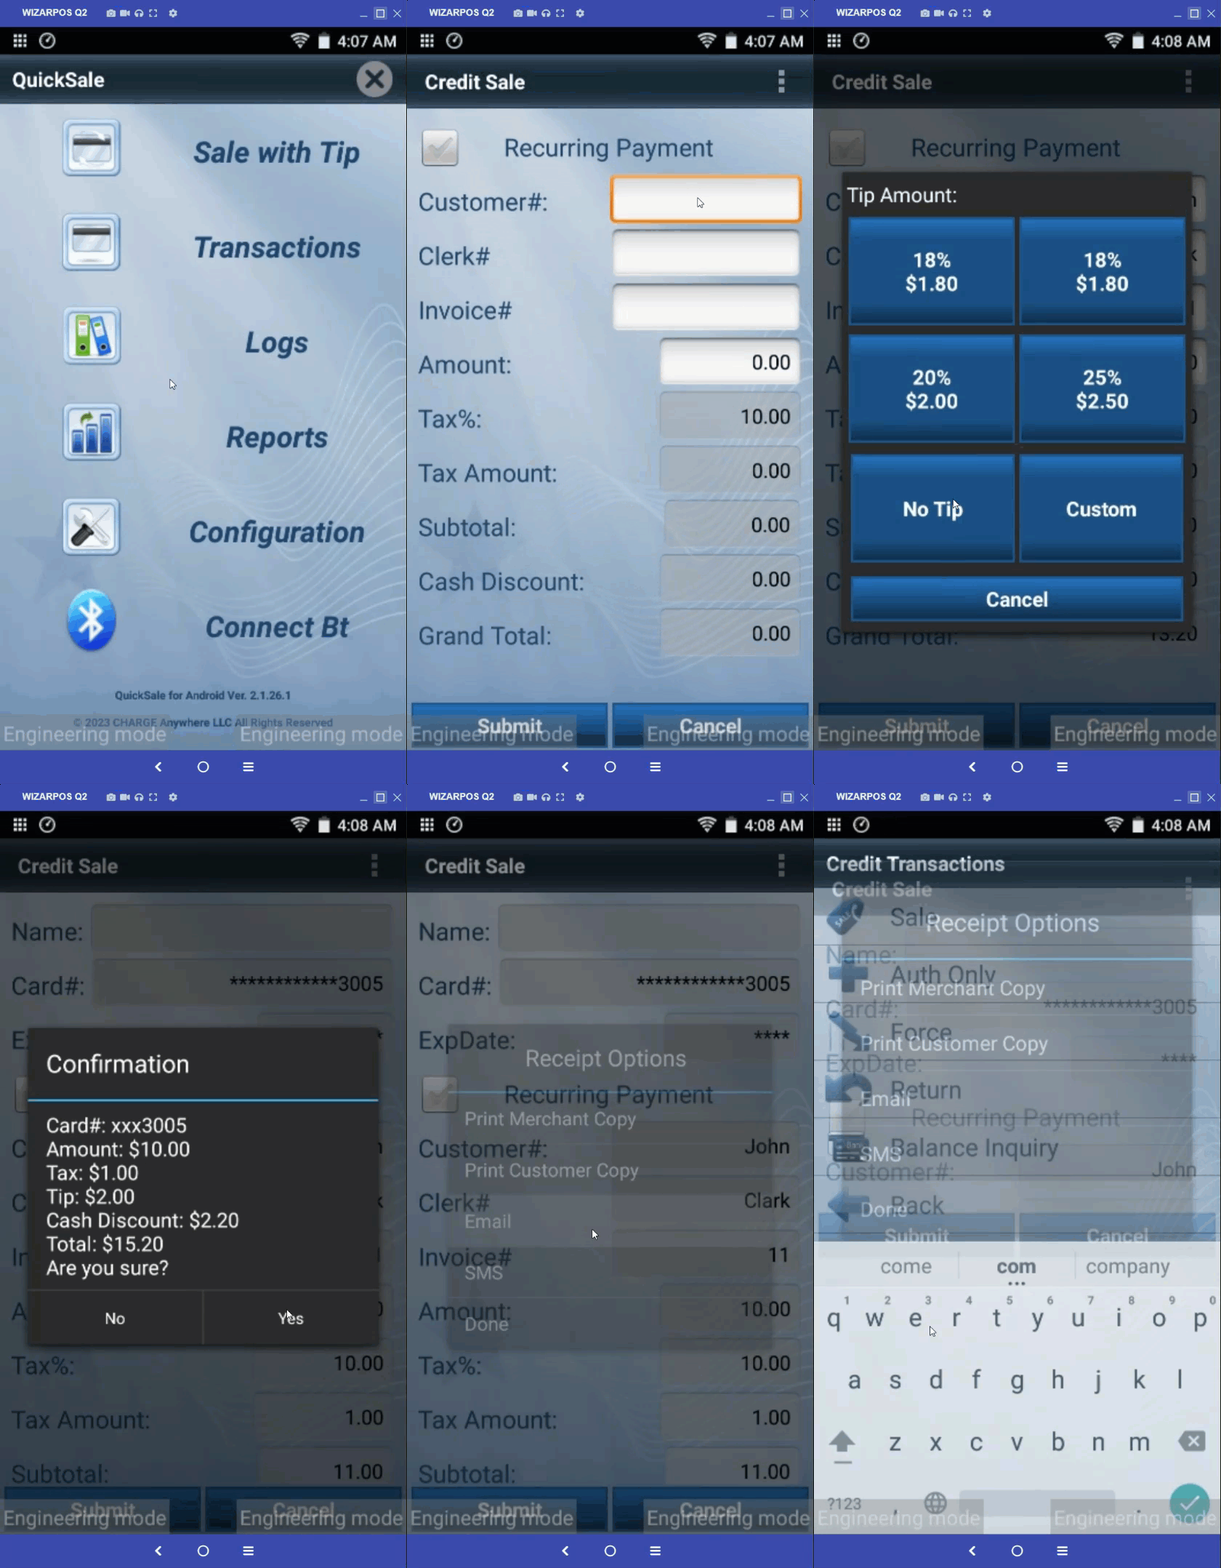
- Navigate to the Transactions section and choose Credit from the menu.
- Select Sale from the menu.
- After entering the amount to be charged and other details, click the Submit button.
- Select the Tip Amount if applicable.
Note: You can enable/disable the Tip Amount by going to Configuration. - Tap the card on the machine to process the transaction.
- Review the transaction details on the confirmation screen and click Yes to proceed.
- Once the payment is approved, you will receive a confirmation message Transaction Approved.
- Click OK.
- A pop-up screen will appear with the following options:
- Print Merchant Copy
- Print Customer Copy
- SMS
- Click Print Options to print the receipt and enter the customer’s email and phone to send the receipt to the customer.
Note: If desired, you can customize the header and footer of the receipt by going toConfiguration > Set Up Options > Optional Prompts > Receipt Options. - Finally, click Done to complete the transaction.
4.3.2 Auth Only
Auth Only is the process of obtaining approval from a cardholder’s bank for a transaction. The merchant requests authorization from the bank by submitting transaction details to Charge Anywhere. If successful, an authorization code is received, allowing the merchant to proceed with the transaction.
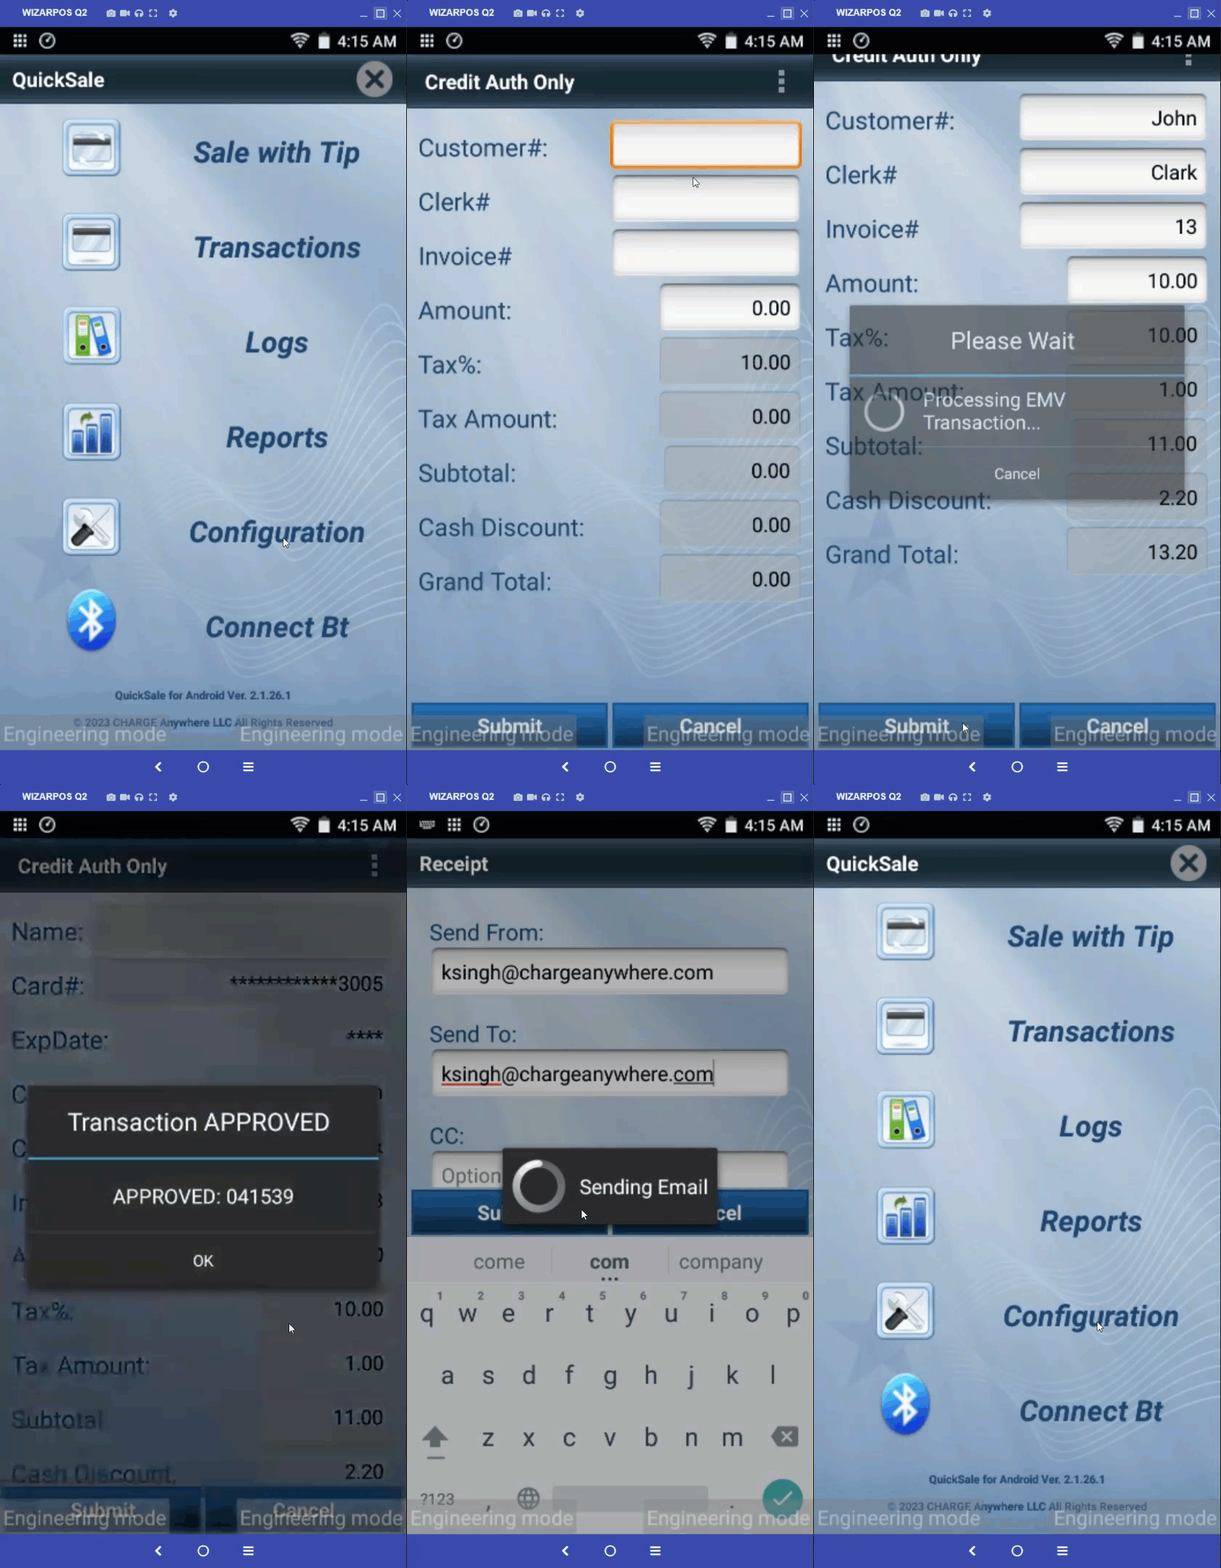
- Navigate to the Transactions section and choose Credit from the menu.
- Select Auth Only from the menu.
- After entering the amount to be charged and other details, click the Submit button.
- Select the Tip Amount if applicable.
- Tap the card on the machine to process the transaction.
- Review the transaction details on the confirmation screen and click Yes to proceed.
- Once the Auth is approved, you will receive a confirmation message Transaction Approved.
- Click OK.
- A pop-up screen will appear with the following options:
- Print Merchant Copy
- Print Customer Copy
- SMS
- Click Print Options to print the receipt and enter the customer’s email and phone to send the receipt to the customer.
- Finally, click Done to complete the transaction.
Note: Authorize receipt will contain the approval code which is required at the time of implementing Capture (Force) from a card.
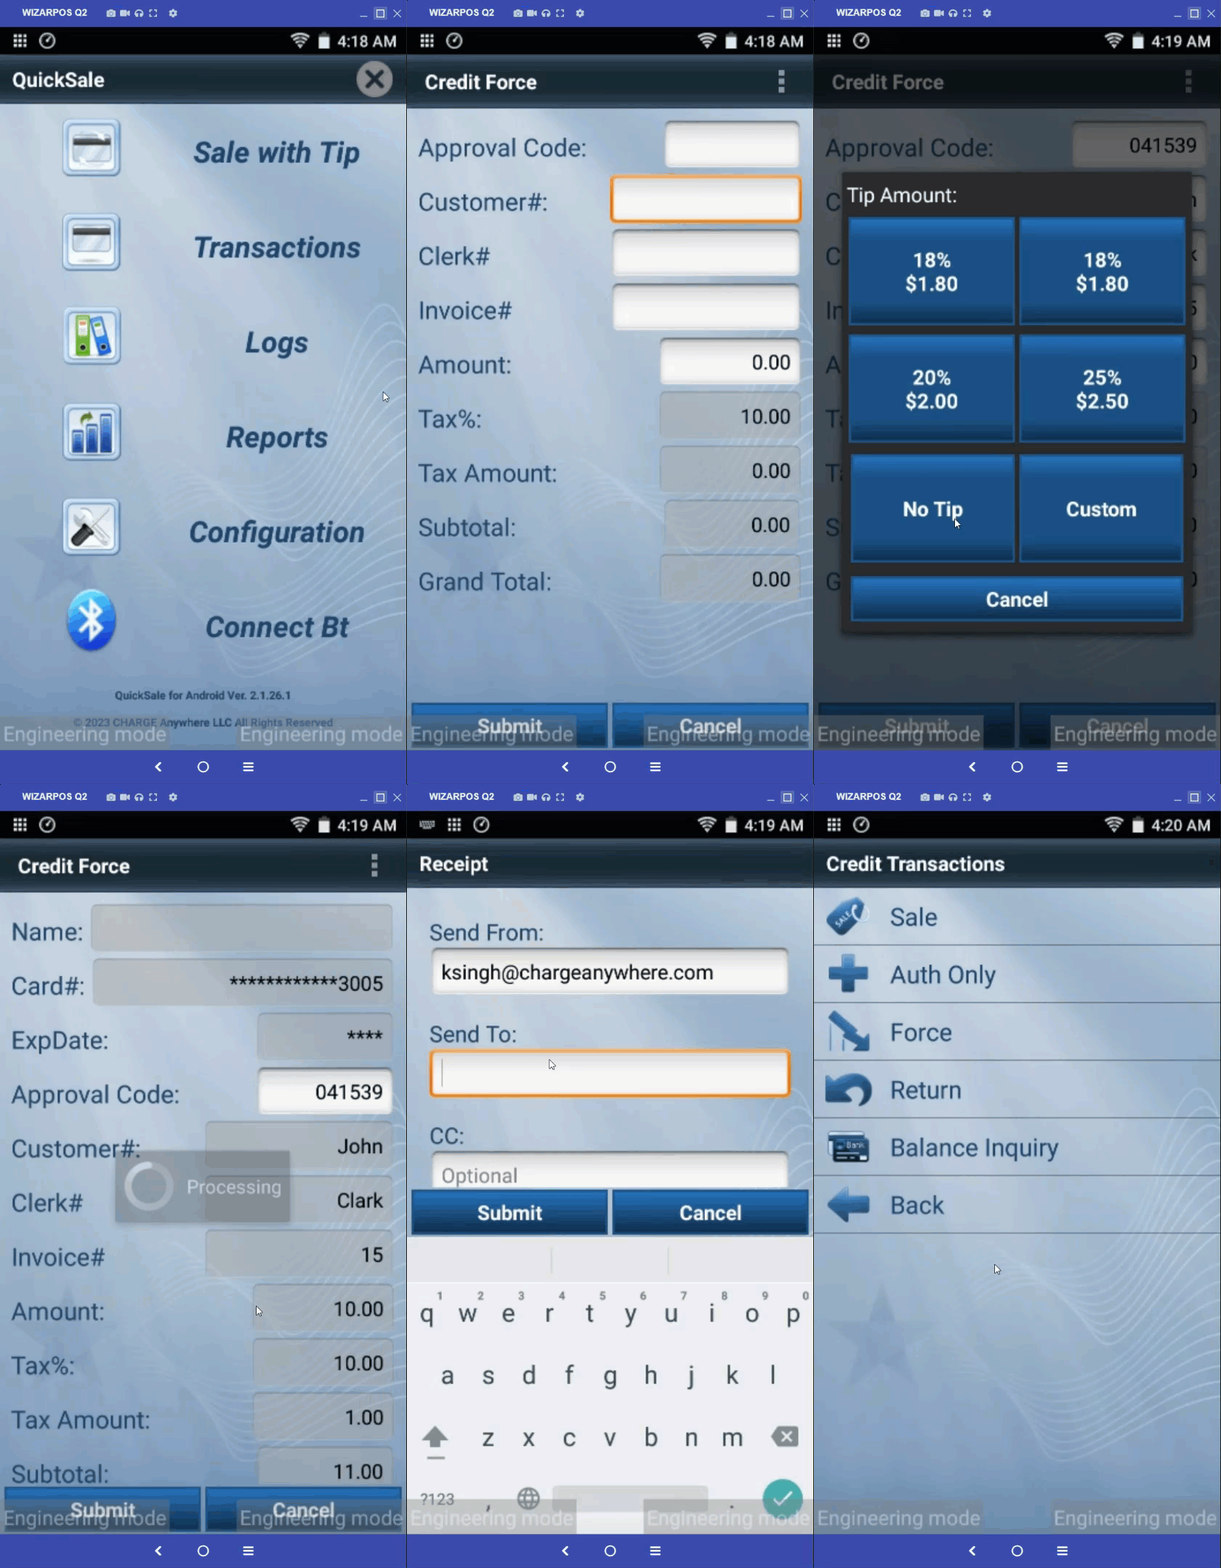
4.3.3 Force (Capture)
Force is the process of transferring the authorized funds from a customer’s account to a merchant’s account. When a customer makes a payment using a credit or debit card, the payment must be authorized by the cardholder’s bank to ensure that they have sufficient funds or credit limit to complete the transaction. Once the payment is authorized, the transaction is typically held in a “pending” status until the merchant captures the funds.
- Navigate to the Transactions section and choose Credit from the menu.
- Select Force from the menu.
- After entering the Approval code, amount to be charged, and other details, click the Submit button.
Note: Approval code will be sent to the customer’s email during Auth only transaction. - Select the Tip Amount if applicable.
- Tap the card on the machine to process the transaction.
- Review the transaction details on the confirmation screen and click Yes to proceed.
- Once the payment is approved, you will receive a confirmation message Transaction Approved.
- Click OK.
- A pop-up screen will appear with the following options:
- Print Merchant Copy
- Print Customer Copy
- SMS
- Click Print Options to print the receipt and enter the customer’s email and phone to send the receipt to the customer.
- Finally, click Done to complete the transaction.
4.3.4 Return
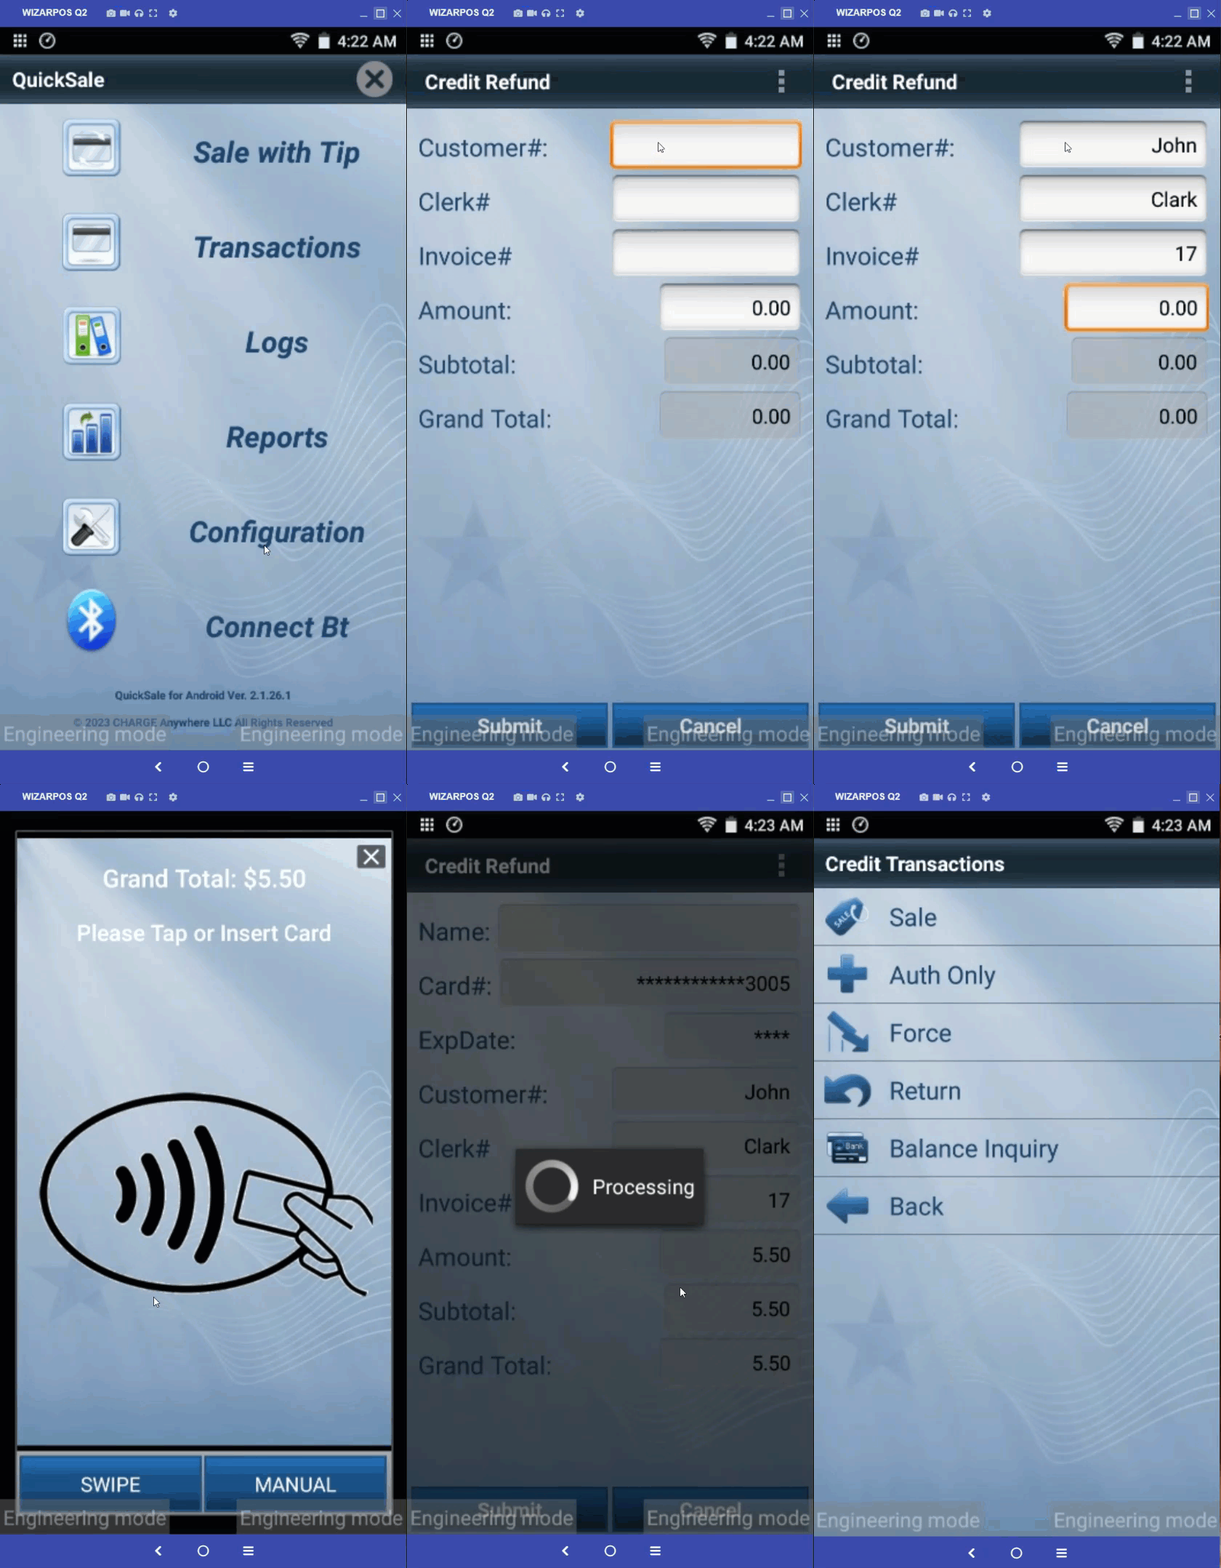
It is a process of returning the payment made by a customer for a product or service that they are not satisfied with or have returned. It involves issuing a credit or refund to the customer’s account, which could be in the form of cash, check, or a reversal of a credit or debit card transaction.
- Navigate to the Transactions section and choose Credit from the menu.
- Select Return from the menu.
- After entering the amount to be refunded and other details, click the Submit button.
- Select the Tip Amount if applicable.
- Tap the card on the machine to process the transaction.
- Review the transaction details on the confirmation screen and click Yes to proceed.
- Once the payment is approved, you will receive a confirmation message Transaction Approved.
- Click OK.
- A pop-up screen will appear with the following options:
- Print Merchant Copy
- Print Customer Copy
- SMS
- Click Print Options to print the receipt and enter the customer’s email and phone to send the receipt to the customer.
- Finally, click Done to complete the transaction.
4.3.5 Balance Inquiry
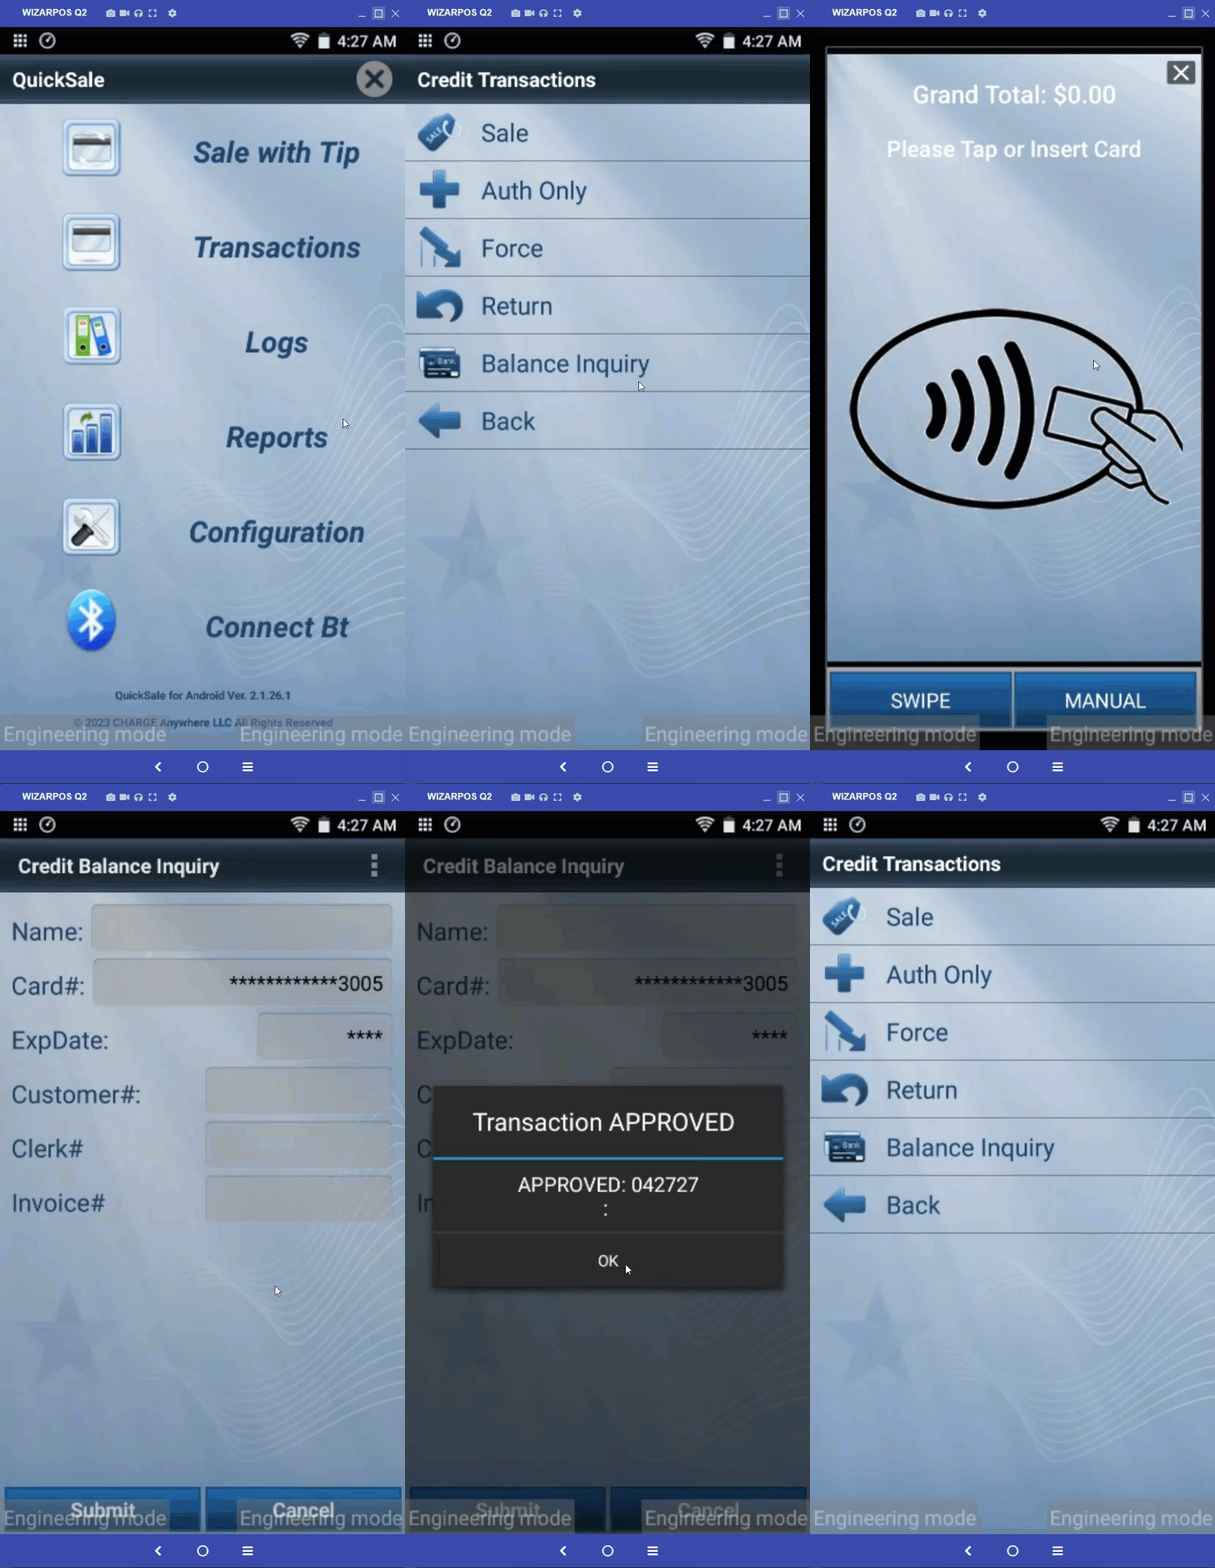
This transaction type allows the user to check the available limit on their credit card. The app will communicate with the bank or financial institution to retrieve the balance information and display it to the user.
- Navigate to the Transactions section and choose Credit from the menu.
- Select Balance Inquiry from the menu.
- Tap the card on the machine to process the transaction.
- Review the transaction details on the confirmation screen and click Yes to proceed.
- Once approved, you will receive a confirmation message Transaction Approved.
- Click OK.
- A pop-up screen will appear with the following options:
- Print Merchant Copy
- Print Customer Copy
- SMS
- Click Print Options to print the receipt and enter the customer’s email and phone to send the receipt to the customer.
- Finally, click Done to complete the transaction.
4.4 Gift/Loyalty
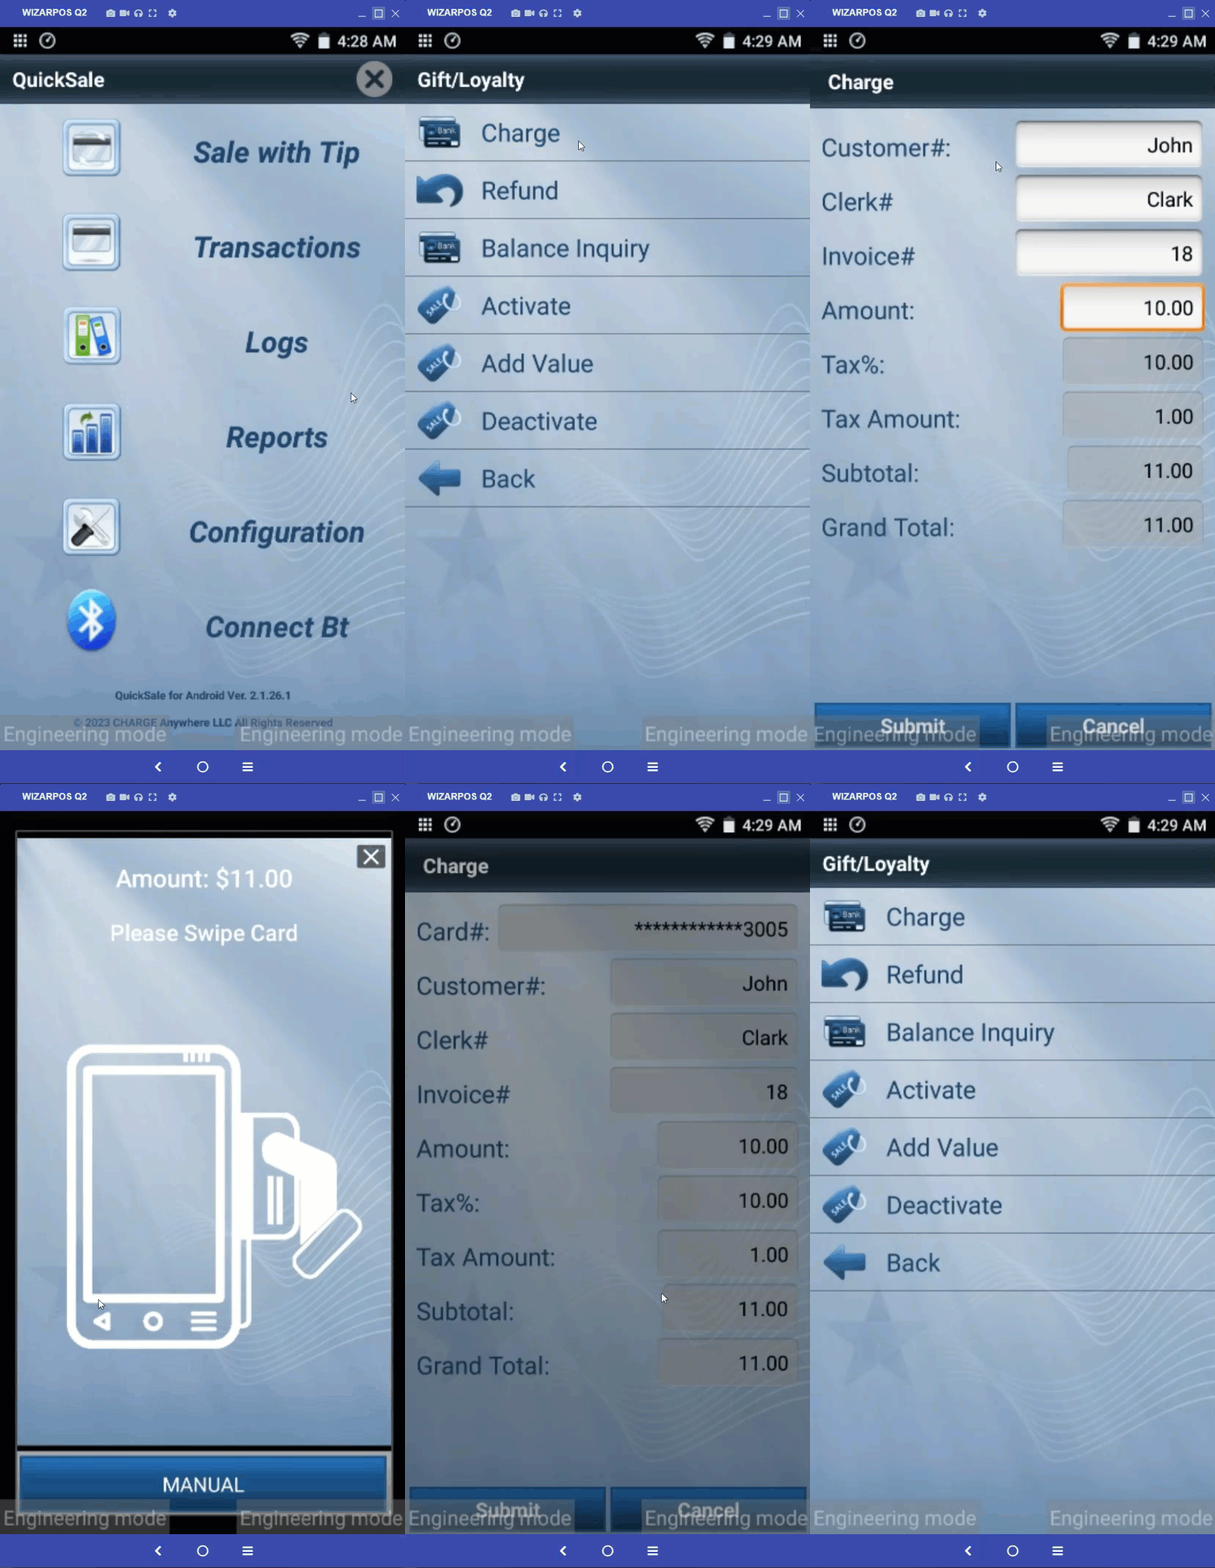
Gift and loyalty cards are prepaid cards that can be used as a form of payment at specific merchants. Gift cards are typically given as a gift and can be used to purchase goods or services.
- Navigate to the Transactions section and choose Gift/Loyalty from the menu.
- Select Charge from the menu.
- After entering the amount to be charged and other details, click the Submit button.
- Select the Tip Amount if applicable.
Note: You can enable/disable the Tip Amount by going to Configuration. - Swipe the card on the machine to process the transaction.
- Review the transaction details on the confirmation screen and click Yes to proceed.
- Once the payment is approved, you will receive a confirmation message Transaction Approved.
- Click OK.
- A pop-up screen will appear with the following options:
- Print Merchant Copy
- Print Customer Copy
- SMS
- Click Print Options to print the receipt and enter the customer’s email and phone to send the receipt to the customer.
Note: If desired, you can customize the header and footer of the receipt by going toConfiguration > Set Up Options > Optional Prompts > Receipt Options. - Finally, click Done to complete the transaction.
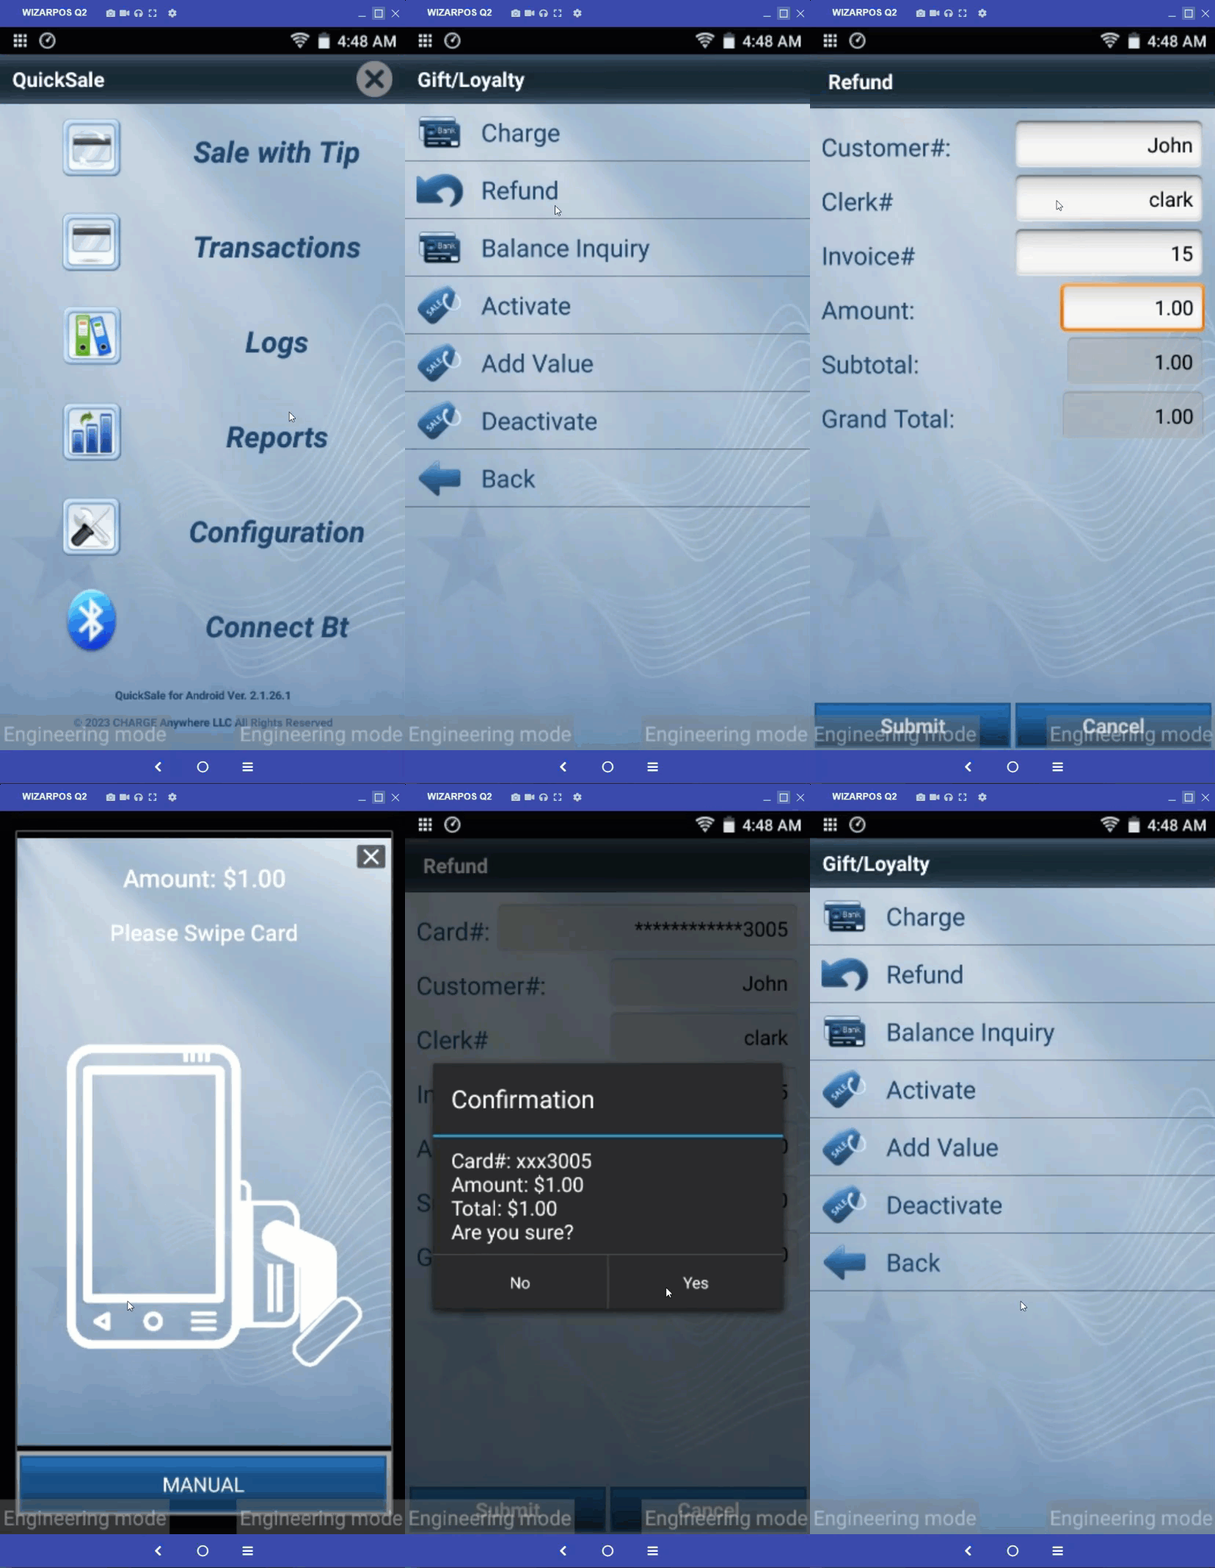
4.4.2 Refund
For a refund transaction, the necessary details are the gift card number, clerk identification number, item cost (excluding discounts), and the grand total to be refunded.
- Navigate to the Transactions section and choose Gift/Loyalty from the menu.
- Select Refund from the menu.
- After entering the amount to be refunded and other details, click the Submit button.
- Select the Tip Amount if applicable.
- Swipe the card on the machine to process the transaction.
- Review the transaction details on the confirmation screen and click Yes to proceed.
- Once the payment is approved, you will receive a confirmation message Transaction Approved.
- Click OK.
- A pop-up screen will appear with the following options:
- Print Merchant Copy
- Print Customer Copy
- SMS
- Click Print Options to print the receipt and enter the customer’s email and phone to send the receipt to the customer.
- Finally, click Done to complete the transaction.
4.4.3 Balance Inquiry
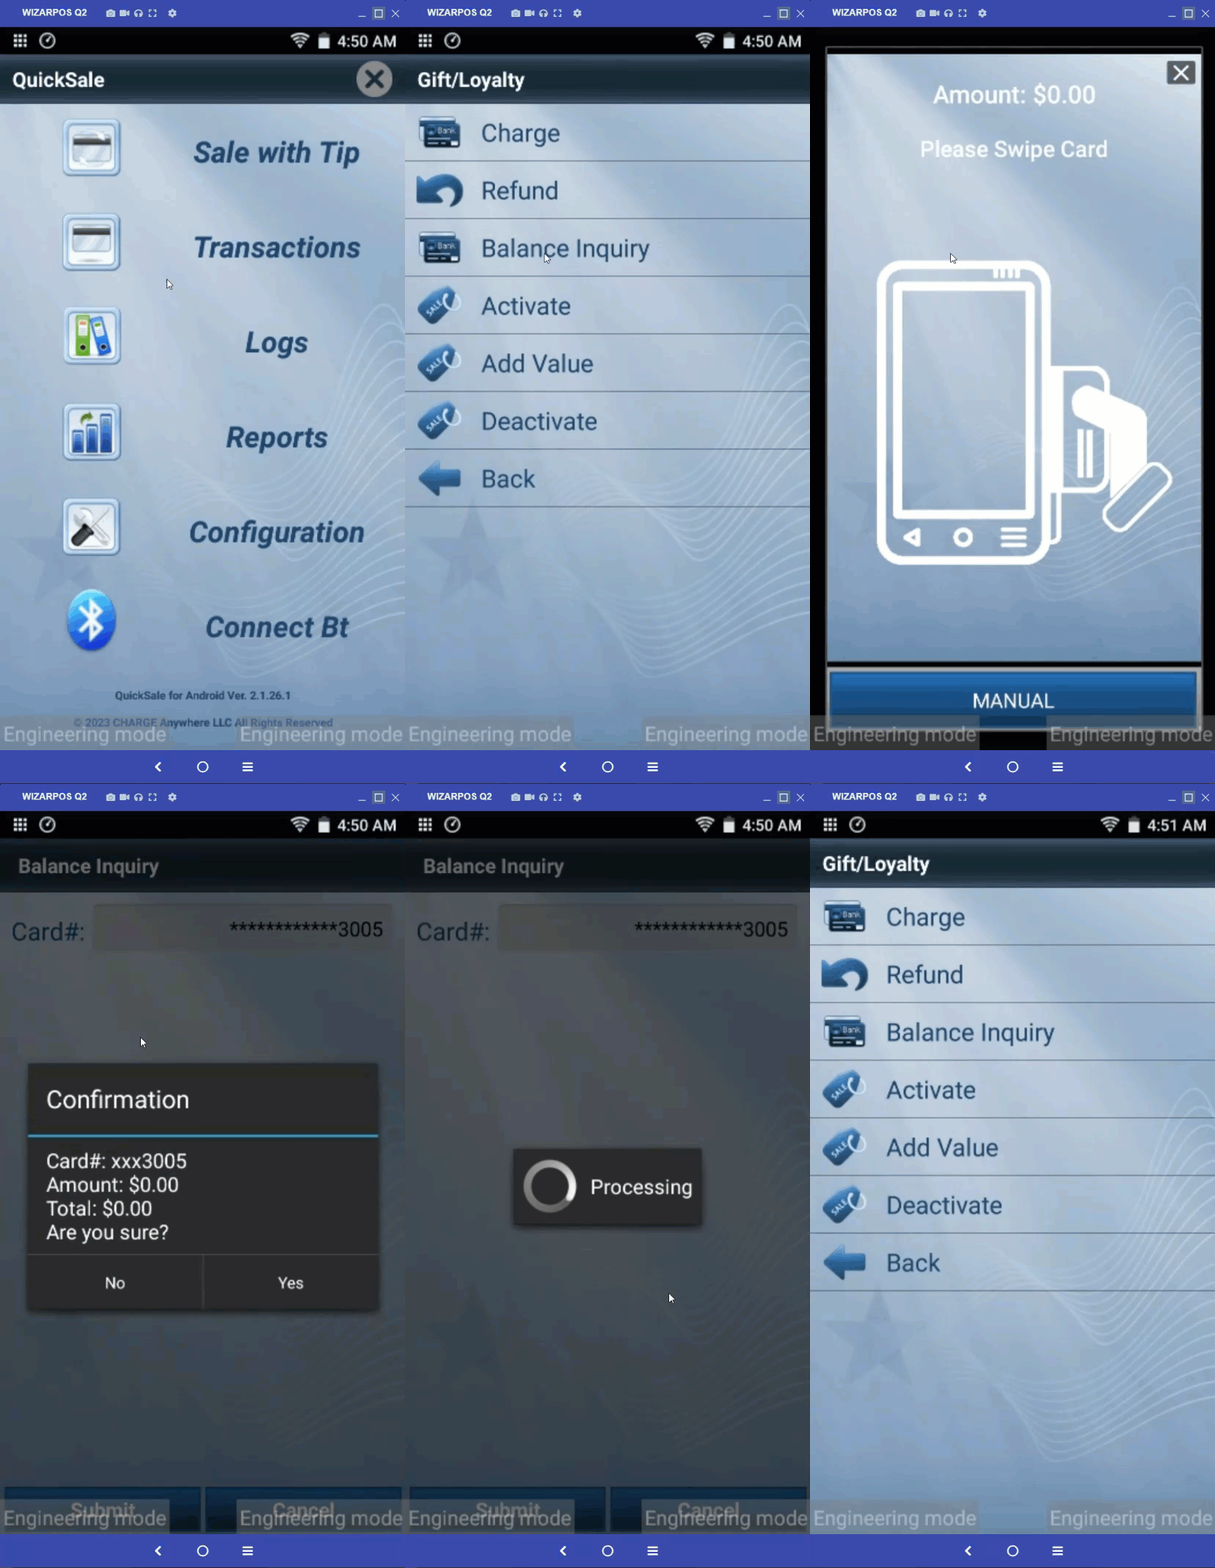
To check the remaining balance on a gift card, only the gift card number is required.
- Navigate to the Transactions section and choose Gift/Loyalty from the menu.
- Select Banalce Inquiry from the menu.
- Swipe the card on the machine to process the transaction.
- Review the transaction details on the confirmation screen and click Yes to proceed.
- Once approved, you will receive a confirmation message Transaction Approved.
- Click OK.
- A pop-up screen will appear with the following options:
- Print Merchant Copy
- Print Customer Copy
- SMS
- Click Print Options to print the receipt and enter the customer’s email and phone to send the receipt to the customer.
- Finally, click Done to complete the transaction.
4.4.4 Activate
To activate a gift card, provide the gift card number, the initial loaded amount, and the grand total paid.
- Card#: The unique number assigned to the Gift card.
- Amount: Total cost of purchased items, excluding discounts.
- Grand Total: Total amount to be paid, including taxes and fees.
4.4.5 Add Value
When adding value to a gift card, provide the gift card number, clerk identification number, item cost (excluding discounts), and the grand total to be paid.
- Card#: The unique number assigned to the Gift card.
- Clerk#: Identification number of the employee processing the sale.
- Amount: Total cost of purchased items, excluding discounts.
- Grand Total: Total amount to be paid, including taxes and fees.
4.4.6 Deactivate
Provide the gift card number to deactivate a gift card and prevent further use.
- Card#: The unique number assigned to the Gift card.
4.5 ACH/eCheck
Automated Clearing House (ACH) is an electronic payment system used for direct deposits, payroll payments, and online bill payments. This type of tender uses a bank account and routing number to transfer funds from one bank account to another.


4.5.1 Sale
To process an ACH/eCheck sale, provide the cardholder’s name, routing number, account number, type (personal or business), recurring payment option, clerk ID, amount, tax, and grand total.
- Name: The cardholder’s name as it appears on the payment card.
- Routing#: Refers to the routing number, also known as the ABA (American Bankers Association) routing transit number.
- Account#: Represents the account number associated with a bank account.
- Type: Personal Savings/Personal Checking/Business Checking
- Recurring Payment:
- Clerk#: Identification number of the employee processing the sale.
- Amount: Total cost of purchased items, excluding discounts.
- Tax Amount: Additional amount based on the tax rate.
- Grand Total: Total amount to be paid, including taxes and fees.
4.5.2 Check Conversion
For check conversion, provide the cardholder’s name, check number, routing number, account number, type (personal or business), clerk ID, and tax amount.
- Name: The cardholder’s name as it appears on the payment card.
- Check#: Represents the check number associated with a particular transaction. It is a unique identifier assigned to each individual check.
- Routing#: Refers to the routing number, also known as the ABA (American Bankers Association) routing transit number.
- Account#: Represents the account number associated with a bank account.
- Type: Personal Savings/Personal Checking/Business Checking
- Clerk#: Identification number of the employee processing the sale.
- Amount: Total cost of purchased items, excluding discounts.
- Tax Amount: Additional amount based on the tax rate.
- Grand Total: Total amount to be paid, including taxes and fees.
4.1.3 Steps to process an ACH Transaction
- Navigate to the Transactions section and choose ACH/eCheck from the menu.
- Select the appropriate transaction type: Sale/Check Conversion.
- Provide account details, transaction amount, tax amount, and other stuff, and click Submit.
- Review the transaction details on the confirmation screen and click Yes to proceed.
- Once the payment is approved, you will receive a confirmation message Transaction Approved.
- A pop-up screen will appear with the following options:
- Print Merchant Copy
- Print Customer Copy
- SMS
- Click Print Options to print the receipt and enter the customer’s email and phone to send the receipt to the customer.
Note: If desired, you can customize the header and footer of the receipt by going toConfiguration > Set Up Options > Optional Prompts > Receipt Options. - Finally, click Done to complete the transaction.
4.6 Debit
A debit card is a plastic card issued by a financial institution that allows the cardholder to access funds in their bank account to make purchases. The amount of the purchase is deducted directly from the cardholder’s account.


4.6.1 Sale
For debit sales, provide the amount, tax%, tax, and cash back.
- Amount: Total cost of purchased items, excluding discounts.
- Tax%: Percentage of tax to be levied on the amount.
- Tax Amount: Additional amount based on the tax rate.
- Cash Back: Any promotional discount in terms of cashback.
- Grand Total: Total amount to be paid, including taxes and fees.
Steps to process a Sale from a Debit Card
- Navigate to the Transactions section and choose Debit from the menu.
- Select Sale from the menu.
- After entering the amount to be charged and other details, click the Submit button.
- Select the Tip Amount if applicable.
Note: You can enable/disable the Tip Amount by going to Configuration. - Tap the card on the machine to process the transaction.
- Review the transaction details on the confirmation screen and click Yes to proceed.
- Once the payment is approved, you will receive a confirmation message Transaction Approved.
- Click OK.
- A pop-up screen will appear with the following options:
- Print Merchant Copy
- Print Customer Copy
- SMS
- Click Print Options to print the receipt and enter the customer’s email and phone to send the receipt to the customer.
Note: If desired, you can customize the header and footer of the receipt by going toConfiguration > Set Up Options > Optional Prompts > Receipt Options. - Finally, click Done to complete the transaction.
4.6.2 Auth Only
Auth Only is the process of obtaining approval for a transaction. The merchant requests authorization by submitting transaction details to Charge Anywhere. If successful, an authorization code is received, allowing the merchant to proceed with the transaction.
- Amount: Total cost of purchased items, excluding discounts.
- Tax%: Percentage of tax to be levied on the amount.
- Tax Amount: Additional amount based on the tax rate.
- Grand Total: Total amount to be paid, including taxes and fees.


Steps to Authorize a Debit Card
- Navigate to the Transactions section and choose Debit from the menu.
- Select Auth Only from the menu.
- After entering the amount to be charged and other details, click the Submit button.
- Select the Tip Amount if applicable.
- Tap the card on the machine to process the transaction.
- Review the transaction details on the confirmation screen and click Yes to proceed.
- Once the Auth is approved, you will receive a confirmation message Transaction Approved.
- Click OK.
- A pop-up screen will appear with the following options:
- Print Merchant Copy
- Print Customer Copy
- SMS
- Click Print Options to print the receipt and enter the customer’s email and phone to send the receipt to the customer.
- Finally, click Done to complete the transaction.
4.6.3 Return
For debit returns, provide the amount to be refunded.
Steps to Return from a Debit Card
- Navigate to the Transactions section and choose Debit from the menu.
- Select Return from the menu.
- After entering the amount to be refunded and other details, click the Submit button.
- Select the Tip Amount if applicable.
- Tap the card on the machine to process the transaction.
- Review the transaction details on the confirmation screen and click Yes to proceed.
- Once the payment is approved, you will receive a confirmation message Transaction Approved.
- Click OK.
- A pop-up screen will appear with the following options:
- Print Merchant Copy
- Print Customer Copy
- SMS
- Click Print Options to print the receipt and enter the customer’s email and phone to send the receipt to the customer.
- Finally, click Done to complete the transaction.
4.6.4 Balance Inquiry
This transaction type allows the user to check the available balance on their card. The app will communicate with the bank or financial institution to retrieve the balance information and display it to the user.
- Name: The cardholder’s name as it appears on the payment card.
- Card#: The unique number assigned to the payment card.
- ExpDate: The expiration date of the payment card, indicating the month and year when the card will expire and can no longer be used for transactions.
- CVVI: This further has 3 options, Want to Bypass, Value illegible, and Not On Card, which doesn’t require entering the CVVI code. However apart from fore mentioned options, to enter a value, the user can select Value Entered.
Steps to do Balance Inquiry from a Debit Card
- Navigate to the Transactions section and choose Debit from the menu.
- Select Balance Inquiry from the menu.
- Tap the card on the machine to process the transaction.
- Review the transaction details on the confirmation screen and click Yes to proceed.
- Once approved, you will receive a confirmation message Transaction Approved.
- Click OK.
- A pop-up screen will appear with the following options:
- Print Merchant Copy
- Print Customer Copy
- SMS
- Click Print Options to print the receipt and enter the customer’s email and phone to send the receipt to the customer.
- Finally, click Done to complete the transaction.
4.7 EBT Cash
EBT stands for Electronic Benefits Transfer. EBT Cash is a government-provided card that can be used to withdraw cash benefits from government assistance programs such as TANF or General Assistance.
4.7.1 Sale
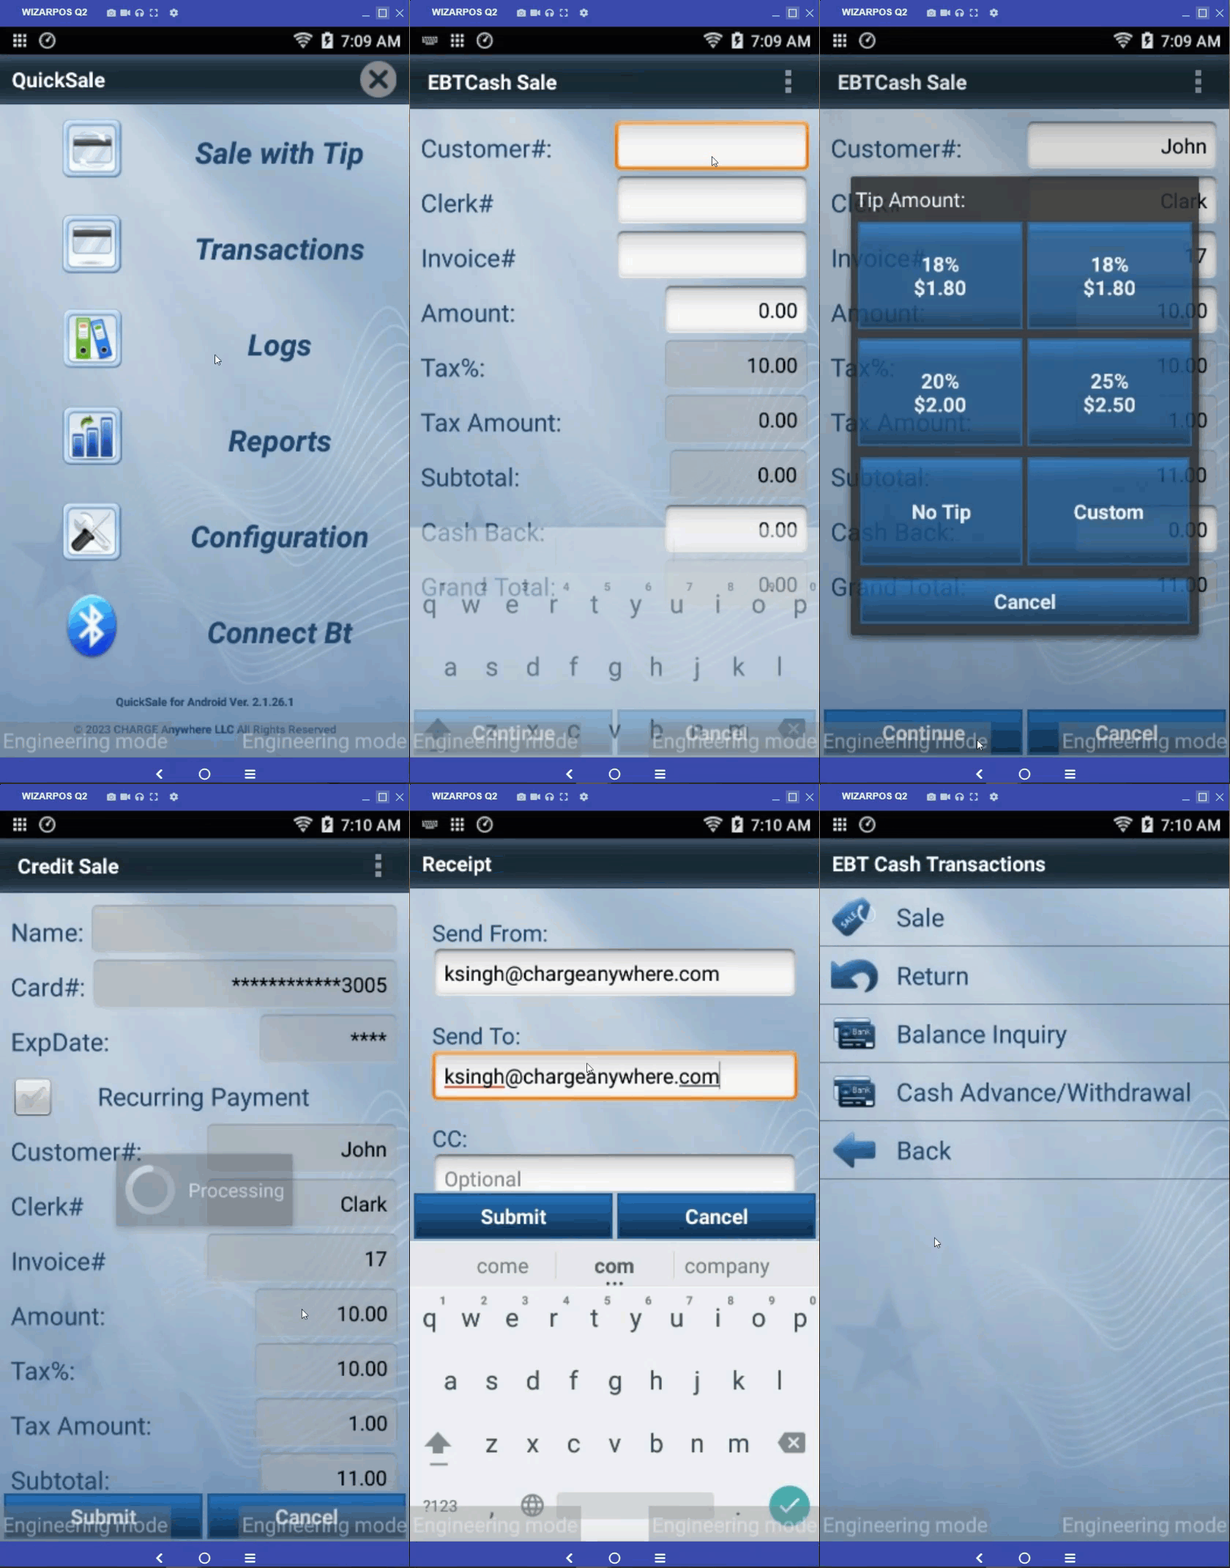
For EBT cash sales, provide the amount, tax%, tax, and cash back.
- Navigate to the Transactions section and choose EBT Cash from the menu.
- Select Sale from the menu.
- After entering the amount to be charged and other details, click the Submit button.
- Select the Tip Amount if applicable.
Note: You can enable/disable the Tip Amount by going to Configuration. - Tap the card on the machine to process the transaction.
- Review the transaction details on the confirmation screen and click Yes to proceed.
- Once the payment is approved, you will receive a confirmation message Transaction Approved.
- Click OK.
- A pop-up screen will appear with the following options:
- Print Merchant Copy
- Print Customer Copy
- SMS
- Click Print Options to print the receipt and enter the customer’s email and phone to send the receipt to the customer.
Note: If desired, you can customize the header and footer of the receipt by going toConfiguration > Set Up Options > Optional Prompts > Receipt Options. - Finally, click Done to complete the transaction.
4.7.2 Refund
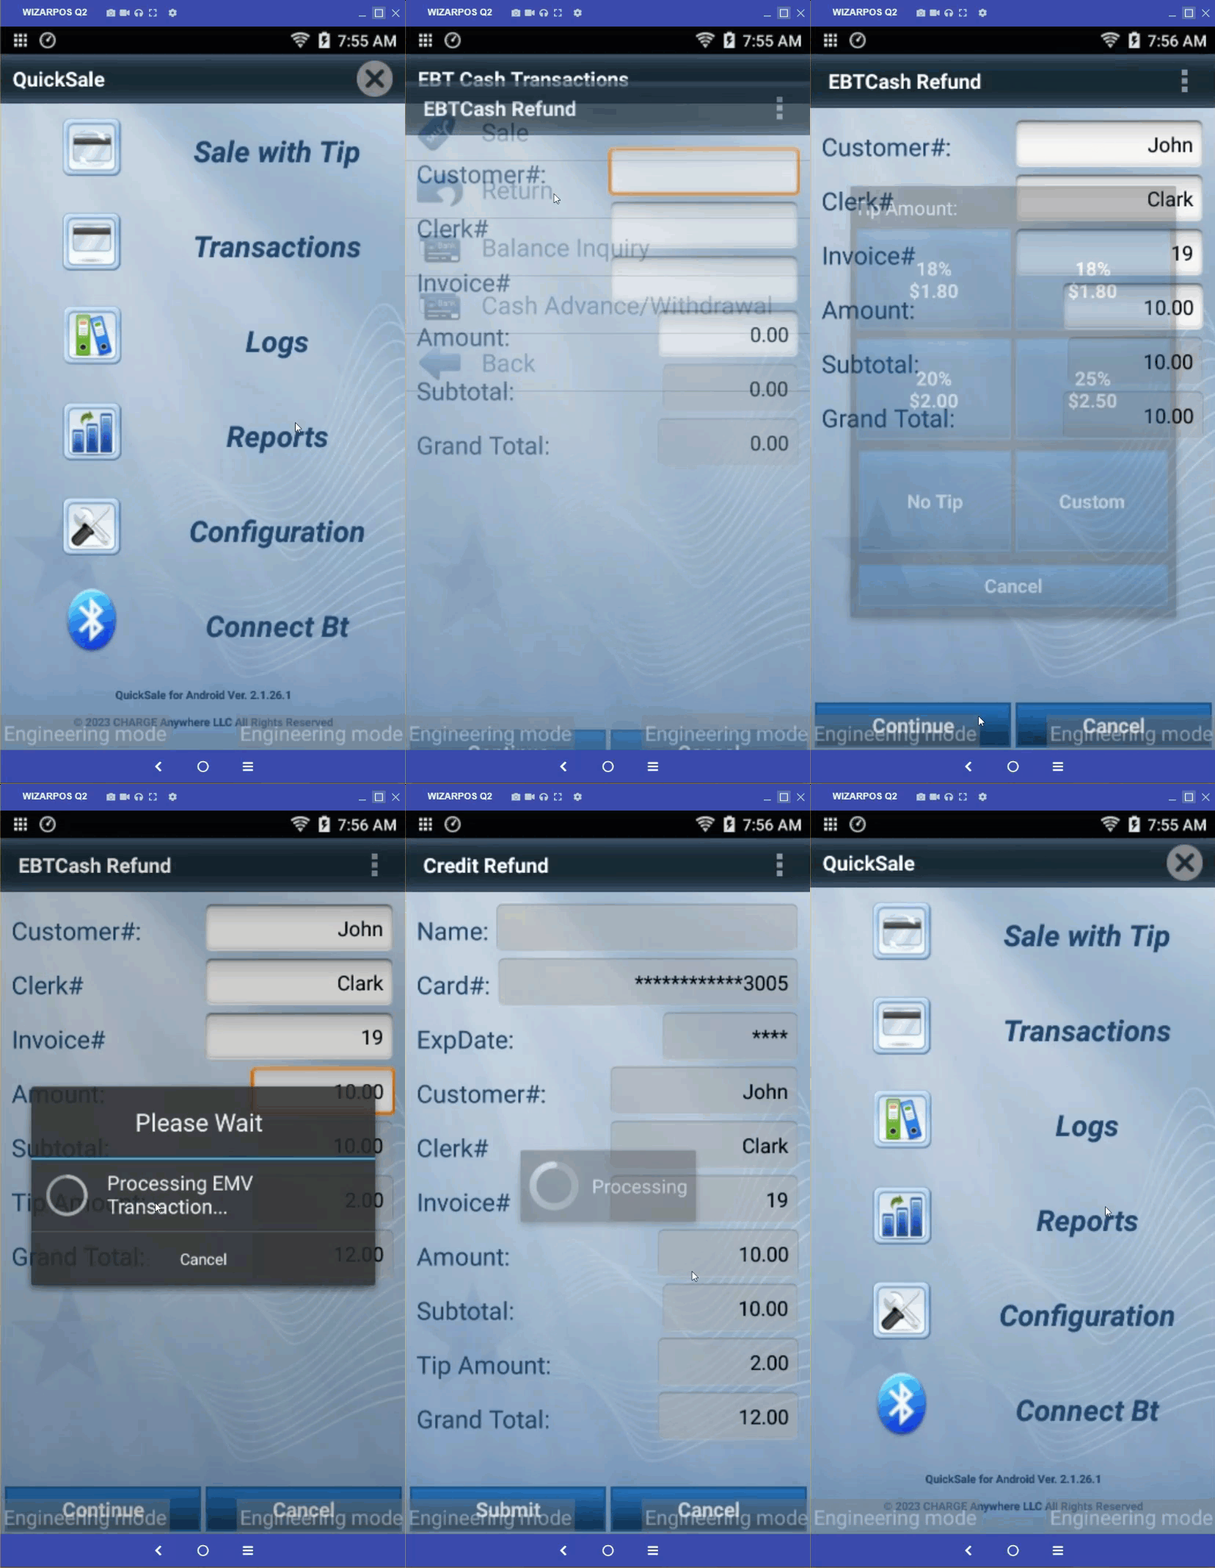
For EBT Cash returns, provide the amount to be refunded.
- Navigate to the Transactions section and choose EBT Cash from the menu.
- Select Return from the menu.
- After entering the amount to be refunded and other details, click the Submit button.
- Select the Tip Amount if applicable.
- Tap the card on the machine to process the transaction.
- Review the transaction details on the confirmation screen and click Yes to proceed.
- Once the payment is approved, you will receive a confirmation message Transaction Approved.
- Click OK.
- A pop-up screen will appear with the following options:
- Print Merchant Copy
- Print Customer Copy
- SMS
- Click Print Options to print the receipt and enter the customer’s email and phone to send the receipt to the customer.
- Finally, click Done to complete the transaction.
4.7.3 Balance Inquiry
This transaction type allows the user to check the available balance.
- Navigate to the Transactions section and choose EBT Cash from the menu.
- Select Balance Inquiry from the menu.
- Tap the card on the machine to process the transaction.
- Review the transaction details on the confirmation screen and click Yes to proceed.
- Once approved, you will receive a confirmation message Transaction Approved.
- Click OK.
- A pop-up screen will appear with the following options:
- Print Merchant Copy
- Print Customer Copy
- SMS
- Click Print Options to print the receipt and enter the customer’s email and phone to send the receipt to the customer.
- Finally, click Done to complete the transaction.
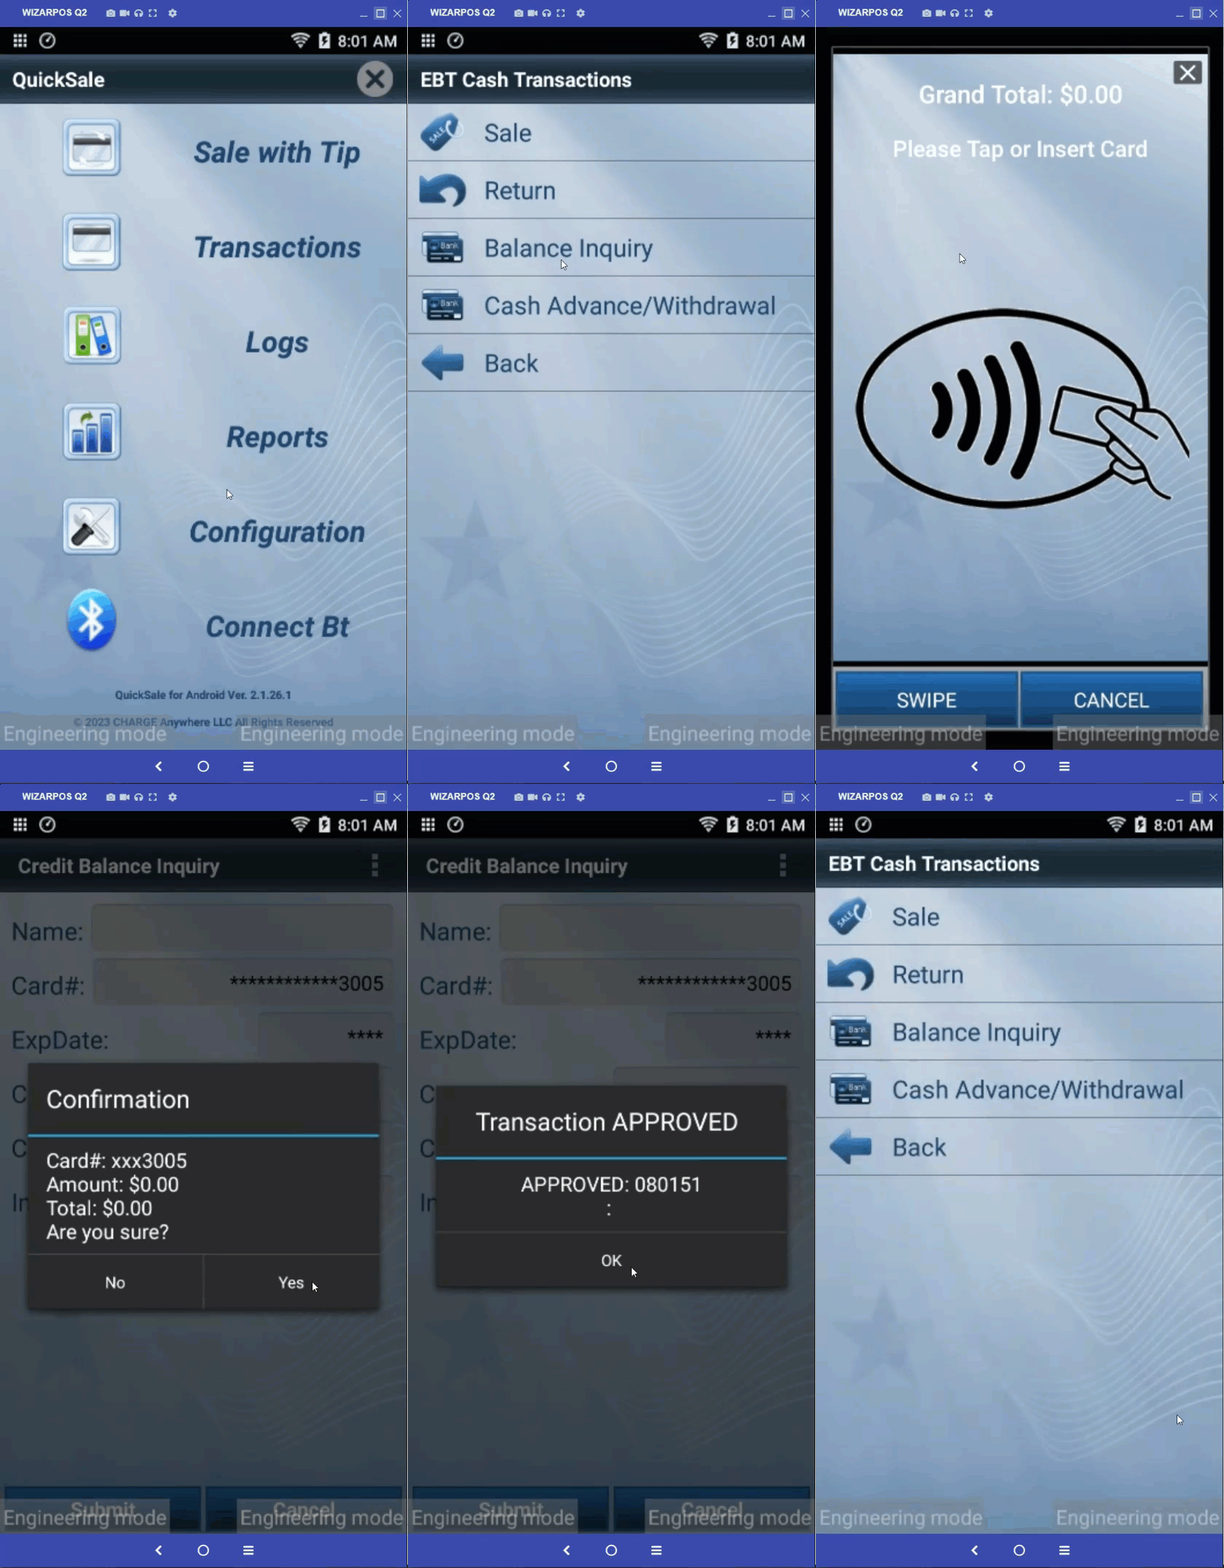
4.7.4 Cash Advance/Withdrawal
For EBT Cash Advance/Withdrawal, provide the amount to be refunded.
- Navigate to the Transactions section and choose EBT Cash from the menu.
- Select Cash Advance/Withdrawal from the menu.
- After entering the amount to be refunded and other details, click the Submit button.
- Select the Tip Amount if applicable.
- Tap the card on the machine to process the transaction.
- Review the transaction details on the confirmation screen and click Yes to proceed.
- Once the payment is approved, you will receive a confirmation message Transaction Approved.
- Click OK.
- A pop-up screen will appear with the following options:
- Print Merchant Copy
- Print Customer Copy
- SMS
- Click Print Options to print the receipt and enter the customer’s email and phone to send the receipt to the customer.
- Finally, click Done to complete the transaction.
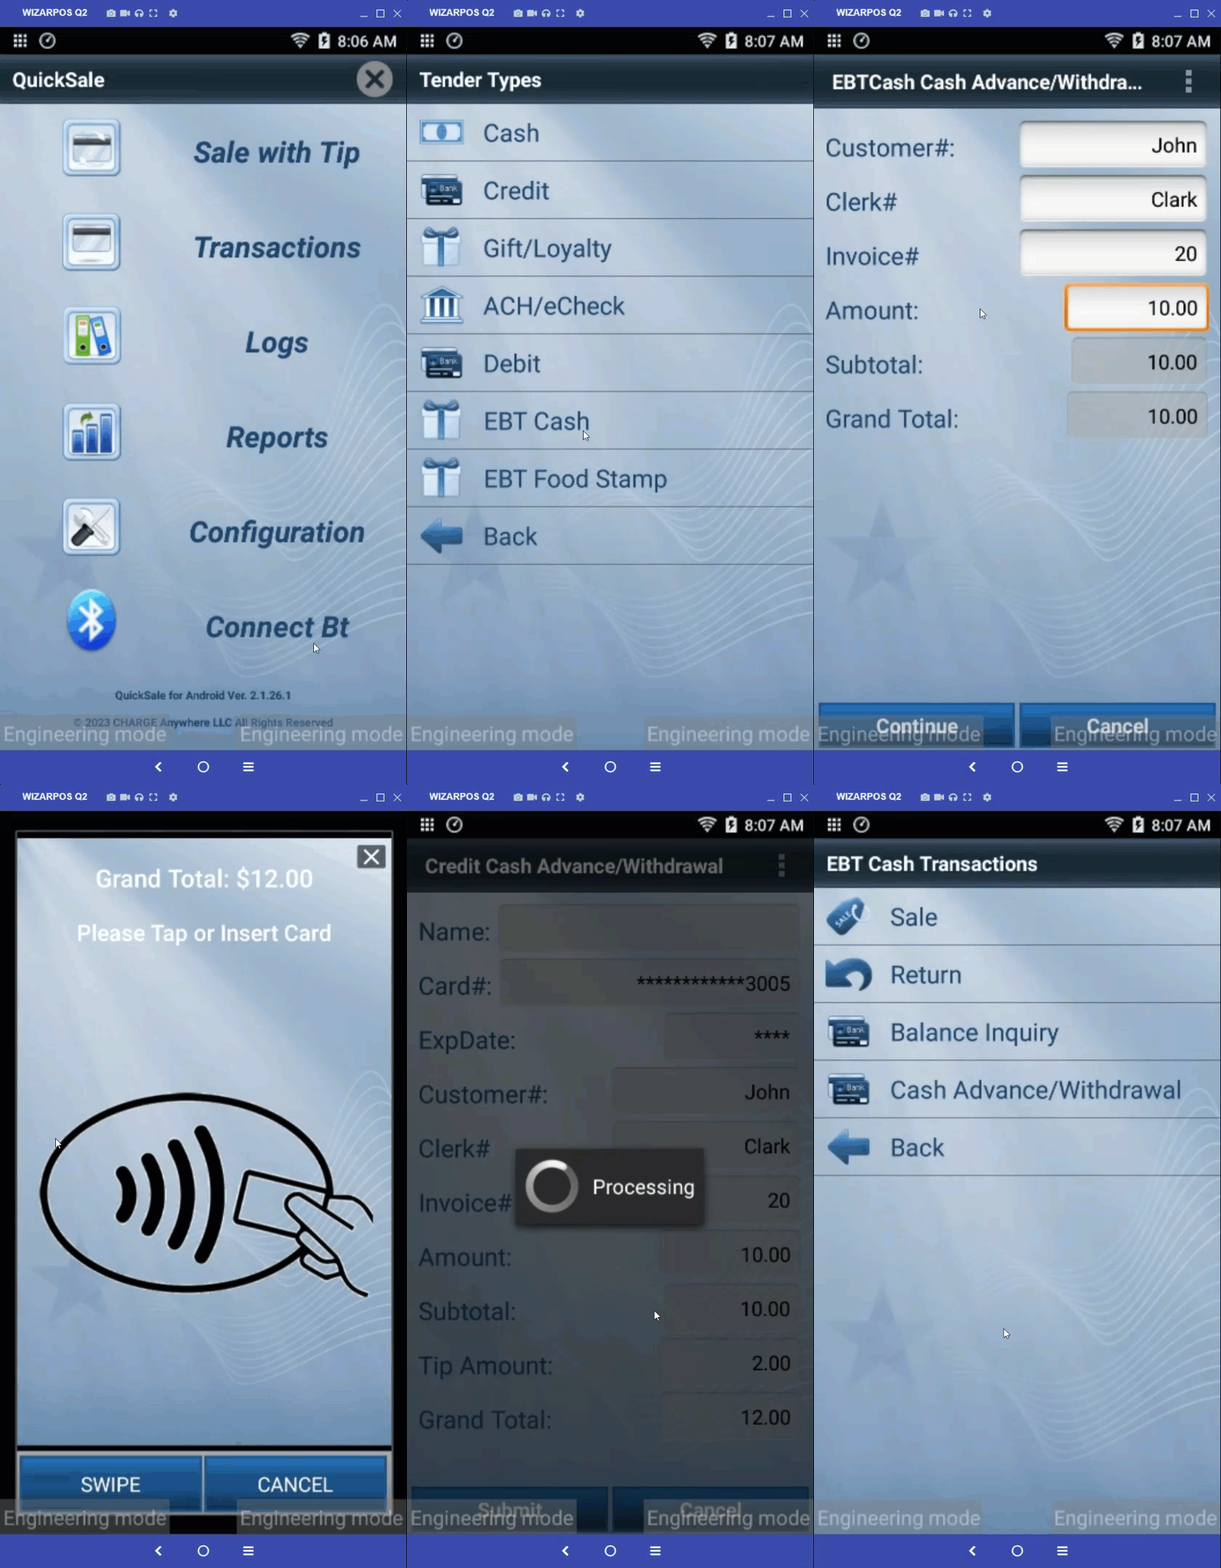
4.8 EBT Food Stamp
EBT Food Stamp is also a government-provided card that can be used to purchase food items at participating retailers that are authorized by the USDA to accept food stamps as a form of payment.
4.8.1 Sale: To process an EBT Food Stamp sale, provide the transaction amount.
- Navigate to the Transactions section and choose EBT Food Stamp from the menu.
- Select Sale from the menu.
- After entering the amount to be charged and other details, click the Submit button.
- Select the Tip Amount if applicable.
Note: You can enable/disable the Tip Amount by going to Configuration. - Tap the card on the machine to process the transaction.
- Review the transaction details on the confirmation screen and click Yes to proceed.
- Once the payment is approved, you will receive a confirmation message Transaction Approved.
- Click OK.
- A pop-up screen will appear with the following options:
- Print Merchant Copy
- Print Customer Copy
- SMS
- Click Print Options to print the receipt and enter the customer’s email and phone to send the receipt to the customer.
Note: If desired, you can customize the header and footer of the receipt by going toConfiguration > Set Up Options > Optional Prompts > Receipt Options. - Finally, click Done to complete the transaction.
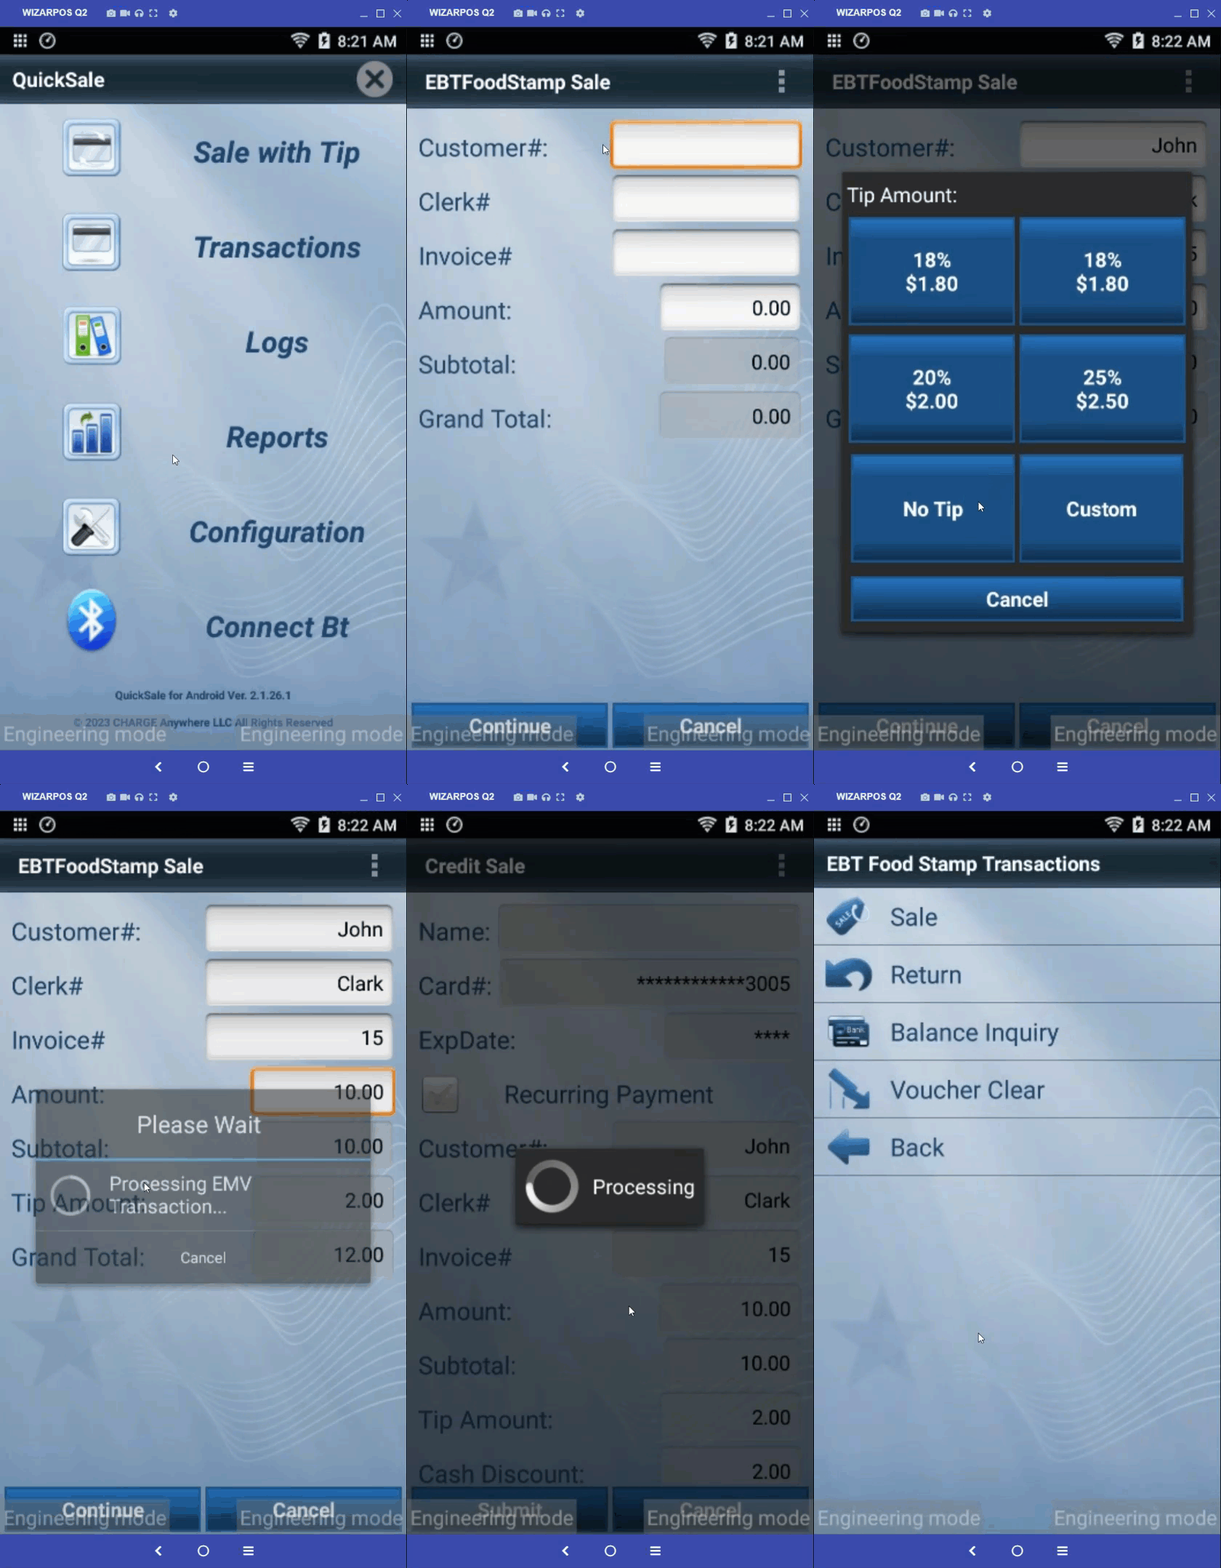
4.8.2 Return: To process an EBT Food Stamp refund, provide the refund amount.
- Navigate to the Transactions section and choose EBT Food Stamp from the menu.
- Select Return from the menu.
- After entering the amount to be refunded and other details, click Submit.
- Select the Tip Amount if applicable.
- Tap the card on the machine to process the transaction.
- Review the transaction details on the confirmation screen and click Yes to proceed.
- Once the payment is approved, you will receive a confirmation message Transaction Approved.
- Click OK.
- A pop-up screen will appear with the following options:
- Print Merchant Copy
- Print Customer Copy
- SMS
- Click Print Options to print the receipt and enter the customer’s email and phone to send the receipt to the customer.
- Finally, click Done to complete the transaction.
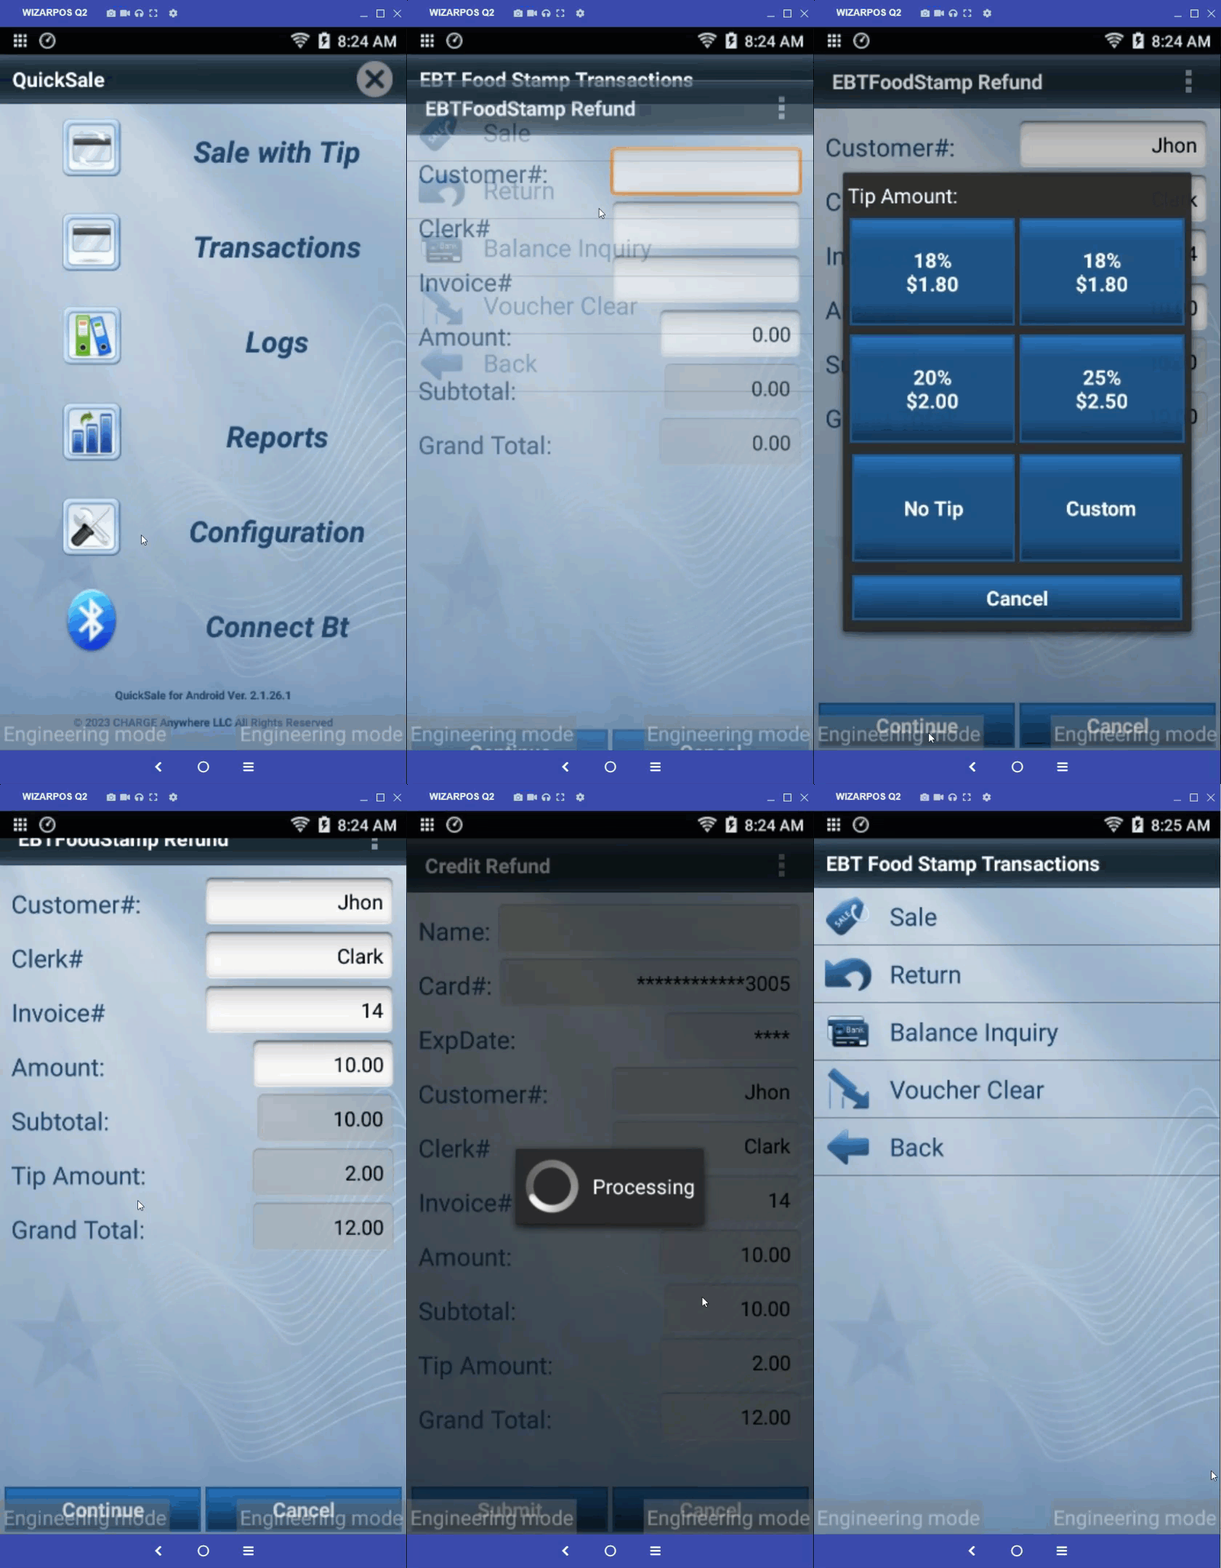
4.8.3 Balance Inquiry: To check the EBT Food Stamp card balance, provide the card number.
- Navigate to the Transactions section and choose EBT Cash from the menu.
- Select Balance Inquiry from the menu.
- Tap the card on the machine to process the transaction.
- Review the transaction details on the confirmation screen and click Yes to proceed.
- Once approved, you will receive a confirmation message Transaction Approved.
- Click OK.
- A pop-up screen will appear with the following options:
- Print Merchant Copy
- Print Customer Copy
- SMS
- Click Print Options to print the receipt and enter the customer’s email and phone to send the receipt to the customer.
- Finally, click Done to complete the transaction.
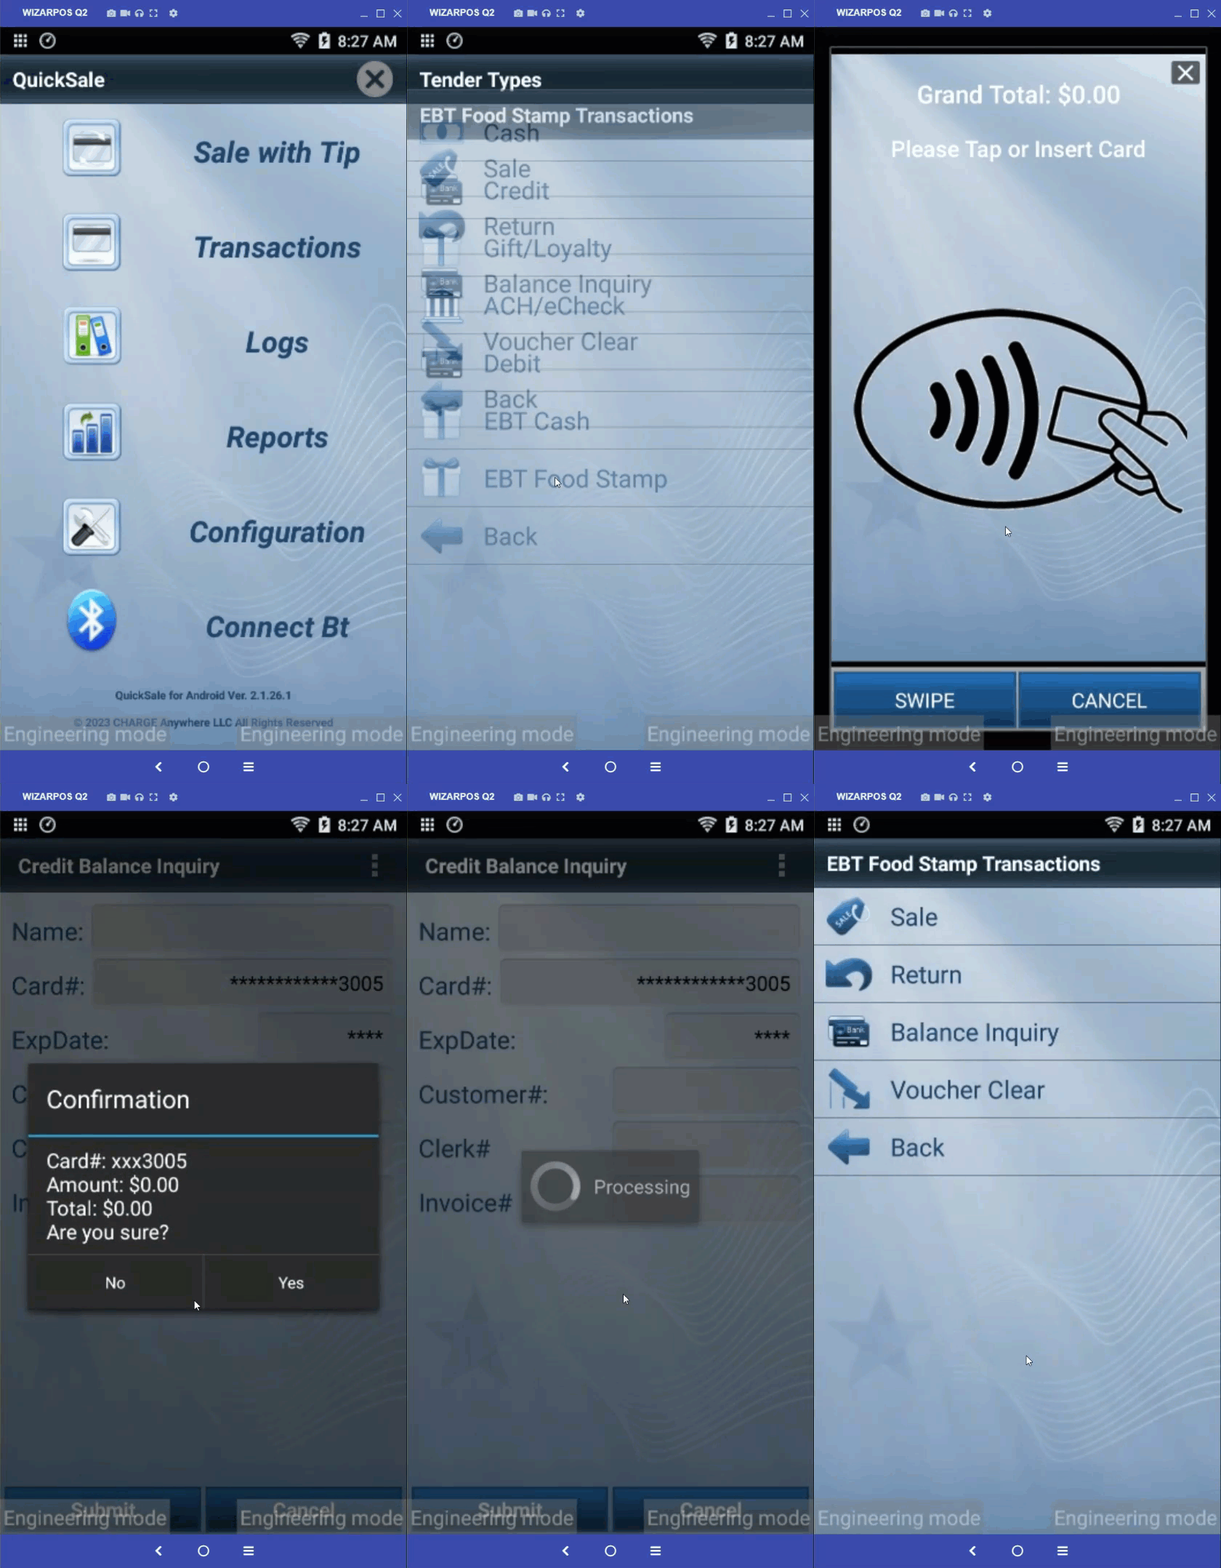
4.8.4 Voucher Clear
To clear an EBT Food Stamp voucher, provide the cardholder’s name, card number, approval code, clerk ID, voucher number, amount, and grand total.
- Name: The cardholder’s name as it appears on the payment card.
- Card#: The unique number assigned to the EBT Food Stamp card.
- Approval Code: The code obtained during the transaction approval process.
- Clerk#: Identification number of the employee processing the sale.
- Voucher#: The voucher number associated with the transaction.
- Amount: Total cost of purchased items, excluding discounts.
- Grand Total: Total amount to be paid, including taxes and fees.
Steps to process an EBT Food Stamp Transaction
- Navigate to the Transactions section and choose EBT Food Stamp from the menu.
- Select Voucher Clear from the menu.
- After entering the approval code, amount to be charged, and other details, click Submit.
- Select the Tip Amount if applicable.
- Tap the card on the machine to process the transaction.
- Review the transaction details on the confirmation screen and click Yes to proceed.
- Once the payment is approved, you will receive a confirmation message Transaction Approved.
- Click OK.
- A pop-up screen will appear with the following options:
- Print Merchant Copy
- Print Customer Copy
- SMS
- Click Print Options to print the receipt and enter the customer’s email and phone to send the receipt to the customer.
- Finally, click Done to complete the transaction.
4.9 Void vs Reversal
Understanding the difference between Void and Reversal is essential when handling payment transactions. While both actions are used to cancel or adjust payments, their behavior differs based on context.
Void
- Used to cancel a sale before settlement.
- Applies to Sale, Refund, and Force.
- GrandTotal = Full Sale Amount
- Example: To cancel a sale of 100.00, use a Void with
GrandTotal = 100.00.
- Example: To cancel a sale of 100.00, use a Void with
Reversal
- Used to cancel or adjust an authorization (before capture) or a sale (post-authorization).
- Applies to Sale, Refund, Auth, and Force.
- The
GrandTotalindicates the amount you want to settle, not the amount you’re cancelling.
Reversal Scenarios
- Full Reversal
GrandTotal = 0.00- Cancels the entire transaction.
- Example: Reversal with
GrandTotal = 0.00→ settle 0.00, cancel 100.00
- Partial Reversal
GrandTotal = Amount to Settle- Cancels the remainder.
- Example: For an authorization of 100.00:
- Reversal with
GrandTotal = 75.00→ settle 75.00, cancel 25.00 - Followed by Force Capture of 75.00
- Reversal with
Use Void when the payment is not yet settled and you want to cancel the full amount.
Use Reversal when adjusting the authorized amount, fully or partially, before capture.
Summary Table
| Scenario | Action | GrandTotal | Outcome |
|---|---|---|---|
| Full sale needs to be canceled | Void | 100.00 | Cancels entire sale before settlement |
| Full authorized amount to be canceled | Reversal | 0.00 | Cancels the authorization completely |
| Partial capture of an authorization | Reversal + Force | 75.00 | Captures 75.00, cancels 25.00 |
| Sale already settled – needs refund | Refund | 100.00 | Initiates return of funds to customer |
5. Logs
QuickSale 1.0 includes several log-related features to help users manage transactions more effectively.


5.1 Current Day Logs
The Current Day Logs feature in QuickSale 1.0 generates a log of all transactions processed during the current day, including details such as the transaction amount, payment method, and transaction status. This log provides a quick and convenient way to review recent activity and track payment processing in real time.
5.2 Archives
Archives in QuickSale 1.0 allow users to access and review transaction logs from previous days or time periods, providing a more comprehensive view of the transaction history. Users can access archived logs by navigating to the Archives feature and selecting the desired date or date range.


5.3 Offline Transactions
QuickSale 1.0 supports processing offline transactions, which are transactions that are completed when the system is unable to connect to the payment network. Offline transactions are stored locally on the device and automatically submitted for processing once a connection is established. Users can view offline transactions by accessing the Offline Transactions log.
5.4 Failed Offline Transactions
Failed offline transactions can occur due to issues such as network connectivity problems or incorrect payment information. QuickSale 1.0 provides error messages and suggestions for how to handle the issue, such as retrying the transaction or using an alternate payment method.
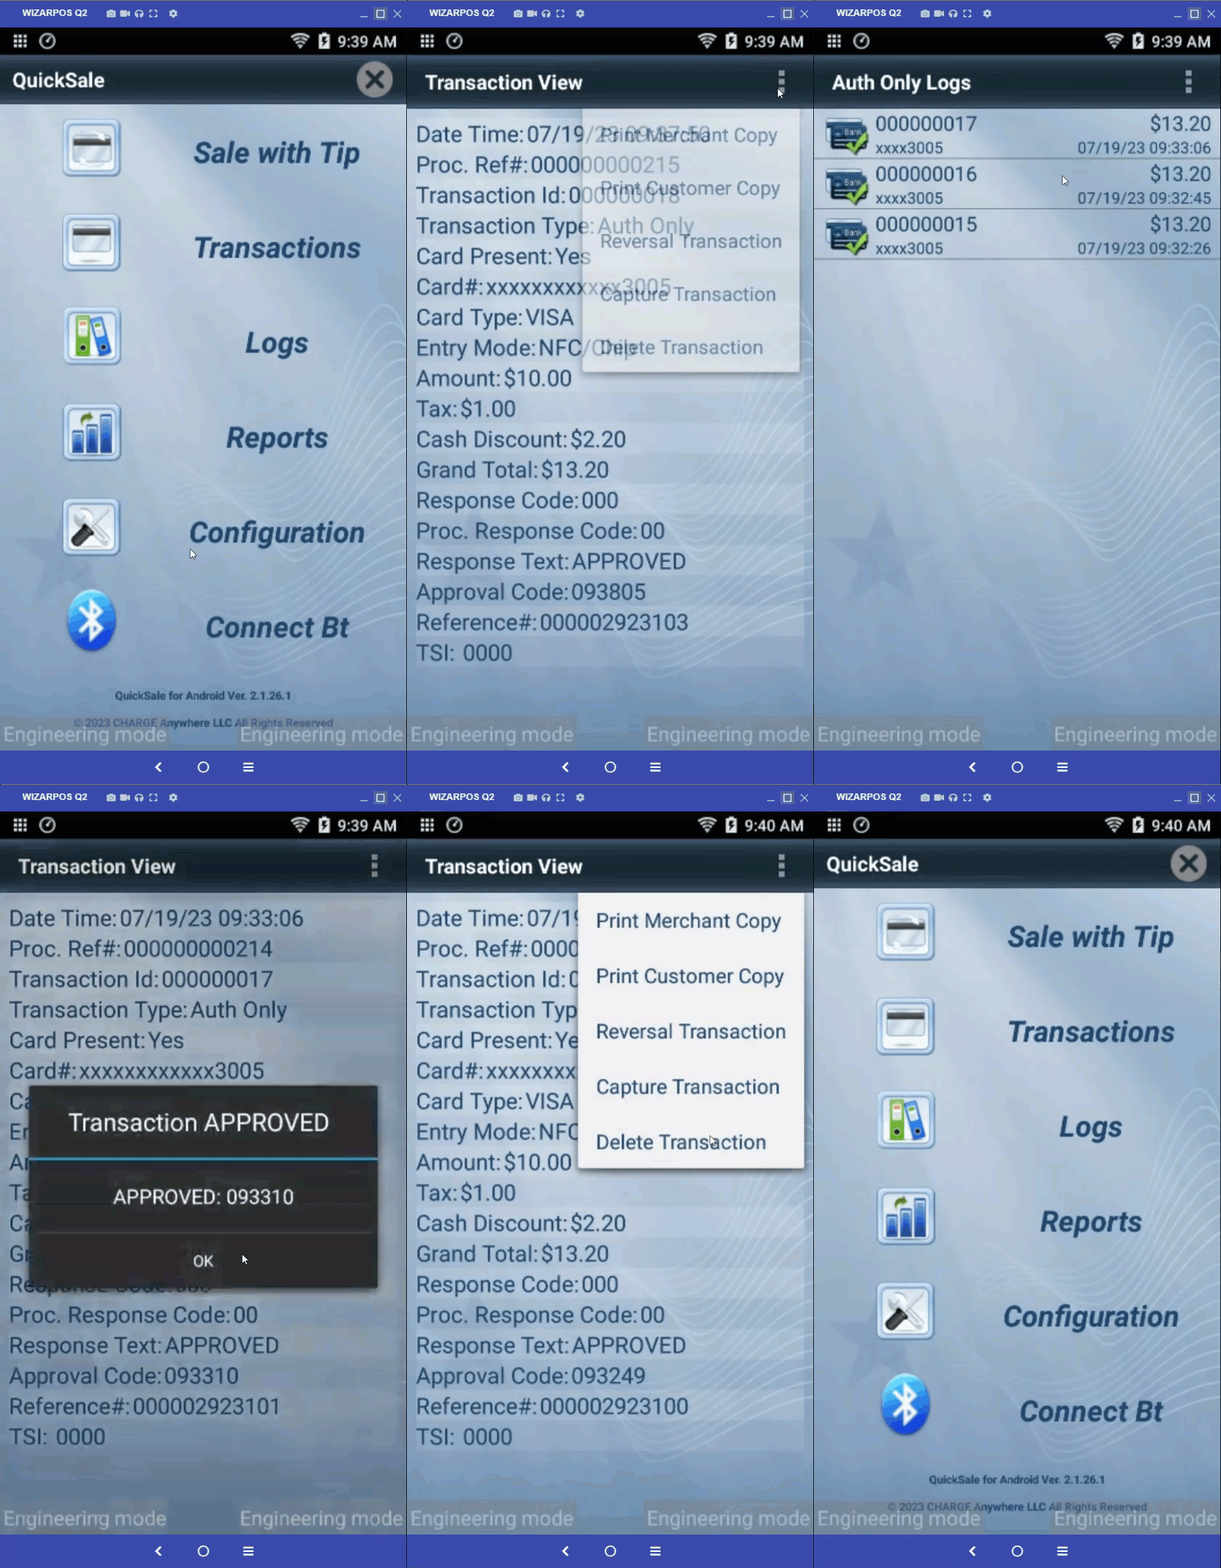
5.5.1 Auth-Only Transactions
Note: This is valid for the Retail Industry type. For the restaurant industry type, this option will become Untipped Transactions.
You can view your authorized transaction history by tapping the Logs button on the dashboard. This will show you a list of all your recent authorized transactions.
Reversal Transaction
- Select the transaction that you want to reverse.
- Click three dots in the top right corner and select Reversal Transaction.
- A pop-up will appear. Click on Reverse to reverse the auth transaction.
Capture Transaction
- Select the transaction that you want to capture.
- Click on the three dots in the top right corner and select Capture Transaction.
- A pop-up will appear. You can alter the amount to be captured. Now, click Capture to capture the auth transaction.
Delete Transaction
- Select the transaction that you want to delete.
- Click on the three dots in the top right corner and select Delete Transaction.
- A pop-up will appear, click Delete to delete the transaction.
Capture All
- Click on the three dots in the top right corner and select Capture All to capture all the transactions at once.
5.5.2 Untipped Transactions
Note: This is valid for the Restaurant Industry type. For the retail industry type, this option will become Authorized Transactions.
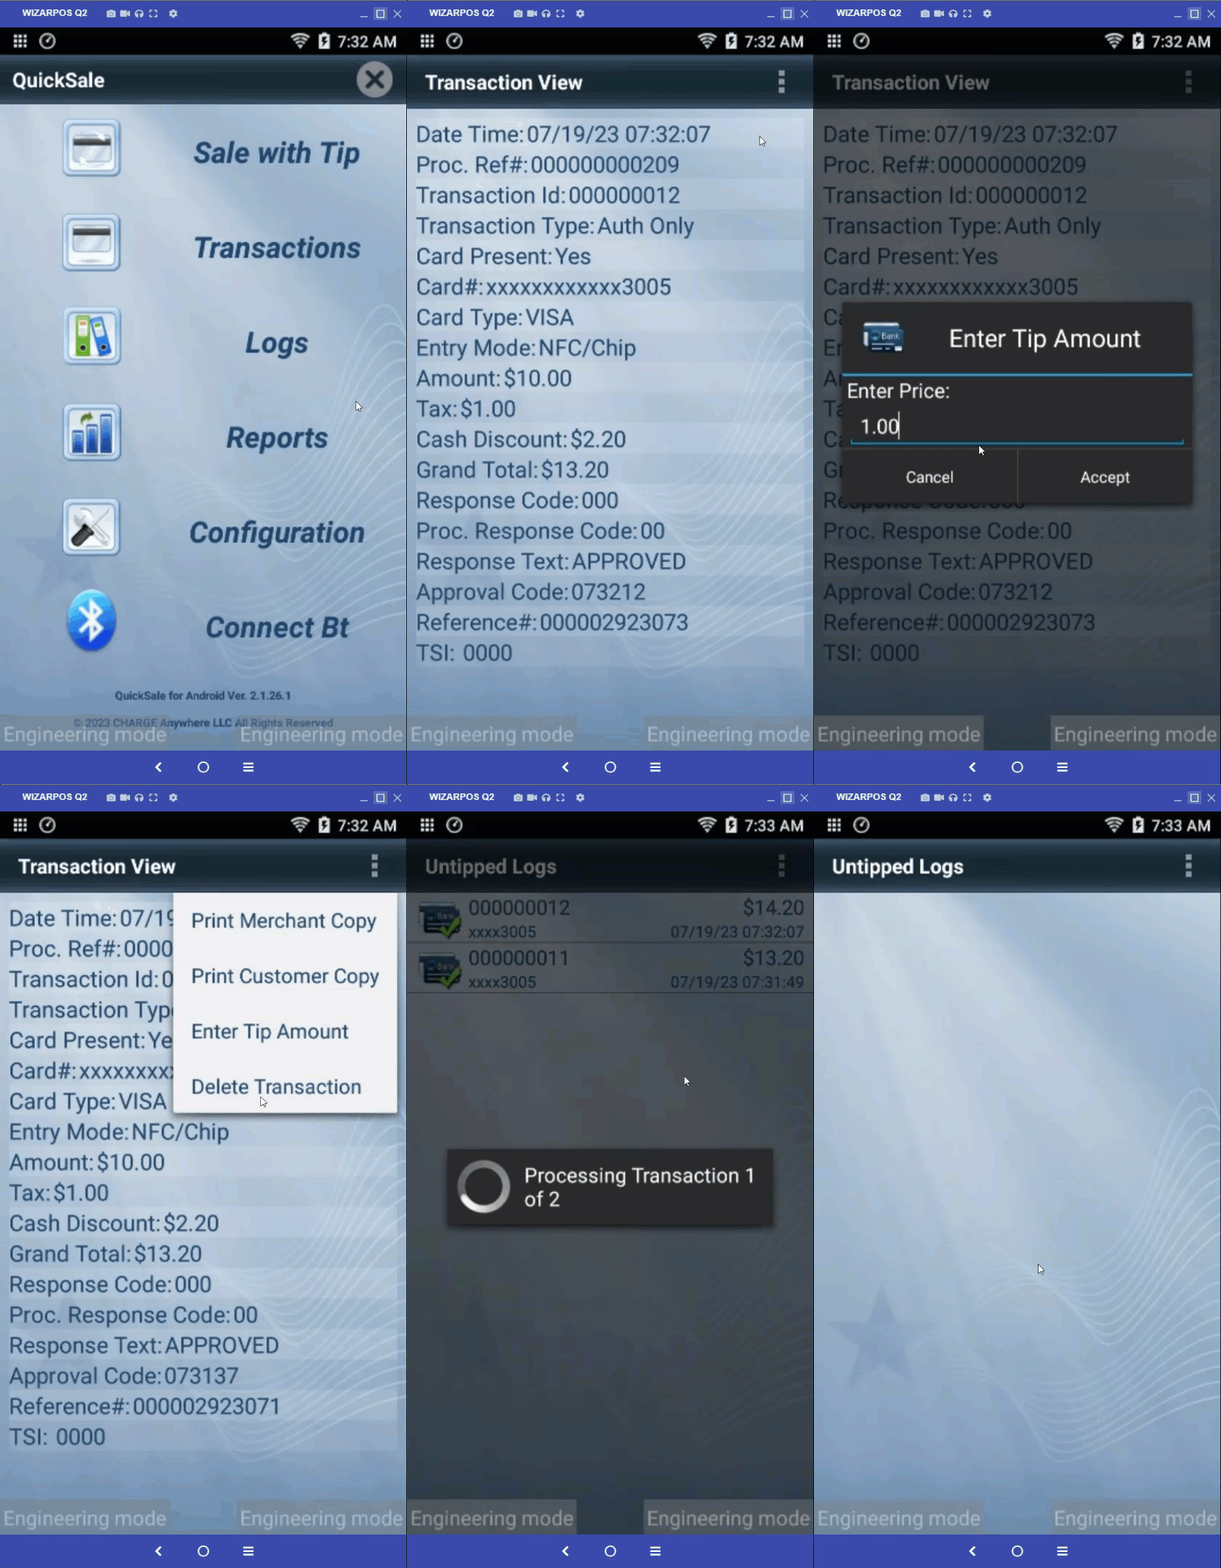
You can view your untipped transaction history by tapping the Logs button on the dashboard. This will show you a list of all your recent untipped transactions.
Add Tip
- Select the transaction for which you want to add the tip.
- Click on the three dots in the top right corner and select Enter Tip Amount.
- A pop-up will appear. Now enter the tip amount and click Accept to add the tip.
Delete Transaction
- Select the transaction that you want to delete.
- Click on the three dots in the top right corner and select Delete Transaction.
- A pop-up will appear, click on Delete to delete the transaction.
Capture All
- Click on the three dots in the top right corner and select Capture All to capture all the transactions at once.
6. Reports


QuickSale 1.0 offers users the ability to generate a wide range of reports to help them better understand their business operations. The report options available include sales reports, inventory reports, transaction reports, and more. Users can customize these reports by selecting the data they want to include and adjusting other settings such as date ranges, transaction types, and payment methods.
6.1 Report Options
To select a report, users can navigate to the Reports > Report Options (by clicking or dragging up) section within QuickSale 1.0 and choose from the available report types. Once a report is selected, users can further customize it by adjusting the report options.
6.1.1 Select Reports
Users can select specific reports to view by choosing from options such as ACH, Cash, Check, Credit, Debit, EBT Cash, EBT Food Stamp, Gift/Loyalty, or All Tenders Total. This allows them to generate reports tailored to their specific needs and requirements. Available prompts:
- Show ACH
- Show Cash
- Show Check
- Show Credit
- Show Debit
- Show EBT Cash
- Show EBT Food Stamp
- Show Gift/Loyalty
- Show All Tenders Total
6.1.2 Detail Level
The level of detail displayed in reports can be adjusted within QuickSale 1.0 to provide users with the information they need. Users can choose from various levels of detail, ranging from a high-level overview to a detailed breakdown of each transaction. Following are the available Detail Level:
- None
- Full
- Short
6.1.3 Clerk# Filter
QuickSale 1.0 allows users to filter reports by the clerk who processed each transaction. This can be particularly useful for businesses with multiple employees processing transactions. To filter by the clerk, users can navigate to the report options section and select the clerk filter.
6.2 Additional Options
To access additional report options please tap on the three dots shown in the top right corner (as shown in the image below).
- Expand All: Expand all sections in the report.
- Collapse All: Collapse all sections in the report.
- Email Report: You can email the sales report to any email id from any given email id. Enter the Send From and Send to email ids and click on the Send button to send the report over email.
- Close Batch: Closing a batch is the process of finalizing and submitting the batch data for processing.
7. Configuration
The Configuration section of the QuickSale 1.0 user guide includes several important features that allow users to customize their experience.
Note: Some of the following configuration options will require authentication using the app credentials, created at the time of initial registration. In case you have forgotten your password, you can reset it by answering a secret question or selecting a prompt to send the temporary password via email.


7.1 Feature Options
Within this section, users can access the “Refresh Services” option, allowing them to update and synchronize their configuration with the Charge Anywhere servers, ensuring they have the latest information.
7.2 Setup
The Setup section guides users through the process of configuring system settings, including tax rates, payment options, and receipt settings. It offers a comprehensive set of customization options to align the app with specific business requirements.


7.2.1 Optional Prompts
This subsection empowers users to set up optional prompts for various identifiers, such as clerk ID, customer ID, and invoice ID. It also enables integration with QuickBooks, streamlining accounting processes.
- Clerk# Prompt: The prompt is displayed to enter the clerk’s identification number.
- Clerk# Text: The available options for the clerk’s identification, can include Clerk#, Driver#, Operator#, Employee#, Vendor#, Server ID, Bartender ID, and Waiter ID.
- Clerk#: The actual clerk’s identification number.
- Enable QuickBooks Integration: An option to enable integration with QuickBooks accounting software.
- Customer# Prompt: The prompt is displayed to enter the customer’s identification number.
- Invoice# Prompt: The prompt is displayed to enter the invoice number.
- Invoice# Text: The available options for the invoice number, can include Invoice#, Ticket#, Job#, and Order#.
- Tax Prompt: The prompt displayed to enter the tax amount or tax-related information.
- Tax Mode: The mode for handling taxes, which can be set to Auto or Manual.
- Tax%: The tax percentage applied to the transaction.
- Tax Presentation on Receipts: The format and visibility of tax information on receipts.
- Tip Prompt: The prompt is displayed to enter the tip amount.
- Tip Receipt: An option to include a tip section on the receipt.
7.2.2 Transaction Settings
Here, users can define preferences related to transaction handling. They can choose the desired signature capture method, set retry attempts for failed transactions, determine actions in case of no response, and enable offline mode and contactless payments. Additionally, users can configure the default amount for transactions and decide whether to display subtotals.
- Signature Capture: The available options for capturing signatures during transactions include Paper Signature (physically signing on paper), Electronic Signature (capturing signatures electronically), or No Signature required.
- Retry Attempts: The number of allowed attempts to retry a transaction in case of a failed or declined authorization.
- No Response Action: The action to take when there is no response from the payment processor, such as asking to store the transaction offline, automatically storing it offline, or taking no action.
- Enable Offline: Enabling the ability to process transactions offline when there is no internet connectivity, with the intention to sync them later when a connection is available.
- Enable Contactless: Allowing the acceptance of contactless payments, such as tap-to-pay cards or mobile wallets, for quick and convenient transactions.
- Default Amount: The preset or default amount set for transactions, which can save time by prefilling the amount field.
- Purchase Cards Enabled: Enabling the acceptance of purchase cards, which are specialized credit cards used by businesses for purchasing goods and services.
- Show Subtotal: Displaying a subtotal amount on the payment screen, providing a breakdown of the total cost before additional fees or taxes are applied.
7.2.3 Quick Payment Service
This feature allows users to enable or disable the Quick Payment Service, which provides a convenient and efficient payment solution for customers.
- Enable QPS: Enable or Disable QPS.


7.2.4 Cash Discount
Users can configure cash discount settings, allowing for the application of discounts for cash transactions.
- Cash Discount: Enable or Disable Cash Discounts
7.2.5 Peripheral Devices
This subsection guides users in setting up peripheral devices like printers and swipers. It also provides additional options for supported printers, including the option to enable BT 2.0 Mode.
- Printer: Option to connect a printer.
- Swiper: Option to connect a swiper.
- Additional Options: To access additional report options please tap on the three dots shown in the top right corner (as shown in the image below).
- Supported Printers.
- Turn On BT 2.0 Mode
7.2.6 Receipt Options
Users can customize the content displayed in the header and footer of receipts. They can also define print options and configure email and SMS settings for sending receipts to customers.


- View/Edit Header: This option allows you to view or edit the header section of the receipt. This section typically contains the company name and other branding elements. Editing this section can help businesses customize their receipts and maintain a consistent brand image.
- View/ Edit Footer: This option allows you to view or edit the footer section of the receipt.
- Print Options: This option allows you to print a merchant and or customer copy for approved and declined receipts.
- Email Options: This option provides settings for sending receipts via email. Users can enter the recipient’s email address to send the receipt. This option can be useful for businesses that want to provide their customers with electronic receipts.
- SMS Options: This option provides settings for sending receipts via SMS text message. This option can be useful for businesses that want to provide their customers with a quick and convenient way to receive their receipts.


7.2.7 Advanced
The Advanced Settings section offers users more advanced configuration options, such as defining specific tender types and incorporating GPS functionality into the app.


- Config Tender Types: In this option, users have the ability to define and configure various payment methods or tender types such as ACH, Cash, Check, Credit, Debit, EBT Cash, EBT Food Stamp, Gift/Loyalty, etc.
- GPS: GPS or Global Positioning System is a location-based service that enables the app to determine the precise location of a device or person during the transaction.
7.2.8 Show All Settings
By selecting this option, users can view all available settings and configurations at a glance, providing a comprehensive overview of the customization options available within the app.
7.3 Security
Configure security settings, user permissions, and password requirements to ensure a secure environment for your transactions.


7.3.1 Fraud Control
Customize fraud control settings, including manager override, display options for cardholder information, and prompts for card-present transactions (card verification, address verification, CVV).
- Allow Manager Override
- Enter the Last 4 Digit
- Name/Card#: Show, Hide, Truncate
- Card Present: Always Ask, Ask, If Manual, Do Not Ask
- AVS: Always Ask, Ask, If Manual, Do Not Ask
- CVV: Always Ask, Ask, If Manual, Do Not Ask
7.3.2 User Management
Manage user accounts by adding, editing, and deleting users, allowing you to control access to the app and its features.
- Add User
- Edit User
- Delete User


7.3.3 Halo
Set limits for maximum sale and refund amounts to prevent unauthorized or excessive transactions.
- Sale Halo: Highest sale amount that can be accepted
- Return Halo: Highest sale amount that can be refunded
7.4 Peripheral Devices
This subsection guides users in setting up peripheral devices like printers and swipers. It also provides additional options for supported printers, including the option to enable BT 2.0 Mode.
- Printer: Option to connect a printer.
- Swiper: Option to connect a swiper.
- Additional Options: To access additional report options please tap on the three dots shown in the top right corner (as shown in the image below).
- Supported Printers.
- Turn On BT 2.0 Mode


7.5 Support
Access support resources, including tax settings configuration, help desk information, card issuer contact details, frequently asked questions, log sharing, and app-related information.
7.5.1 Help Desk Info
- Card Processor Name: Please provide the name of the card processor.
- Phone#: Please provide the phone number of the card processor.
- Terminal Name: Please provide the name of the terminal.
- Phone#: Please provide the phone number.


7.5.2 Card Type Info
If you encounter a suspicious transaction, please reach out to us immediately. Make sure to have your merchant ID number available for reference.
Here are the contact numbers for reporting suspicious transactions:
- American Express: (800) 528-2121
- Discover Card: (800) 347-1111
- Visa/MasterCard: (800) 944-1111
- Diners Club: (800) 525-9040
7.5.3 FAQ
Password Policy:
- Length: Passwords must be at least 8 characters long.
- Complexity: Passwords must include both upper and lower case letters, as well as numbers.
- User name restriction: User names cannot be used as part of the password.
7.5.4 Send Log
Share logs and error information via email, WhatsApp, or other communication channels to troubleshoot and resolve technical problems efficiently.
7.5.5 About
Provides information about the application, including its version and other relevant details.
- App Info: Displays information about the application, such as its name, version, and developer.
- Gateway Info: Offers details about the payment gateway used by the application, including its name and configuration.
- Processor Info: Provides information about the payment processor associated with the application, such as the processor’s name and contact details.
- Hardware Info: Displays information about the hardware used by the application, including the device’s model, manufacturer, and specifications.
- Payment Security Info: Offers information about the security measures implemented by the application to protect payment transactions and sensitive customer data.
7.6 Maintenance
Perform essential maintenance tasks such as rotating encryption keys, updating logs, unregistering the app, and accessing GPS data.
- Rotate KEK: This option allows users to rotate the Key Encryption Key (KEK), which is a cryptographic key used to encrypt and decrypt other keys. Rotating the KEK helps enhance security by regularly changing the encryption key.
- Rotate Keys: Users can rotate encryption keys associated with the system. Key rotation involves replacing existing keys with new ones to ensure the security and integrity of sensitive data.
- Rotate Logs: This feature enables users to rotate or clear log files, which contain records of system events and activities. Rotating logs helps manage the size and storage of log files, ensuring efficient system performance and facilitating effective auditing.
- Unregister: Unregistering refers to the process of removing the app or device from the current registration or association. This feature allows users to unregister the device or application from the current account or system.
- View GPS Data: Users can access and view GPS (Global Positioning System) data, which provides information about the geographical location of the device or user. This feature allows users to monitor and track location-related information.
- Update AJR File: Updating the AJR (Authorized Java Runtime) file involves installing the latest version or making necessary modifications to ensure the smooth functioning and compatibility of the Java runtime environment used by the application. This update helps maintain optimal performance and compatibility with the underlying system requirements.


7.7 Batch Management
Batch management is a process of grouping multiple transactions into a batch or a single set for processing. This section allows you to view batch history and close the current batch.
Close Batch
This setting allows us to close the current batch. Closing a batch is the process of finalizing and submitting the batch data for processing. The app automatically closes the batch at the end of each day. However, you manually close the batch by clicking on the Close Batch button.
Batch History
This setting allows the app to store and view the history of batch transactions. Batch history provides a detailed record of each transaction processed within a batch. This information can be used for various purposes, such as reconciliation, reporting, and auditing. You can view the history of all batches by clicking on the Batch History button.

8. Multi Currency Feature for QuickSale 1.0
The Multi Currency feature allows merchants to process sales in multiple currencies through QuickSale 1.0. Once enabled, you can select between the US Dollar and a second currency (Jamaican Dollar or Cayman Dollar) at the time of sale.
Two companies are configured behind the scenes:
- Transactions processed in US Dollars are routed through Company 1.
- Transactions processed in Jamaican Dollars or Cayman Dollars are routed through Company 2.
Merchants are prompted to select a currency before confirming a sale, ensuring the transaction is correctly routed based on the selected currency.
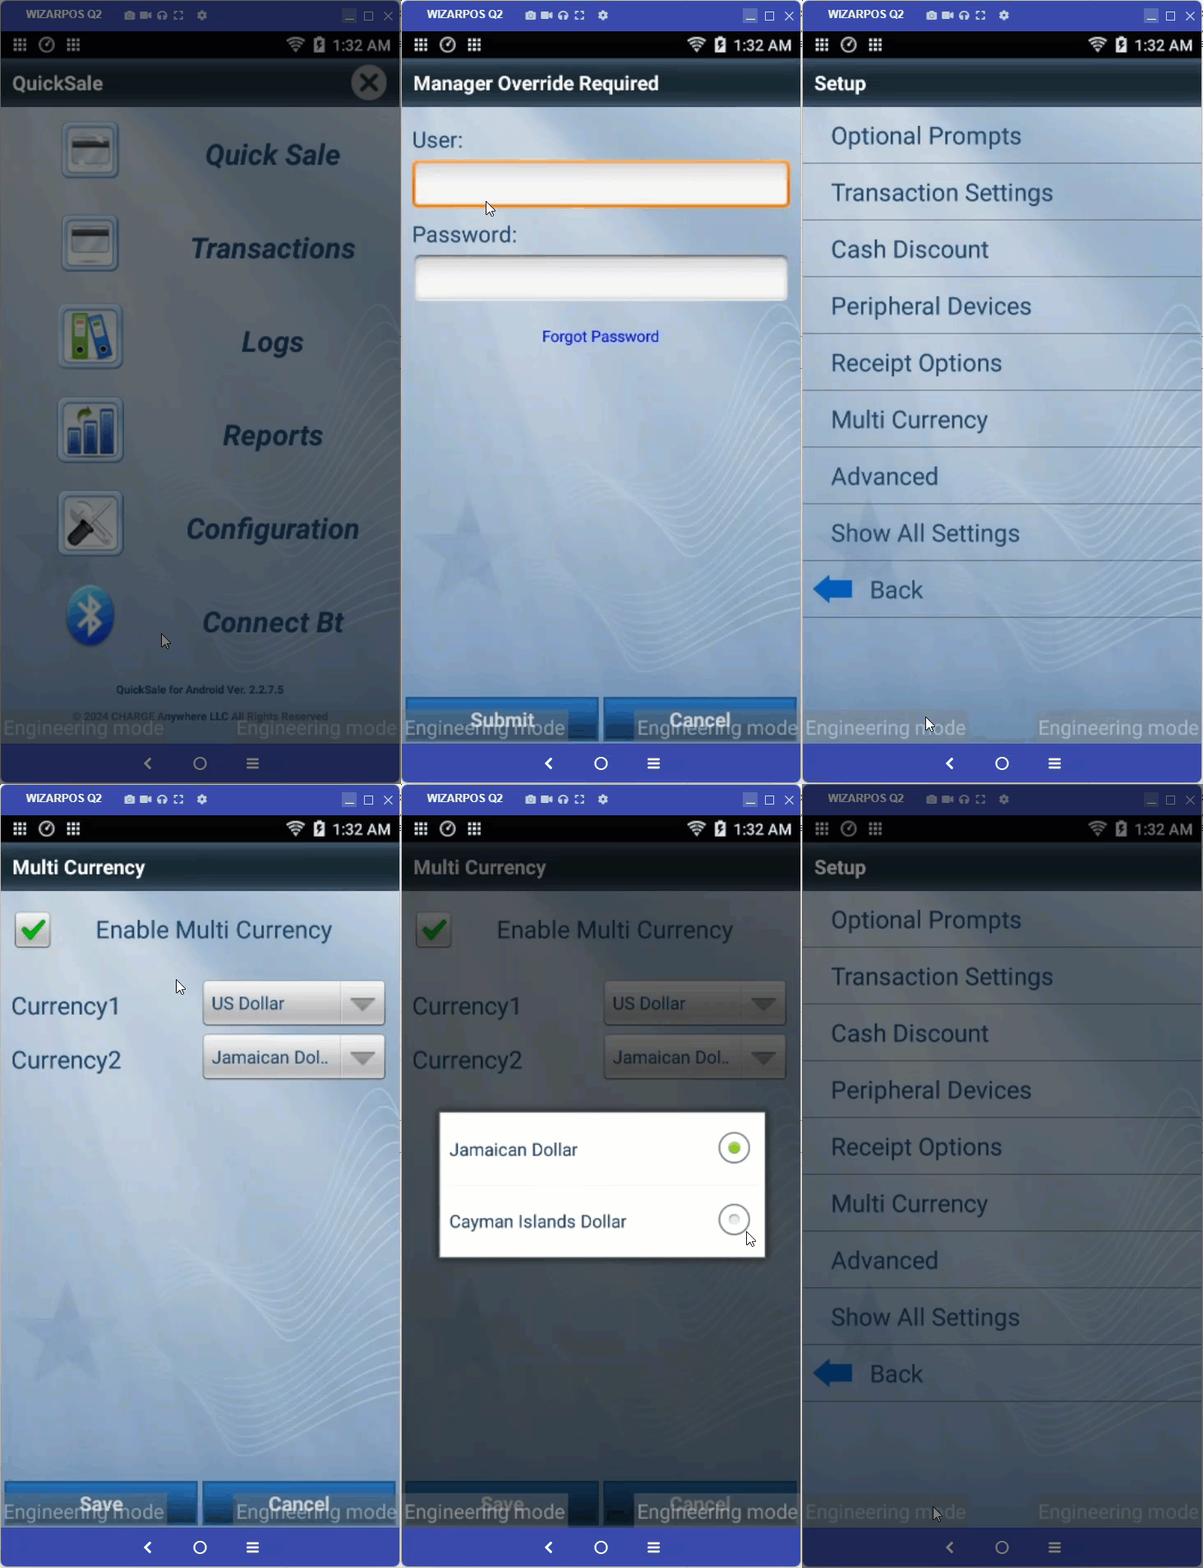
Setting Up Multi Currency
To enable and configure Multi Currency:
- From the home screen, tap Configuration.
- Select Setup.
- Enter username and password.
- Click Submit.
- Tap Multi Currency.
- Check the Enable Multi Currency checkbox.
- Two currencies are displayed:
- Currency 1: US Dollar (non-editable).
- Currency 2: Select either Jamaican Dollar or Cayman Dollar from the dropdown menu.
- Tap Save to apply the settings.
Note: The US Dollar is fixed as the primary currency. Only the second currency can be toggled between the Jamaican Dollar and the Cayman Dollar.
Processing a Sale with Multi Currency
Once Multi Currency is enabled:
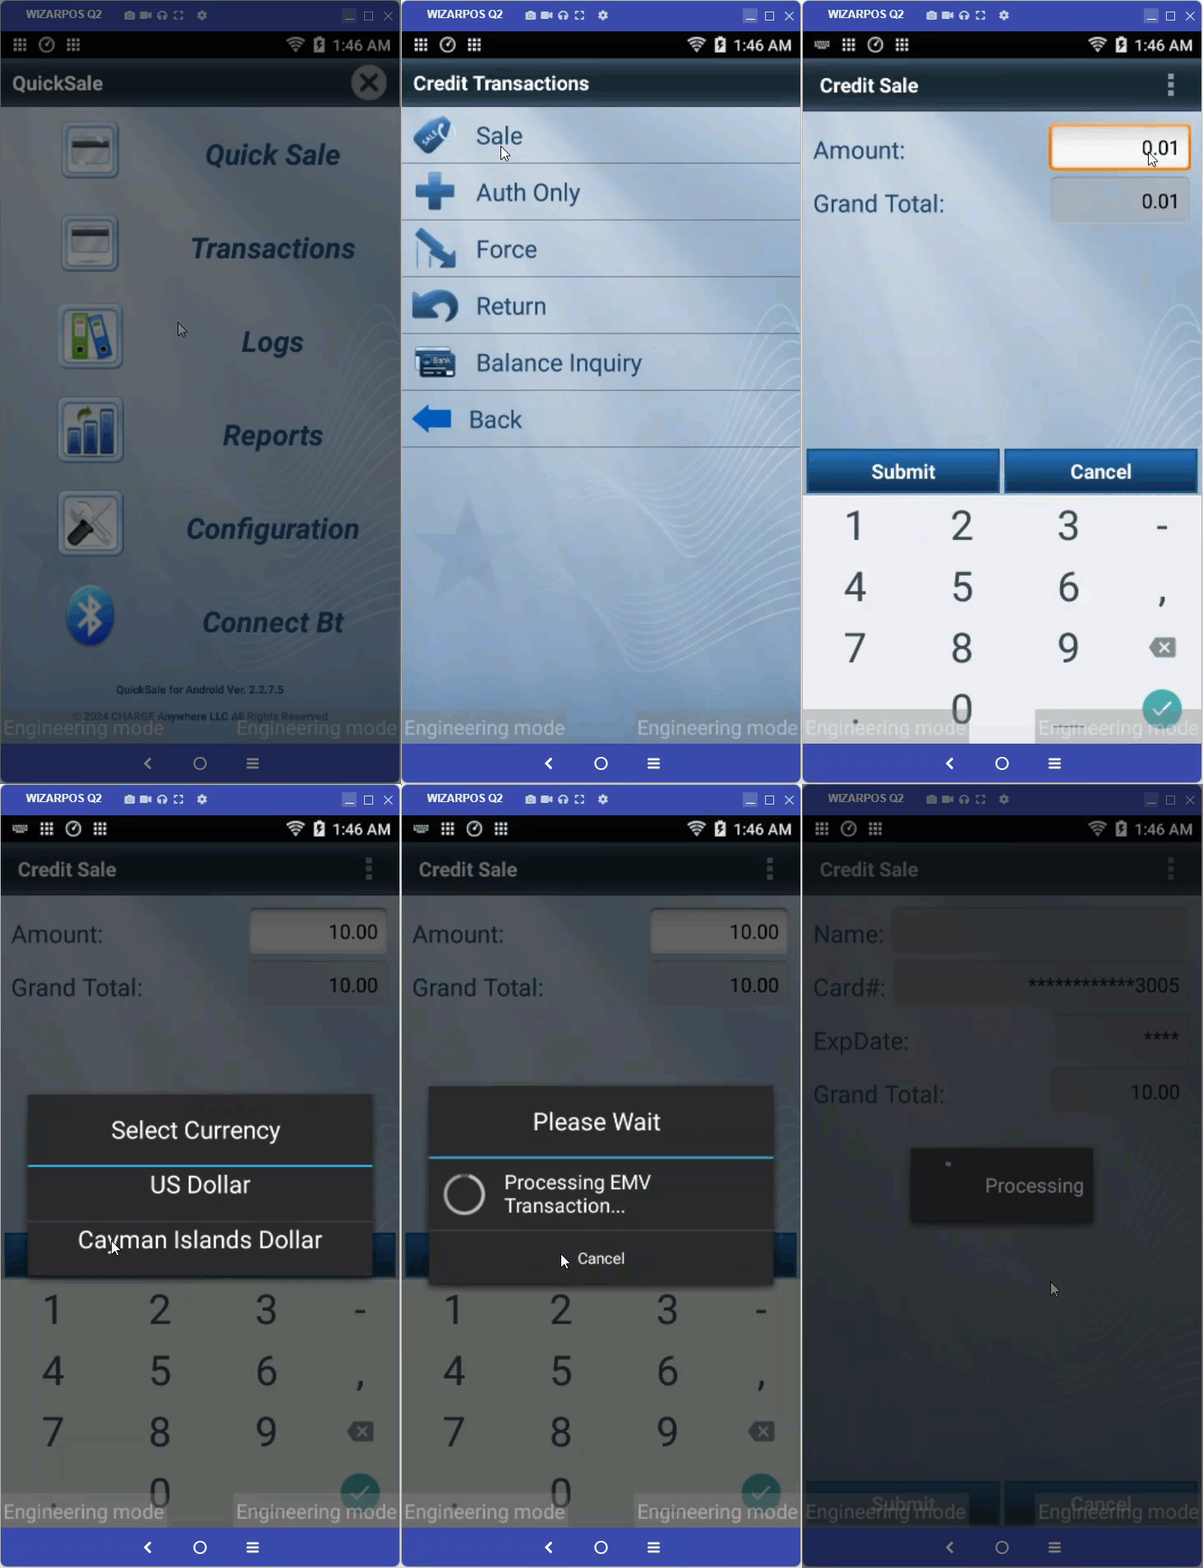
- From the home screen, select Transactions and choose Credit from the menu.
- Select Sale from the menu.
- Enter the sale amount.
- Tap Submit.
- The Select Currency pop-up is displayed.
- Choose the desired currency for the transaction:
- Selecting US Dollar processes the transaction under Company 1.
- Selecting Jamaican Dollar or Cayman Dollar processes the transaction under Company 2.
- Complete the sale as normal. For detailed information, refer to the processing sale section.
Important: Selecting the correct currency ensures the transaction is routed to the appropriate backend company.
9. Connect BT
The Connect BT feature in QuickSale 1.0 enables users to connect and pair Bluetooth devices with the application. This allows for seamless communication and integration between QuickSale and external peripherals or accessories.
10. Change Log
| Date | Update Summary |
| December 10, 2025 | Added a link to the QuickSale Semi Release Notes in the Introduction section. |
Receive a monthly summary of new and updated technical documents.