1. Introduction
QuickSale 2.0 by Charge Anywhere is a payment app designed to help businesses simplify their payment processing. QuickSale 2.0 app enables you to process transactions, view transaction history, and customize your settings. The app is designed to work with smartphones and tablets, making it easy to use wherever you are.
2. Getting Started
1. Installation
To begin, download and install the Charge Anywhere QuickSale 2.0 app on your Android device. If you haven’t already, contact our support team at support@chargeanywhere.com to obtain your license number.
2. Account Setup
Open the app and create your account with your license number and phone number. Once your account is set up, you can start accepting payments and managing your transactions.
3. Registration
1. Getting Started
Open the app on your device, and you’ll be prompted to enter your registration credentials.
2. Credentials
- Manual Entry: Enter your license number and phone number in the respective fields to register and access the app. Accurate information is crucial for a successful registration process.
- Scan QR Code: Alternatively, click the Click to Scan QR Code option to scan a QR code containing your registration credentials. This feature simplifies the registration process by auto-filling your details and automatically submitting them without the need for further action.
3. Submit
- If you’ve entered your details manually, click Submit to complete the registration process and log into your account.
- For QR Code registration, submission is automatic, and you will be logged in without additional steps.

4. Login
Note: Admin users are not required to log in and can access the app immediately after registration without creating new user accounts. However, to add new users and assign different or restricted permissions, admin users must follow the steps outlined below.
1. Admin Login and Setup
After registration, the admin must:
- Set up their password. Refer to the Configuration section.
- Add a new user. Refer to the User Management section.
- Set permissions for the new user, specifying access levels and roles, such as Cash Management, Reports, Security, and others.
- After configuring the new user, the admin can exit the app.
2. New User Login
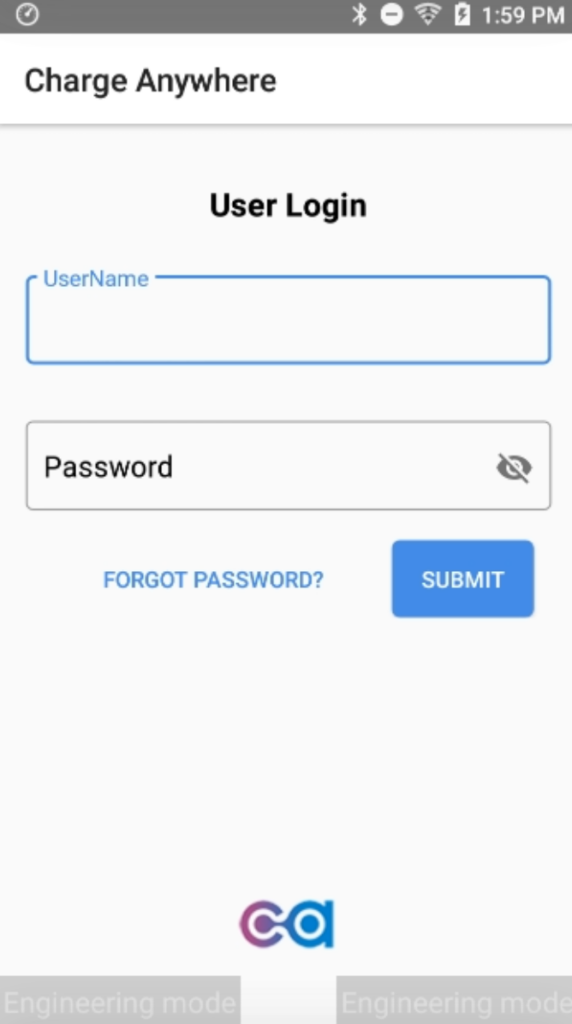
Once the admin has added the new user and set the necessary permissions, the new user can log in using their login credentials (UserName and Password) on the User Login screen.
The login interface appears as follows:
- UserName: Enter the provided username.
- Password: Enter the provided password.
- If the user forgets the password, they can click Forgot Password? to reset it.
Upon successful login, the user is directed to their dashboard.
Note: If a new user attempts to access a feature for which they lack the required permissions, the Manager Override screen will appear. At this point, either the admin or the manager can enter their PIN or password to authorize access and proceed.
5. Transactions
Transactions involve the exchange of payment for goods or services between a customer and a merchant. QuickSale 2.0 supports various transaction types, including sale, authorization, capture, refund, and void, across multiple payment methods.
Go to the Configuration section to configure the app for processing transactions and receipts.
Note: To know the list of predefined trigger values that can be used to test various transaction responses within Charge Anywhere, refer to the Trigger Values for Testing Transactions guide.
Sale
A sale is a completed transaction where a customer purchases goods or services and pays using a credit or debit card. It is the primary transaction type for selling products or services.
QuickSale 2.0 supports the following tender types:
- ACH (Automated Clearing House)
- Cash
- Check
- Credit
- Gift/Loyalty
- Debit
- EBT Cash
- EBT Food Stamp
Processing Sale with the Credit Tender Type
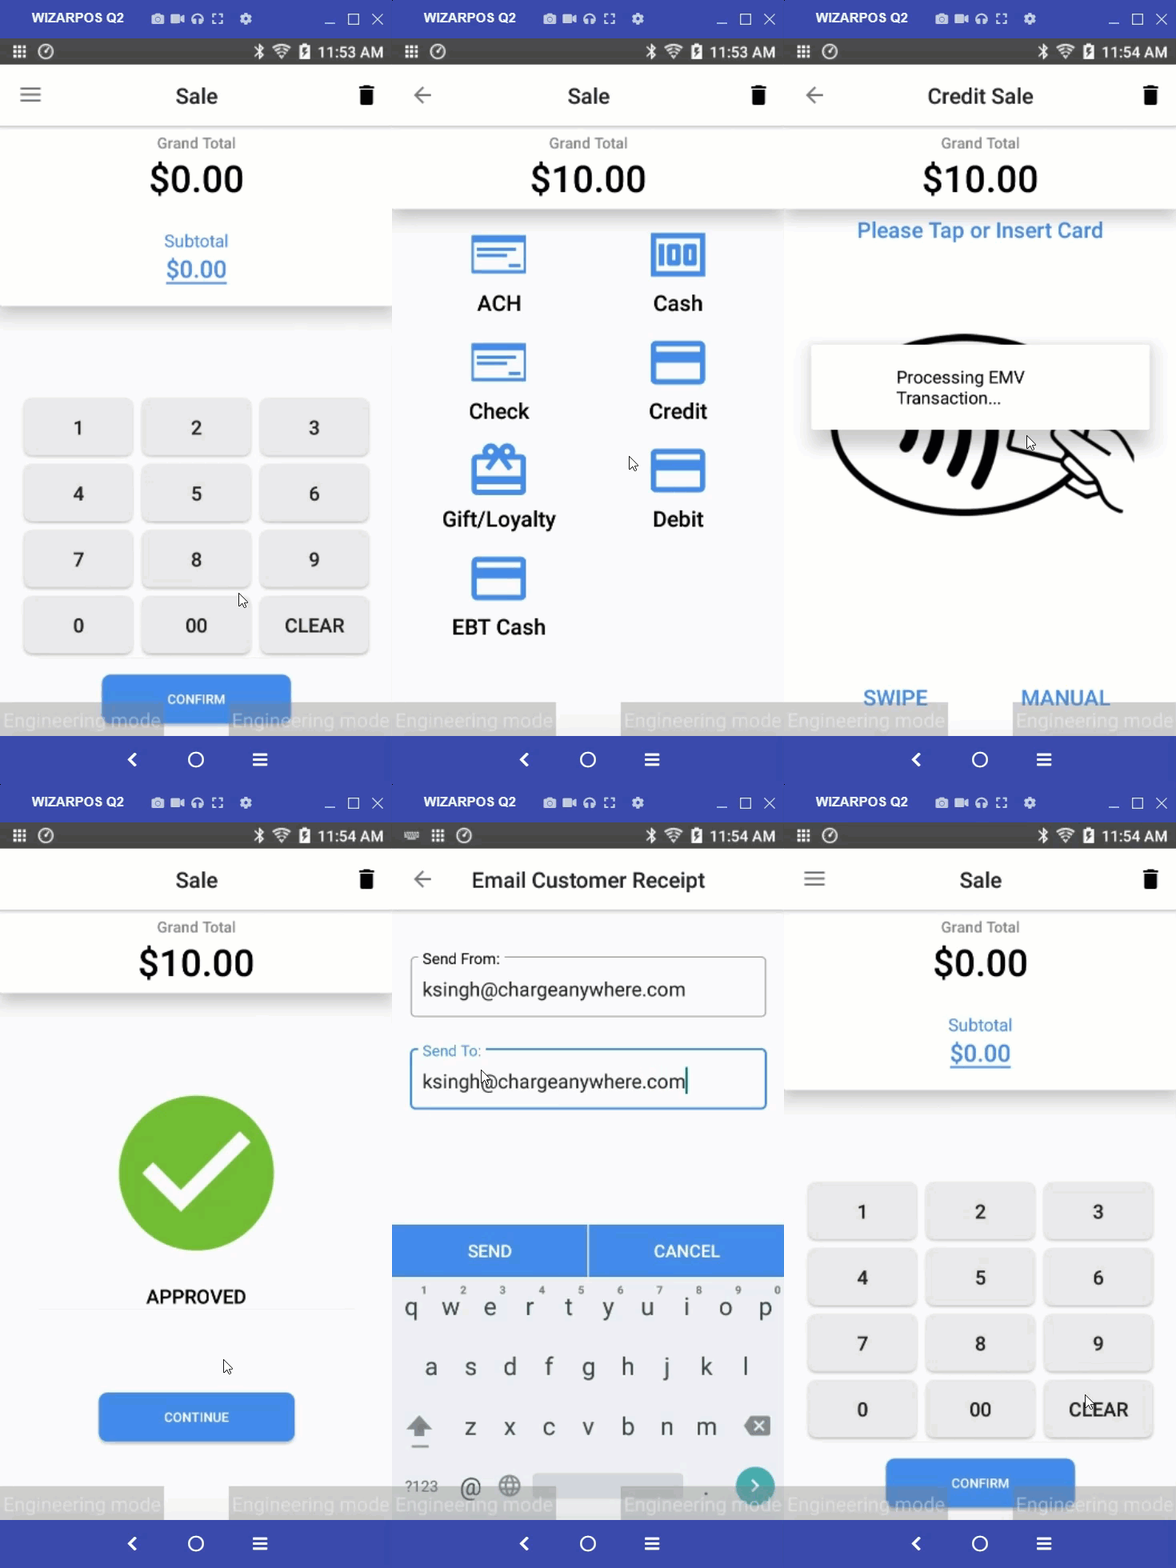
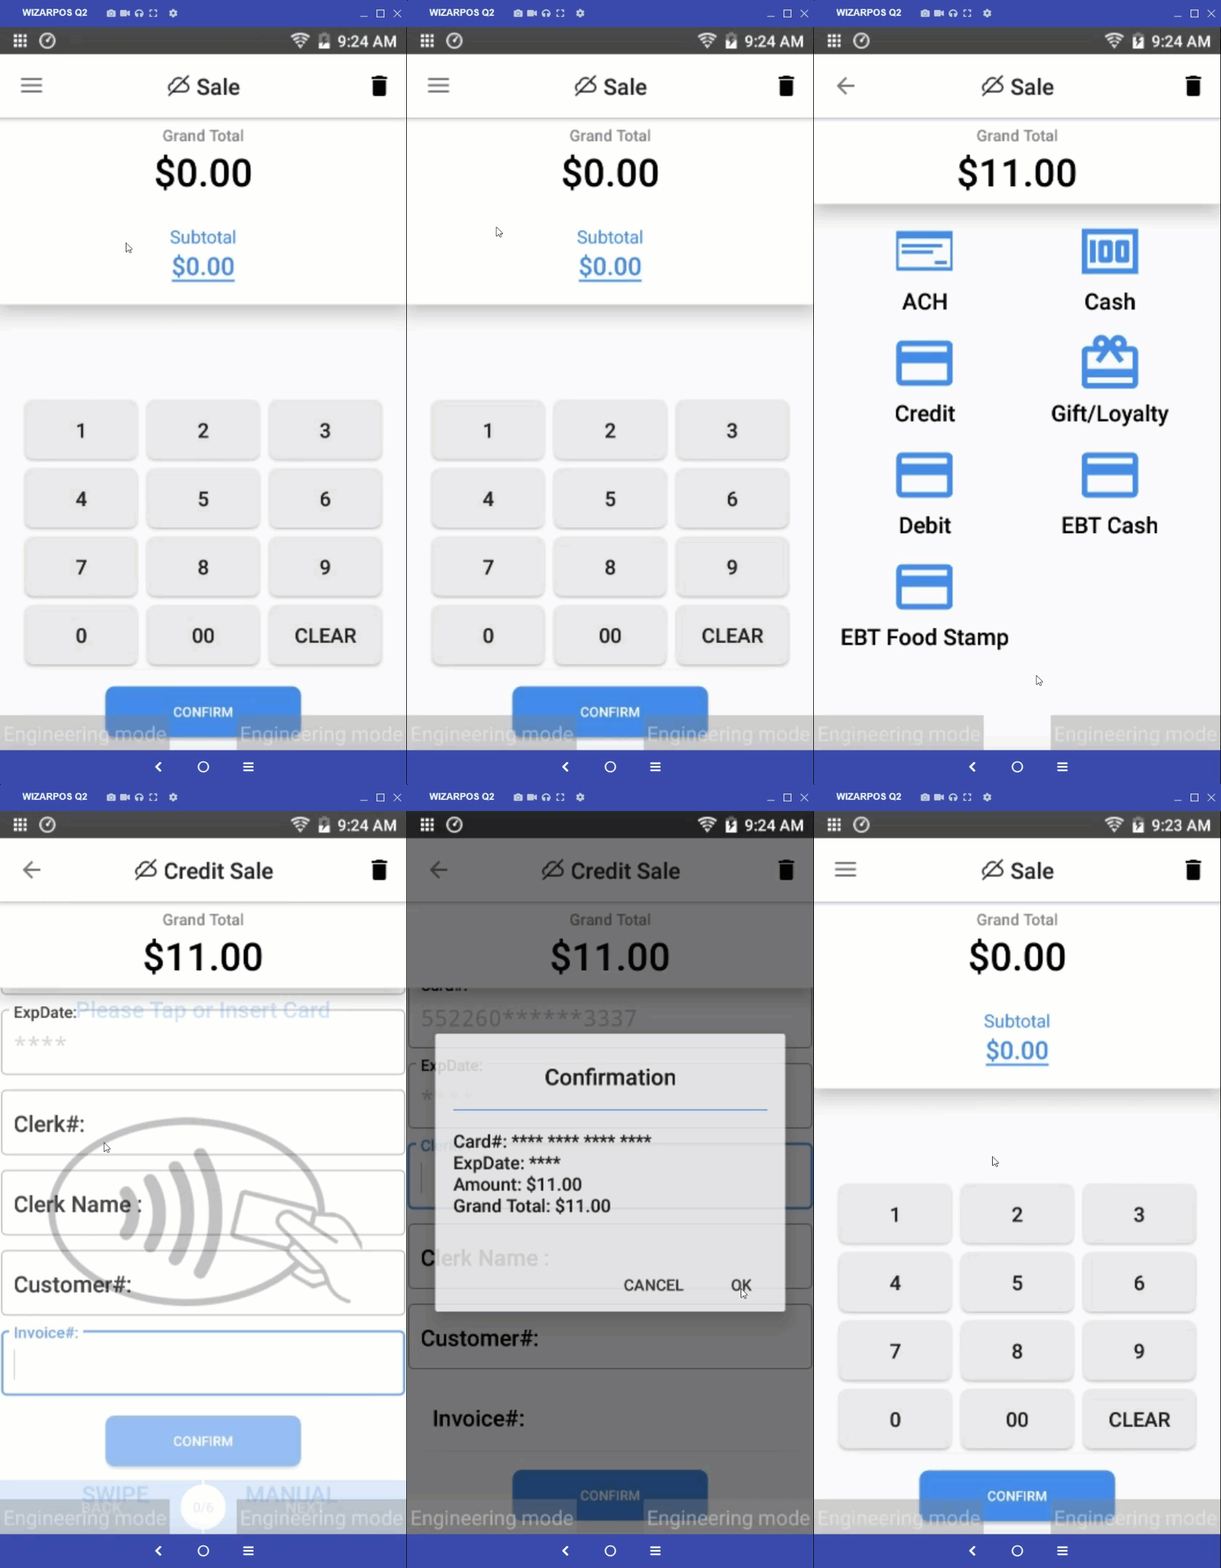
1. Accepting Payment
- Open the QuickSale 2.0 app.
- Select Sale from the menu options.
- Input the charge amount and confirm.
2. Choosing Tender Type
- Select the preferred tender type. Credit in this case.
- Tap/insert the card for automatic entry. You can also manually enter card details by selecting the Manual option.
3. Approval and Receipt
- Once approved, you’ll see the Approved message. Click Continue.
- Collect the customer’s signature, email, and phone number, if enabled in the receipt options configuration.
- Select Print Merchant Copy to print the merchant receipt and Print Customer Copy to print the customer receipt, if enabled in the receipt options configuration.
- Select Done to complete the transaction.
Note: You can configure the header and footer of the receipt from Configuration -> Set Up Options -> Optional Prompts -> Receipt Options.
Processing Sale with the Gift Tender Type
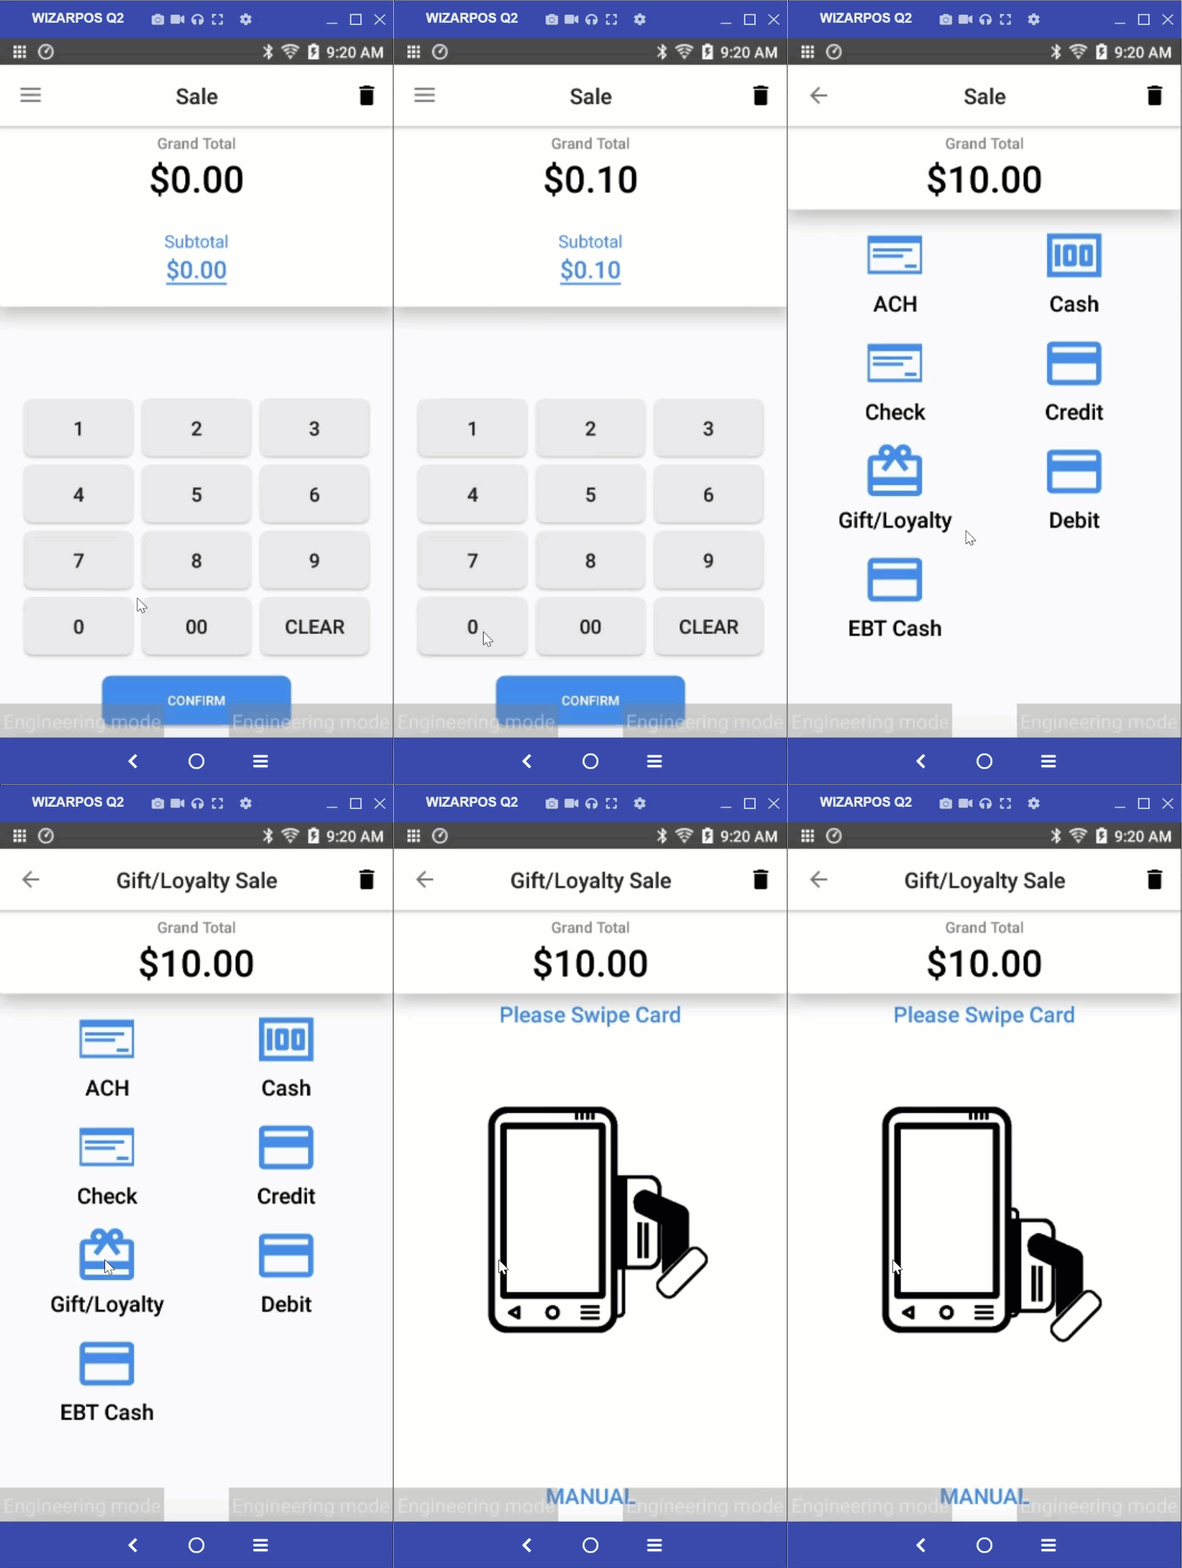
1. Accepting Payment
- Open the QuickSale 2.0 app.
- Select Sale from the menu options.
- Input the charge amount and confirm.
2. Choosing Tender Type
- Select the tender type as a Gift/Loyalty.
- Swipe the gift card for automatic entry. You can also manually enter card details by selecting the Manual option.
3. Approval and Receipt
- Once approved, you’ll see the Approved message. Click Continue.
- Collect the customer’s signature, email, and phone number, if enabled in the receipt options configuration.
- Select Print Merchant Copy to print the merchant receipt and Print Customer Copy to print the customer receipt, if enabled in the receipt options configuration.
- Select Done to complete the transaction.
Processing Sale with the Debit Tender Type
1. Accepting Payment
- Open the QuickSale 2.0 app.
- Select Sale from the menu options.
- Input the charge amount and confirm.
2. Choosing Tender Type
- Select the tender type as a Debit.
- Tap/insert the card for automatic entry. You can also manually enter card details by selecting the Manual option.
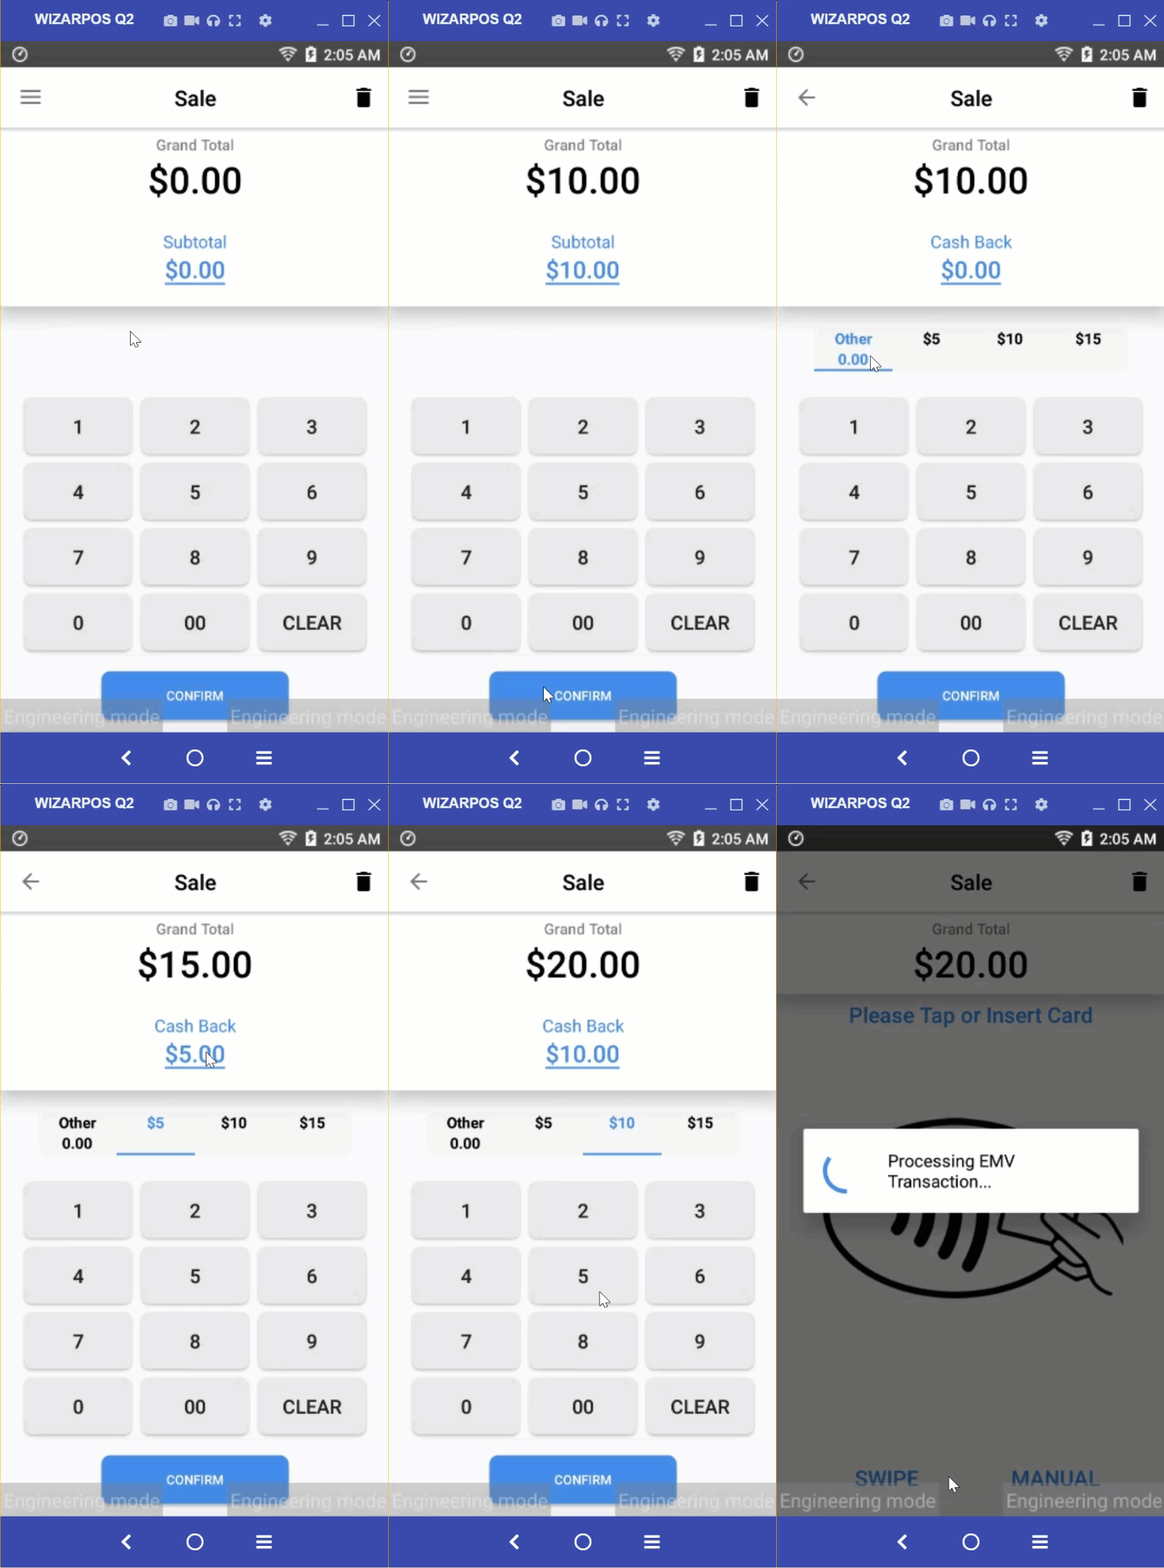
3. Selecting Cash Back Amount
- Select the predefined cashback amount or enter the other cashback amount and confirm.
4. Approval and Receipt
- Once approved, you’ll see the Approved message. Click Continue.
- Collect the customer’s signature, email, and phone number, if enabled in the receipt options configuration.
- Select Print Merchant Copy to print the merchant receipt and Print Customer Copy to print the customer receipt, if enabled in the receipt options configuration.
- Select Done to complete the transaction.
Note: Cashback is a feature of Debit Sale transactions. To enable the cashback:
- Channel/Merchant must have PIN enabled.
- The Debit tender type must be enabled.
- Cash Back in Debit must be enabled.
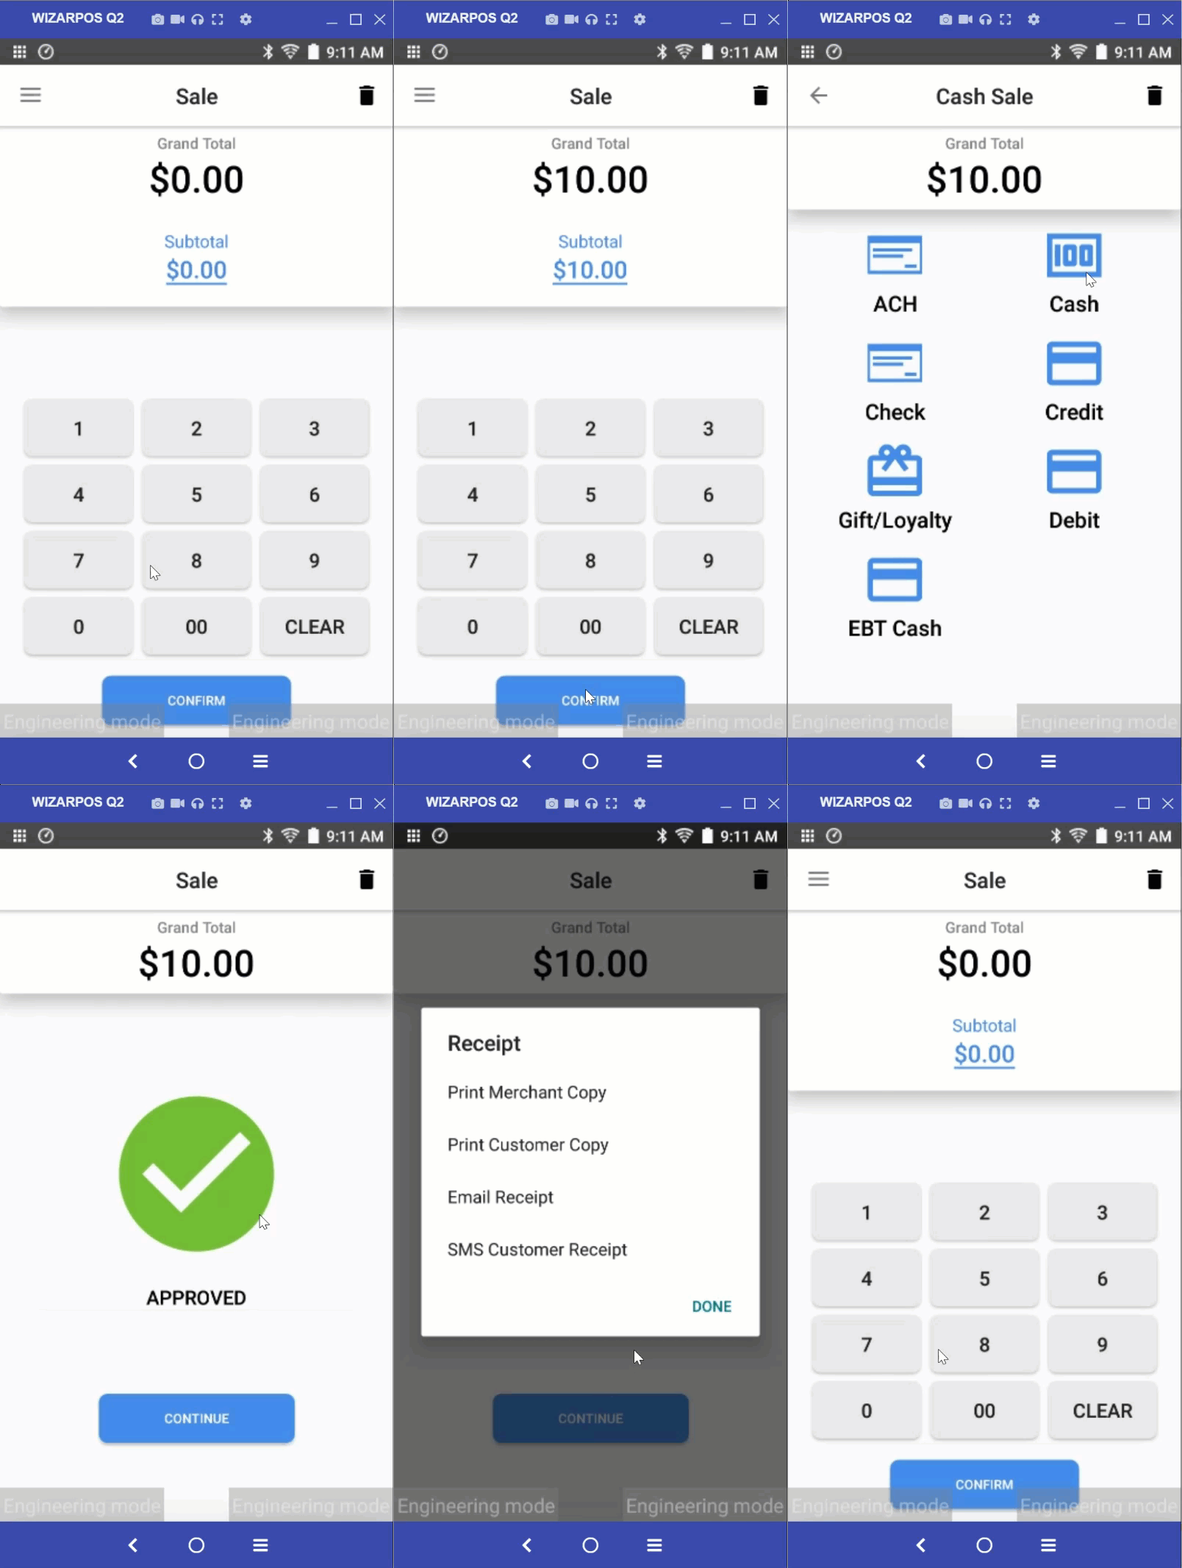
Processing Sale with the Cash Tender Type
1. Accepting Payment
- Open the QuickSale 2.0 app.
- Select Sale from the menu options.
- Input the charge amount and confirm.
2. Choosing Tender Type
- Select the tender type as Cash.
3. Approval and Receipt
- Once approved, you’ll see the Approved message. Click Continue.
- Collect the customer’s signature, email, and phone number, if enabled in the receipt options configuration.
- Select Print Merchant Copy to print the merchant receipt and Print Customer Copy to print the customer receipt, if enabled in the receipt options configuration.
- Select Done to complete the transaction.
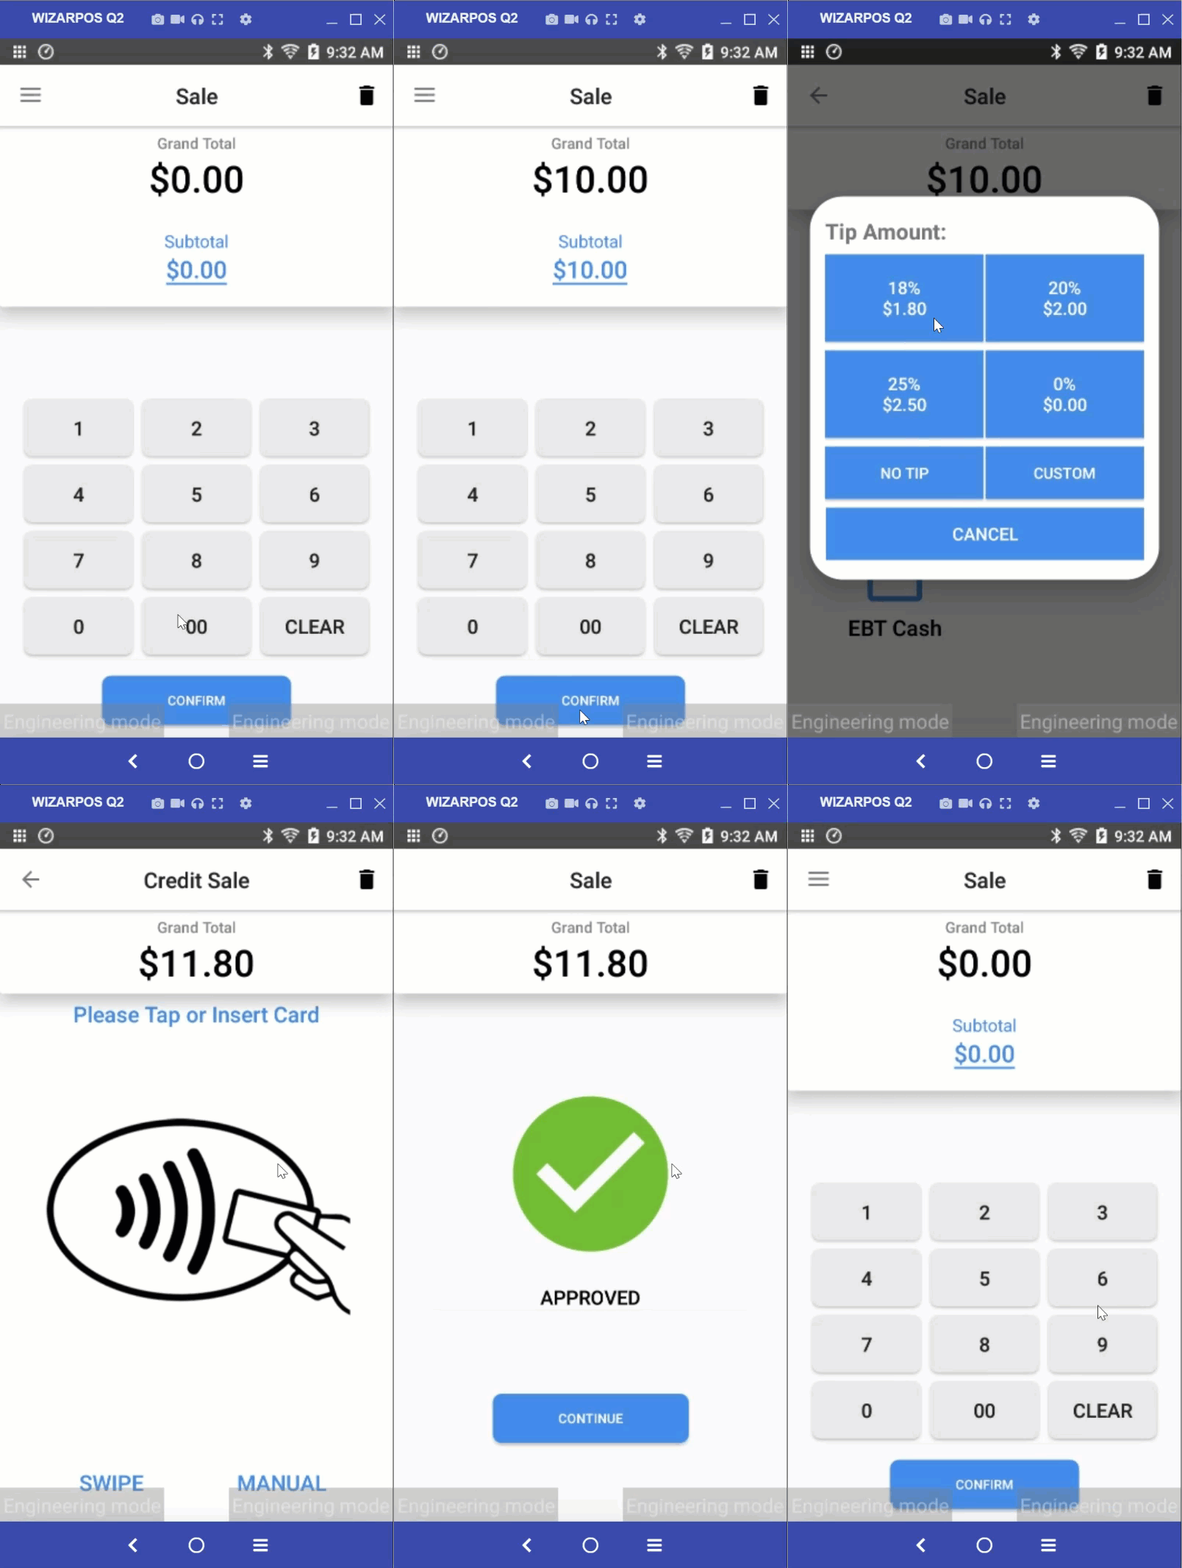
Processing Sale with Tip
- Enabling Tip
- Open the QuickSale 2.0 app.
- Go to
Configurations -> Setup Options -> Optional Prompts - Enable the tip option if it’s not already enabled.
- Processing a Sale with Tip
- Open the QuickSale 2.0 app.
- Select Sale from the menu options.
- Input the charge amount and confirm.
- Selecting Tip Percentage
- After entering the charge amount, select the tip percentage.
- Click Submit to proceed.
- Choosing Tender Type
- Select the preferred payment method.
- Tap/insert the card for automatic entry. You can also manually enter card details by selecting the Manual option.
- Approval and Receipt
- Once approved, you’ll see the Approved message. Click Continue.
- Collect the customer’s signature, email, and phone number, if enabled in the receipt options configuration.
- Select Print Merchant Copy to print the merchant receipt and Print Customer Copy to print the customer receipt, if enabled in the receipt options configuration.
- Select Done to complete the transaction.
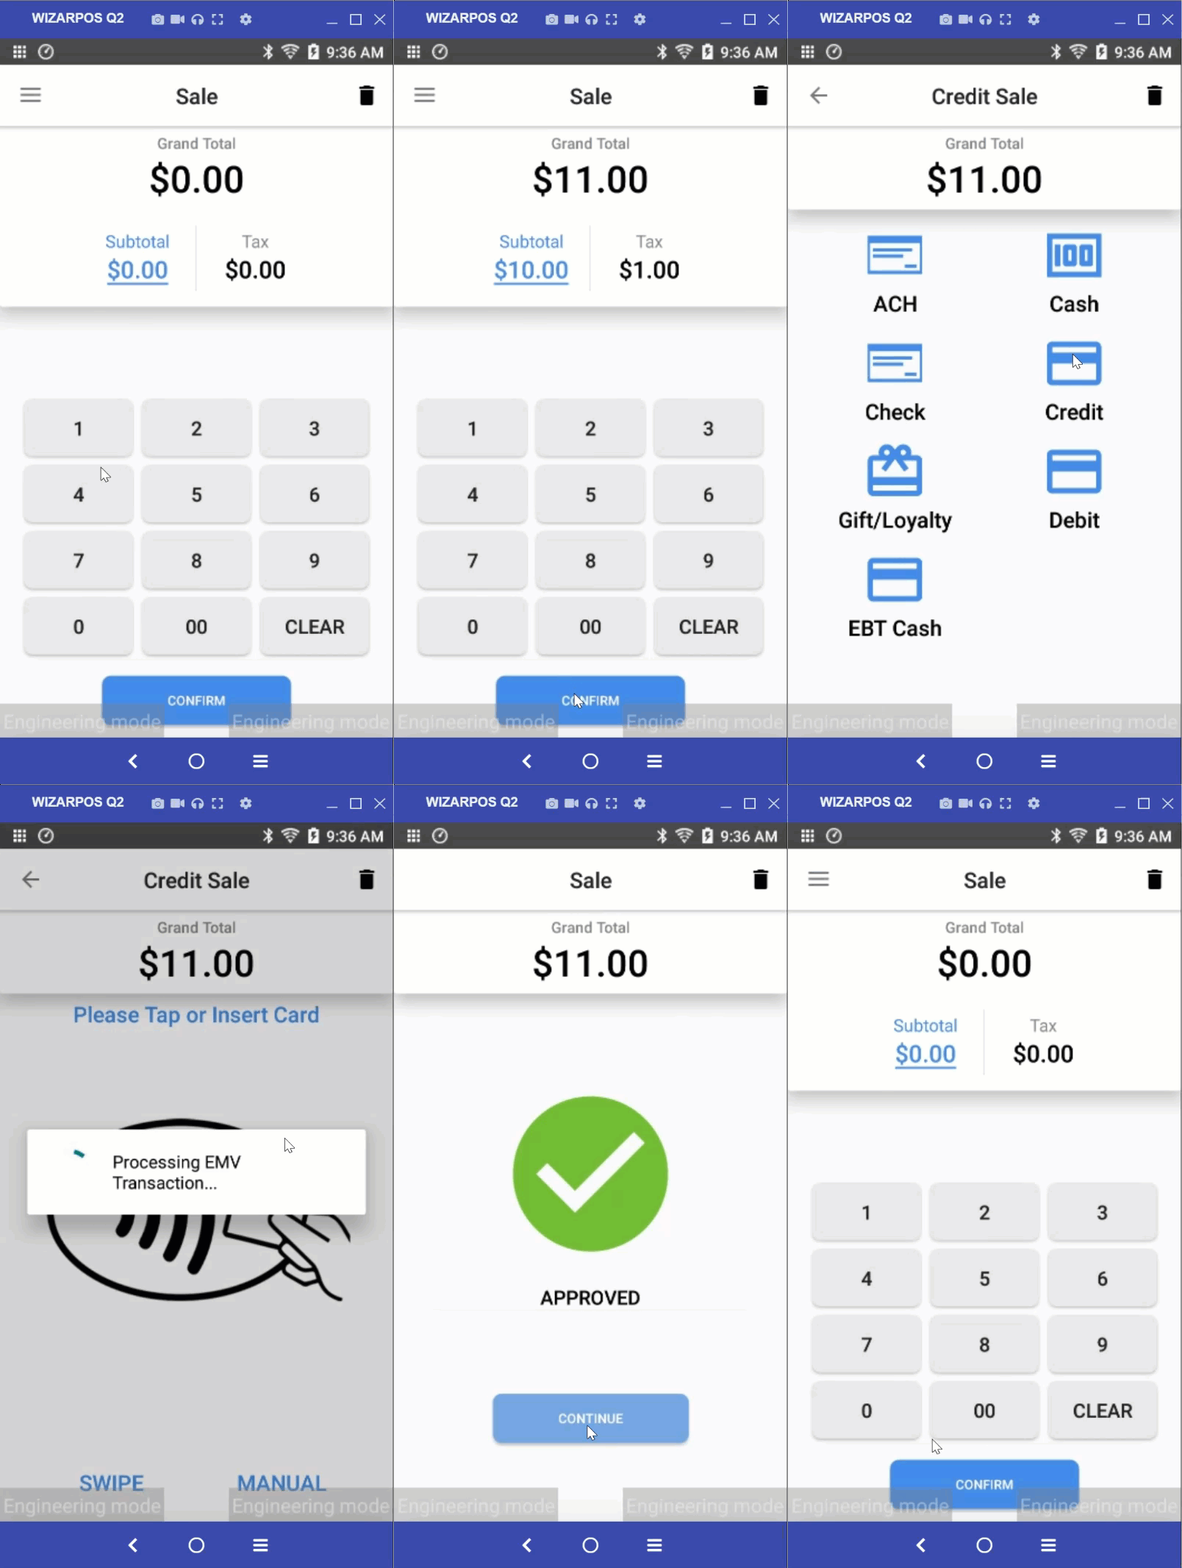
Processing Sale with Tax
- Enabling Tax
- Open the QuickSale 2.0 app.
- Go to
Configurations -> Setup Options -> Optional Prompts - Enable the tax option.
- Processing a Sale with Tax
- Open the QuickSale 2.0 app.
- Select Sale from the menu options.
- Input the charge amount and confirm. Tax will be automatically calculated based on your tax settings in the Configuration section.
- Choosing Tender Type
- Select the preferred payment method.
- Tap/insert the card for automatic entry. You can also manually enter card details by selecting the Manual option.
- Approval and Receipt
- Once approved, you’ll see the Approved message. Click Continue.
- Collect the customer’s signature, email, and phone number, if enabled in the receipt options configuration.
- Select Print Merchant Copy to print the merchant receipt and Print Customer Copy to print the customer receipt, if enabled in the receipt options configuration.
- Select Done to complete the transaction.
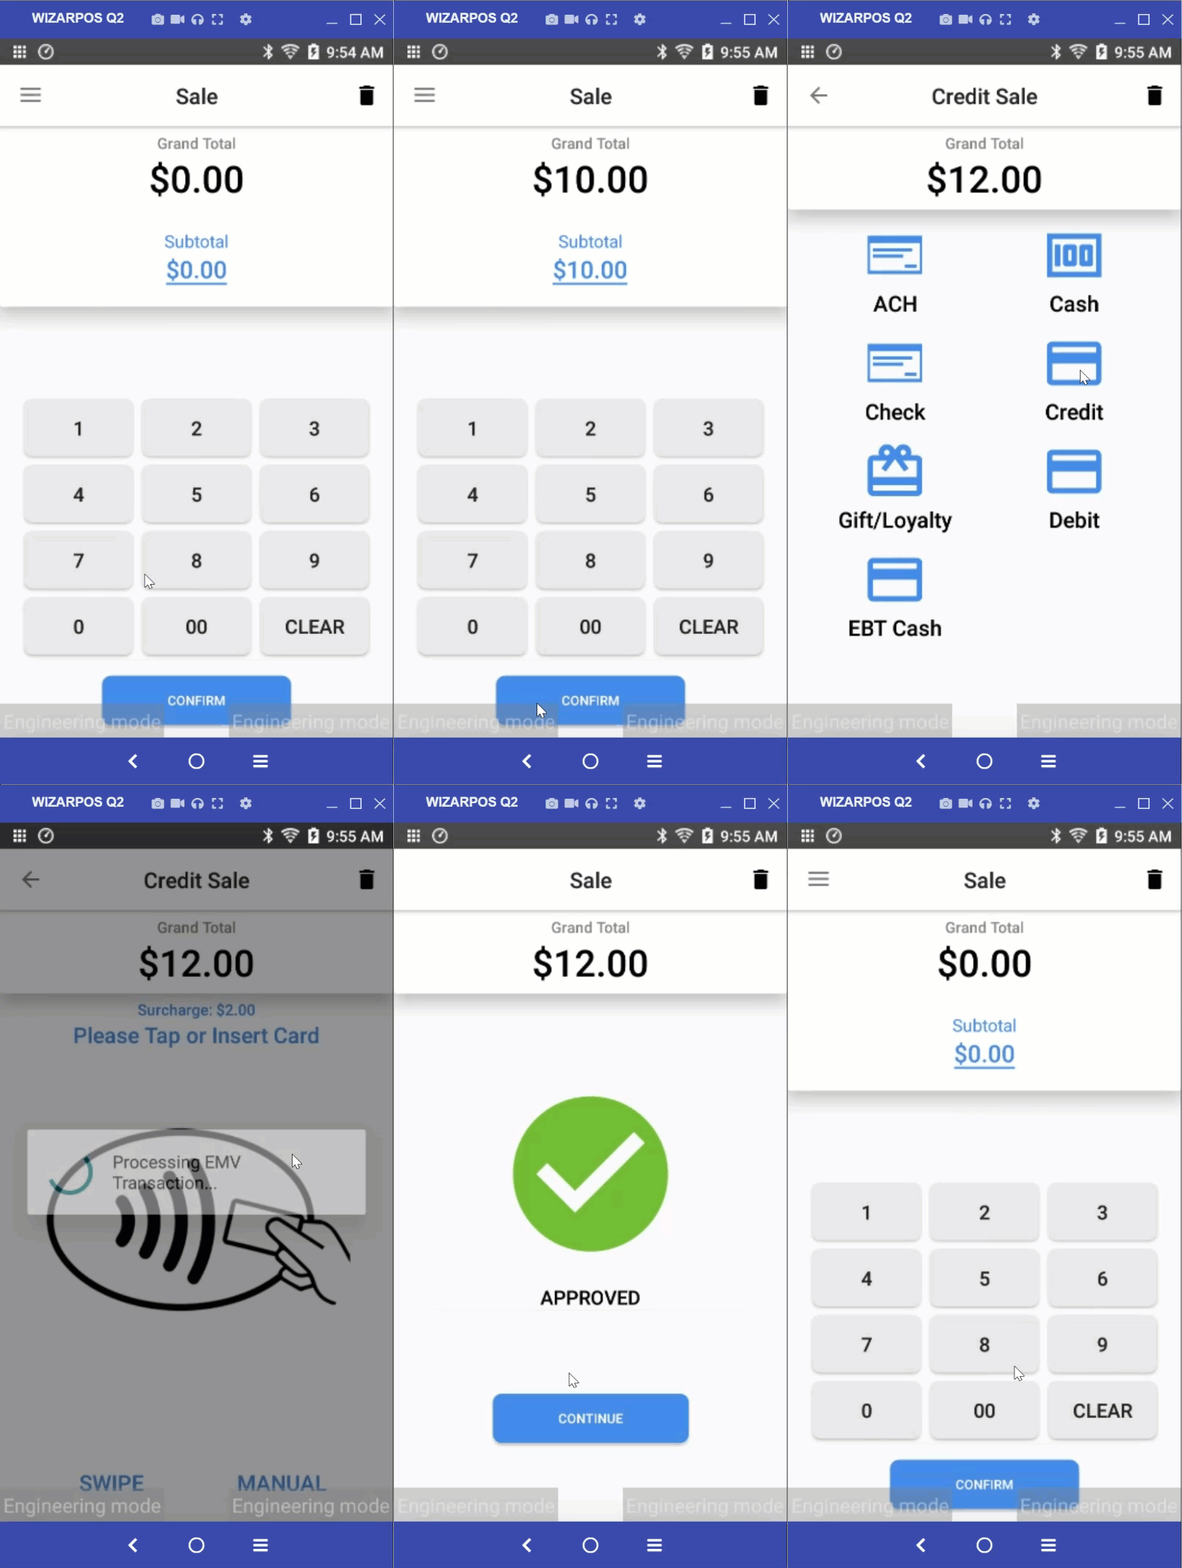
Processing Sale with Surcharge
- Enabling Surcharge
- Open the QuickSale 2.0 app.
- Go to
Configurations -> Setup Options -> Fee Program - Enable the Fee Program by checking the check box.
- Select Surcharge from the dropdown and configure the surcharge settings.
- Processing a Sale with Surcharge
- Open the QuickSale 2.0 app.
- Enter the charge amount or select Sale from the menu options.
- Input the charge amount and confirm.
Note: Surcharge will get automatically applied to the sale amount.
- Choosing Tender Type
- Select the preferred payment method.
- Tap/insert the card for automatic entry. You can also manually enter card details by selecting the Manual option.
- Approval and Receipt
- Once approved, you’ll see the Approved message. Click Continue.
- Collect the customer’s signature, email, and phone number, if enabled in the receipt options configuration.
- Select Print Merchant Copy to print the merchant receipt and Print Customer Copy to print the customer receipt, if enabled in the receipt options configuration.
- Select Done to complete the transaction.
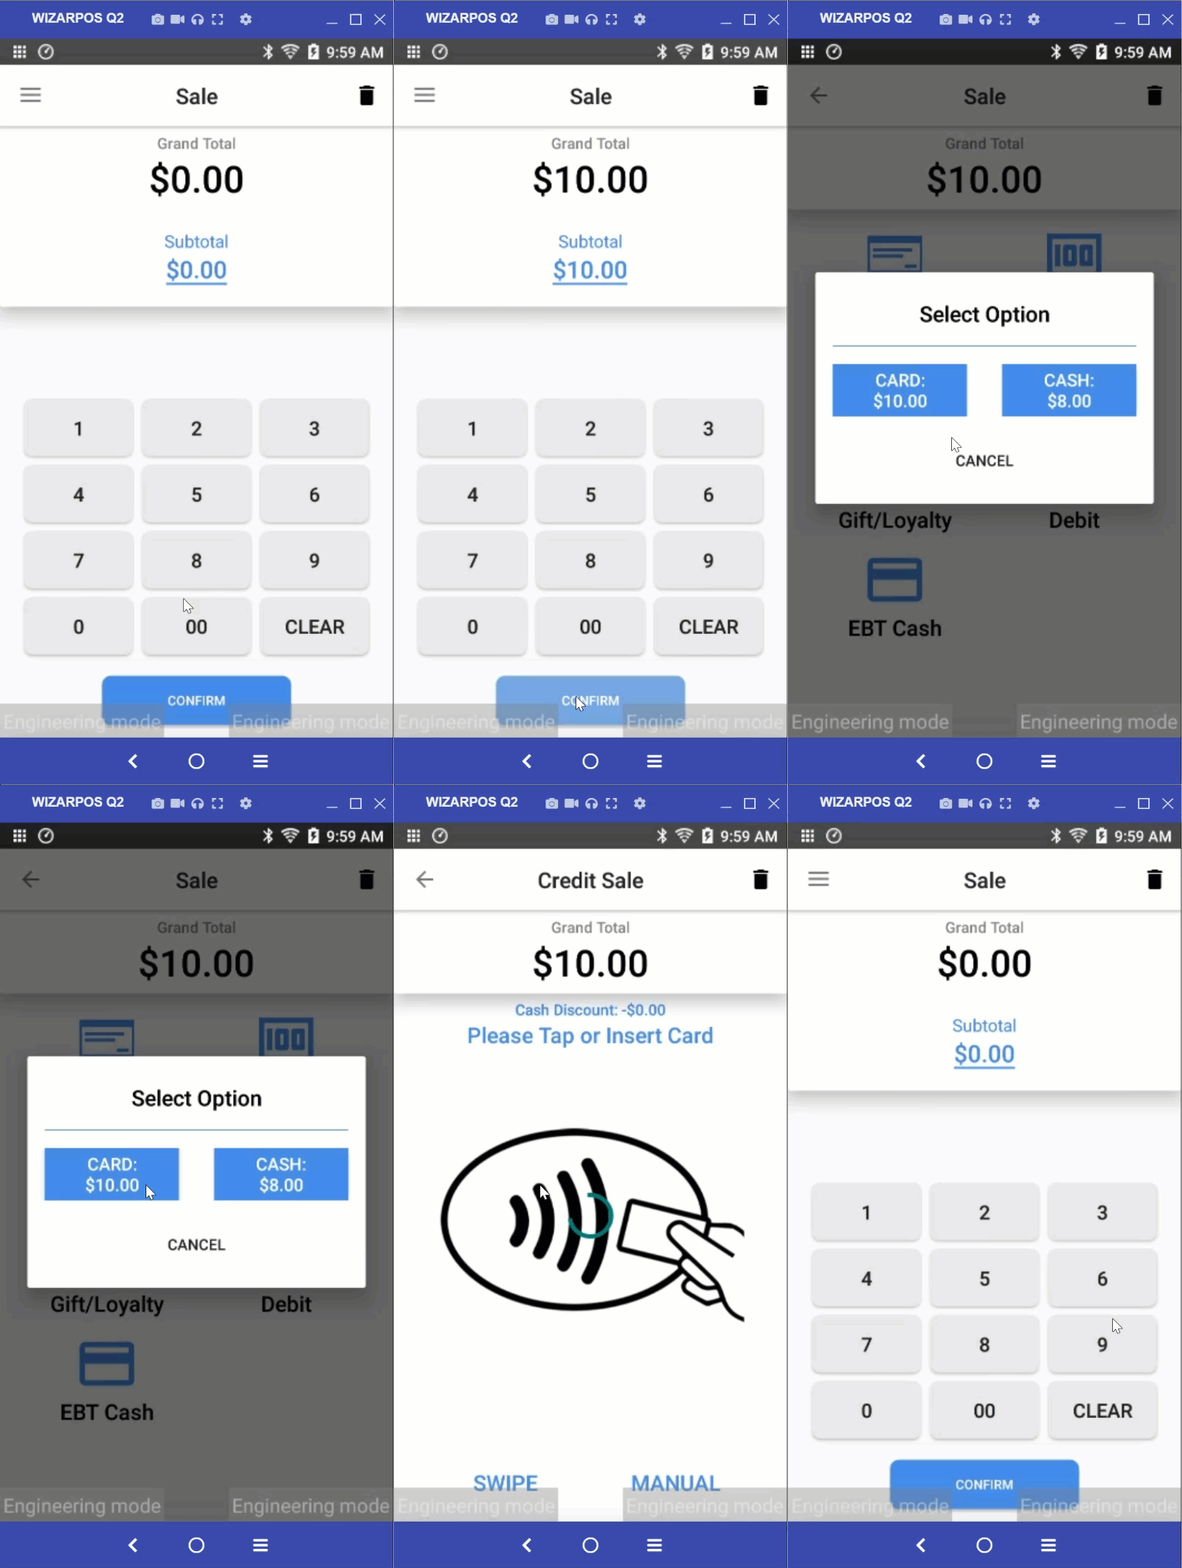
Processing Sale with Cash Discount
- Enabling Cash Discount
- Open the QuickSale 2.0 app.
- Go to
Configurations -> Setup Options -> Fee Program - Enable the Fee Program by checking the check box.
- Select Cash Discount from the dropdown and configure the cash discount settings.
- Processing a Sale with Cash Discount
- Open the QuickSale 2.0 app.
- Select Sale from the menu options.
- Input the charge amount and confirm.
- Selecting Cash Discount Type
- After entering the charge amount, you’ll be prompted to choose the cash discount type:
- Card: Adds the cash discount fee to the sale amount.
- Cash: Does not add the cash discount fee to the sale amount.
- After entering the charge amount, you’ll be prompted to choose the cash discount type:
- Choosing Tender Type
- Select the preferred payment method.
- Tap/insert the card for automatic entry. You can also manually enter card details by selecting the Manual option.
- Approval and Receipt
- Once approved, you’ll see the Approved message. Click Continue.
- Collect the customer’s signature, email, and phone number, if enabled in the receipt options configuration.
- Select Print Merchant Copy to print the merchant receipt and Print Customer Copy to print the customer receipt, if enabled in the receipt options configuration.
- Select Done to complete the transaction.
Credit Sale on BlueCash 50 Device
1. Accepting Payment
- Open the QuickSale 2.0 app.

Note: The BlueCash 50 device shows the WELCOME message when you launch the app. - Select Sale from the menu options.
- Input the charge amount and confirm.
2. Choosing Tender Type
- Select the preferred tender type. Credit in this case.
- Tap/insert the card for automatic entry. You can also manually enter card details by selecting the Manual option.

Note: The BlueCash 50 device shows the sale amount on the customer-facing LCD screen when you enter the amount in the app.
3. Approval and Receipt
- Once approved, you’ll see the Approved message. Click Continue.
- Collect the customer’s signature, email, and phone number, if enabled in the receipt options configuration.
- Select Print Merchant Copy to print the merchant receipt and Print Customer Copy to print the customer receipt, if enabled in the receipt options configuration.
- Select Done to complete the transaction.

Note: The BlueCash 50 device shows the APPROVED message on the customer-facing LCD screen when the app approves the transaction.

Note: The BlueCash 50 device shows the DECLINED message on the customer-facing LCD screen when the app declines the transaction.
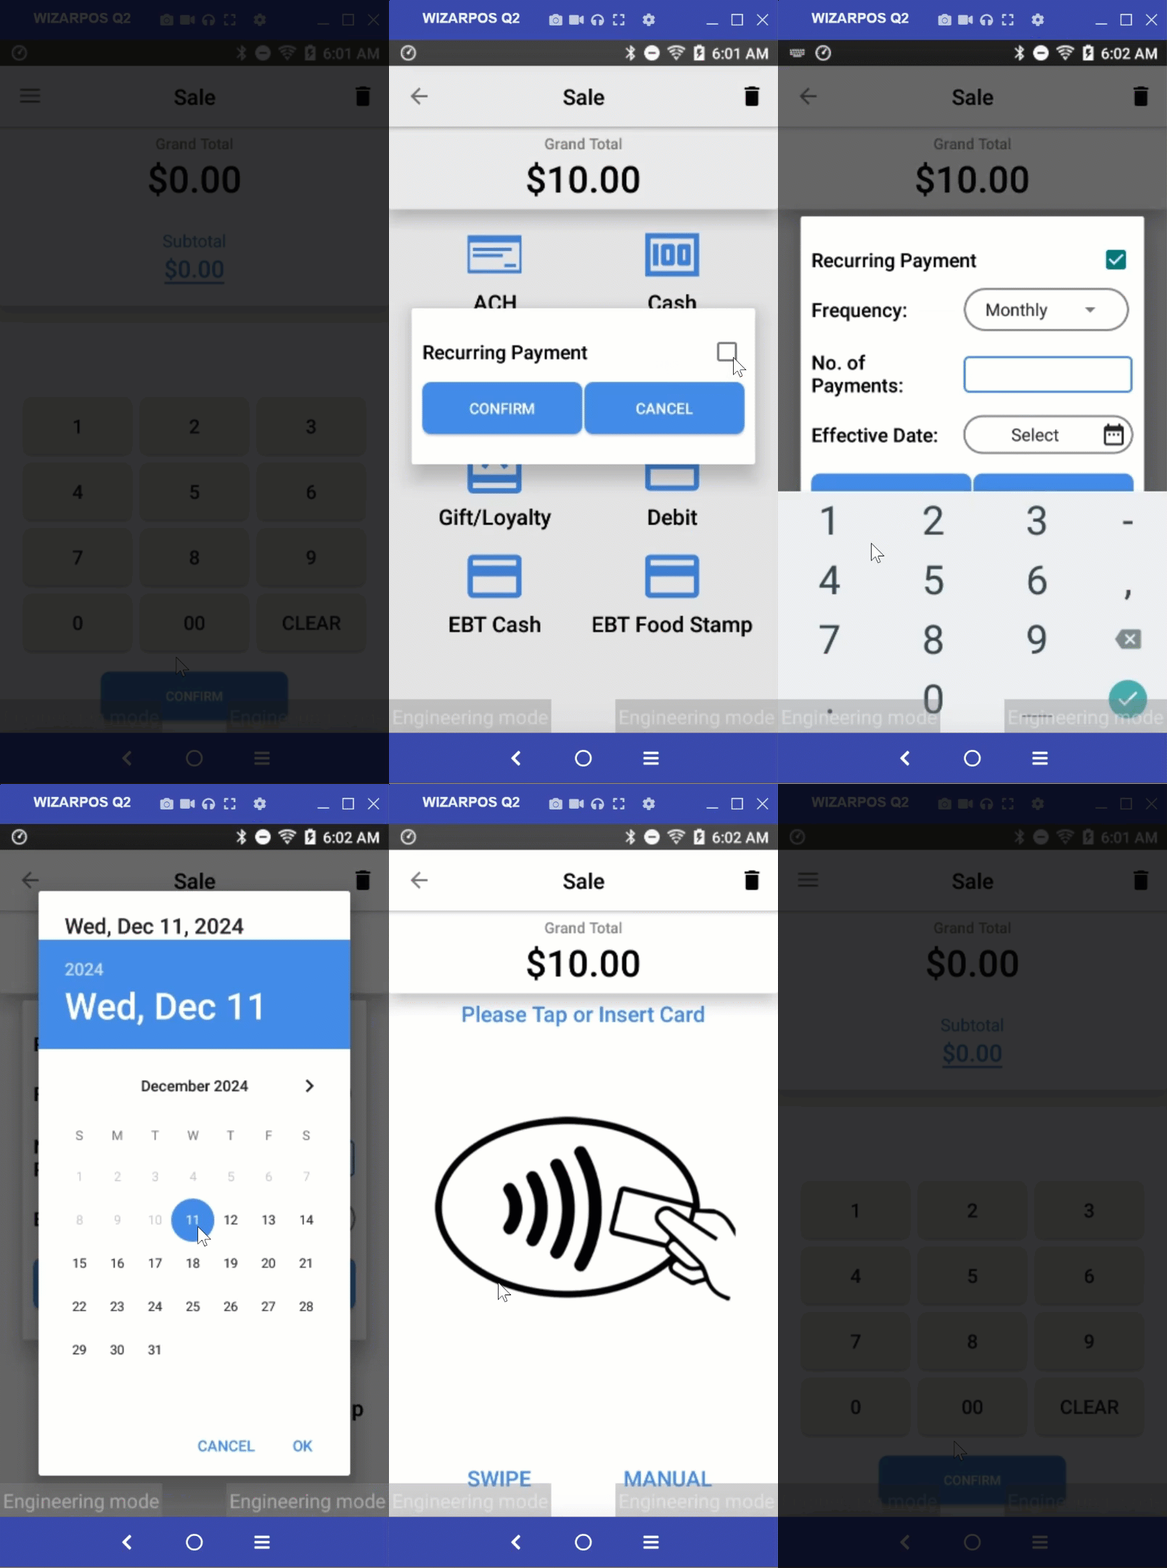
Recurring Sale
A Recurring Sale allows merchants to set up automated, scheduled payments for Credit or ACH transactions over a specified period. This feature allows for flexible configuration of payment frequency, number of installments, and start date.
Note: Recurring payments are only valid for Credit and ACH transactions.
1. Accepting Payment
- Open the QuickSale 2.0 app.
- Select Sale from the menu options.
- Input the charge amount and confirm.
2. Choosing Tender Type
- Select the preferred tender type. Credit or ACH in this case.
- Upon selecting the tender type, enable the Recurring Payment checkbox when the pop-up appears.
3. Configuring Recurring Payment
- After enabling Recurring Payment, fill out the required details:
- Frequency: Choose from options such as Daily, Weekly, Biweekly, Monthly, Quarterly, Semi-Annually, or Annually.
- Number of Payments: Enter the total number of payments for the recurring transaction.
- Effective Date: Select the start date for the recurring payments.
- Click Confirm to proceed with the recurring payment setup.
4. Processing Payment
- Tap/insert the card for automatic entry (if using Credit). For ACH, enter the necessary bank account details manually.
5. Approval and Receipt
- Once approved, you’ll see the Approved message. Click Continue.
- Collect the customer’s signature, email, and phone number, if enabled in the receipt options configuration.
- Select Print Merchant Copy to print the merchant receipt and Print Customer Copy to print the customer receipt, if enabled in the receipt options configuration.
- Select Done to complete the transaction.
Purchase Card Sale
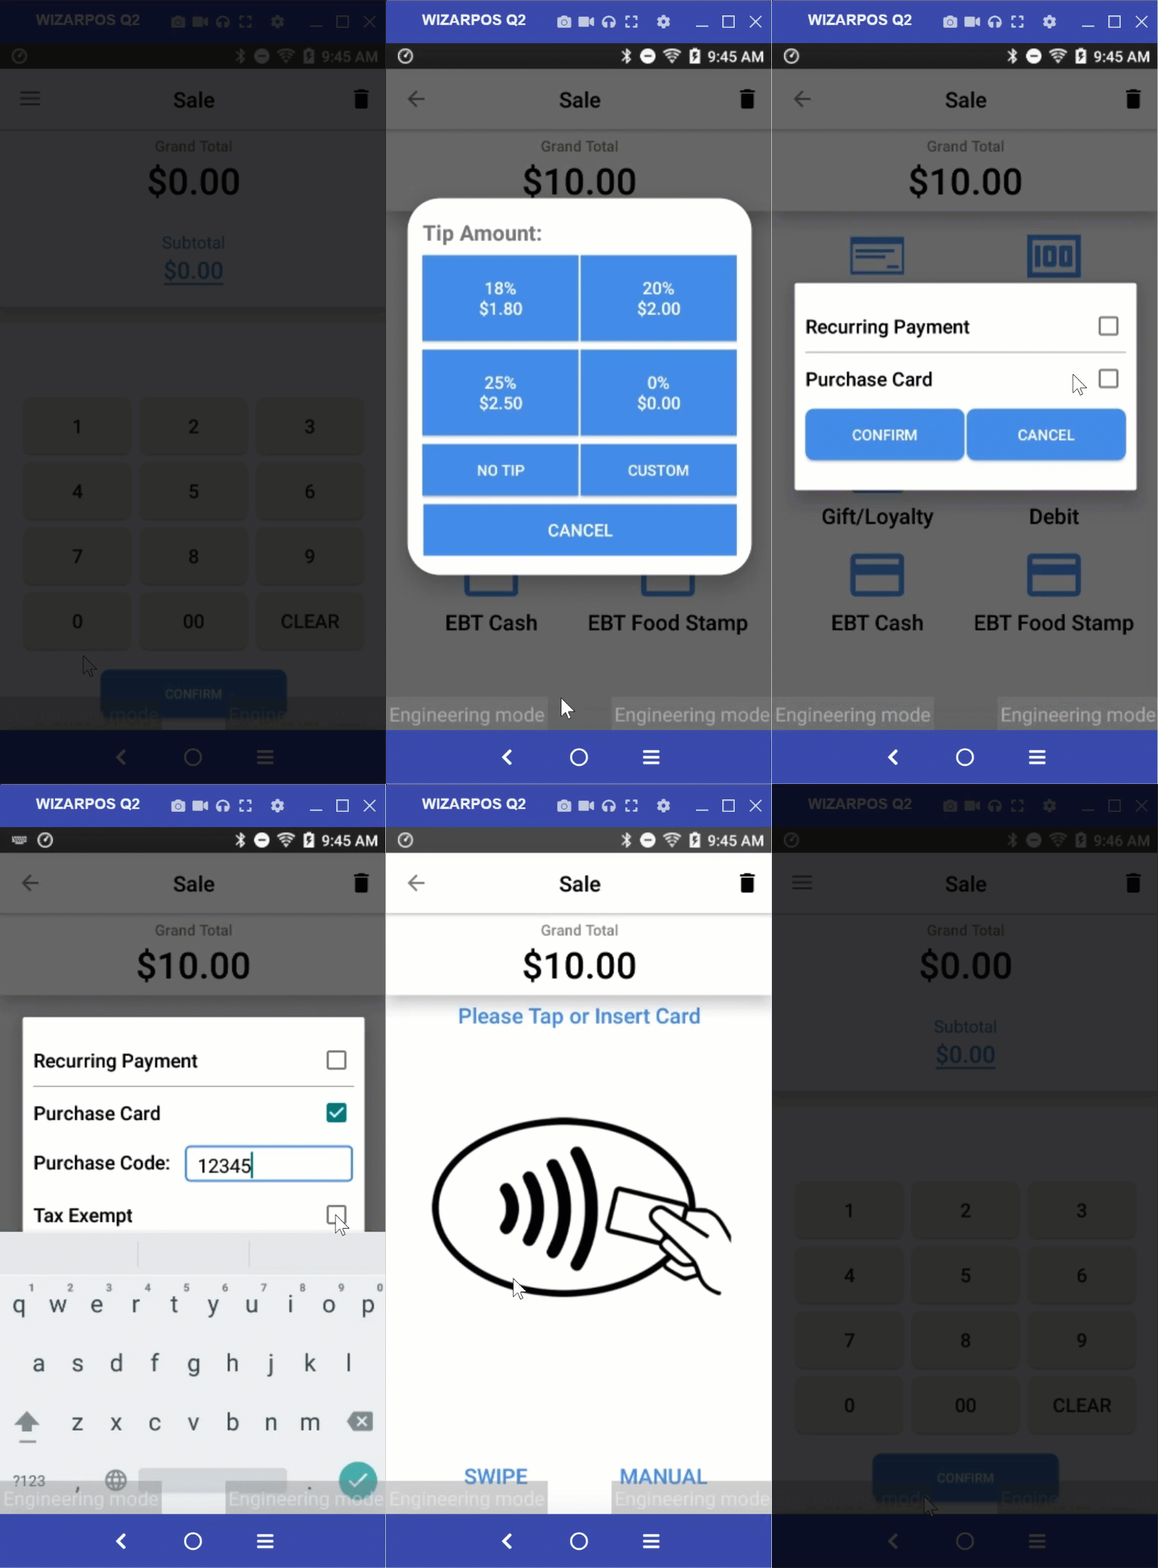
A Purchase Card Sale enables merchants to process transactions specifically designed for corporate purchase cards, allowing businesses to manage expenses seamlessly.
Note: This feature is only applicable for Credit Card transactions and is configured through a checkbox in the payment tender selection pop-up.
Note: To accept purchase cards, navigate to Configurations -> Setup Options -> Optional Prompts and enable the Purchase Card checkbox.
1. Accepting Payment
- Open the QuickSale 2.0 app.
- Select Sale from the menu options.
- Input the charge amount and confirm.
2. Choosing Tender Type
- A list of tender types will appear. Tap on Credit to select the credit card payment option.
- Upon selecting the tender type, enable the Purchase Card checkbox when the pop-up appears.
3. Providing Purchase Card Details
- After enabling the Purchase Card checkbox, complete the required details in the prompted fields:
- Purchase Code: Enter the relevant purchase code provided by the cardholder or organization.
- Tax Exempt (if applicable): If the transaction is tax-exempt, check the box for tax exemption.
- After entering the required information, select the Confirm button to proceed.
4. Processing Payment
- Tap/insert the card for automatic entry.
- Ensure that the purchase card is used for the transaction.
5. Approval and Receipt
- Once approved, you’ll see the Approved message. Click Continue.
- Collect the customer’s signature, email, and phone number, if enabled in the receipt options configuration.
- Select Print Merchant Copy to print the merchant receipt and Print Customer Copy to print the customer receipt, if enabled in the receipt options configuration.
- Select Done to complete the transaction.
Refund
A refund is a transaction where a merchant returns all or a portion of a customer’s payment for goods or services. Refunds can be initiated for various reasons, such as customer dissatisfaction, product returns, or billing errors.
The refund process involves transferring the appropriate amount of funds from the merchant’s account back to the customer’s account. Refunds can take different forms, such as a credit to the customer’s card account, a transfer of funds to the customer’s bank account, or a physical refund in the form of cash or a check.
Note: You can also initiate a refund from the Transaction Logs by selecting the sale and clicking the Refund button without needing to enter card details.
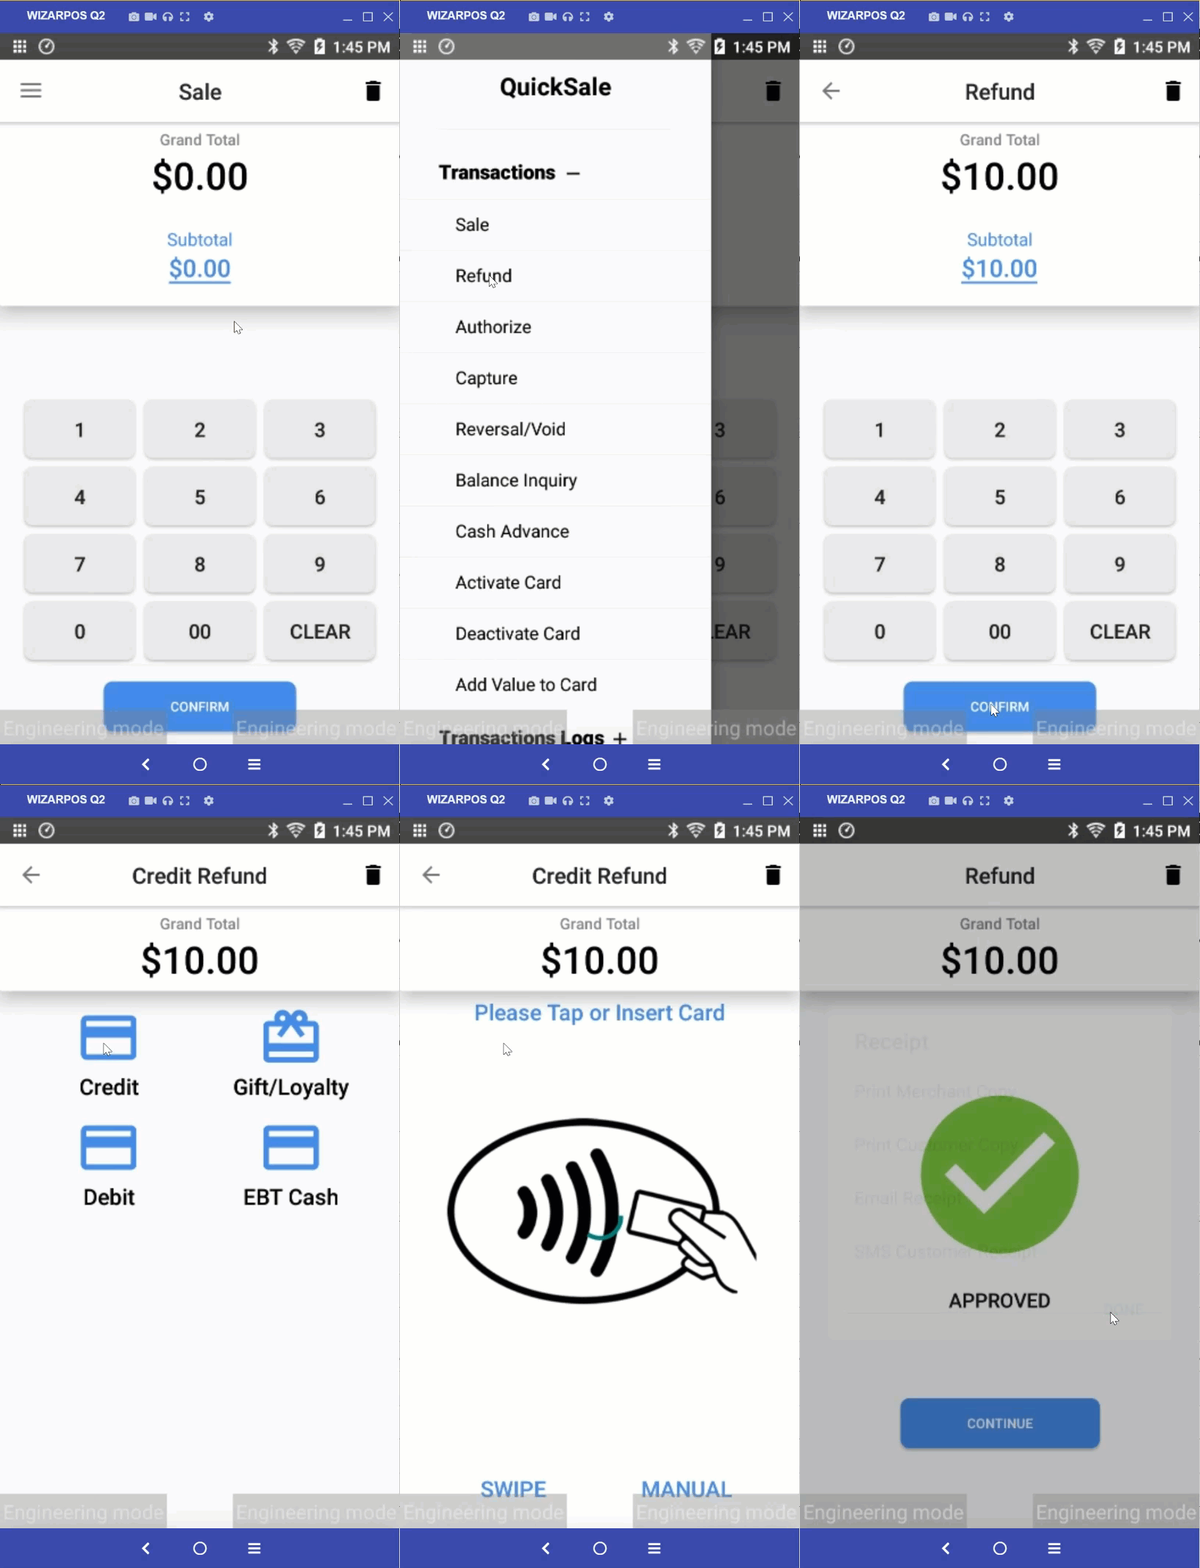
Processing a Refund
- Accepting Payment
- Open the QuickSale 2.0 app.
- Select Refund from the menu options.
- Input the refund amount and confirm.
- Choosing Tender Type
- Select the preferred tender type.
- Tap/insert the card for automatic entry. You can also manually enter card details by selecting the Manual option.
- Approval and Receipt
- Once approved, you’ll see the Approved message. Click Continue.
- Collect the customer’s signature, email, and phone number, if enabled in the receipt options configuration.
- Select Print Merchant Copy to print the merchant receipt and Print Customer Copy to print the customer receipt, if enabled in the receipt options configuration.
- Select Done to complete the transaction.
Authorize
Authorize is a process of obtaining approval from a cardholder’s bank for a transaction. When a customer uses a credit or debit card for a purchase, the merchant must request authorization from the cardholder’s bank to verify the availability of sufficient funds or credit limit to complete the transaction.
The authorization process involves submitting transaction details, including the amount and card information, to Charge Anywhere. Charge Anywhere forwards these details to the cardholder’s bank, which verifies the customer’s account for adequate funds or credit limit.
If the authorization is successful, the cardholder’s bank sends an authorization code to Charge Anywhere, indicating that the transaction is approved. The merchant can then proceed with the transaction, such as delivering the product or providing the service.
Steps to process Authorize
1. Accepting Auth Only
- Open the QuickSale 2.0 app.
- Select Authorize from the menu options.
- Input the Auth Only amount and confirm.
2. Choosing Tender Type
- Select the preferred tender type.
- Tap/insert the card for automatic entry. You can also manually enter card details by selecting the Manual option.
3. Approval and Receipt
- Once approved, you’ll see the Approved message. Click Continue.
- Collect the customer’s signature, email, and phone number, if enabled in the receipt options configuration.
- Select Print Merchant Copy to print the merchant receipt and Print Customer Copy to print the customer receipt, if enabled in the receipt options configuration.
- Select Done to complete the transaction.
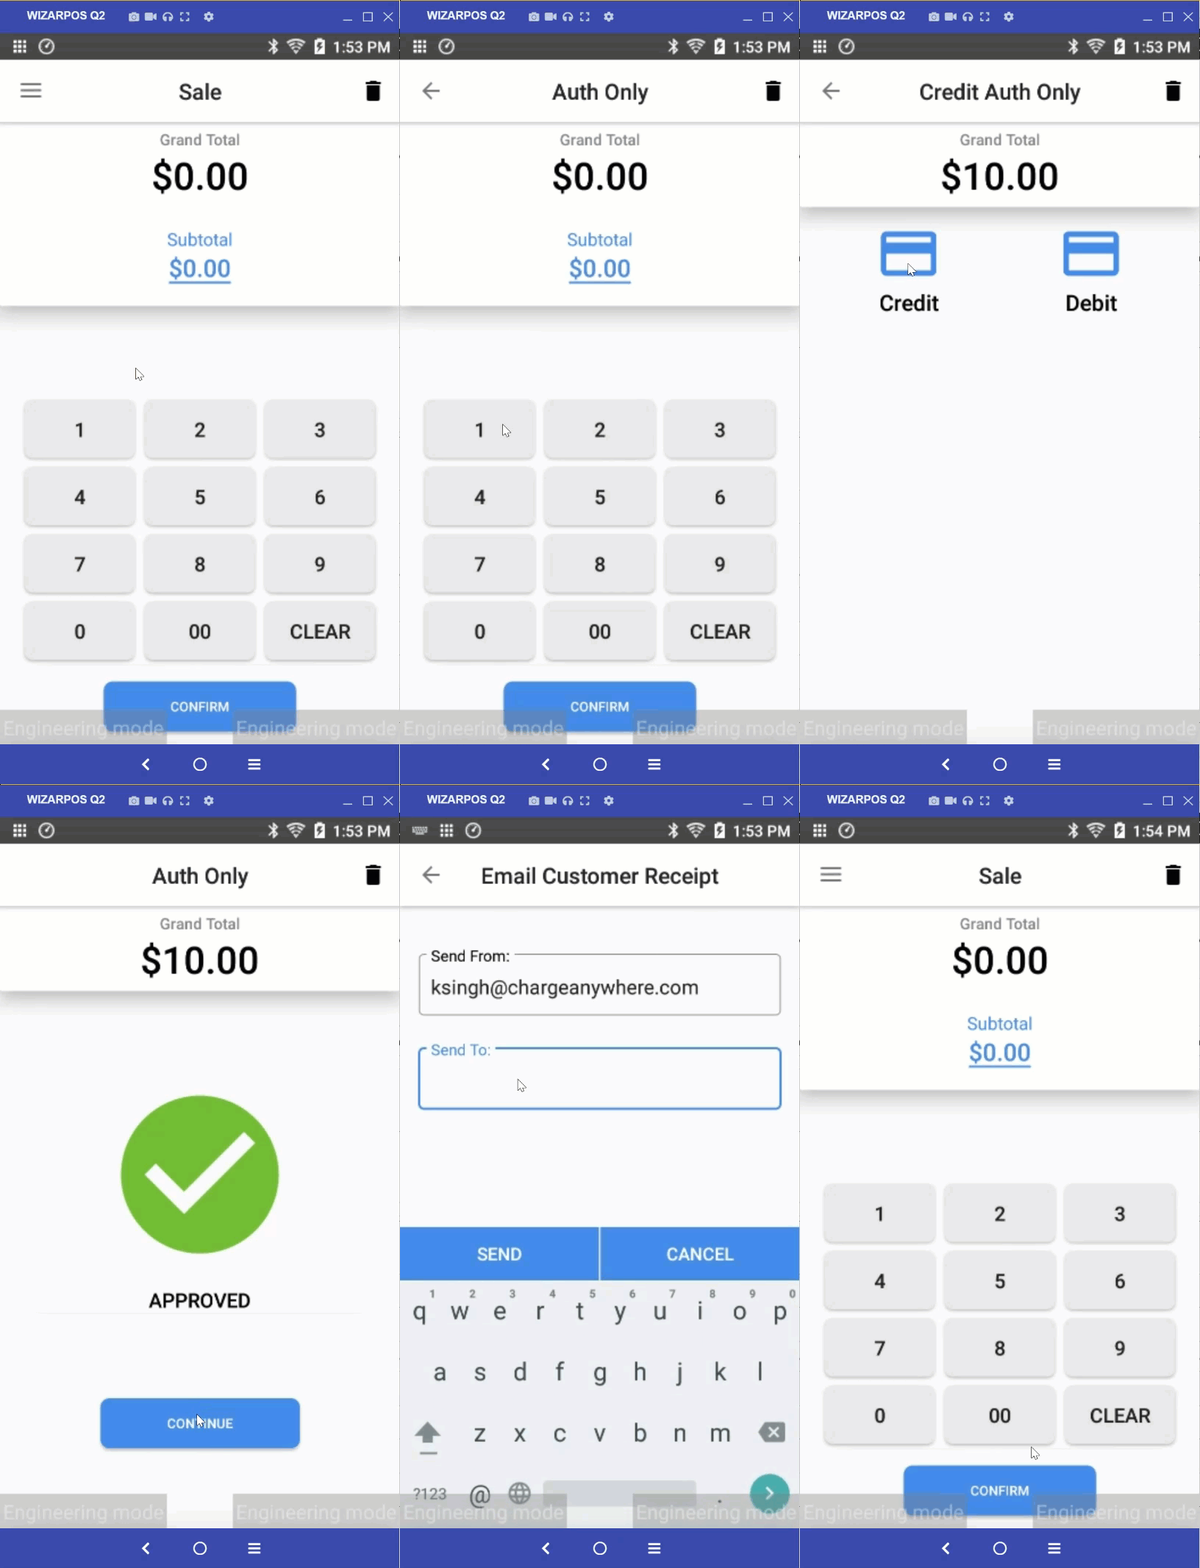
Note: Authorization receipt will contain the approval code which is required at the time of implementing Capture (Force) from a card. When the Authorization Receipt is sent to the Customer’s Email, the Approval Code can be obtained from the email.
Capture
Capture is the process of transferring the authorized funds from a customer’s account to a merchant’s account. After a customer’s payment is authorized, the transaction is typically in a “pending” status until the merchant captures the funds.
Capturing the payment can occur after delivering the product or service to the customer. During the capture process, the authorized funds are transferred to the merchant’s account and later settled and deposited based on the payment processor’s timeframe.
Note: You can also initiate a capture from the Transaction Logs by selecting the sale and clicking the Capture button without entering the card details.
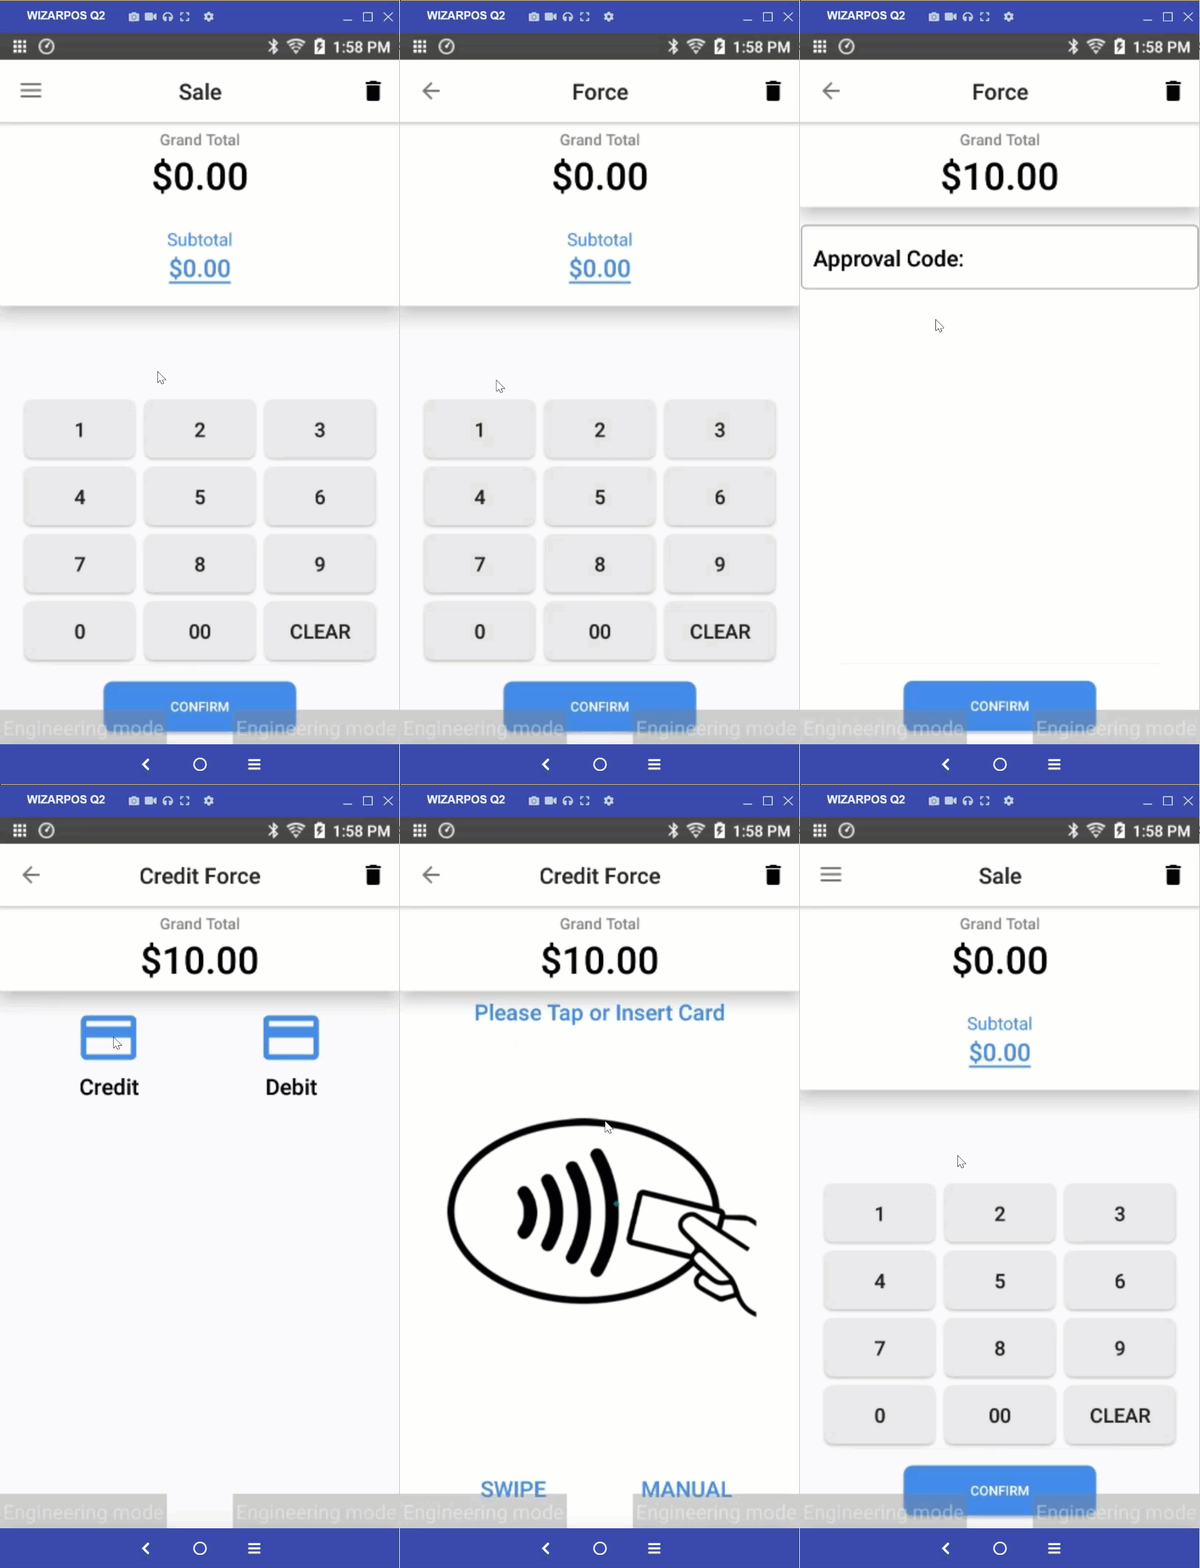
Steps to process Capture
1. Accepting Payment
- Open the QuickSale 2.0 app.
- Select Capture from the menu options.
- Input the Force amount and confirm.
- Enter the Approval Code obtained during the Authorize.
Note: Approval code is present in the Authorize receipt or can also be obtained from the customer’s email if the email was provided during Authorize.
2. Choosing Tender Type
- Select the preferred tender type.
- Tap/insert the card for automatic entry. You can also manually enter card details by selecting the Manual option.
3. Approval and Receipt
- Once approved, you’ll see the Approved message. Click Continue.
- Collect the customer’s signature, email, and phone number, if enabled in the receipt options configuration.
- Select Print Merchant Copy to print the merchant receipt and Print Customer Copy to print the customer receipt, if enabled in the receipt options configuration.
- Select Done to complete the transaction.
Reversal/Void
A Reversal or Void transaction allows a merchant to partially or fully refund a deducted amount or cancel a sale. It is useful when a customer changes their mind about a purchase, a mistake occurs in the transaction, or there’s an issue with the product or service.
Steps to process a Reversal/Void
- Open the QuickSale 2.0 app.
- Select Reversal/Void from the menu options.
- Select the transaction you want to refund or void.
- After selecting the transaction, you have two options:
- Refund: To refund the transaction amount to the customer’s account.
- Void: To cancel the transaction (Please note that a voided transaction does not refund the customer’s account, so you may need to issue a refund separately if necessary).
Refund
A refund is a process of returning the payment made by a customer for a product or service that they are not satisfied with or have returned. It involves issuing a credit or refund to the customer’s account, which could be in the form of cash, check, or a reversal of a credit or debit card transaction.
A refund can be initiated for various reasons, such as the product not meeting the customer’s expectations, a defect or damage in the product, or any other issue that prevents the customer from using or enjoying the product or service as intended. Refunding a sale is an important part of customer service, as it helps to maintain a good reputation and build trust with customers.
Note: You can also initiate a refund from the Transaction Logs by selecting the sale and clicking the Refund button without entering the card details.
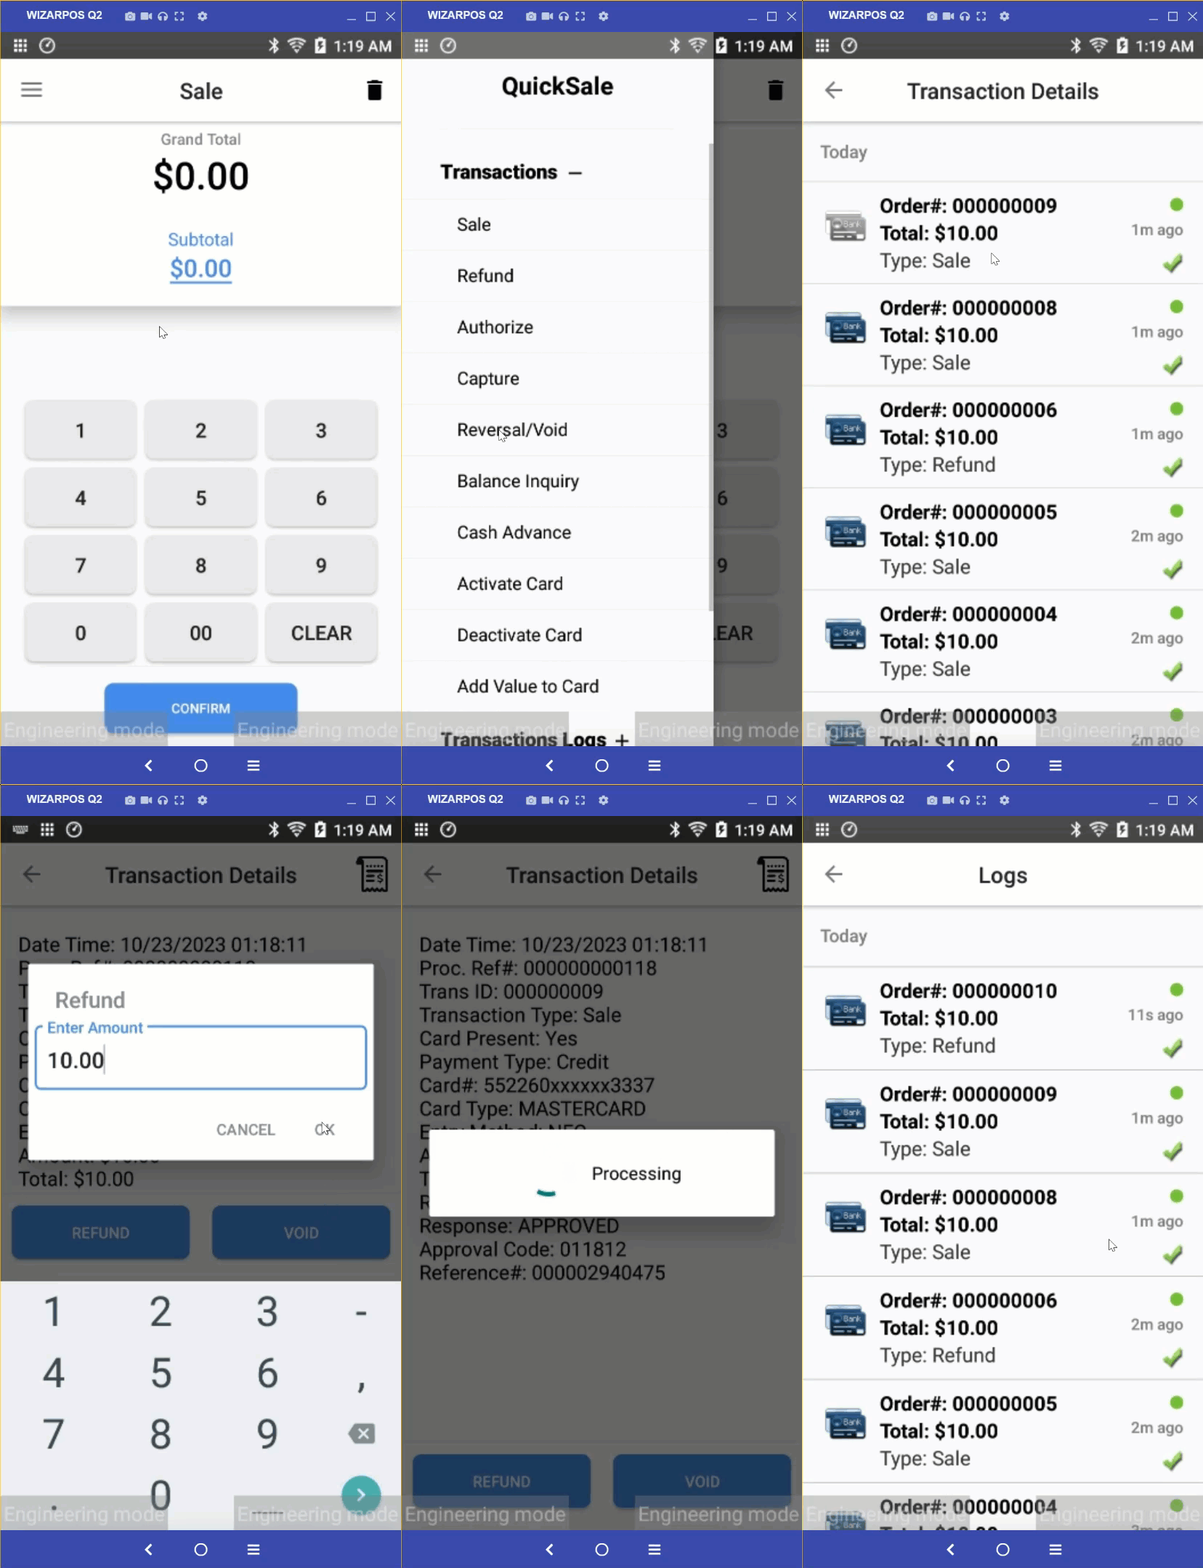
Steps to Refund
4.1 To refund the amount, click Refund.
4.2 Enter the refund amount and click OK to proceed.
Note: You can either partially refund the amount or fully refund the amount depending on a particular case.
4.3 Once the refund is approved, you will receive a confirmation message containing the Approval Code.
Void
Void typically means to cancel or reverse a previously completed transaction. This can occur for various reasons, such as a customer changing their mind about a purchase, a mistake in the transaction, or an issue with the product or service that was purchased.
When a sale is voided, the transaction is essentially nullified, and any money paid by the customer is refunded or credited back to their account. The voiding process may vary depending on the specific payment method and system used but typically involves reversing the payment and updating records to reflect the canceled transaction.
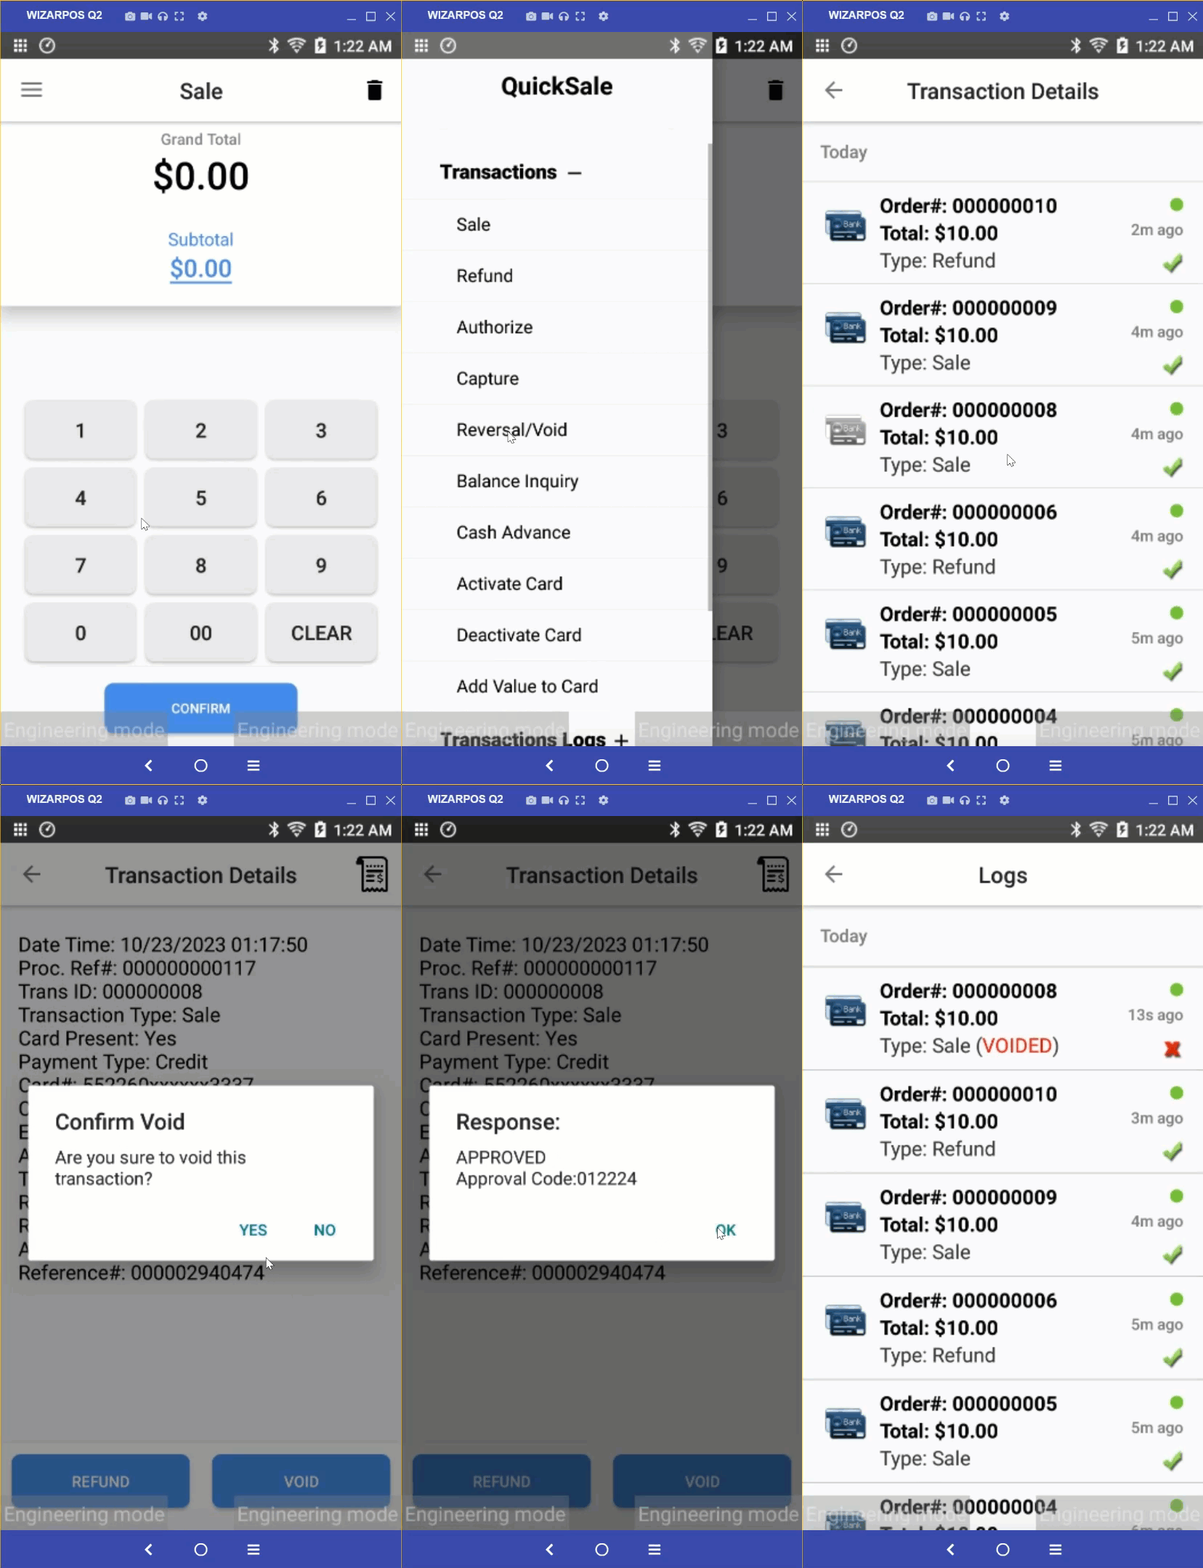
Steps to process Void
4.1 To void the transaction, click Void and then click Yes to confirm the Void.
Note: You can void a sale within 24 hours only. After 24 hours time window, you will not see the option to void a sale.
4.2 Once the void is approved, you will receive a confirmation message containing the Approval Code.
Void vs Reversal
Understanding the difference between Void and Reversal is essential when handling payment transactions. While both actions are used to cancel or adjust payments, their behavior differs based on context.
Void
- Used to cancel a sale before settlement.
- Applies to Sale, Refund, and Force.
- GrandTotal = Full Sale Amount
- Example: To cancel a sale of 100.00, use a Void with
GrandTotal = 100.00.
- Example: To cancel a sale of 100.00, use a Void with
Reversal
- Used to cancel or adjust an authorization (before capture) or a sale (post-authorization).
- Applies to Sale, Refund, Auth, and Force.
- The
GrandTotalindicates the amount you want to settle, not the amount you’re cancelling.
Reversal Scenarios
- Full Reversal
GrandTotal = 0.00- Cancels the entire transaction.
- Example: Reversal with
GrandTotal = 0.00→ settle 0.00, cancel 100.00
- Partial Reversal
GrandTotal = Amount to Settle- Cancels the remainder.
- Example: For an authorization of 100.00:
- Reversal with
GrandTotal = 75.00→ settle 75.00, cancel 25.00 - Followed by Force Capture of 75.00
- Reversal with
Use Void when the payment is not yet settled and you want to cancel the full amount.
Use Reversal when adjusting the authorized amount, fully or partially, before capture.
Summary Table
| Scenario | Action | GrandTotal | Outcome |
|---|---|---|---|
| Full sale needs to be canceled | Void | 100.00 | Cancels entire sale before settlement |
| Full authorized amount to be canceled | Reversal | 0.00 | Cancels the authorization completely |
| Partial capture of an authorization | Reversal + Force | 75.00 | Captures 75.00, cancels 25.00 |
| Sale already settled – needs refund | Refund | 100.00 | Initiates return of funds to customer |
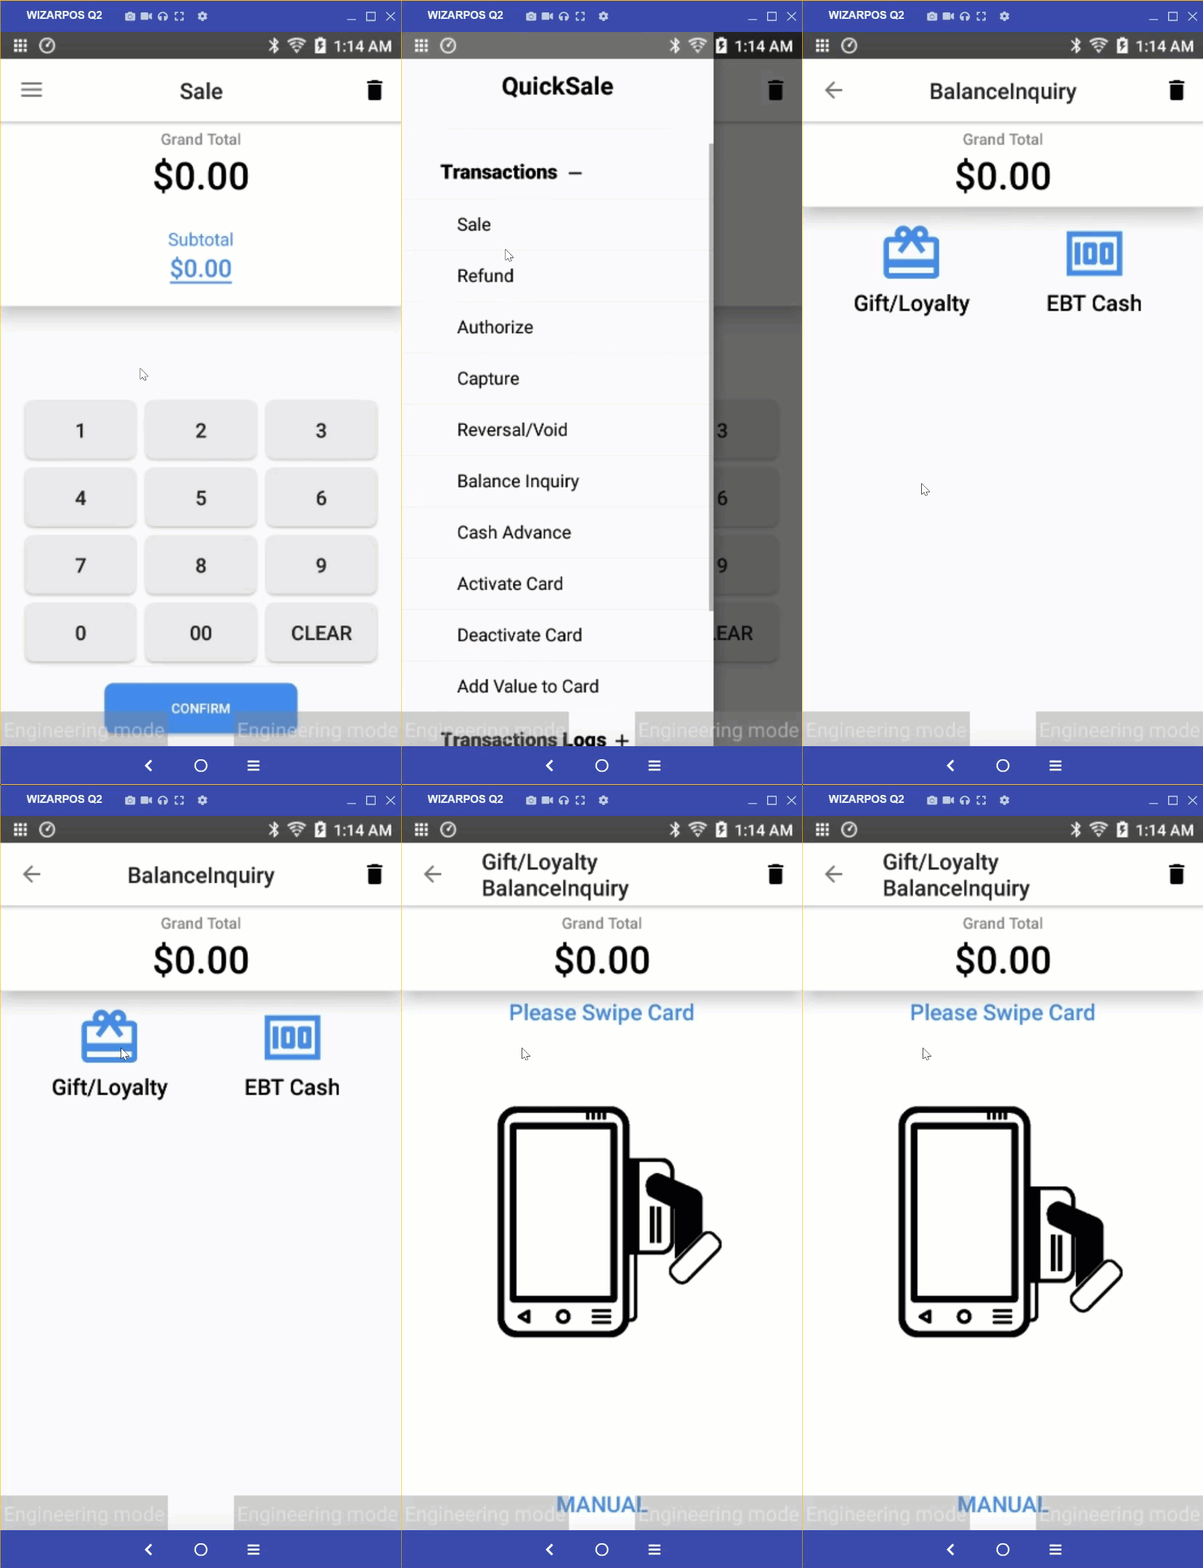
Balance Inquiry
Balance Inquiry is a transaction type that allows users to check the available balance of a specific gift card or account linked to the payment processing app. This feature provides users with instant access to their balance information.
Steps to process Balance Inquiry
- Open the QuickSale 2.0 app.
- Select Balance Inquiry from the menu options.
- Swipe your card or enter card details manually by selecting the Manual option.
- Once approved, you will see the Approved message along with the balance details.
Cash Advance
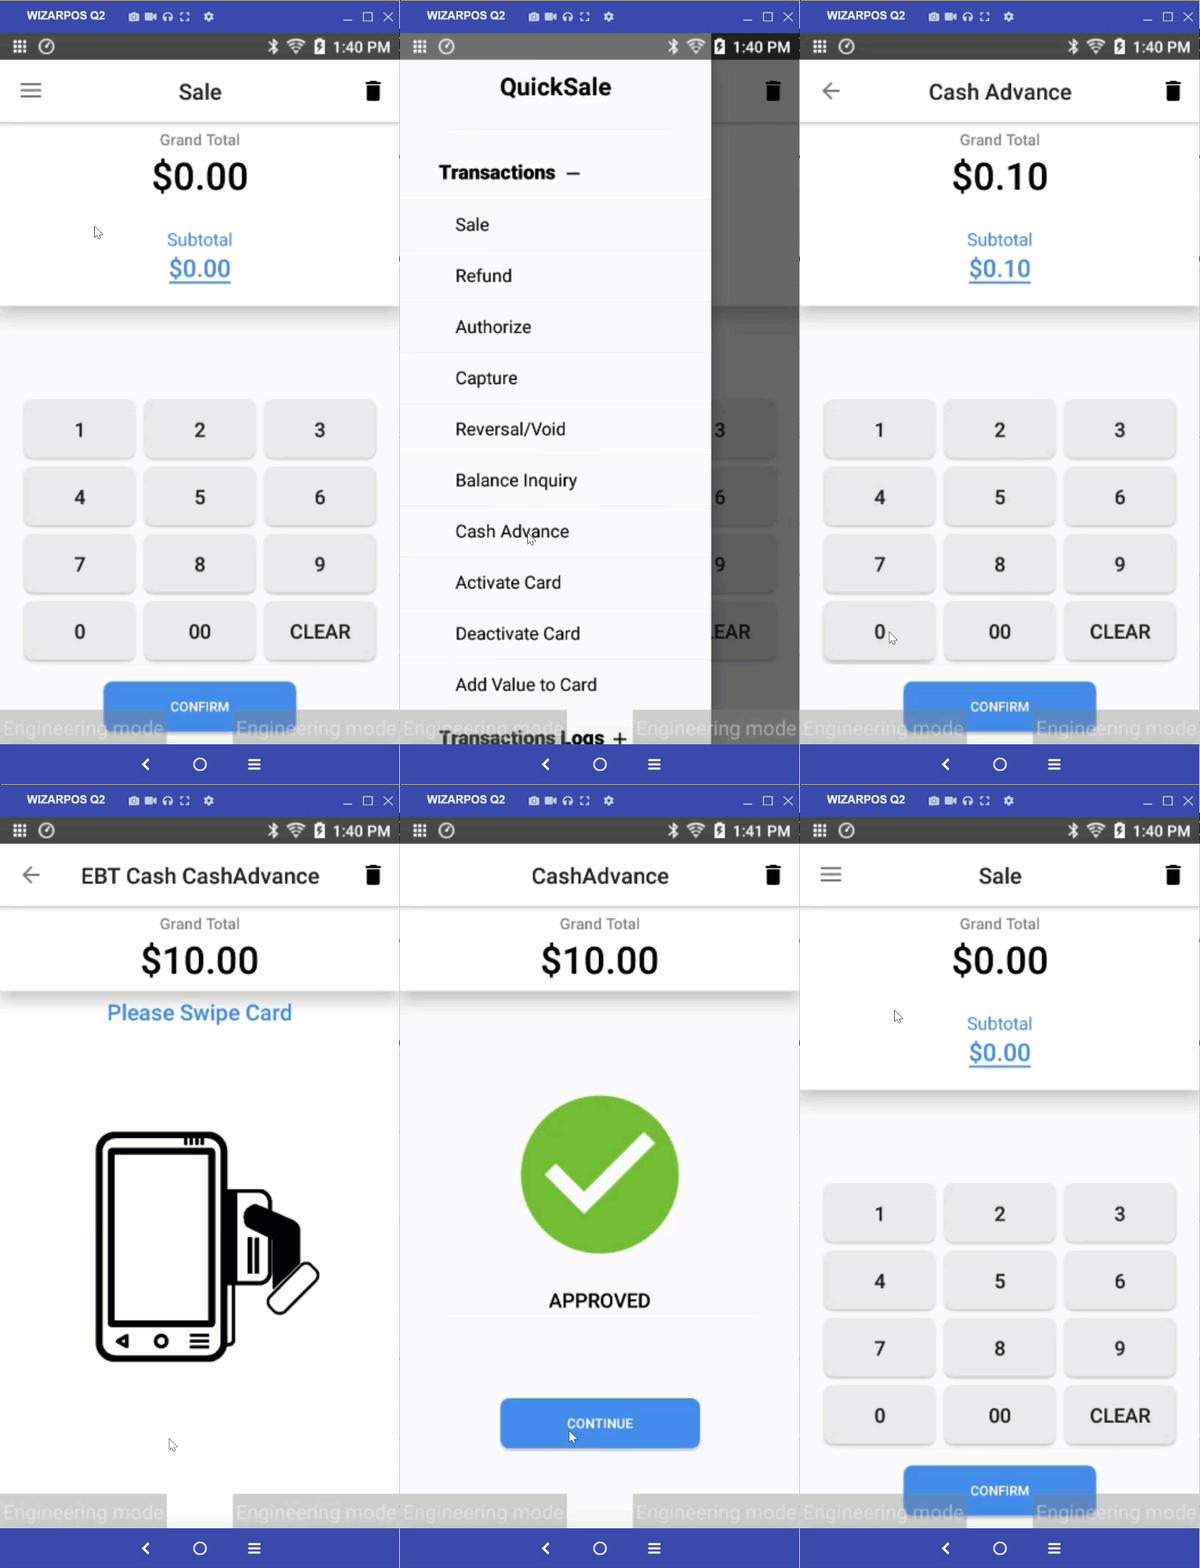
A Cash Advance is an EBT Cash Option and is a transaction that allows users to withdraw cash using EBT Cash from the app. Users can specify the desired amount of cash they wish to withdraw, and the app will process the transaction accordingly.
Steps to process Cash Advance
1. Accepting Cash Advance
- Open the QuickSale 2.0 app.
- Select Cash Advance from the menu options.
- Input the amount and confirm.
- Swipe the card and enter the PIN
2. Approval and Receipt
- Once approved, you’ll see the Approved message. Click Continue.
- Collect the customer’s signature, email, and phone number, if enabled in the receipt options configuration.
- Select Print Merchant Copy to print the merchant receipt and Print Customer Copy to print the customer receipt, if enabled in the receipt options configuration.
- Select Done to complete the transaction.
Activate Card
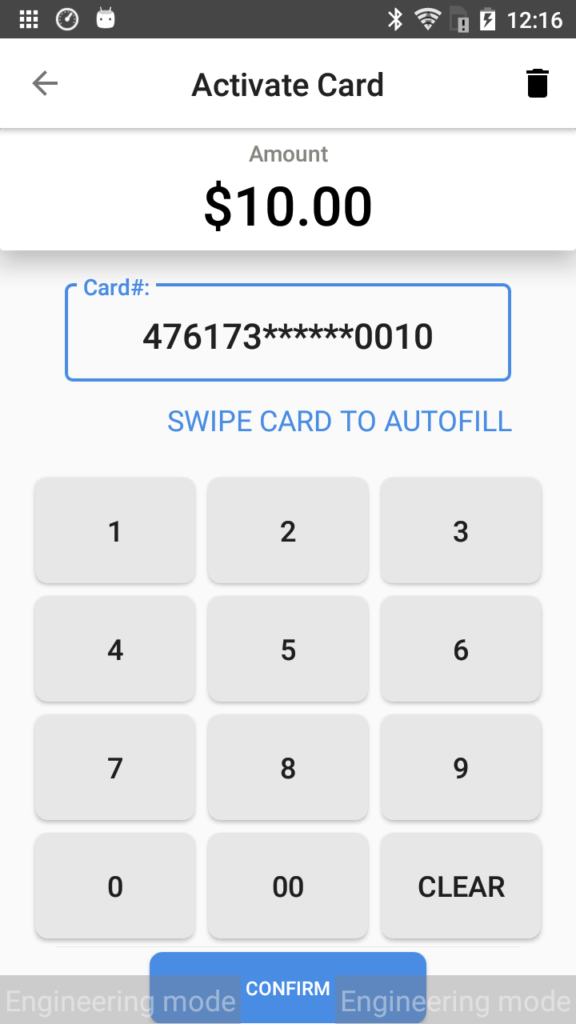
Activate Card is a transaction type that enables users to activate a new gift card they have received. Users need to enter card details into the app to complete the activation process.
Steps to process Activate Card
- Open the QuickSale 2.0 app.
- Select Activate Card from the menu options.
- Swipe the card to autofill or enter the card number and click Confirm.
- Once the card is successfully activated, you will receive a confirmation message.
Deactivate Card
Deactivate Card is a transaction type that allows users to disable a gift card that they have linked to the payment processing app. This can be useful in cases where the user has lost the card or suspects fraudulent activity.
Add Value to Card
Add Value to Card is a transaction type where the user can load money onto a Gift card. The user can specify the amount they want to add, and the app will update the card’s balance.
6. Transaction Logs
Transaction logs are comprehensive records that capture details of every transaction processed through Charge Anywhere. These logs typically include vital information such as the date and time of the transaction, the transaction amount, the type of card used for payment, the authorization code, and other relevant details pertaining to the transaction.
To access your transaction history, follow these steps:
- From the main menu, select Transaction Logs.
- Here, you can view a list of your transactions, filter them by date or payment type, and search for specific transactions.
View/Modify Transactions
To view and potentially modify transactions, follow these steps:
- From the main menu, tap the View/Modify Transactions button. This will display a list of your recent transactions.
- Select the transaction you wish to modify from the transaction logs.
Refund
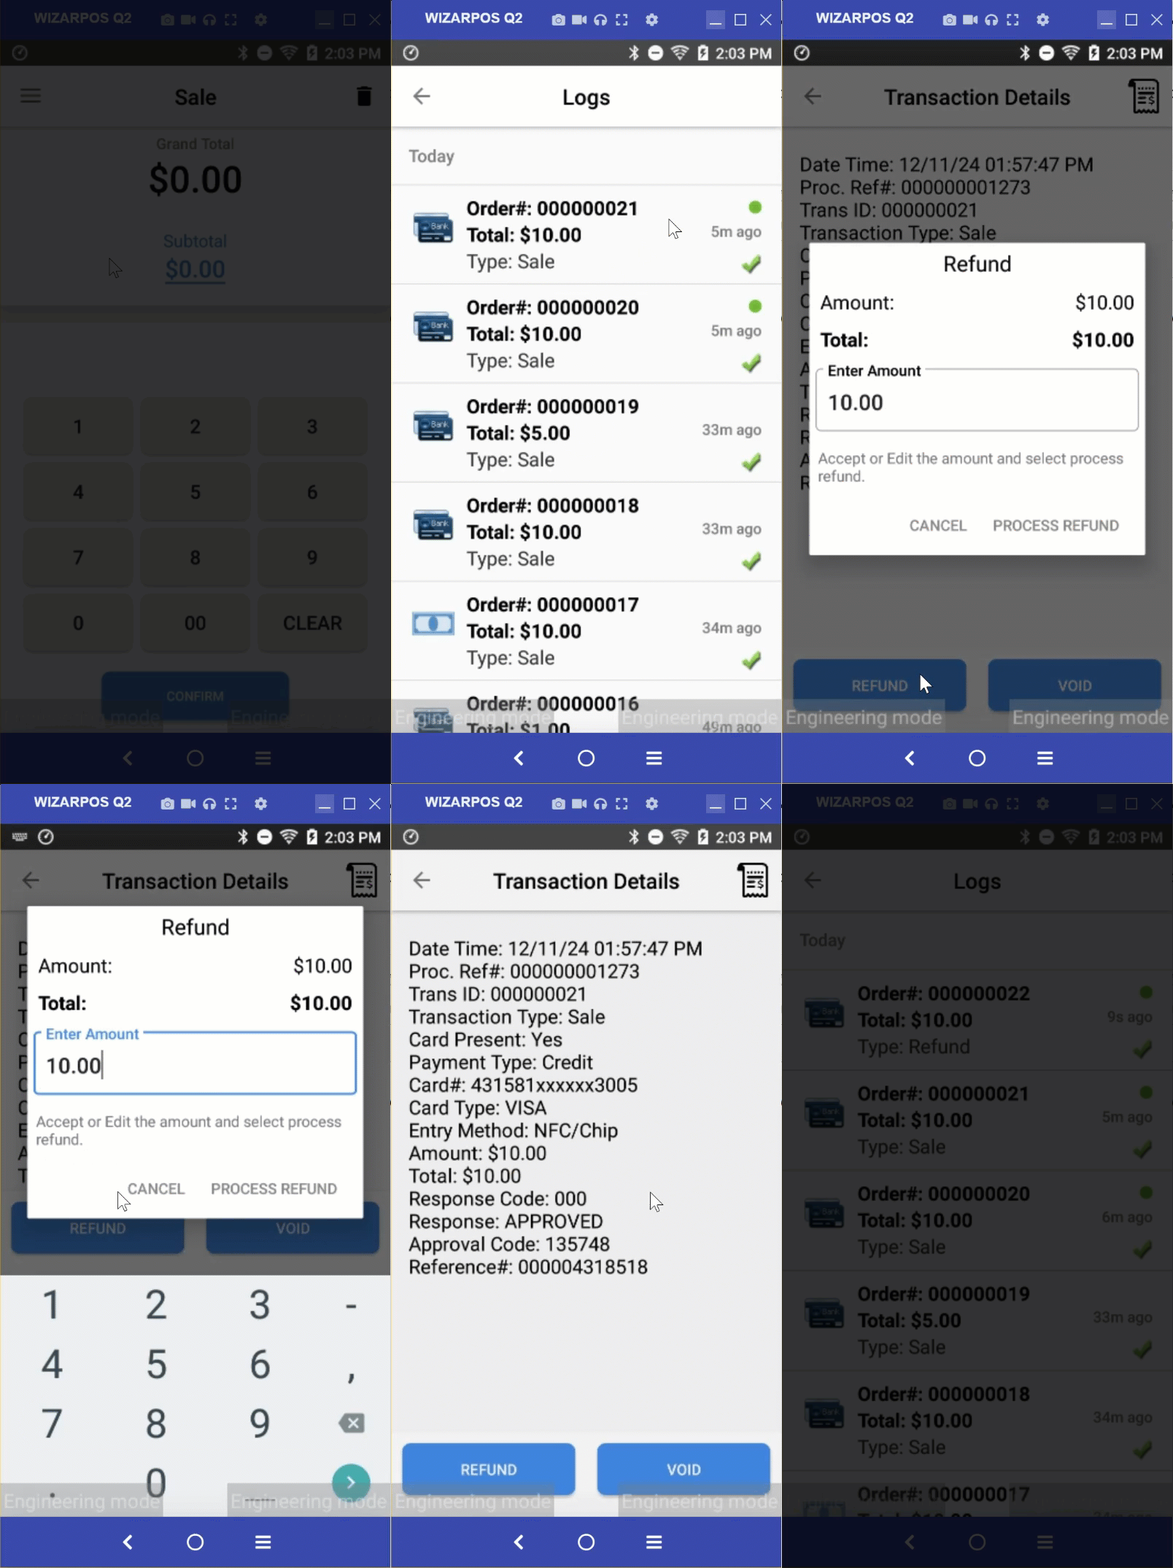
If you need to process a refund for a transaction, here’s how to do it:
- Select the transaction for which you want to initiate a refund.
- Once the transaction is selected, click Refund
- A refund pop-up window will appear, prompting you to enter the refund amount.
- Enter the refund amount and click OK.
Note: The system ensures that the refund amount does not exceed the original transaction amount. - The system will process your refund request and seek approval. Wait for a moment while the system confirms the refund request.
- Once the refund is approved, you will receive a confirmation message displaying the Approval Code.
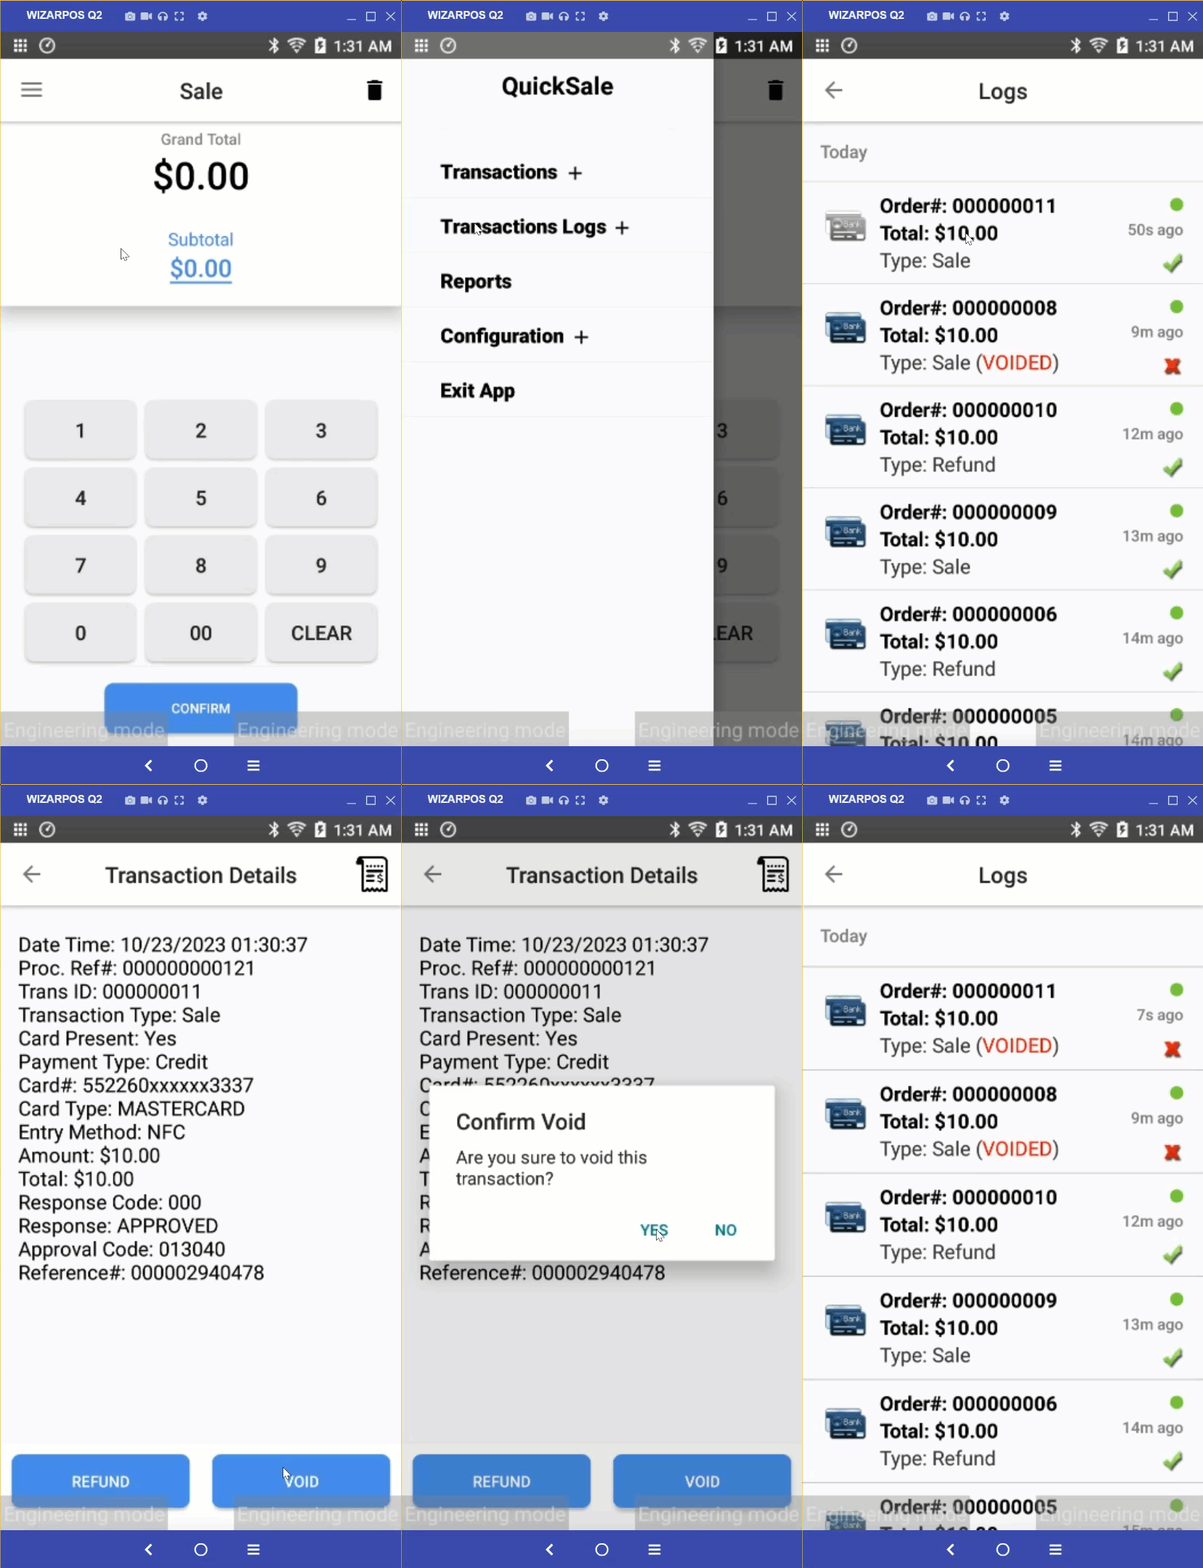
Void
To void a transaction, follow these steps:
- Select the transaction that you want to void.
- Once the transaction is selected, click Void.
- The system will process your void request and seek approval. Wait for a moment while the system confirms the void request.
- Once the void is approved, you will receive a confirmation message displaying the Approval Code.
Offline Transactions
Offline transactions can be completed even when there is no connectivity to the payment gateway or other online services. Charge Anywhere allows the merchant to store payment data locally and then transmit it to the payment server once connectivity is restored.
While offline transactions can provide a convenient solution for businesses and customers in certain situations, they do pose some risks. For example, offline transactions may be more susceptible to fraudulent activity since they are not immediately processed and verified by the payment gateway. Additionally, they may take longer to process and settle, which can impact cash flow and reconciliation processes for businesses.
You can view your offline transaction history by tapping Offline Transactions in the menu bar. This will show you a list of all your recent offline transactions.
Failed Offline Transactions
Failed offline transactions show a list of transactions that were not completed successfully due to an error during the processing of the payment data. This can occur if the payment terminal is unable to store the payment data locally or if the data cannot be transmitted to the payment processor once connectivity is restored.
There are several reasons why an offline transaction may fail, including:
- Insufficient funds: If the customer’s account does not have enough funds to cover the transaction, the payment will fail.
- Expired card: If the customer’s payment card has expired, the payment will not be processed.
- Incorrect PIN: If the customer enters an incorrect PIN, the transaction will be declined.
- Connectivity issues: If the payment terminal is unable to establish a connection with the payment processor, the transaction will fail.
You can view your failed online transaction history by tapping Failed Online Transactions in the menu bar. This will show you a list of all your failed online transactions.
Authorized Transactions
1. You can view your authorized transaction history by tapping the Authorized Transactions button in the menu bar. This will show you a list of all your recent authorized transactions.
2. Select the transaction which you want to settle. You will see the following three options along with the transaction details:
- Set Final Amount
- Void
- Capture
3. Set Final Amount: Use this option to modify the amount that has to be captured.
- To modify the final amount click Set Final Amount.
- Enter the new amount that needs to be captured.
- Click OK.
- Once done, you will receive a successful response stating “Transaction Updated”.
- Click OK and proceed to capture the amount.
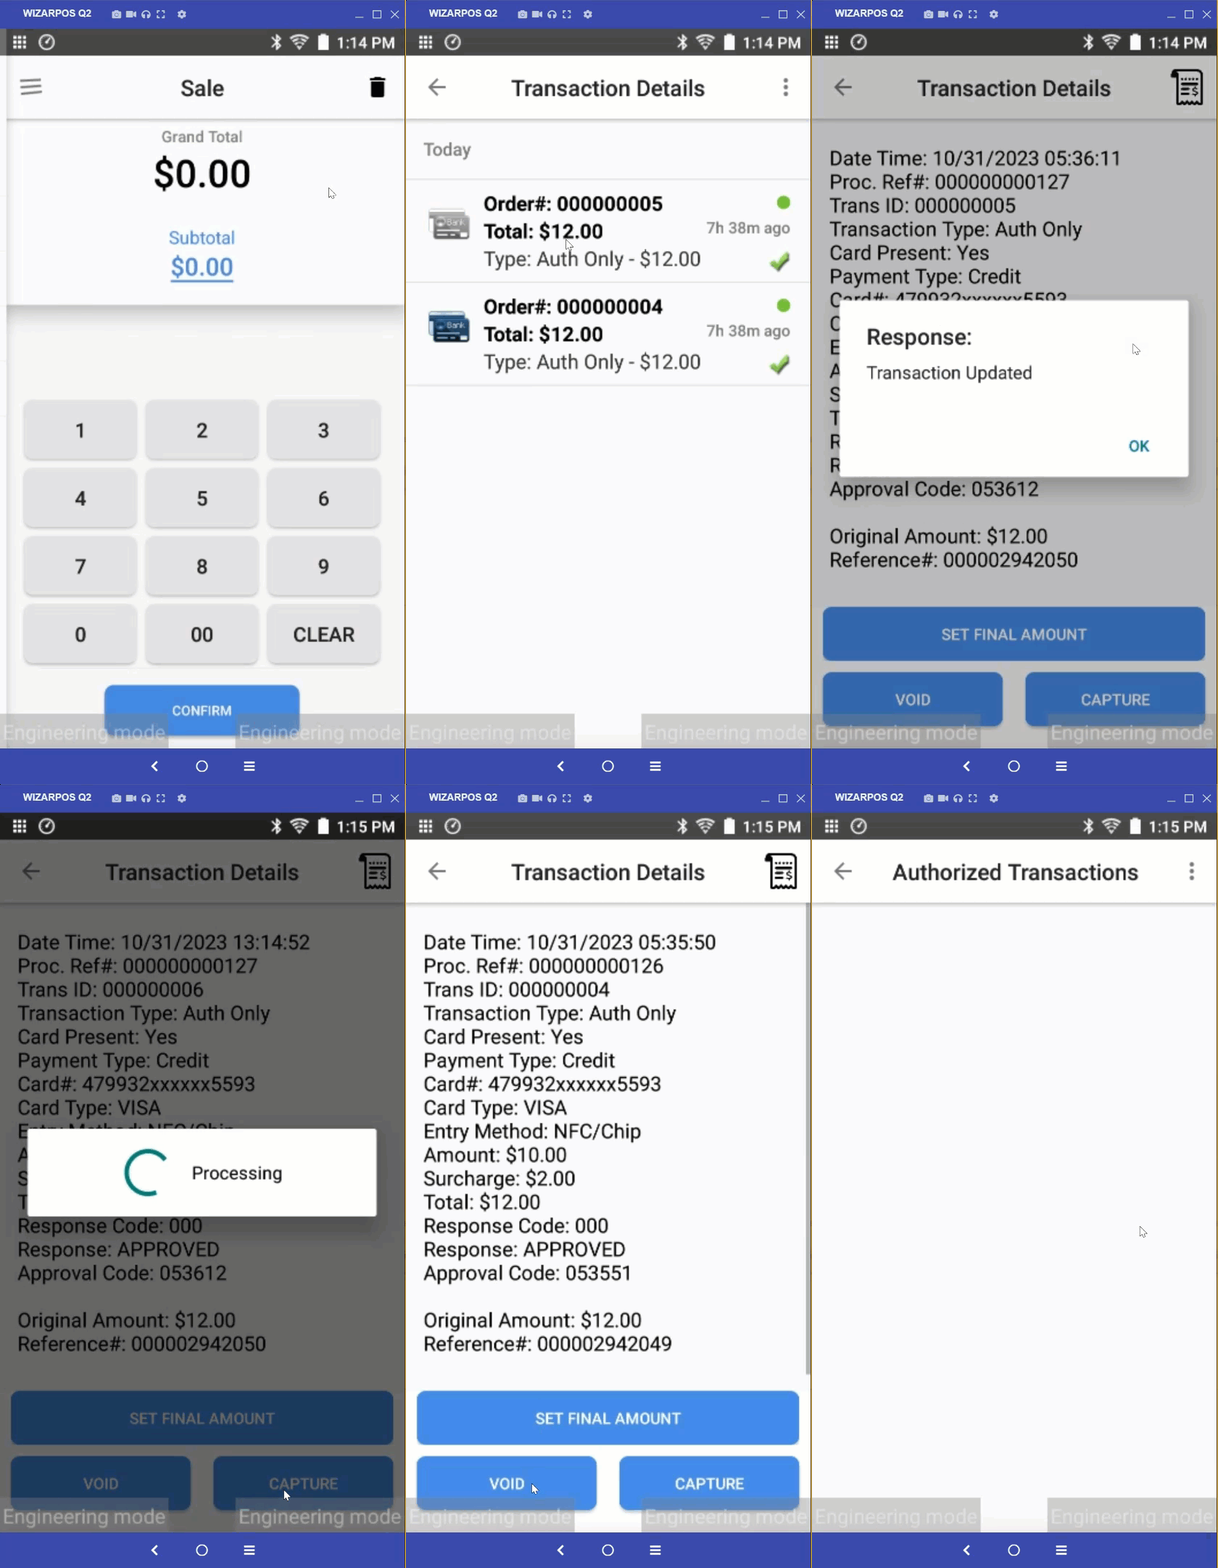
4. Void: Use this option to void the Auth transaction.
- Click Void.
- A prompt window will appear asking “Are you sure to void this transaction”.
- Select Yes, if you want to proceed.
- Once done, you will receive an approved response along with the approval code.
5. Capture: Use this to capture the Authorized amount.
- Click Capture to capture the authorized amount.
- Once done, you will see the Approved response along with the approval code.
7. Reports
Reports provide insights and analysis on the transactions processed through Charge Anywhere. These reports can provide valuable information on several key metrics including credit net total, revenue, detailed sales report, etc. You can also print details of transactions from the reports section.
1. This section gives you the Credit Net Total for the current batch from different tender types.
2. Click the three dots icon present at the top right corner. You will see the following options:
- Report
- Close Batch
2.1 Reports: The Reports section offers a range of transaction reports to provide valuable insights into business operations and financial data.
You can fetch the following reports:
- EDC Summary
- EDC Daily
- EDC Daily Detail
- Brand Summary
- Brand Daily
- Brand Daily Detail
- Clerk Summary
- Clerk Daily
- Clerk Daily Detail
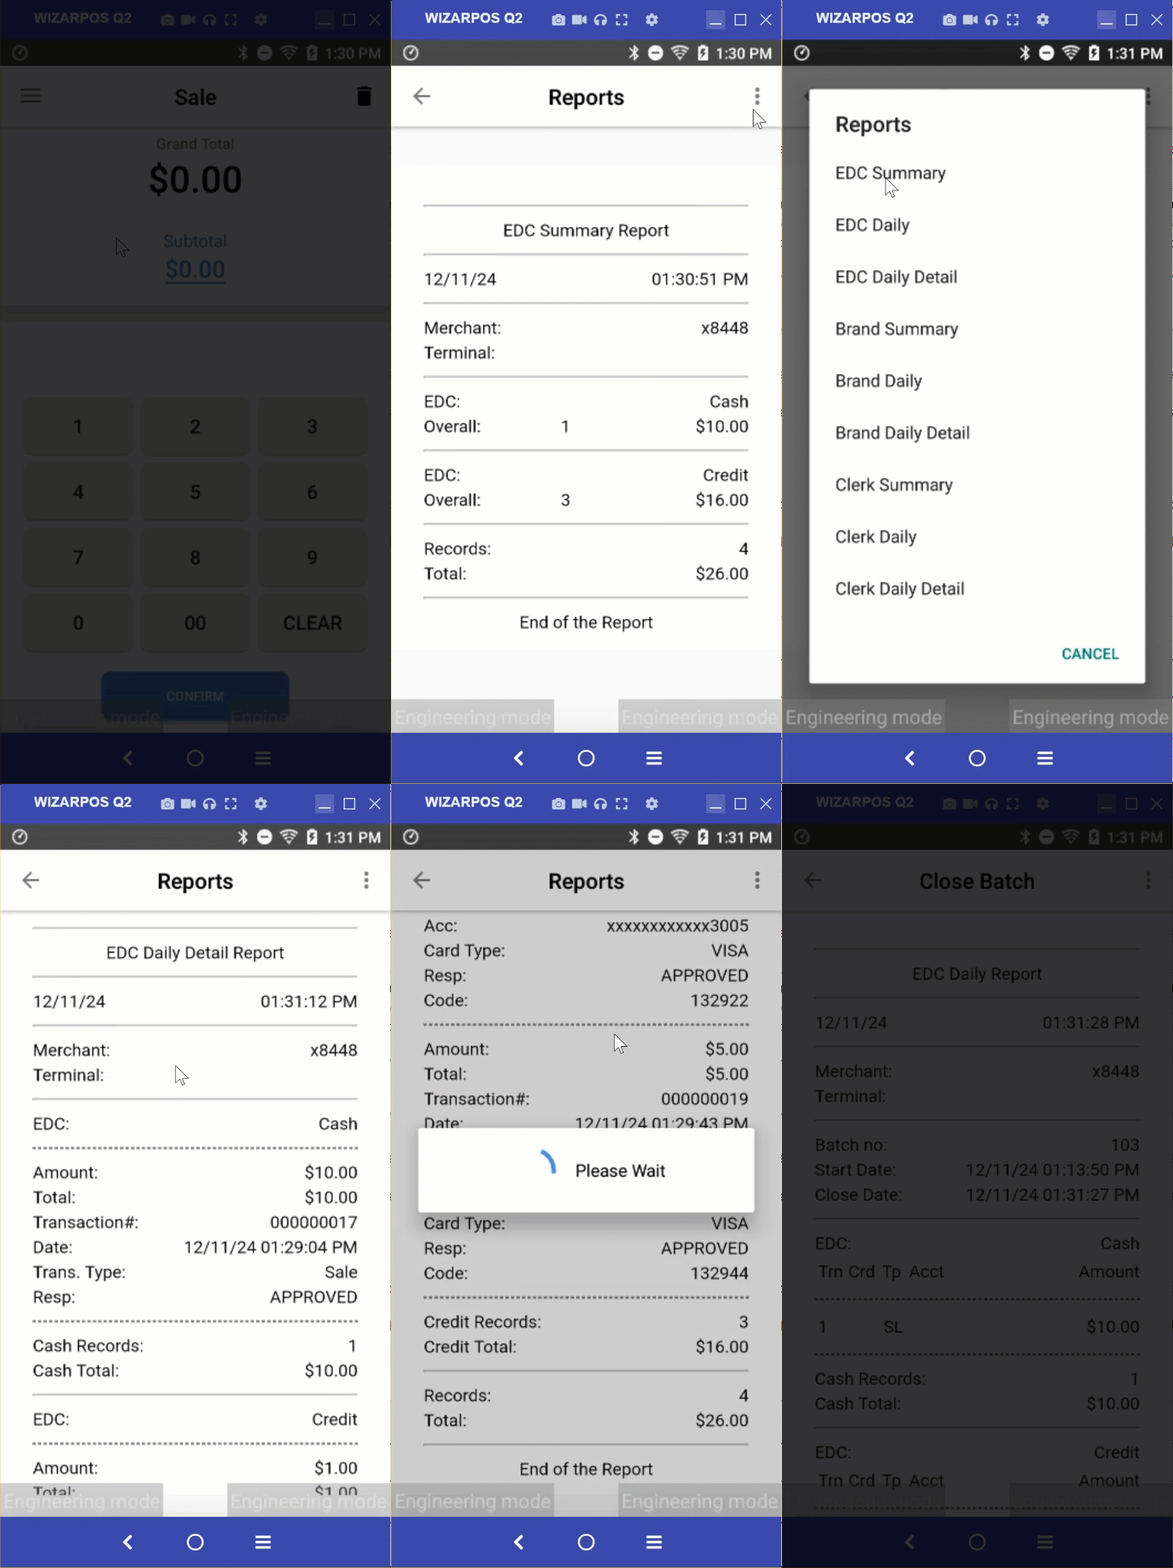
2.2 Print: Click Print to take the printout of the transaction data.
Note: Your device must be connected to the printer to print the report.
2.3 Email: You can email the sales report to any email ID from any given email ID. Enter the Send From and Send to email IDs and click the Send button to send the report over email.
2.4 Close Batch: Closing a batch is the process of settling all the authorized transactions for a specific period and sending them to the payment processor for processing. A batch is typically closed at the end of each business day, although this can vary depending on the business’s specific needs and processing requirements.
To close the batch click the Close batch button. A confirmation window will appear, click the OK button to close the batch.
Reports Types
- EDC Summary: The EDC Summary report provides an overview of transactions aggregated by EDC/Payment Types. It offers a consolidated summary of transactions, including totals and key metrics.
- EDC Daily: The EDC Daily report gives you a daily breakdown of transactions. This report is helpful for tracking daily transaction trends and performance.
- EDC Daily Detail: For a more detailed view of EDC transactions, the EDC Daily Detail report offers a comprehensive breakdown. It includes transaction-specific information, such as transaction type, amount, and timestamps, providing a granular understanding of daily EDC activity.
- Brand Summary: The Brand Summary report compiles data related to specific brands, Visa, MasterCard, … It summarizes sales, returns, and other relevant metrics for each brand.
- Brand Daily: Access the Brand Daily report for a daily overview of sales and performance metrics. This report is useful for monitoring daily brand-specific trends.
- Brand Daily Detail: For a deeper dive into brand-specific transactions, the Brand Daily Detail report provides transaction-level details. It includes information like itemized sales, returns, and timestamps, allowing for a thorough analysis of daily brand activity.
- Clerk Summary: The Clerk Summary report provides an aggregated overview of transactions by clerk. It highlights metrics such as total sales, returns, and other transaction summaries for each clerk.
- Clerk Daily: The Clerk Daily report offers a daily breakdown of transactions processed by each clerk. It is useful for monitoring individual clerk performance and daily activity.
- Clerk Daily Detail: For an in-depth analysis of clerk-specific transactions, the Clerk Daily Detail report provides transaction-level details. It includes information such as transaction type, amount, and timestamps for each clerk, offering a granular view of daily performance.
8. Configuration
Configuration settings enable you to set up various options and parameters to customize the behavior and functionality of the app. These settings include the following options:
- Set Up Options
- Batch Management
- Security
- Support
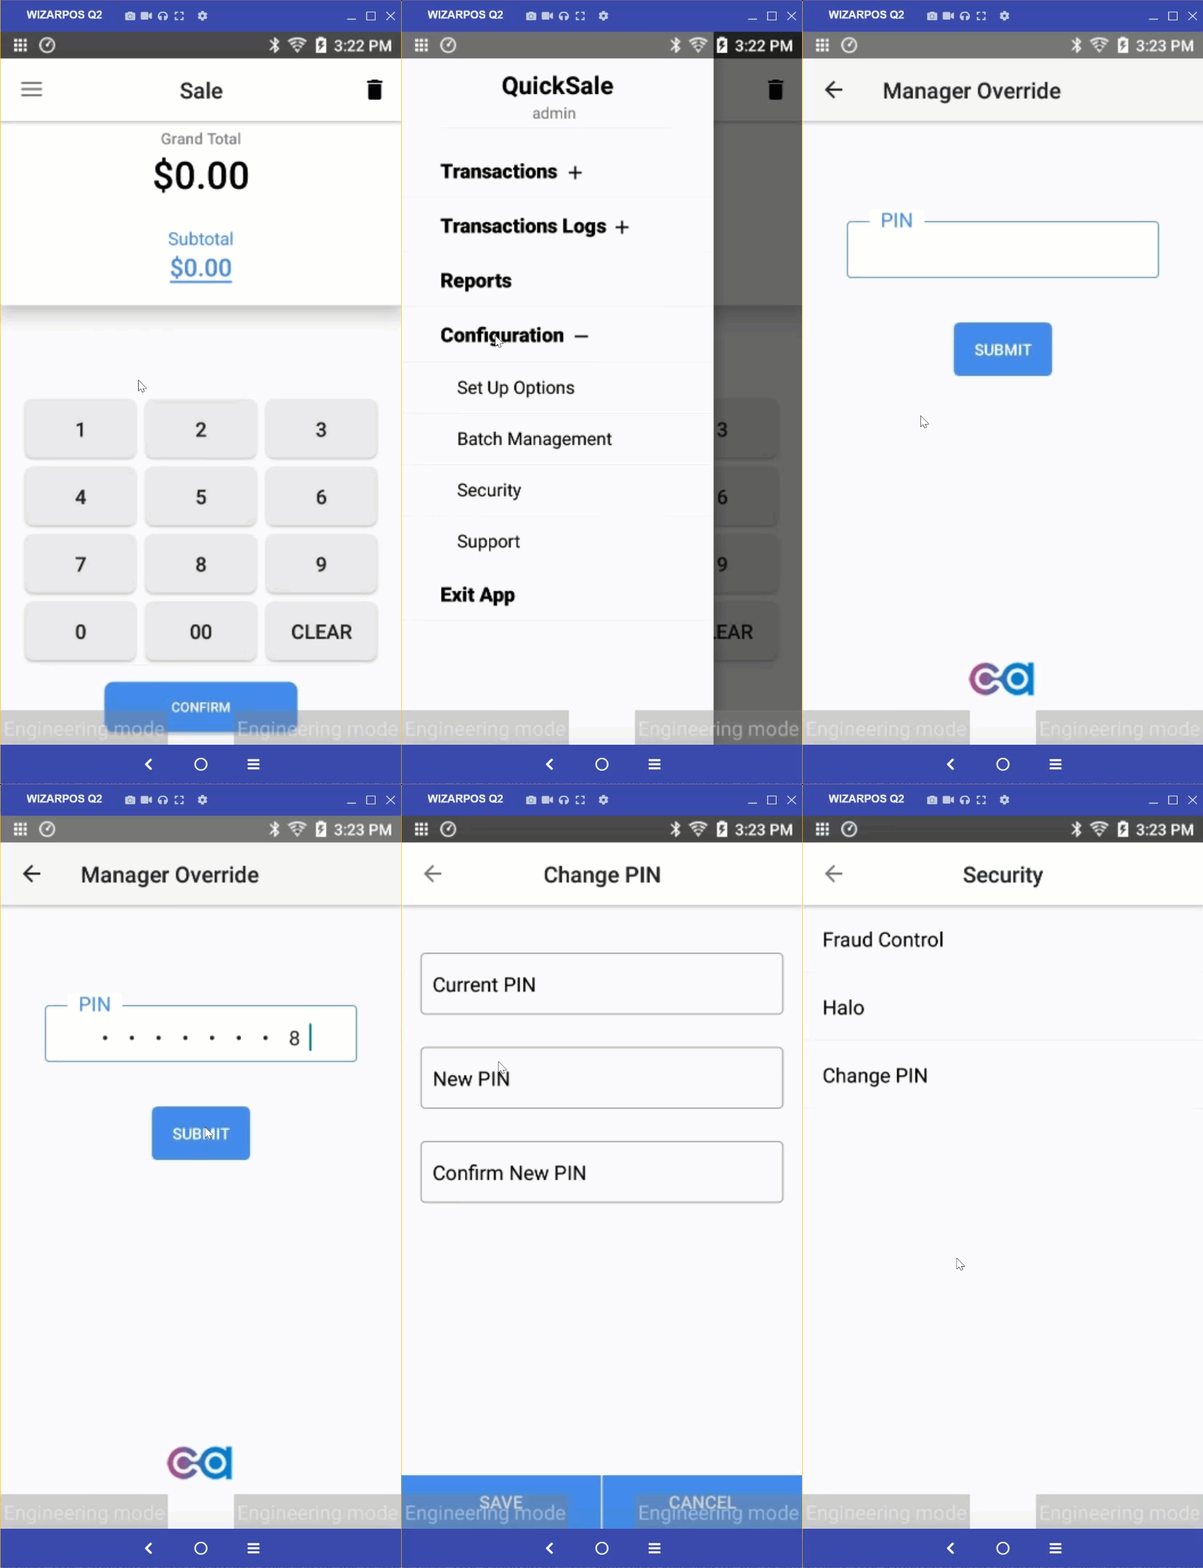
Before you start configuring the Quicksale app, you need to set up a PIN and create your username and password from the app.
Note: By default, Manager Override is enabled in the settings, necessitating the use of a PIN for authentication instead of a password. The default PIN is ‘12345678.’ Additionally, merchants can change the default PIN in the STEM configuration of the Partner Portal.

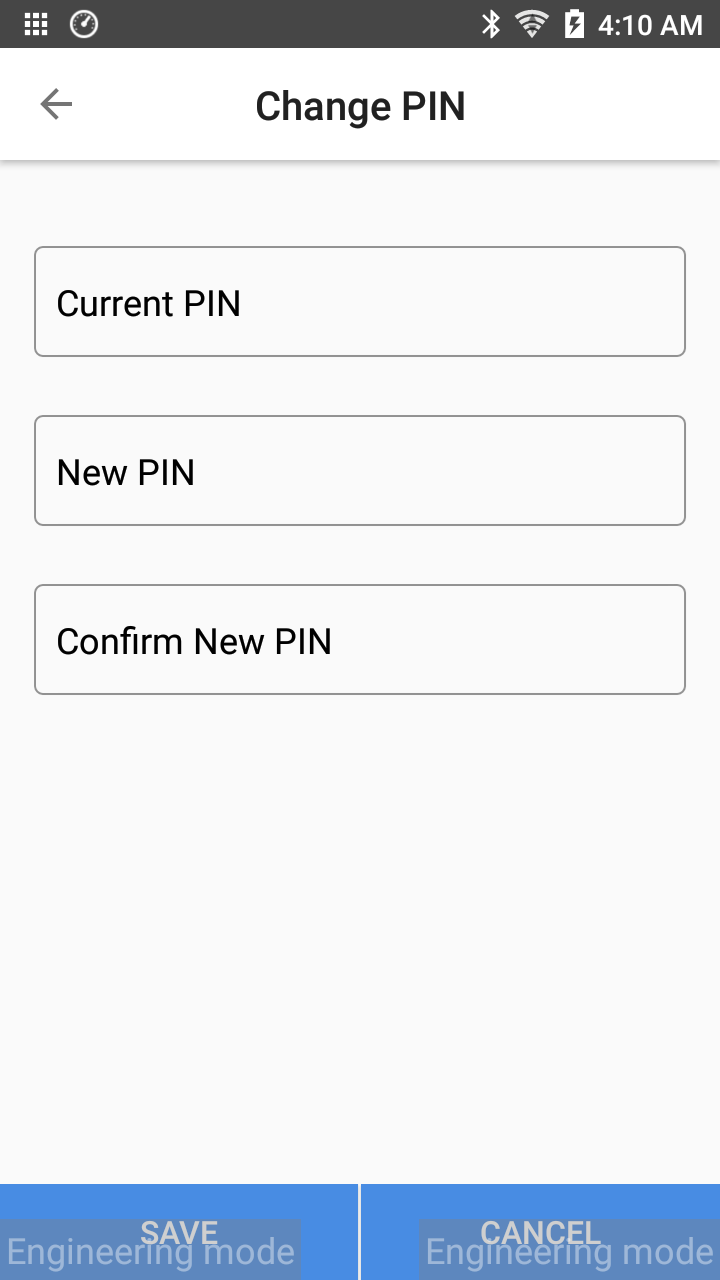
Change PIN
To change your PIN, navigate to Configuration -> Security -> Change PIN
- Enter Current PIN
- Enter New PIN and Confirm New PIN
- Click Save to confirm the PIN change
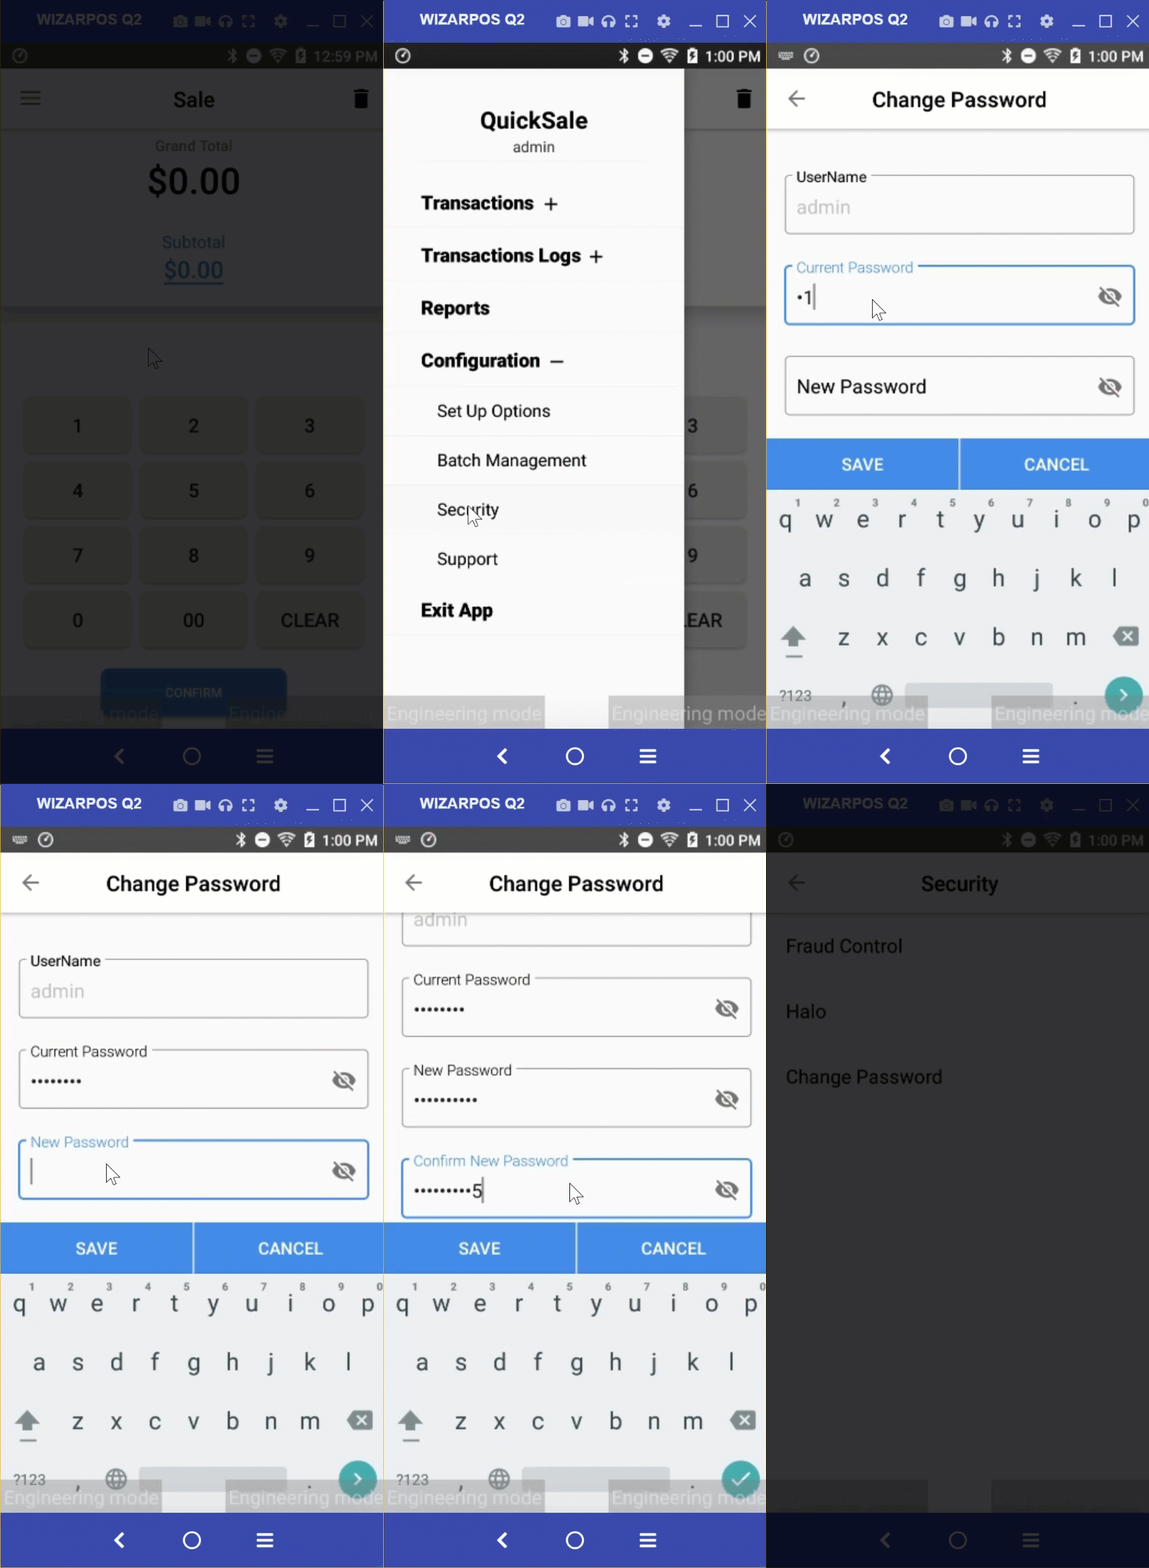
Password Setup
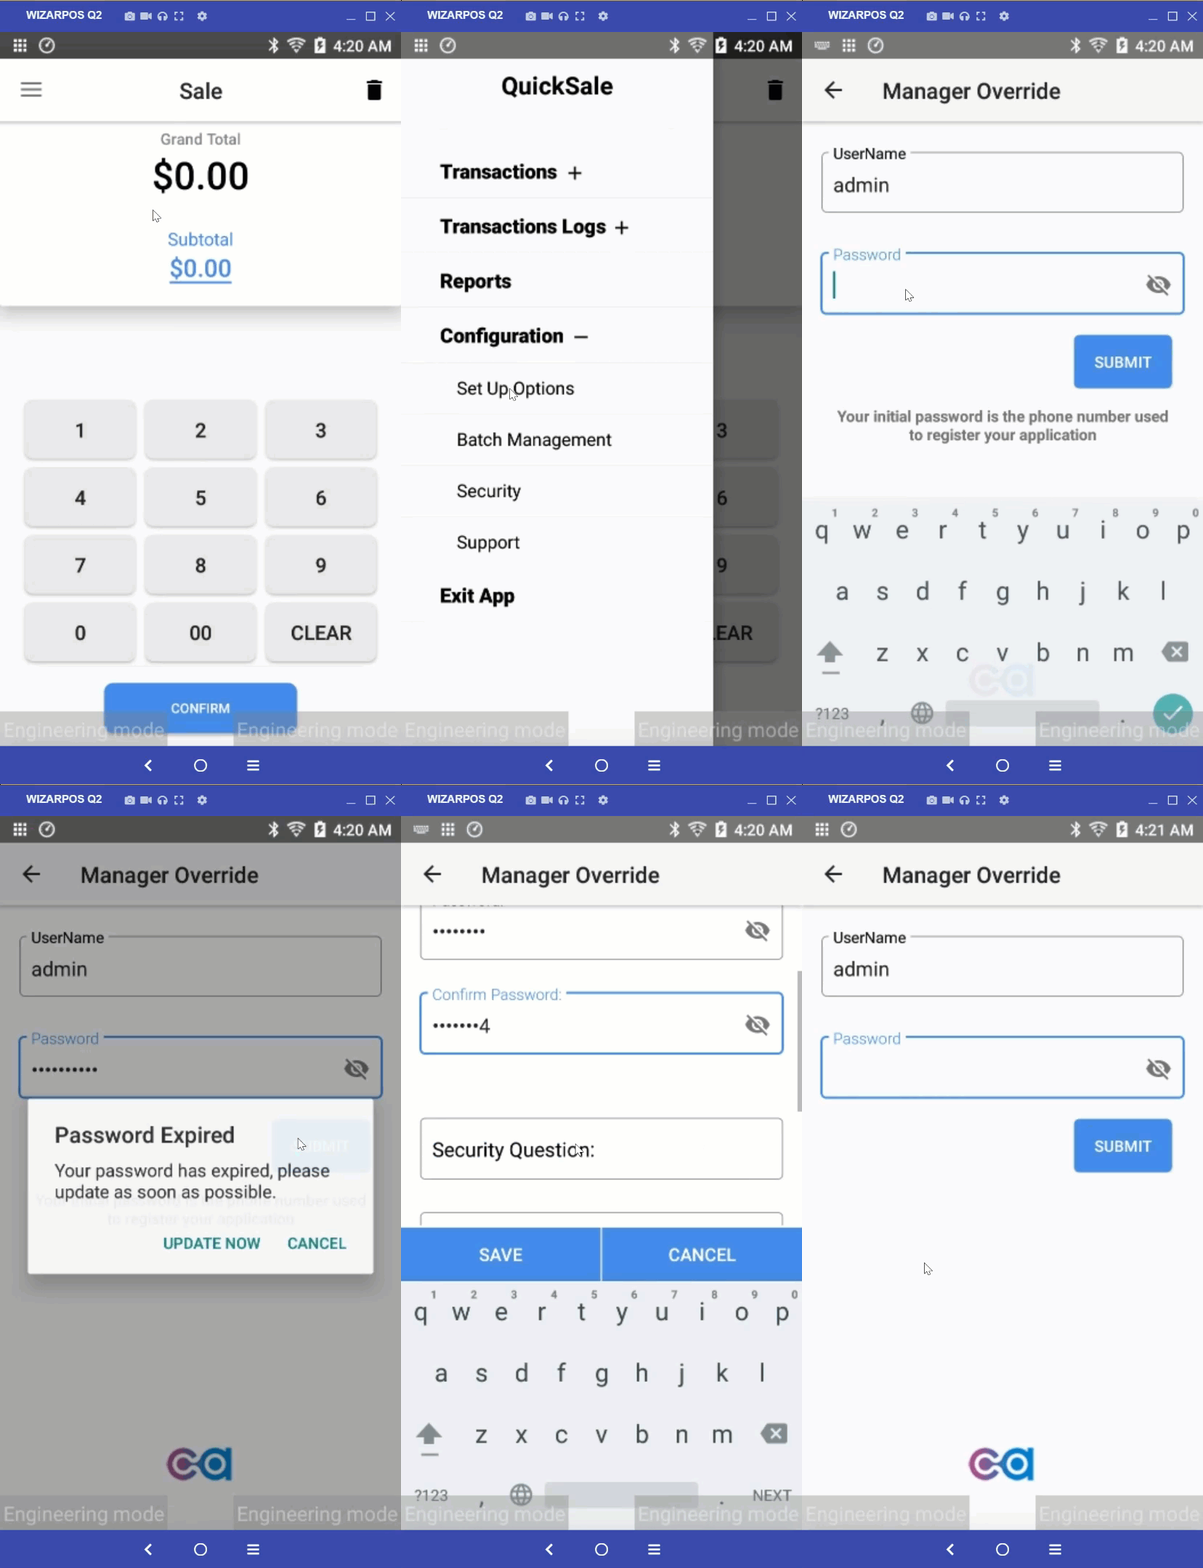
To enable username and password you need to disable Manager Override by navigating to Configuration -> Security -> Fraud Control -> Allow Manager Override
- To set up your password, follow these steps:
- Click Set Up Options, which will redirect you to a new screen.
- Provide your username and password. The default username is ‘admin,’ and the default password is your phone number.
- Enter these details and click the Submit button.
- Upon submission, a pop-up window labeled Password Expired will appear. Click the Update Now button to create a new password.
- Enter your new password, confirm the password, select a security question, and provide the corresponding security answer. Then, click the Save button to store the new password securely.
Set Up Options
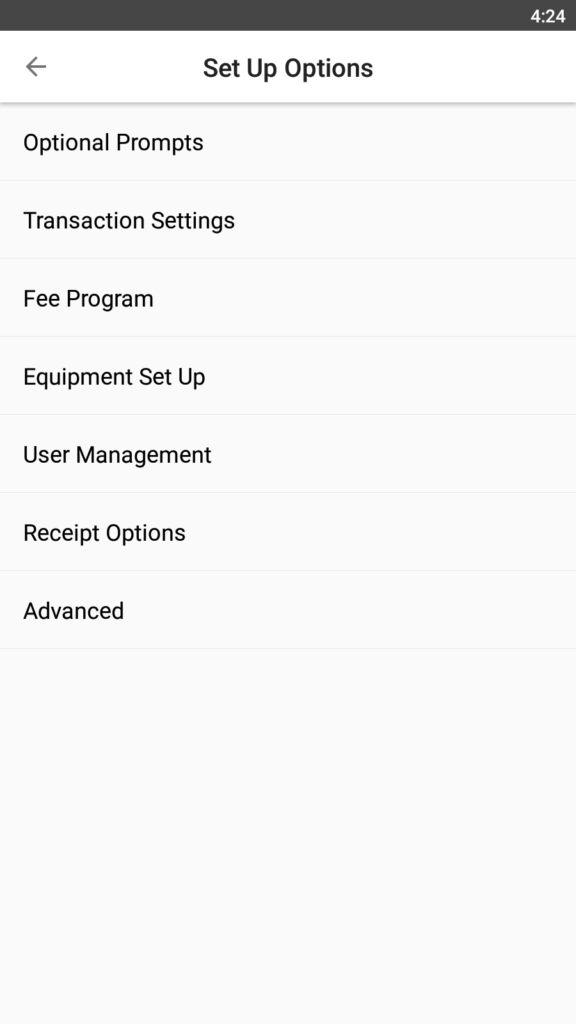
This section will help you customize several options including tax rates, tips, cash discounts, user management, receipt options, etc.
- From the menu options, go to
Configuration -> Set Up Options. - Next, you will need to enter the PIN or provide your user credentials, including the username and password.
- Once you have successfully logged in, you can start configuring the QuickSale 2.0 app.
Optional Prompts
From the menu options navigate to Configuration -> Set Up Options -> Optional Prompts.
- Clerk# Prompt: Checkbox prompt that asks the user for clerk attribute during the transaction.
- Clerk# Text: Dropdown for text input for clerk attribute.
- Clerk# Required: Checkbox that, when enabled, mandates entering the clerk attribute during the transaction to proceed.
- Clerk Name Prompt: Checkbox prompt that asks the user for the clerk name during the transaction.
- Clerk Name Text: Text input for clerk name text.
- Clerk Name: Text input for clerk name.
- Enable QuickBooks Integration: Checkbox that enables QuickBooks integration.
- Customer# Prompt: Checkbox prompt that asks the user for the customer name.
- Customer# Required: Checkbox that, when enabled, makes entering the customer number mandatory for completing the transaction.
- Invoice# Prompt: Checkbox prompt that asks the user for the invoice number.
- Invoice# Text: Dropdown for text input for invoice number.
- Invoice# Required: Checkbox that, when enabled, mandates entering the invoice number during the transaction to proceed.
- Tax Prompt: Checkbox prompt that asks the user for tax during the transaction.
- Tax Mode: Dropdown that allows the user to choose tax mode (Auto or Manual).
- Tax%: Text input for tax percentage.
- Tax Presentation on Receipts: Checkbox that enables tax presentation on receipts.
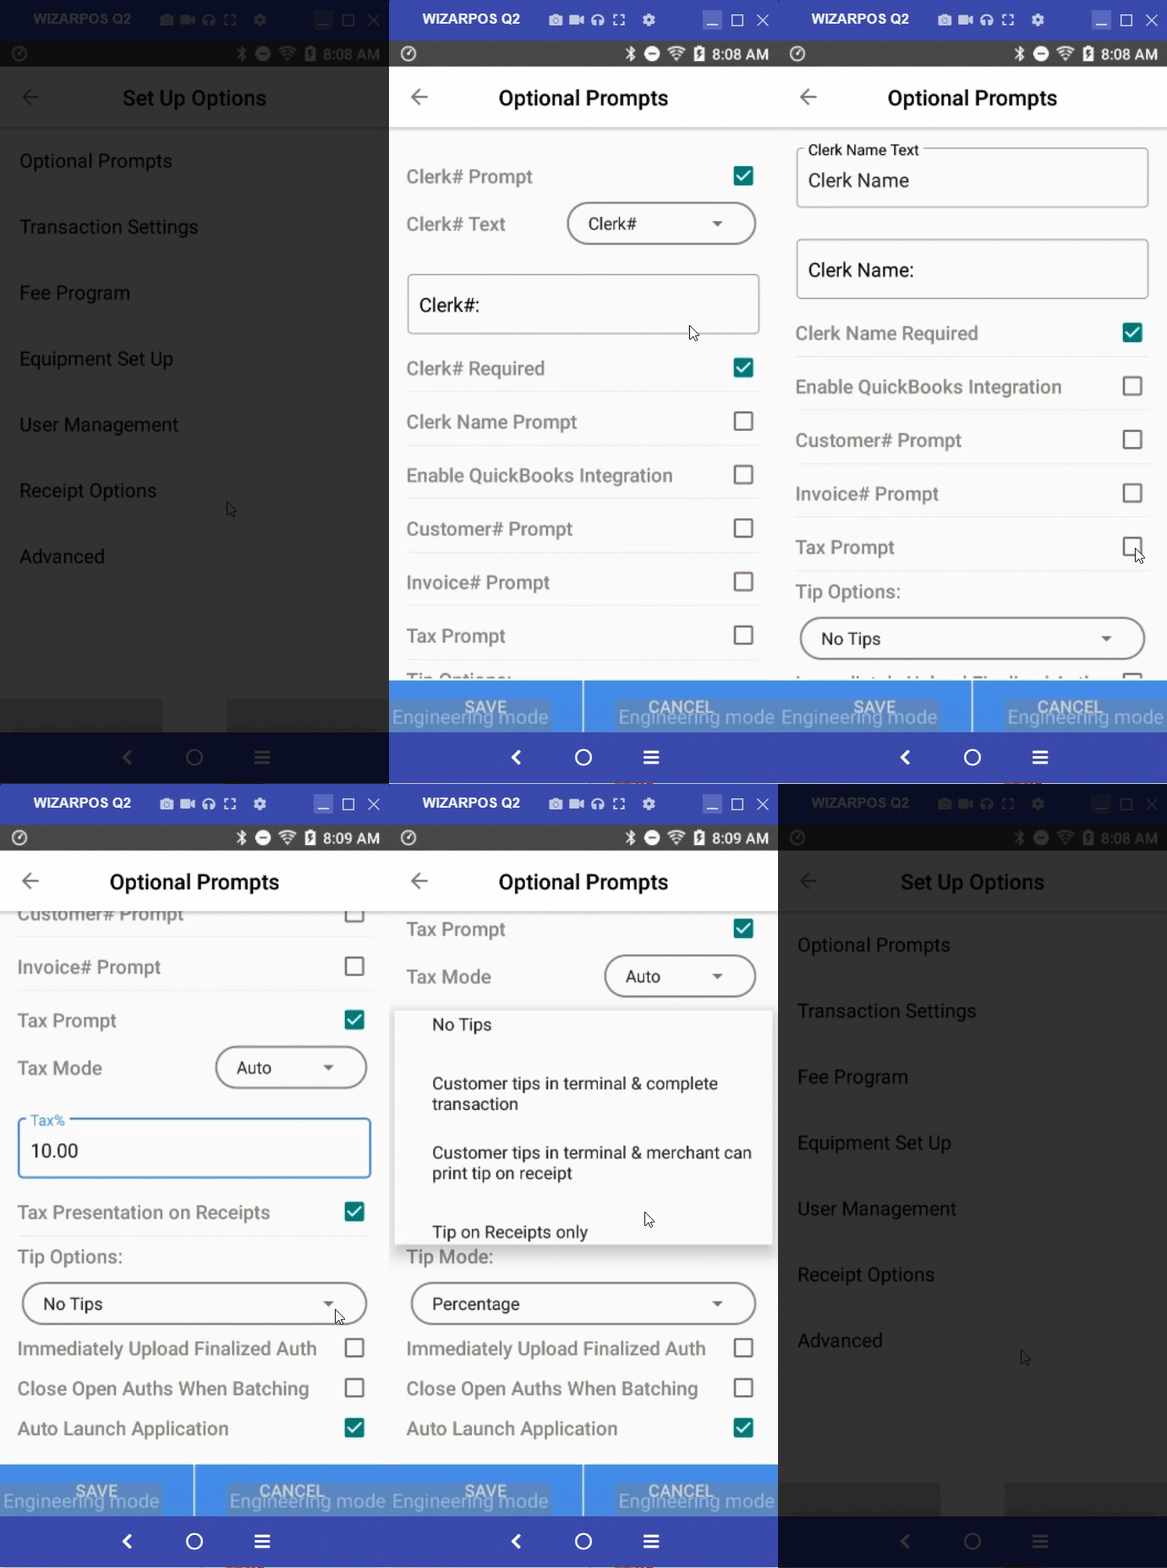
- Tip Options: Dropdown that allows the user to select one of the following tip handling modes.
- No Tips: Option to disable tipping functionality during the transaction. No tip will be prompted or added.
- Customer Tips in Terminal & Complete Transaction: Option where the customer is prompted to enter the tip directly in the terminal. The tip is added to the total, and the transaction is completed in one step.
- Customer Tips in Terminal & Merchant Can Print Tip on Receipt: Option where the customer enters the tip in the terminal, and the merchant can print the tip amount on the receipt for record-keeping.
- Tip on Receipts Only: Option to allow the customer to add a tip after the transaction by writing it on the printed receipt. The merchant can then set the tip amount based on the customer’s input on the receipt. The sale and tip amounts are captured together as part of the authorized transaction.

- Tip Mode: A dropdown that allows the user to select the method for calculating the tip during the transaction. The available options in this dropdown are:
- Percentage: The tip is calculated as a percentage of the transaction amount. The percentage value can be set by the user.
- Amount: The tip is entered as a fixed amount by the user or customer.
- Immediately Upload Finalized Auth: Checkbox that, when enabled, uploads finalized transactions immediately.
- Close Open Auths When Batching: Checkbox that, when enabled, closes any open authorizations during batching.
- Immediately Upload Tipped Sale: Checkbox that, when enabled, uploads finalized tipped sales immediately.
- Close Untipped Sales When Batching: Checkbox that, when enabled, closes sales without tips during batching.
- Show Suggested Tip: Checkbox that, when enabled, displays tip suggestions on the receipt to the customer.
- Auto Launch Application: Checkbox that, when enabled, automatically launches the application at startup.

Transaction Settings
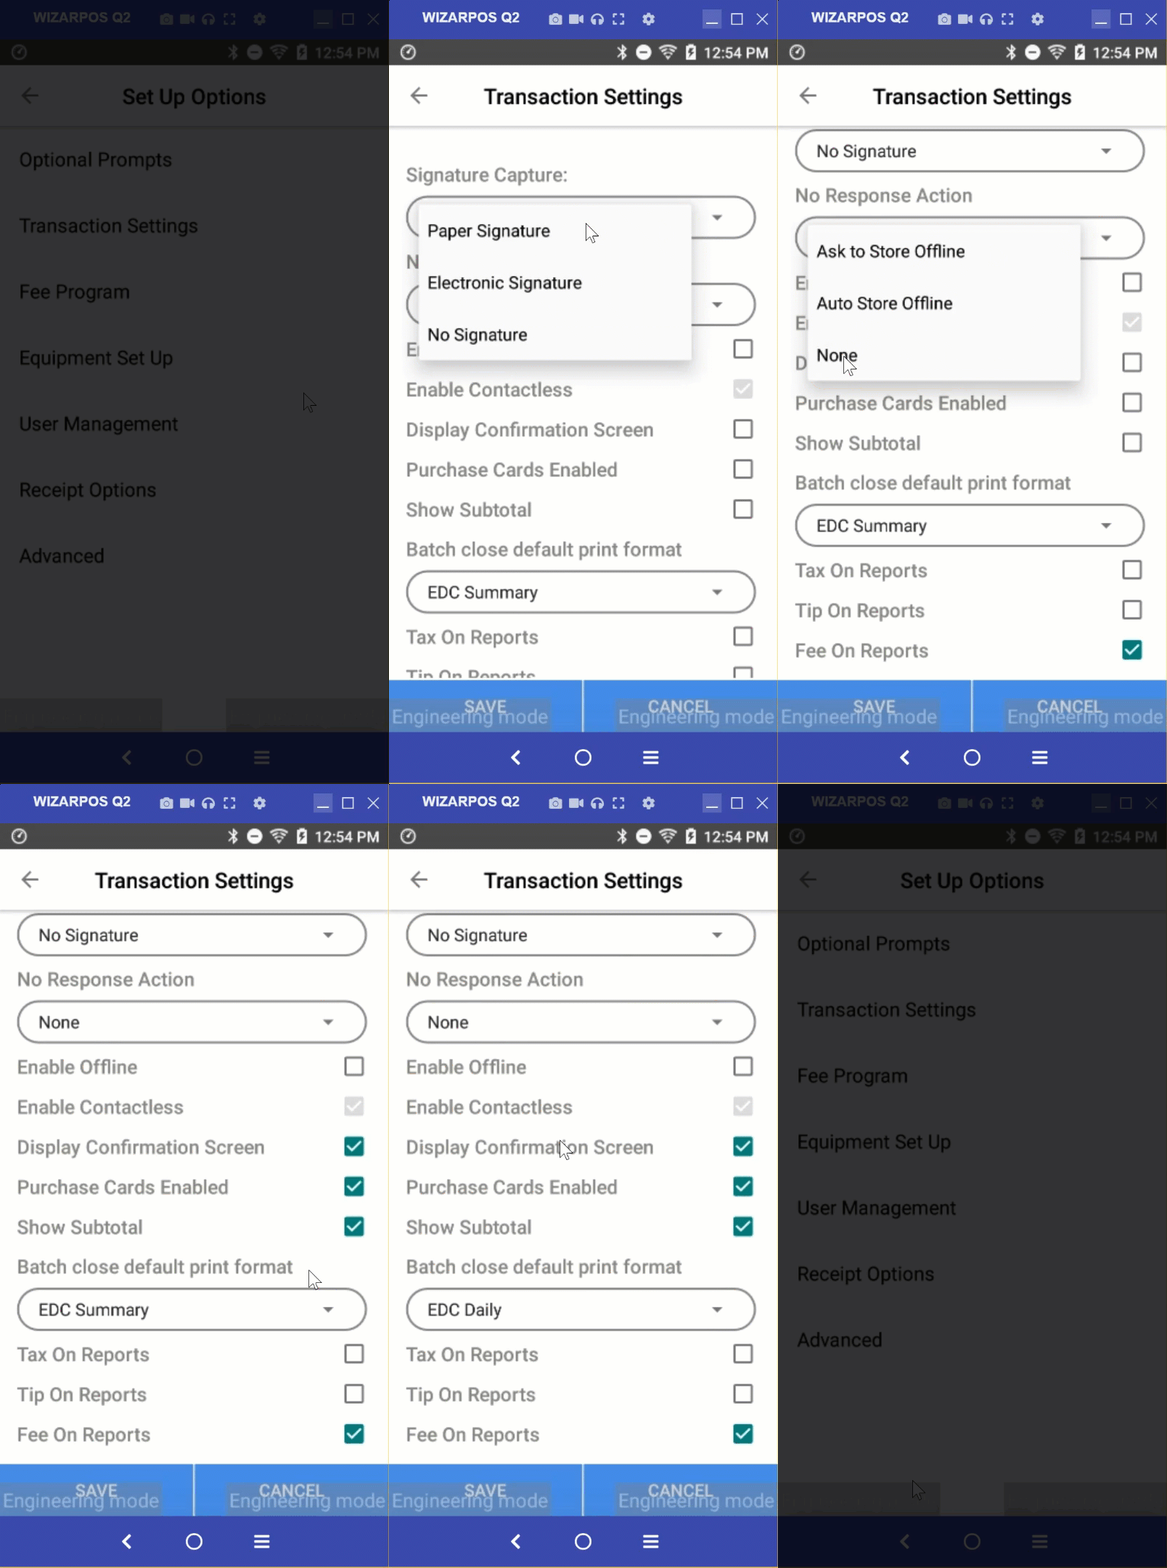
From the menu options navigate to Configuration -> Set Up Options -> Transaction Settings.
Transaction Settings enables you to customize several options related to transactions. Here is a brief description of each field along with their corresponding sub-options.
- Signature Capture: This field contains three sub-options – Electronic Signature, Paper Signature, and No Signature. It specifies whether the transaction requires a signature, and if so, whether it will be captured electronically or on paper.
- No Response Action: This field contains three sub-options – Ask to Store Offline, Ask to Store Offline, and None. It specifies the action to take when no response is received from the customer during the transaction.
- Enable Offline: This field enables offline transactions, allowing transactions to be processed when a network connection is not available.
- Enable Contactless: This field enables contactless payment options.
- Display Confirmation: This field specifies whether the confirmation screen will be displayed after the transaction.
- Purchase Cards Enabled: This field specifies whether purchase cards are enabled for the transaction.
Note: This is only applicable to transactions with the credit tender type. - Show Subtotal: This field specifies whether the subtotal will be displayed during the transaction.
- Batch Close Default Print Format: Specifies the default report format for printing when closing a batch.
- Tax on Reports: Includes tax details in the transaction reports.
- Tip on Reports: Includes tip details in the transaction reports.
- Fee on Reports: Includes fee details in the transaction reports.
Fee Program
To navigate to Fee Program, click the three horizontal lines located in the top left corner. Then navigate to Configuration -> Set Up Options -> Fee Program.
Fee Program lets a merchant pass the cost of payment processing fees to the customer as an additional charge on top of the original transaction amount.
Fee programs are of five types:
- Surcharge
- Service Fee
- Convenience Fee
- Dual Pricing
- Cash Discount
Fee Program Rules:
- Surcharge
- The default label is Surcharge but merchants are allowed to specify a different label
- Charge Anywhere sends the value to the processor (gateway)
- Charge Anywhere prints the value on the receipt and details
- The default mode is percent
- Service Fee
- It is only allowed to be called Service Fee
- Charge Anywhere sends the value to the processor
- Charge Anywhere prints the value on the receipt and details
- The default mode is percent
- It is only allowed for specific MCCs (N/A)
- Convenience Fee
- It is only allowed to be called Convenience Fee
- Charge Anywhere prints the value on the receipt and details
- Charge Anywhere does not send the value to the processor
- The default mode is amount
- Dual Pricing (value entered is the cash value and the total amount is increased by fee )
- The default label is Dual Pricing but merchants are allowed to specify a different label
- Charge Anywhere does not send the value to the processor
- Charge Anywhere does not print the value on the receipt and details
- The default mode is percent
- Cash Discount (value entered is the card value and the total amount is decreased by fee)
- The default label is Cash Discount but merchants are allowed to specify a different label
- Charge Anywhere does not send the value to the processor
- Charge Anywhere does not print the value on the receipt and details
- The default mode is percent
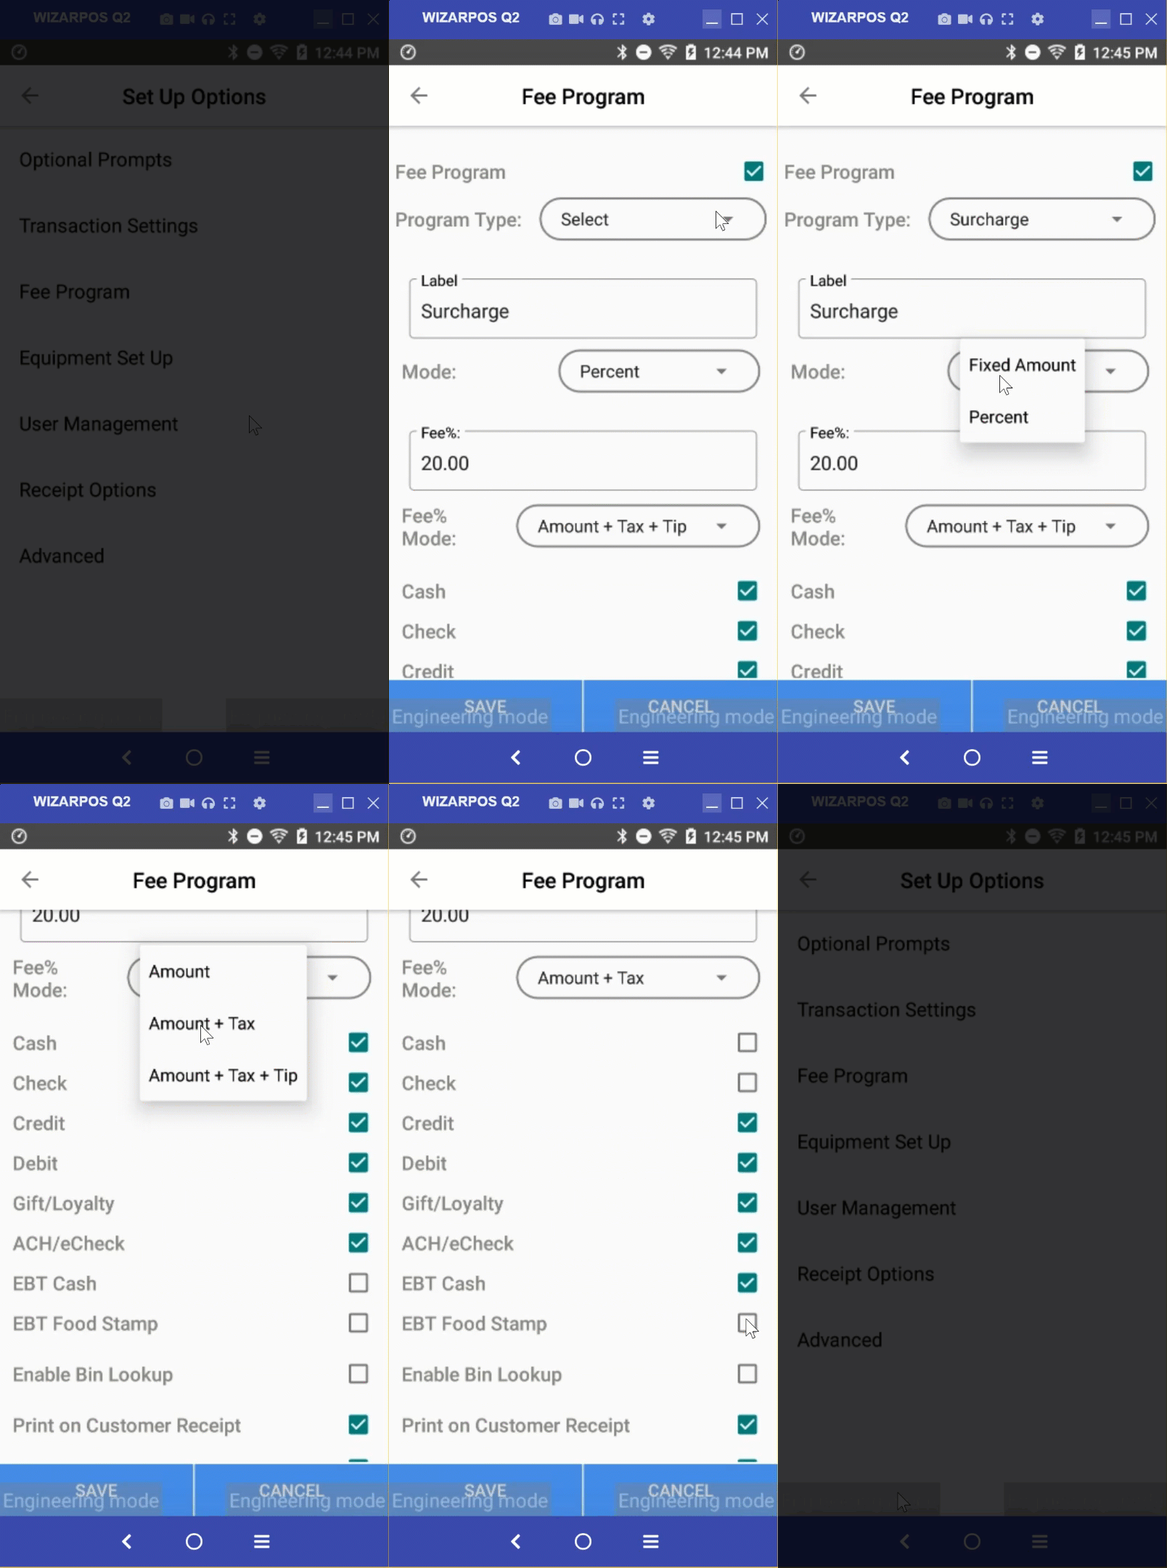
Here is a brief description of each field along with their corresponding sub-options.
- Program Type: Specifies the type of fee program to use. The available options are Surcharge, Service Fee, Convenience Fee, Dual Pricing, and Cash Discount.
- Label: The label appears on the manual card entry screen, card swipe screen, transaction details, and receipts. This field does not apply to Cash Discount programs.
- Mode: Specifies the type of fee calculation to be applied. The available options are:
- Percent: Calculates the fee as a percentage of the transaction amount.
- Fixed Amount: Applies a fixed fee to the transaction regardless of the transaction amount.
- Fee%: Specifies the percentage rate or the amount to be applied to the transaction amount as the fee.
- Fee% Mode: Specifies how the fee percentage is calculated. The available options are:
- Amount: Fee is calculated on the transaction amount only.
- Amount + Tax: Fee is calculated on the transaction amount plus applicable tax.
- Amount + Tax + Tip: Fee is calculated on the transaction amount, tax, and tip combined.
- Applicable Payment Methods: Allows merchants to define the payment methods the fee program applies to. The updated list includes:
- Cash
- Check
- Credit
- Debit
- Gift/Loyalty
- ACH/eCheck
- EBT Cash
- EBT Food Stamp
- Enable BIN Lookup: When enabled, allows the system to perform a BIN (Bank Identification Number) lookup to determine card type for accurate fee application.
- Print on Customer Receipt: Enables printing of the fee details on the customer receipt.
- Print on Merchant Receipt: Enables printing of the fee details on the merchant receipt.
Equipment Set Up
To access the Equipment Set Up feature, follow these steps:
- Tap on the three horizontal lines icon located at the top left corner of the screen.
- From the menu that appears, select Configuration.
- In the Configuration section, choose Set Up Options.
- Within Set Up Options, select Equipment Set Up.
Supported Devices
The following devices are supported in the QuickSale 2.0 app:
- WizarPOS: Q2, Q3, Q2 Premium
- Miura: PTS3, PTS5
- Datecs: BluePad 50 Plus, BlueLite v2, BlueLite v4, BlueCash 50, BluePad 5500 Plus
- IDTECH: VP3300
Device Setup Guidelines
Note: Refer to the Device Setup Guide for detailed steps on setting up devices supported by the QuickSale 2.0 app.
- WizarPOS:
- Supported devices include Q2, Q3, and Q2 Premium.
- WizarPOS peripheral devices must be connected via Local.
- Additionally, the swiper and printer will be automatically connected after successfully registering and completing the Remote Key Injection (RKI) process.
- Miura Devices:
- Datecs Devices:
- Supported devices include BluePad 50 Plus, BlueLite v2, BlueLite v4, BlueCash 50, and BluePad 5500 Plus.
- BluePad 50 Plus, BlueLite v2, and BlueLite v4 can be connected via Bluetooth or USB.
- BlueCash 50, and BluePad 5500 Plus devices must be connected via Local.
- For Bluetooth connections, the device must first be paired through the Android phone’s Bluetooth settings.
- IDTECH:
- Supported devices include VP3300.
- This device can be connected to an Android phone via a micro-USB to Type-C cable for a stable and secure connection.
Printer Setup
To configure the printer settings:
- Access the Equipment Set Up section using the steps mentioned above.
- Select the printer you want to configure for your transactions.
Card Reader Setup
To set up the card reader:
- Access the Equipment Set Up section.
- Configure and connect the card reader to enable seamless payment processing.
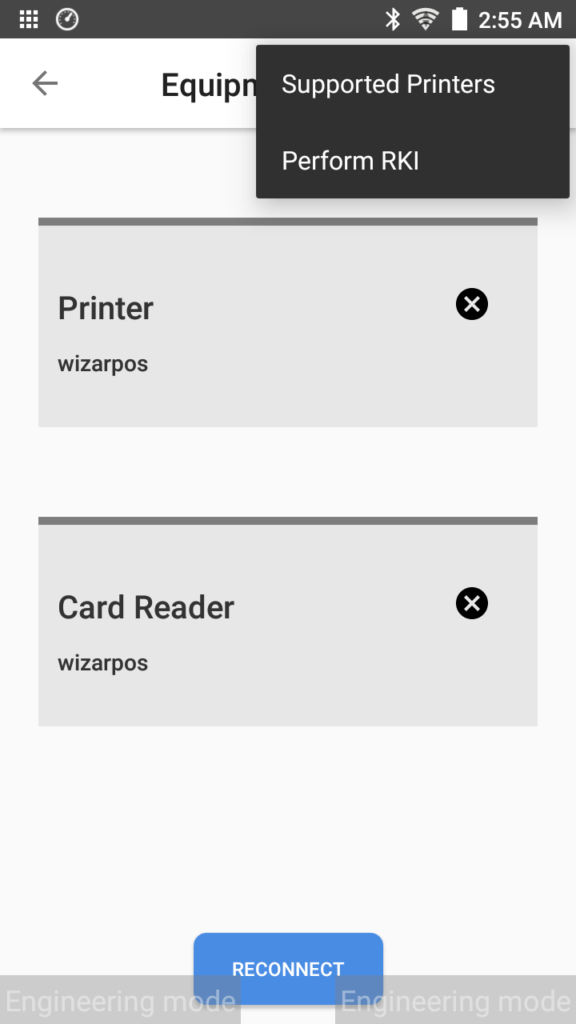
Perform Remote Key Injection (RKI)
To perform RKI:
- Click the three dots located in the top-right corner of the Equipment Set Up screen.
- Select Perform RKI to initiate Remote Key Injection.
User Management
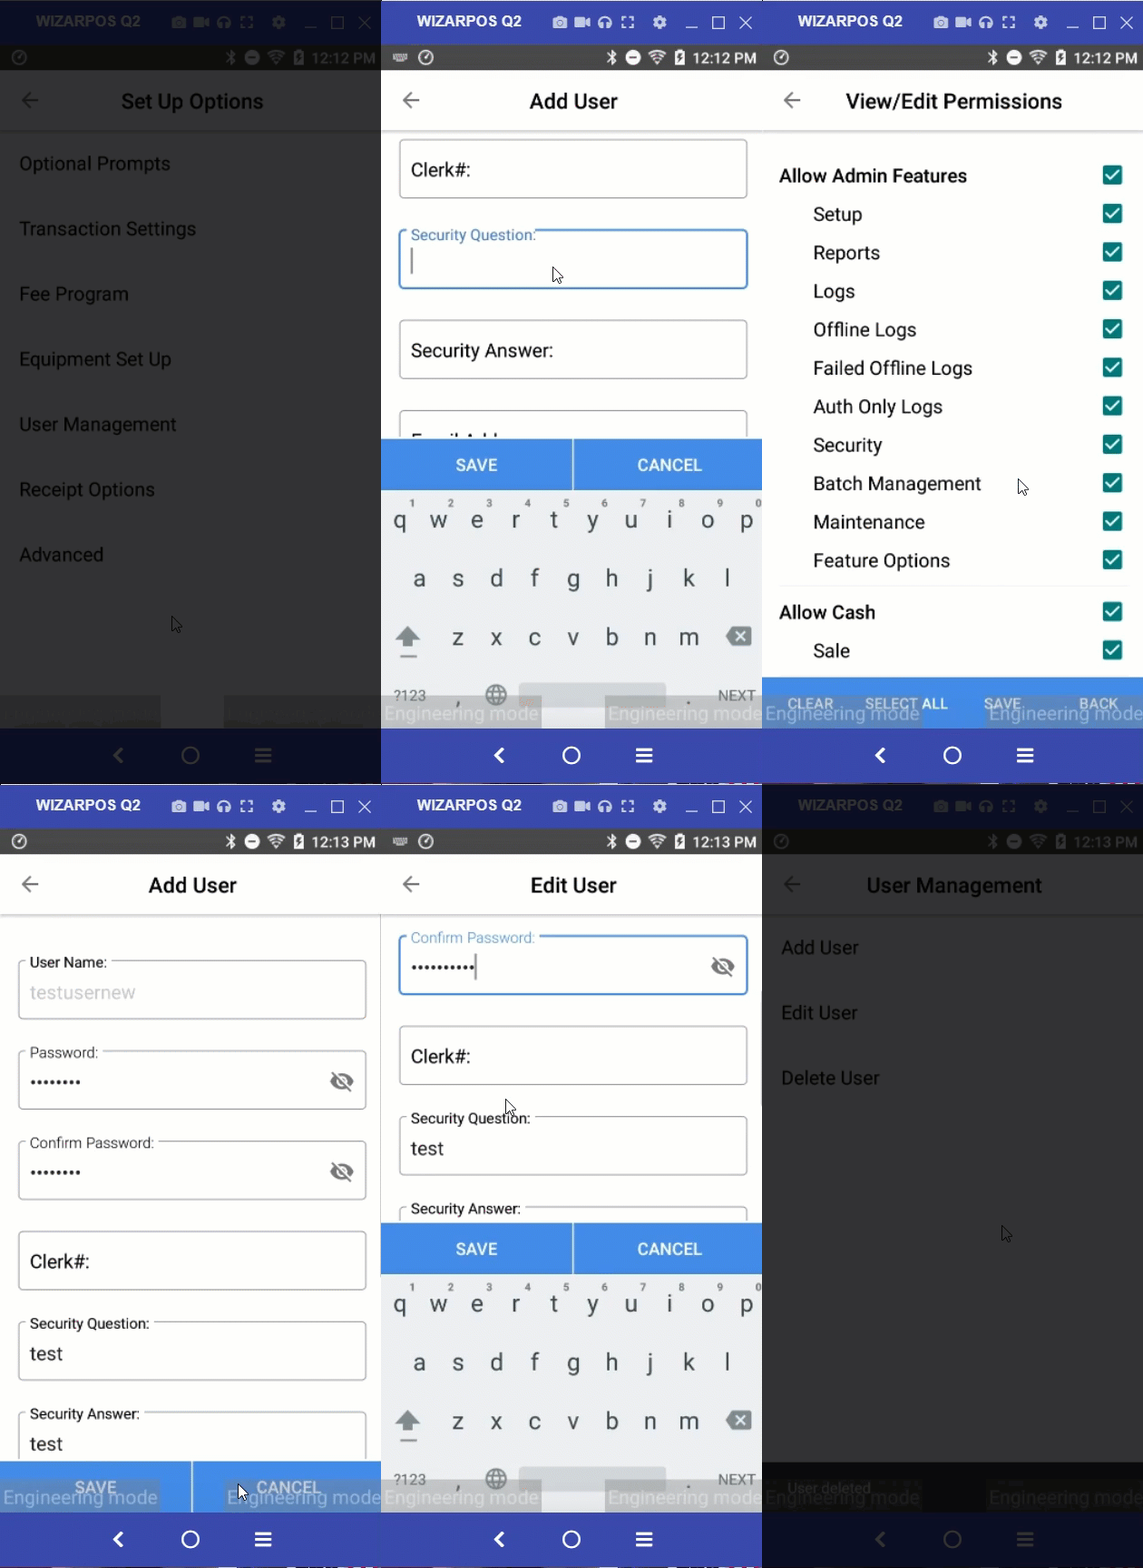
To navigate to User Management, click the three horizontal lines located in the top left corner. Then navigate to Configuration -> Set Up Options -> User Management.
Add User: This field specifies the option to add a new user to the system. Click the Add User button to add the new user. Fill out the form with the user’s information and click Save to create a new user account.
View/Edit Permissions: This section allows you to manage user-specific permissions. You can enable or disable various permissions for different features, such as Admin Features, Cash Management, Reports, and others. This feature ensures that users have the appropriate access levels based on their roles.
Note: To add a user, the username should be at least 6 characters long and the password should be at least 8 characters with a capital letter, a lowercase letter, and a number.
Edit User: This field specifies the option to edit an existing user account. This can include updating the user’s personal information, such as name or contact details, etc.
Delete User: This field specifies the option to delete an existing user account. This should typically only be done if the user is no longer needed, or if the account has been compromised.
Receipt Options
From the menu options navigate to Configuration -> Set Up Options -> Receipt Options.
Receipt options enable you to customize various settings and functionalities available for managing receipts in QuickSale 2.0 app. Here is a brief description of each field:
- View/Edit Header: This option allows you to view or edit the header section of the receipt. This section typically contains the company name, and other branding elements. Editing this section can help businesses customize their receipts and maintain a consistent brand image.
- View/Edit Footer: This option allows you to view or edit the footer section of the receipt.
- Print Options: This option allows you to print a merchant and or customer copy for approved and declined receipts.
Note: If you want to print the customer copy, a pop-up box will appear, click the confirm button to print the customer copy. - Email Options: This option provides settings for sending receipts via email. Users can enter the recipient’s email address to send the receipt. This option can be useful for businesses that want to provide their customers with electronic receipts.
- SMS Options: This option provides settings for sending receipts via SMS text message. This option can be useful for businesses that want to provide their customers with a quick and convenient way to receive their receipts.

Advanced
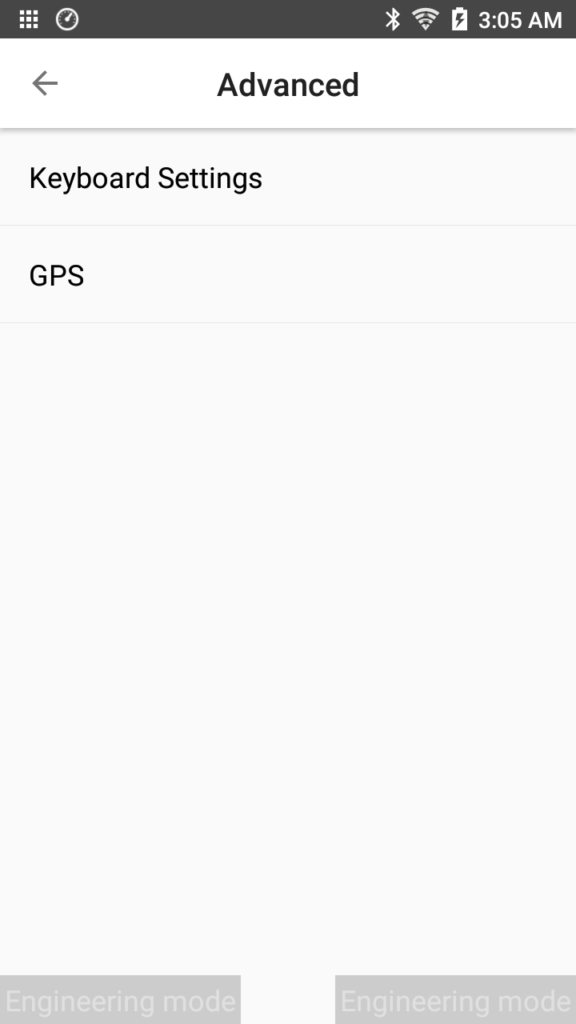
From the menu options navigate to Configuration -> Set Up Options -> Advanced.
Keyboard Settings: Keyboard settings provide you with advanced customization options for your typing experience
GPS: GPS or Global Positioning System is a location-based service that enables the app to determine the precise location of a device or person during the transaction.
Batch Management
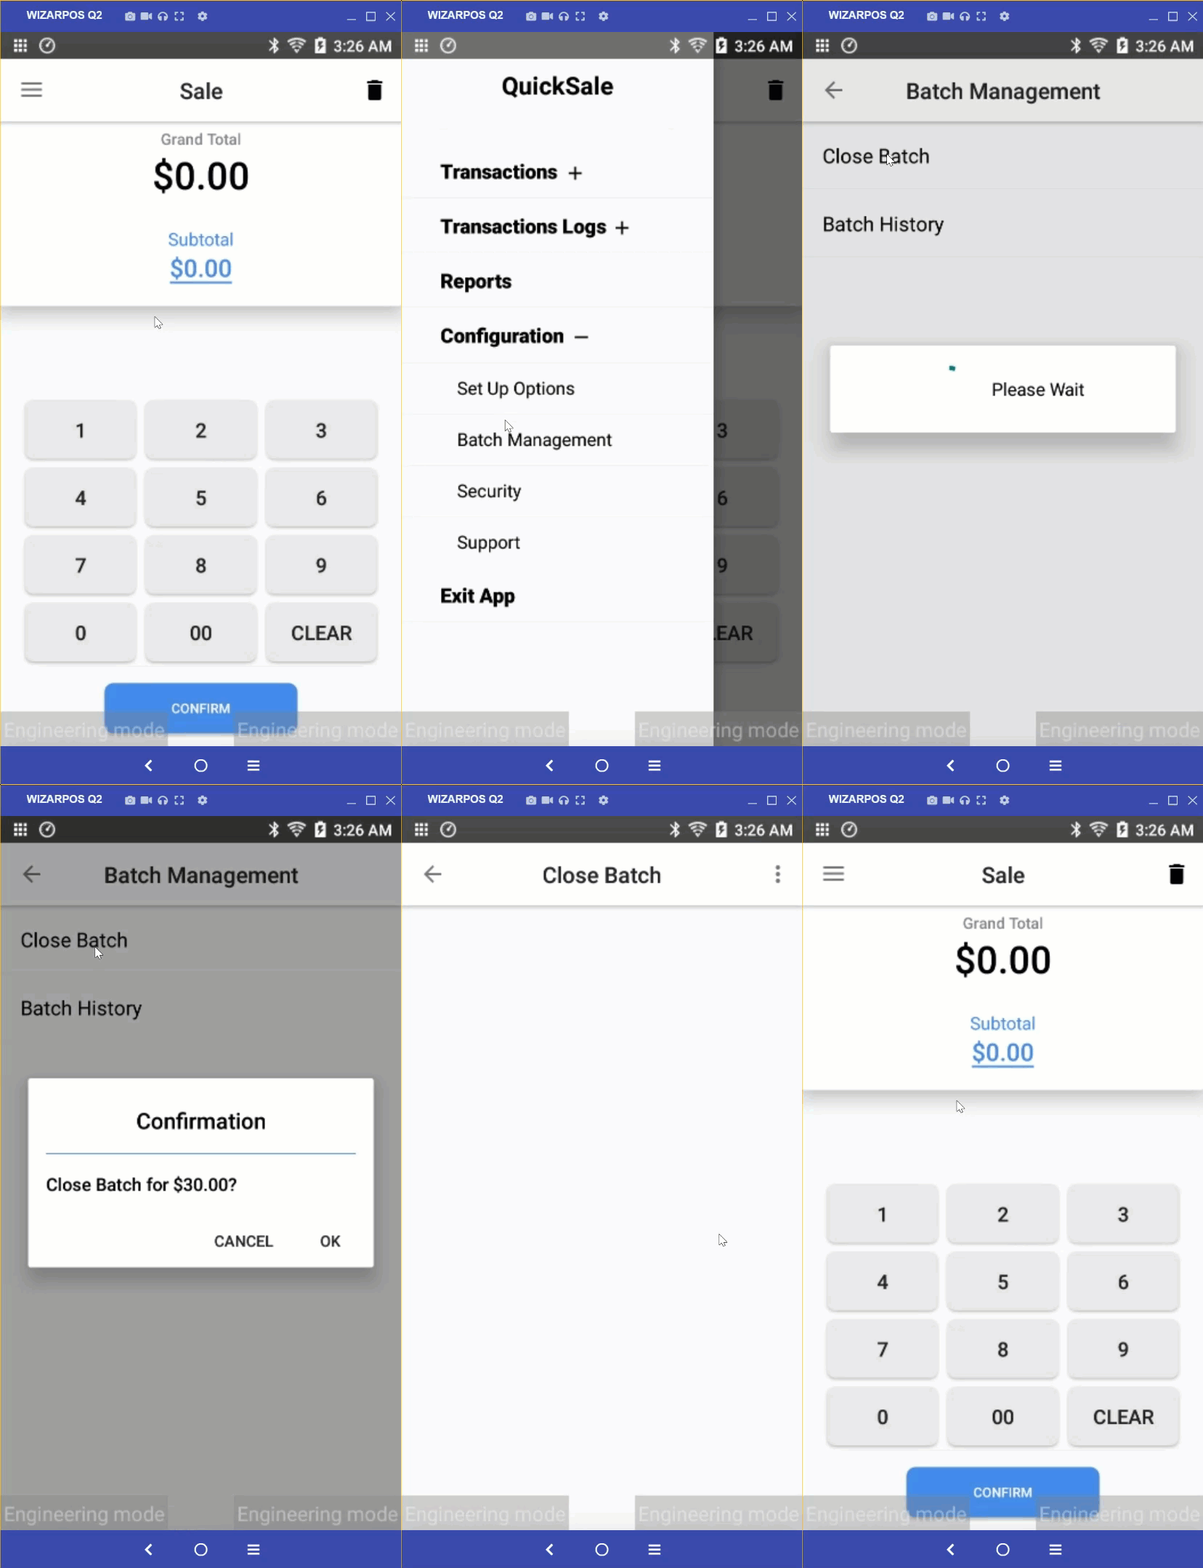
Batch management is a process of grouping multiple transactions into a batch or a single set for processing. This section allows you to view batch history and close the current batch.
Close Batch
This setting allows us to close the current batch. Closing a batch is the process of finalizing and submitting the batch data for processing. The app automatically closes the batch at the end of each day. However, you can manually close the batch by clicking the Close Batch button.
Batch History
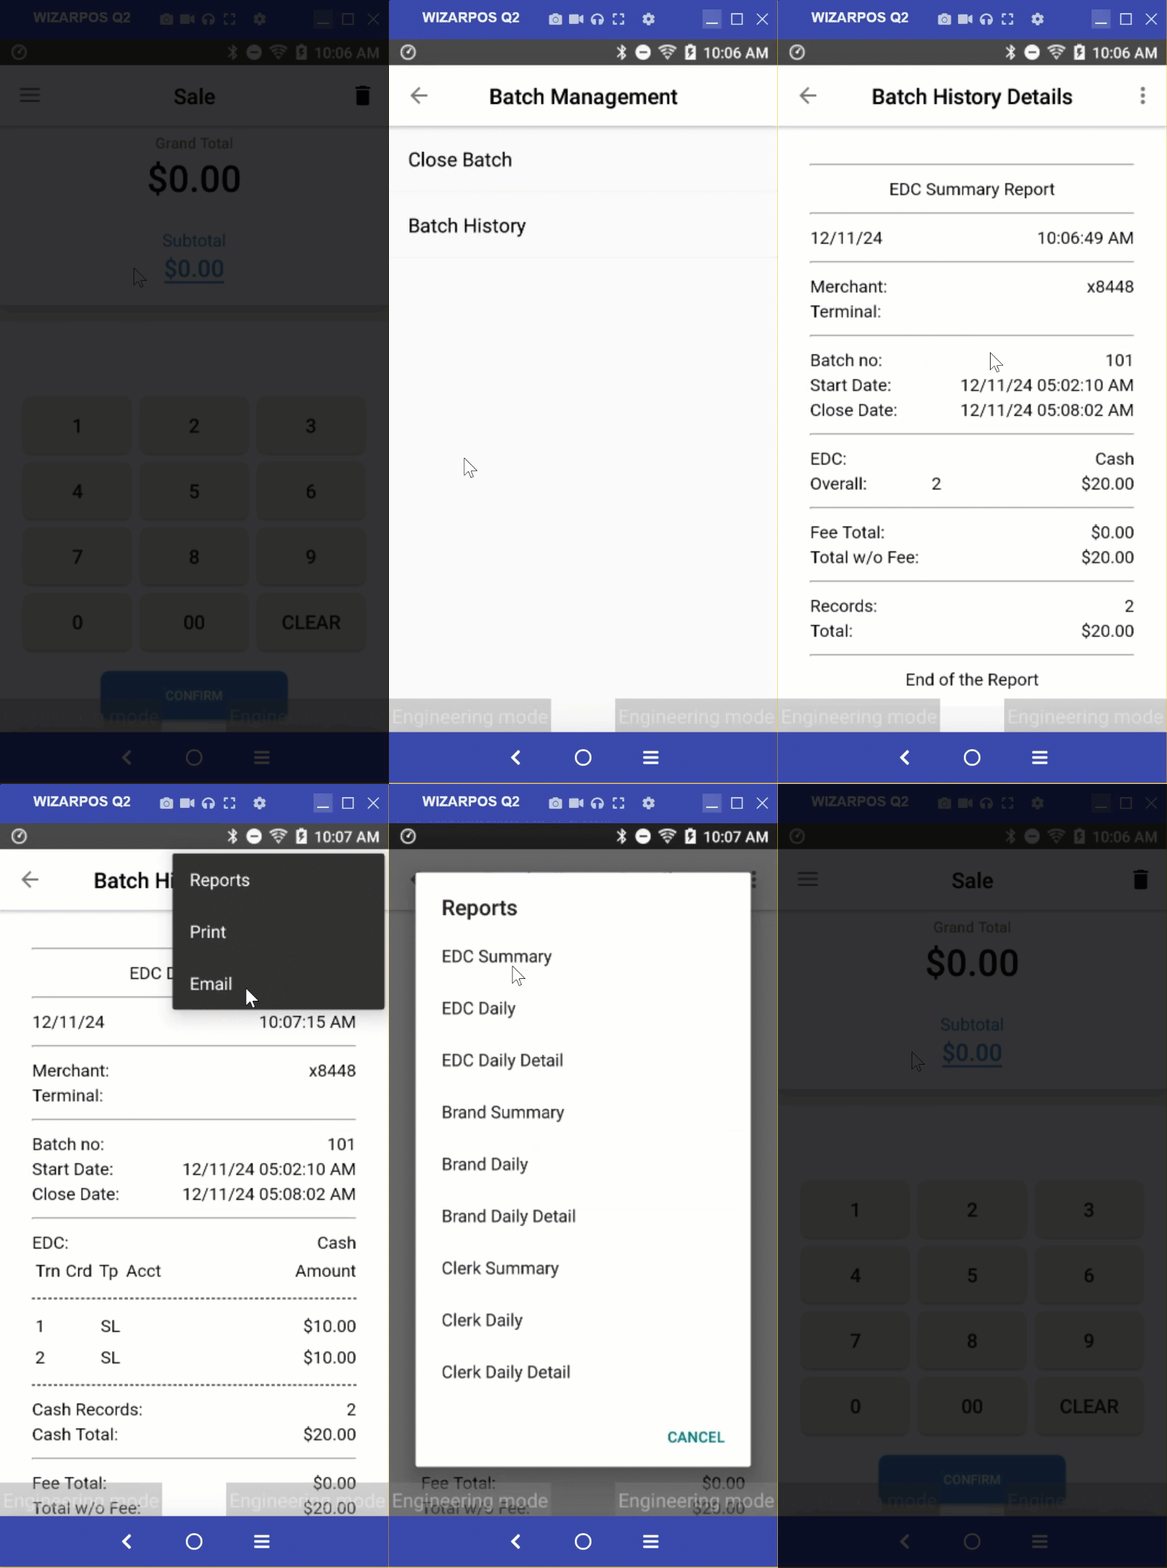
This setting allows the app to store and view the history of batch transactions. Batch history provides a detailed record of each transaction processed within a batch. This information can be used for various purposes, such as reconciliation, reporting, and auditing. You can access and manage batch history through the following steps:
Viewing Batch History
- Navigate to Batch Management and select the Batch History option.
- The Batch History screen displays a list of all previous batches with details such as Batch Number, Date Opened, Date Closed, and Total Amount Processed.
Accessing Detailed Batch History
- Select a batch from the list to view its detailed history. The detailed view includes Merchant and terminal details, Batch number, start date, and close date.
Accessing Reports from Batch History
- In the detailed Batch History view, you can access reports by tapping the three-dot menu at the top-right corner.
Security
This section will help you customize security-related options.
- To navigate to Security, click the three horizontal lines icon located at the top left corner. A menu will appear, where you can select Configuration and then click Security.
- Next, you will need to provide your user credentials, including the username and password (admin is the default username). If this is your first time logging in, you will need to set up a password before proceeding.
- Once you have successfully logged in, you can start configuring the QuickSale 2.0 app.
Fraud Control
The following are security settings related to fraud control in a payment processing app:
- Allow Manager Override: This checkbox enables the Manager Override functionality. When enabled, the system will prompt the manager to enter a PIN to override certain fraud control settings for a transaction. If disabled, the system will ask for the password instead of the PIN.
Additionally, the Manager Override feature allows admins or managers to authorize access when a user attempts to access features for which they lack the necessary permissions. This ensures secure and controlled access to sensitive features. - Enter Last 4 Digits: This checkbox requires the user to enter the last 4 digits of the credit card when processing a transaction. This is a security measure that helps to prevent fraud by ensuring that the user has physical access to the credit card.
- Name/Card#: This setting determines whether the user can view the customer’s full name and credit card number when processing a transaction. The options are Hide, Show, or Truncate. Hiding the name and card number can help prevent fraud by limiting the amount of sensitive information that is visible to the user.
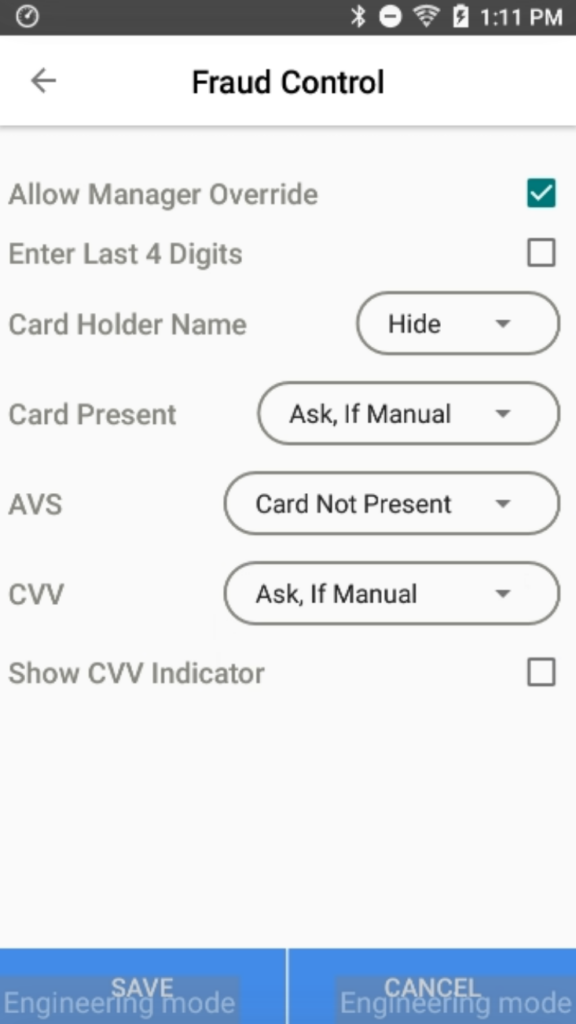
4. Card Present: This setting determines whether the user is prompted to indicate whether the credit card is present during the transaction. The options are Ask if Manual, Always Ask, or Do Not Ask. Asking whether the card is present is a security measure that helps to prevent fraud by ensuring that the user is physically in possession of the credit card.
5. AVS: AVS stands for Address Verification Service, which is a security measure that verifies the billing address provided by the customer with the address on file with the credit card issuer. This setting determines when the user is prompted to verify the billing address. The options are Always Ask, Ask if Manual, Card Not Present, or Do Not Ask.
6. CVV: CVV stands for Card Verification Value, which is a three-digit or four-digit security code on the back of the credit card. This setting determines when the user is prompted to enter the CVV. The options are Ask if Manual, Card Not Present, or Do Not Ask.
7. Show CVV Indicator: This setting determines whether an indicator for the CVV (Card Verification Value) is displayed on the transaction screen. Enabling this option helps to ensure that the CVV is clearly presented as a required field when applicable, improving transaction security by reinforcing the need for CVV validation during manual entry or card-not-present scenarios.
These security settings help to prevent fraud and protect customer data by requiring additional verification steps and limiting the amount of sensitive information visible to the user.
Halo
Halo represents the highest Sale or Refund amount that can be processed during the transaction.
Sale Halo: Highest sale amount that can be processed during the transaction. 0 represents no limit.
Refund Halo: Highest refund amount that can be processed during the transaction. 0 represents no limit.

Change Pin
Note: To enable username and password you need to enable Manager Override by navigating to Configuration -> Security -> Fraud Control -> Allow Manager Override
To update your PIN for enhanced security, follow these steps:
- Current PIN: Enter your current PIN. This step verifies your identity and ensures that only authorized users can make changes.
- New PIN: After entering your current PIN, input your desired new PIN in the New PIN field.
- Confirm New PIN: To prevent errors, enter the new PIN again in the Confirm New PIN field.
Once you’ve entered and confirmed your new PIN, click Save to apply changes.
Change Password
Note: To enable username and password you need to disable Manager Override by navigating to Configuration -> Security -> Fraud Control -> Allow Manager Override
To update your password for enhanced security, follow these steps:
- Current Password: Enter your current password. This step verifies your identity and ensures that only authorized users can make changes.
- New Password: After entering your current password, input your desired new password in the New Password field.
- Confirm New Password: To prevent errors, enter the new password again in the Confirm New Password field.
Once you’ve entered and confirmed your new password, click Save to apply changes.
Support
From the menu options navigate to Configuration -> Support.
Refresh Services
This setting allows the user to refresh the app’s services, such as updates to payment processing, to ensure that the app is operating at optimal performance.
FAQ
This setting provides answers to frequently asked questions about the app, such as how to use certain features or troubleshoot common issues.
About
This setting provides information about the app, such as App Info, Gateway Info, Processor Info, and Hardware Info.
Show All Settings
This setting allows the user to view all the settings available in the app in one place.

Maintenance
This setting refers to the process of updating, repairing, or otherwise maintaining the app’s functionality.
- To navigate to Maintenance, click the three horizontal lines located in the top left corner. A menu will appear, where you can select Configuration, click Support and then select Maintenance.
- Next, you will need to provide your user credentials, including the username and password (admin is the default username). If this is your first time logging in, you will need to set up a password before proceeding.
- Rotate KEK: KEK stands for Key Encryption Key, which is used to encrypt and decrypt sensitive information in the payment processing system. This setting allows the user to rotate or change the KEK periodically for security reasons, to prevent unauthorized access to sensitive information.
- Rotate Keys: This setting allows the user to rotate or change the encryption keys used QuickSale 2.0. This is done to ensure the security of the payment processing system by preventing unauthorized access.
- Unregister: This setting allows the user to unregister from the QuickSale 2.0 app. Click the Unregister button, then enter the License number and Phone number in the corresponding box. Then click Submit to unregister the user.
- View GPS Data: This setting allows the user to view the GPS data associated with a particular payment transaction. This can be useful for tracking the location of a payment transaction and verifying the authenticity of the transaction.
- Clear Pending Reversal: This setting allows the user to clear any pending reversals in the payment processing system. A reversal is a transaction that cancels a previously authorized transaction, and pending reversals can cause issues with the payment processing system if they are not cleared in a timely manner.

9. Multi-MID Feature for QuickSale 2.0
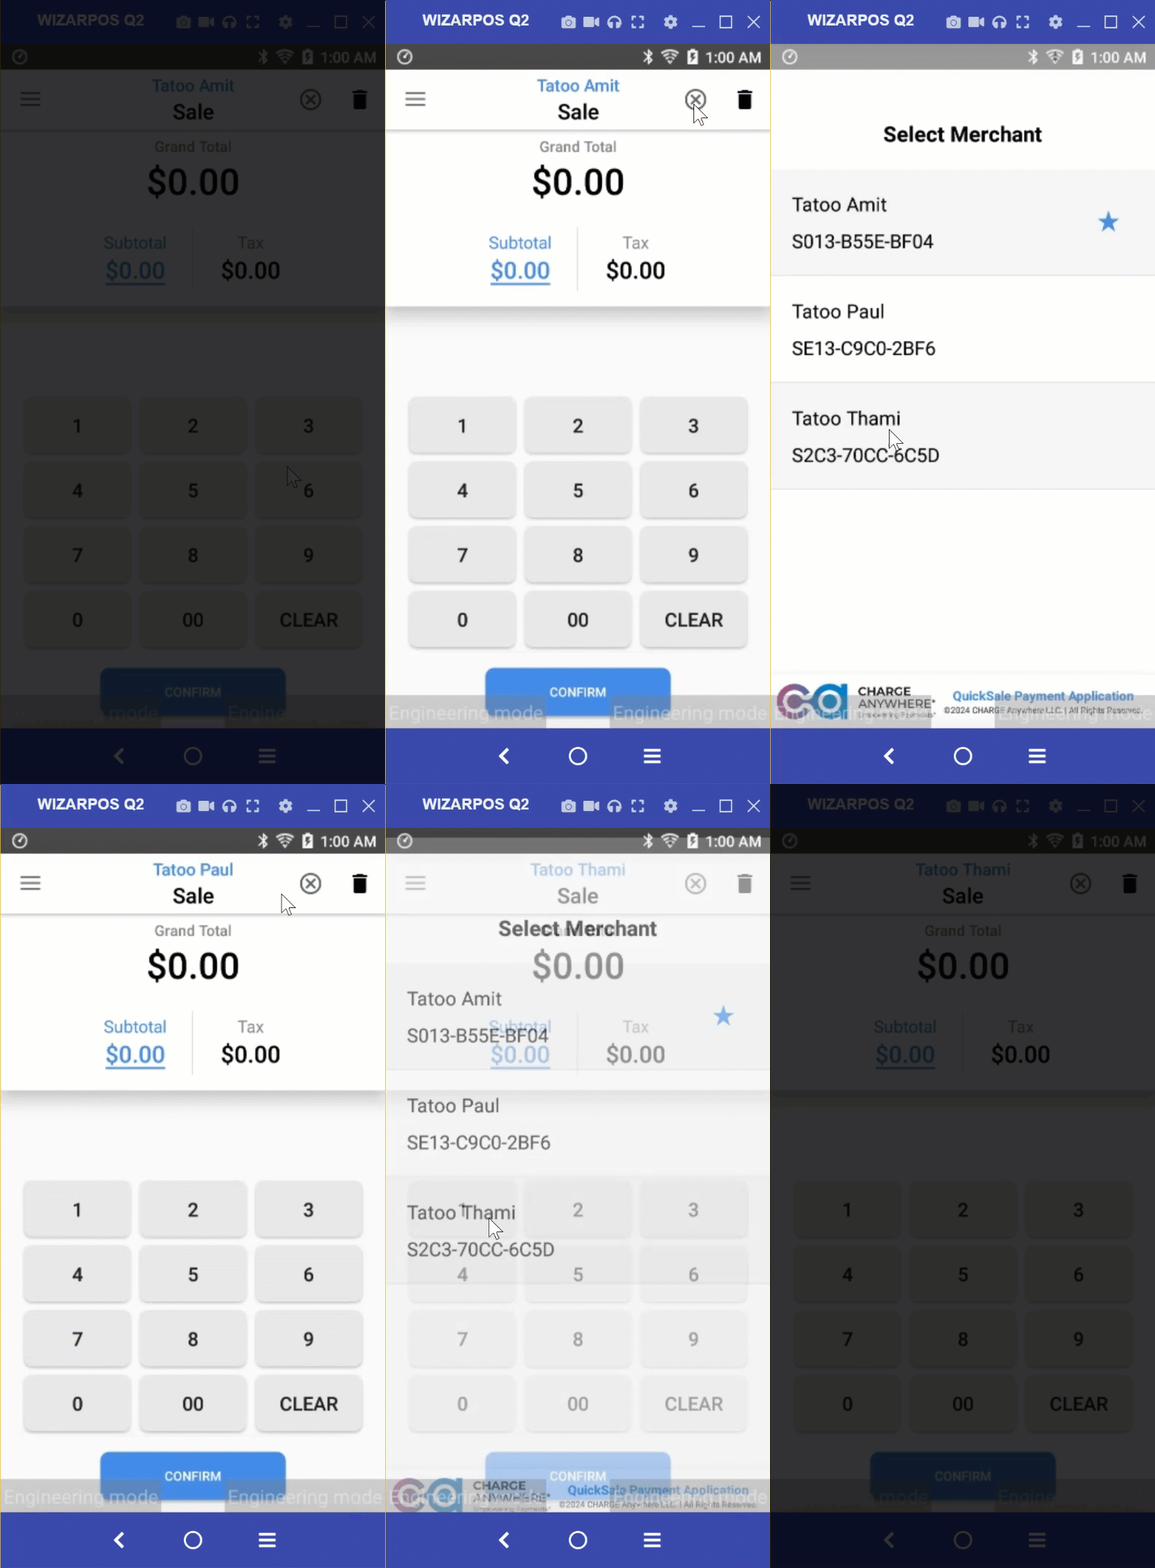
The Multi-MID feature in QuickSale 2.0 allows businesses to manage multiple merchant profiles within a single app environment. This functionality is designed to support users who process transactions under different merchant IDs, offering flexibility and enhanced workflow management.
How to Use the Multi-MID Feature
Pre-requisite: Registration with a multi-MID profile in the QuickSale 2.0 app must be complete.
Selecting a Merchant Profile
- Open the QuickSale 2.0 app.
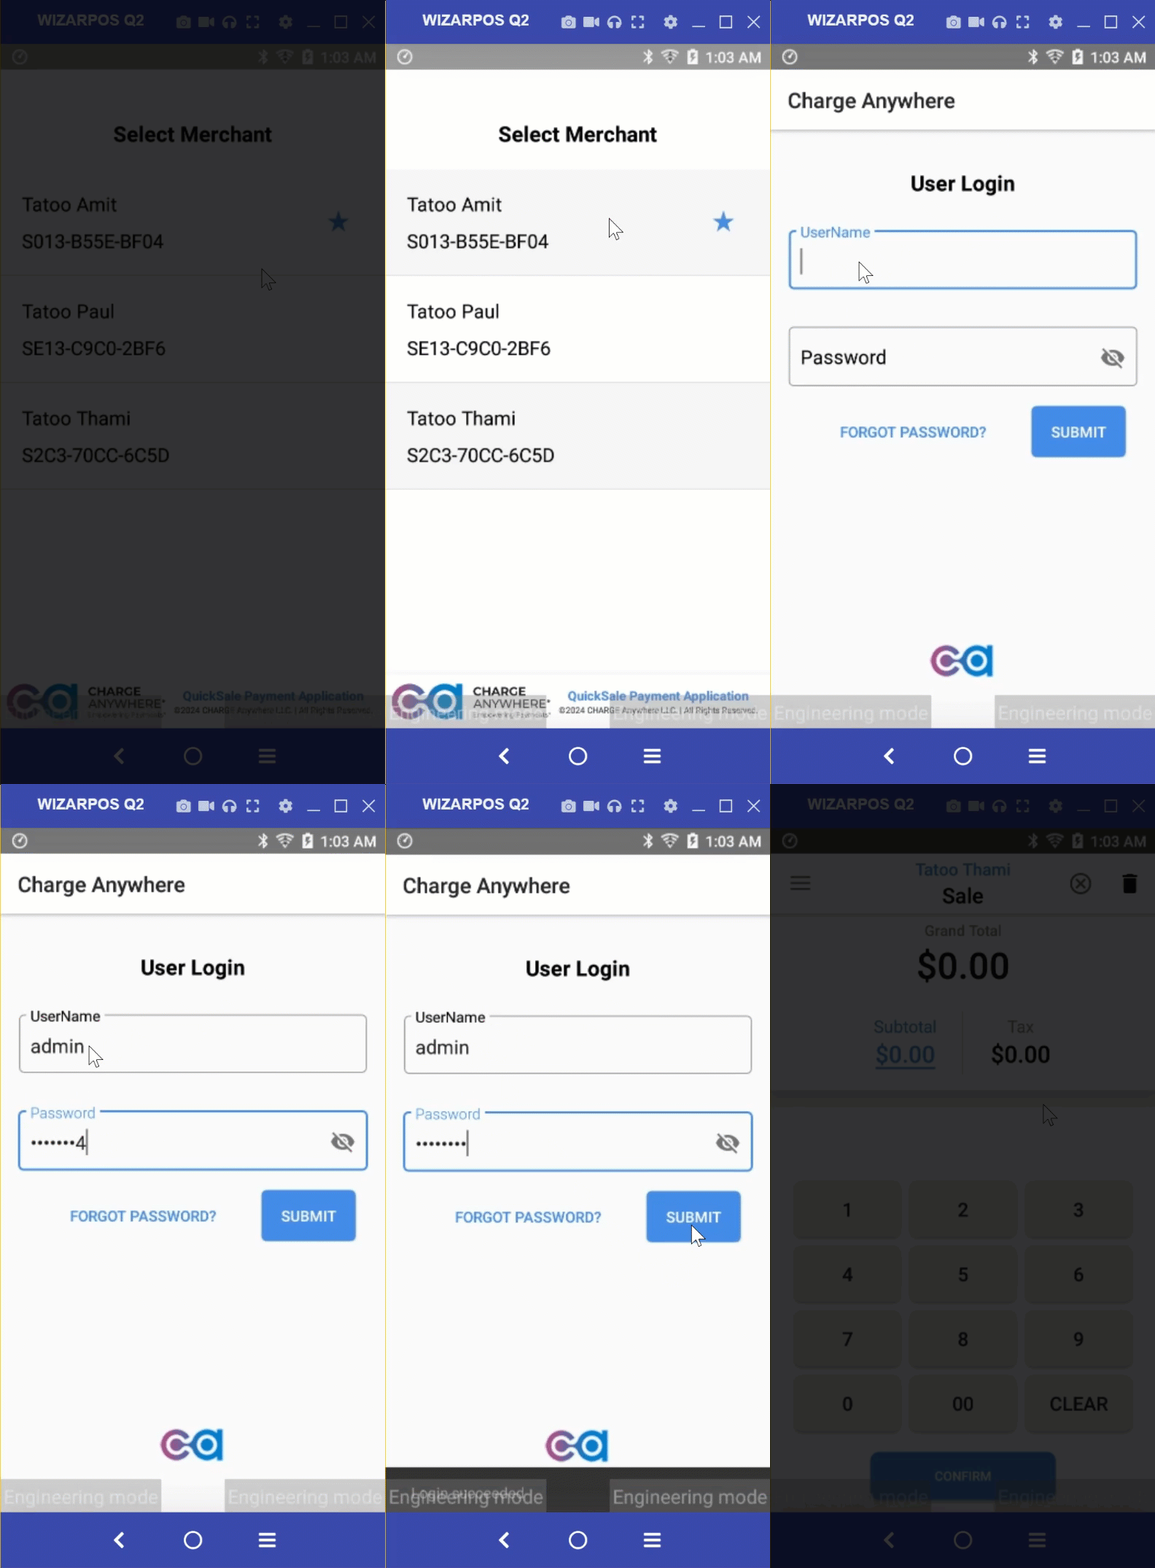
- You will be directed to the Select Merchant screen.
- A list of available merchant profiles will be displayed.
- The primary merchant profile is highlighted with a star (★) icon.
- Tap the desired merchant profile to proceed.
- If multiple user accounts are created for the selected merchant profile, enter your user account credentials.
- Username: Enter your username.
- Password: Enter your password.
- If no user accounts are created, this step is skipped.
Processing a Transaction with Multi-MID
Once a merchant profile and user account (if any) are selected, transactions can be processed as outlined in the original transaction flow.
Example: Processing Sale with the Credit Tender Type
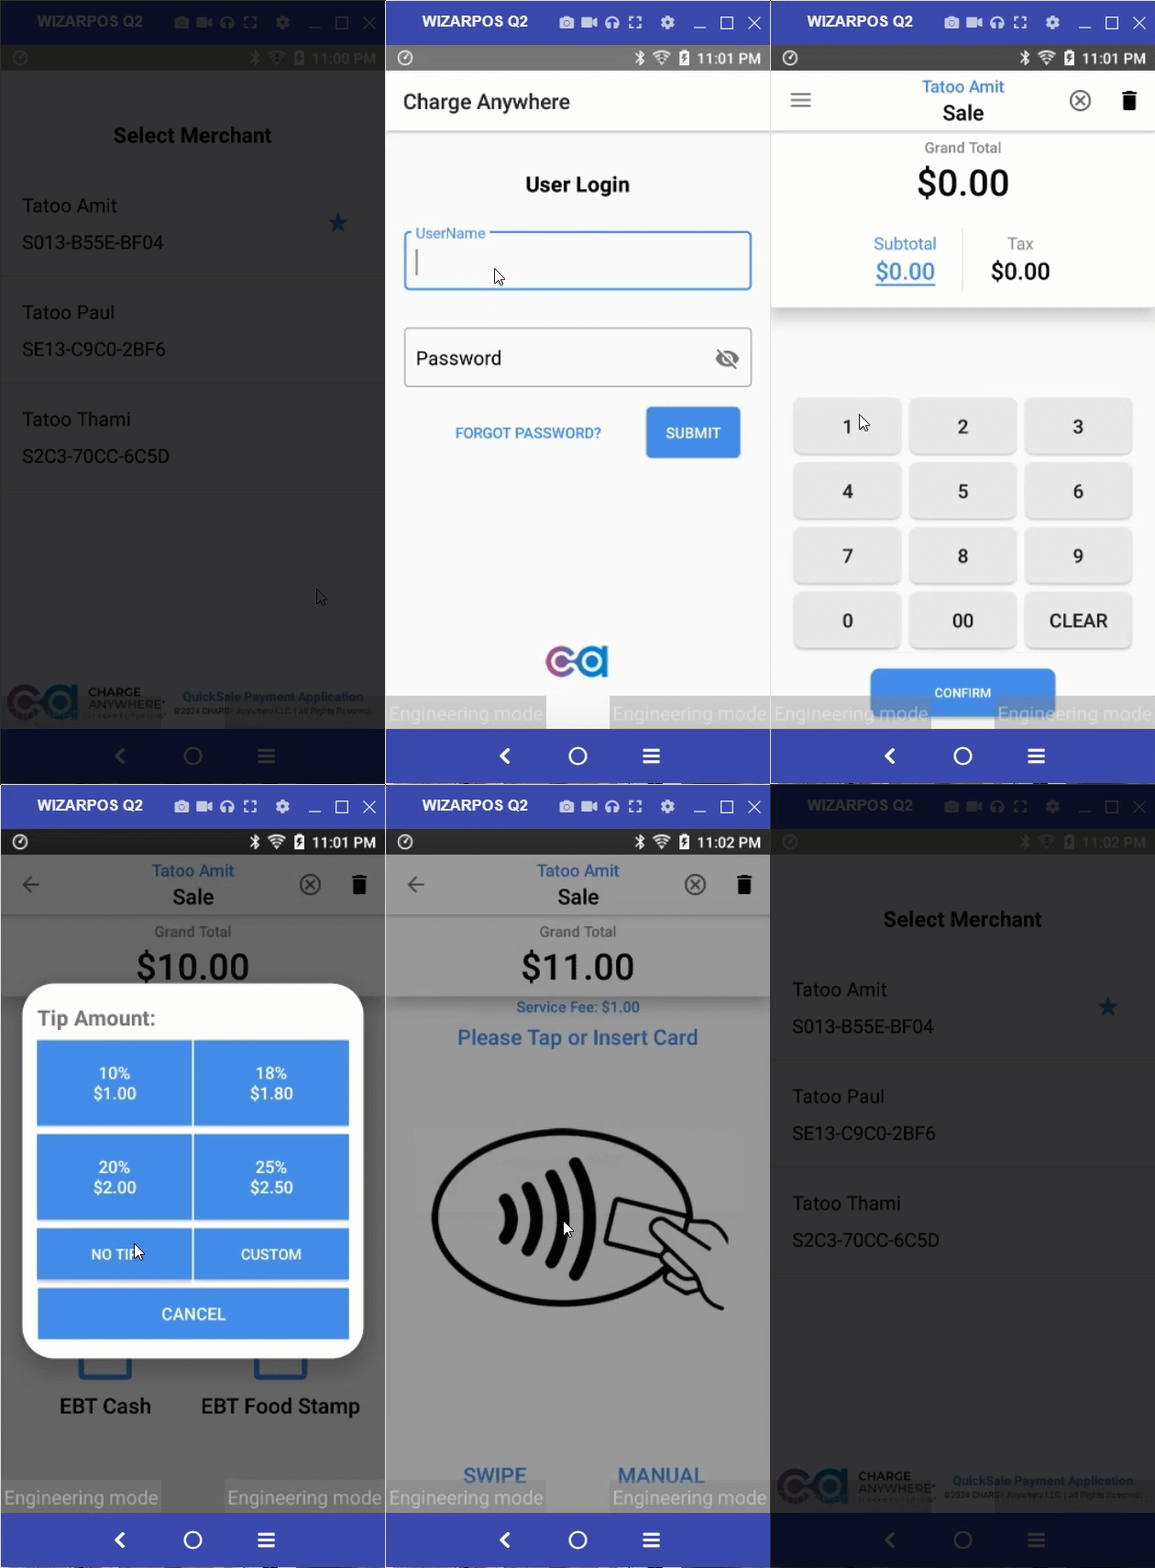
1. Selecting Merchant and User Profile
- Open the QuickSale 2.0 app.
- You will be directed to the Select Merchant screen:
- A list of available merchant profiles will be displayed.
- The primary merchant profile is highlighted with a star (★) icon.
- Tap the desired merchant profile to proceed.
- If multiple user accounts are created for the selected merchant profile:
- Enter your Username and Password to authenticate.
- If no user accounts are created, this step is skipped, and you can proceed directly to the transaction screen.
2. Accepting Payment
- Select Sale from the menu options.
- Input the charge amount and confirm.
3. Choosing Tender Type
- Select the preferred tender type. Credit in this case.
- Tap/insert the card for automatic entry. You can also manually enter card details by selecting the Manual option.
4. Approval and Receipt
- Once approved, you’ll see the Approved message. Click Continue.
- Collect the customer’s signature, email, and phone number, if enabled in the receipt options configuration.
- Select Print Merchant Copy to print the merchant receipt and Print Customer Copy to print the customer receipt, if enabled in the receipt options configuration.
- Select Done to complete the transaction.
Switching Merchant Profiles
- Tap the Cross Icon (✖) from the home screen in the top menu.
- The Select Merchant screen will appear.
- Choose a different merchant profile from the list.
- If prompted, enter your user account credentials for the selected merchant profile.
- The app will load the selected merchant profile, and its name will appear in the top menu.
Additional Features and Notes
- Refresh Services and User Management: These options are available only for the main merchant profile.
- STEM Configuration: During each transaction, the STEM configuration is applied as per the selected merchant profile.
- Transaction Logs, Reports, and Batch Management: These sections display information specific to the currently selected merchant profile.
- Enable Offline Mode: This is a common setting across all merchant profiles. If enabled for one profile, it applies to all profiles.
10. Products Feature for QuickSale 2.0
The Products feature in QuickSale 2.0 enhances transaction processing by enabling merchants to build transactions by adding predefined products from the QS-Products app. With this functionality, merchants can easily adjust product quantities using increment (+) and decrement (-) buttons, ensuring seamless modifications. The refresh and reset options provide real-time product updates and allow quick adjustments to transaction totals.
This feature is useful for businesses that handle inventory-based sales, offering a structured and efficient approach to itemized transactions.
Setting Up QS-Products App
The Products feature in QuickSale 2.0 relies on the QS-Products app to manage and load products before processing sales. Users must first install and configure the QS-Products app if products are unavailable.
1. Accessing My Products
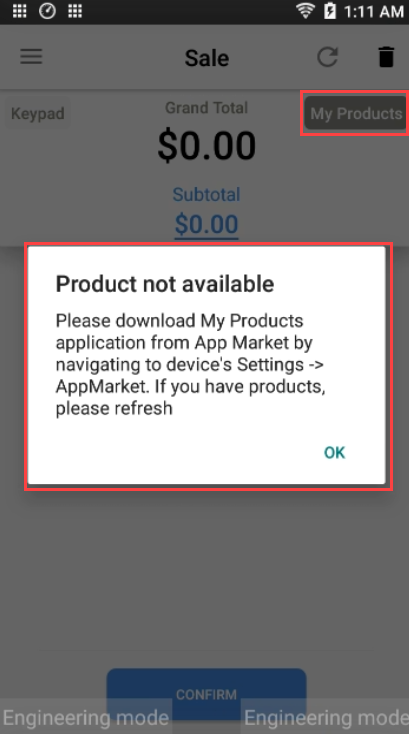
- On the Sale screen, tap My Products to open the product selection list.
- If no products are available, a pop-up message appears:
“Product not available. Please download My Products application from App Market by navigating to device’s Settings -> App Market. If you have products, please refresh.”
2. Installing and Configuring QS-Products
- Download and install the QS-Products app from the device’s app market.
- Open QS-Products and add the required products.
- Save the product list.
Note: To learn more about QS-Products app, including how to add and manage products, refer to the QS-Products User Guide.
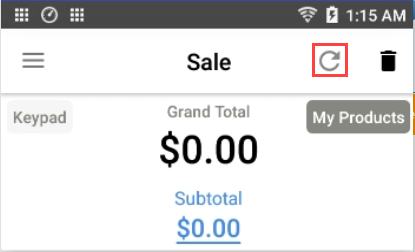
3. Refreshing the Product List in QuickSale 2.0
- Return to the Sale screen in QuickSale 2.0.
- Tap the Refresh Icon on the top-right corner to fetch the updated product list.
- Once refreshed, the added products appear in My Products for selection.
Example: Processing Sale with the Credit Tender Type
1. Adding Products to the Sale
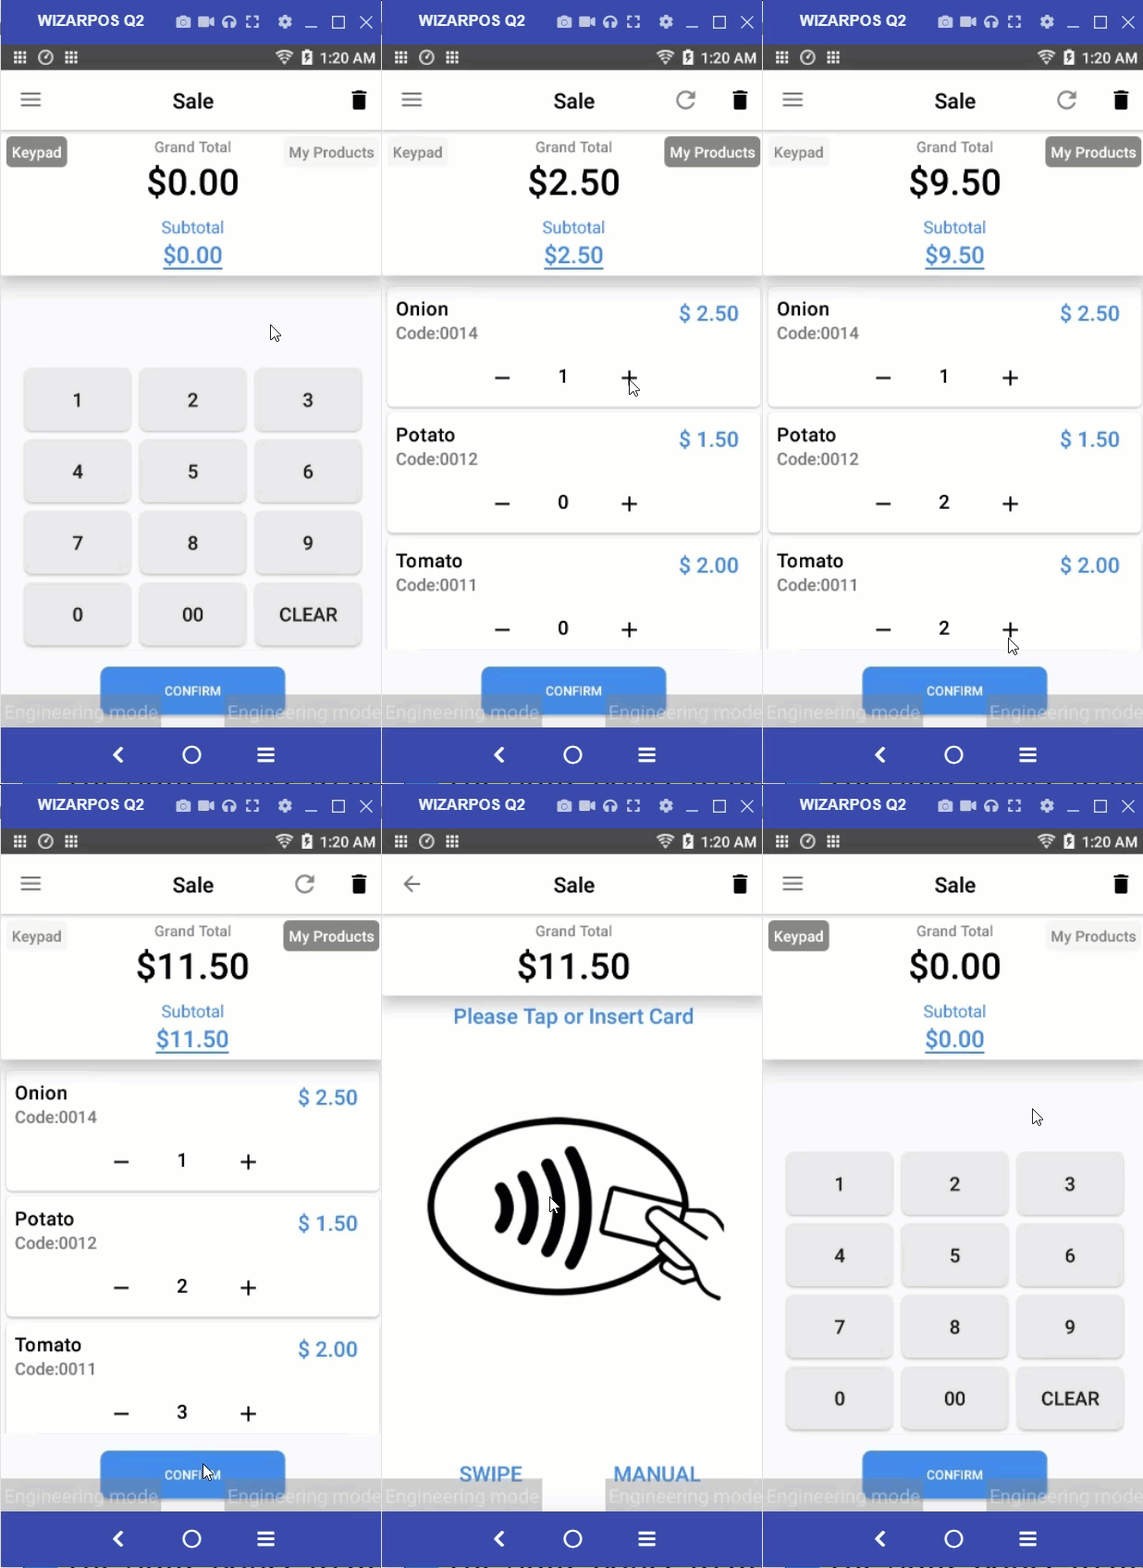
- Open the QuickSale 2.0 app. The Sale screen appears with:
- Keypad: Allows manual entry of transaction amounts.
- My Products: Enables selection from predefined product listings.
- Tap My Products to view the available products.
- If no products are available, a pop-up message prompts the user to install and configure the QS-Products app. Users must add products to the QS-Products app for products to appear in the QuickSale 2.0 app.
- If products exist, they will be displayed with their names, codes, and prices.
- Adjust the product quantity using:
- (+) Button: Increases the quantity of the selected product.
- (-) Button: Decreases the quantity of the selected product.
- The Subtotal and Grand Total automatically update based on the selected products.
- Using the action icons:
- Refresh Icon: Refreshes the product list, fetching the latest updates from the QS-Products app.
- Bin Icon: Resets all product quantities to zero, making the Grand Total = $0.00.
2. Confirming the Sale
- After all items are added, tap Confirm to finalize the selection.
- The Grand Total is updated on the Sale screen.
Note: Tax, Tip, Fee Program, etc., are applicable based on the configuration.
3. Choosing Tender Type
- Select the preferred tender type. Credit in this case.
- Tap/insert the card for automatic entry. You can also manually enter card details by selecting the Manual option.
4. Approval and Receipt
- Once approved, you’ll see the Approved message. Click Continue.
- Collect the customer’s signature, email, and phone number, if enabled in the receipt options configuration.
- Select Print Merchant Copy to print the merchant receipt and Print Customer Copy to print the customer receipt, if enabled in the receipt options configuration.
- Select Done to complete the transaction.
Additional Features and Notes
- Switching Merchant Profile: Products are displayed based on the selected merchant profile.
- STEM Configuration: During each transaction, the STEM configuration is applied as per the selected merchant profile.
- Refresh Services: When you tap Refresh Services under Support, the app fetches product lists along with STEM configuration for all merchant profiles.
11. Exit App
Once you are done with the transactions you can exit the App by clicking the Exit App button.
12. Troubleshooting
If you encounter any issues with the app, please feel free to seek Charge Anywhere QuickSale 2.0 support at support@chargeanywhere.com for troubleshooting tips and FAQs.
We hope this user guide helps you get started with the Charge Anywhere QuickSale 2.0 payment app.