1. Introduction
Semi-integration by Charge Anywhere is a payment application designed to help businesses simplify their payment processing. The app enables you to process transactions, view transaction history, and customize your settings. Semi-integration is designed to work with various devices, making it easy to use wherever you are.
Explore the QuickSale Semi Release Notes for a detailed breakdown of the latest features, system enhancements, bug fixes, feature deprecations, and much more.
Quick Navigation: To see a chronological history of all recent changes, please view the Change Log at the bottom of this document.
2. Installation
The following files are provided in the “Semi-Integration.zip” file.
- Semi-Integration.apk: Unzip the Semi-Integration.zip file on your computer. Install the Semi-Integration.apk on your Android device.
- ClientTestApplication: Open the ClientTestApplication folder and run the SemiIntegrationTestApplication.exe file on your Windows desktop.
3. Registration
1. Getting Started
Open the app on your device, and you’ll be prompted to enter your registration credentials.
2. Credentials
- Manual Registration: Enter your license number and phone number in the respective fields to register and access the app. Accurate information is crucial for a successful registration process.
- Register using QR Code: Alternatively, tap the Register using QR Code button to scan a QR code containing your registration credentials. This feature simplifies the registration process by auto-filling your details and automatically submitting them without the need for further action.
3. Submit
- If you’ve entered your details manually, tap Submit to complete the registration process and log into your account.
- For QR Code registration, submission is automatic, and you will be logged in without additional steps.


4. How to Use the Semi-Integration
Pre-requisites
- Install the Semi-Integration application on an Android device and launch it.
- Acquire a Developer Software License Key from Charge Anywhere. Contact
cert.questions@chargeanywhere.comfor the same.
Registering the Terminal (Test Environment)
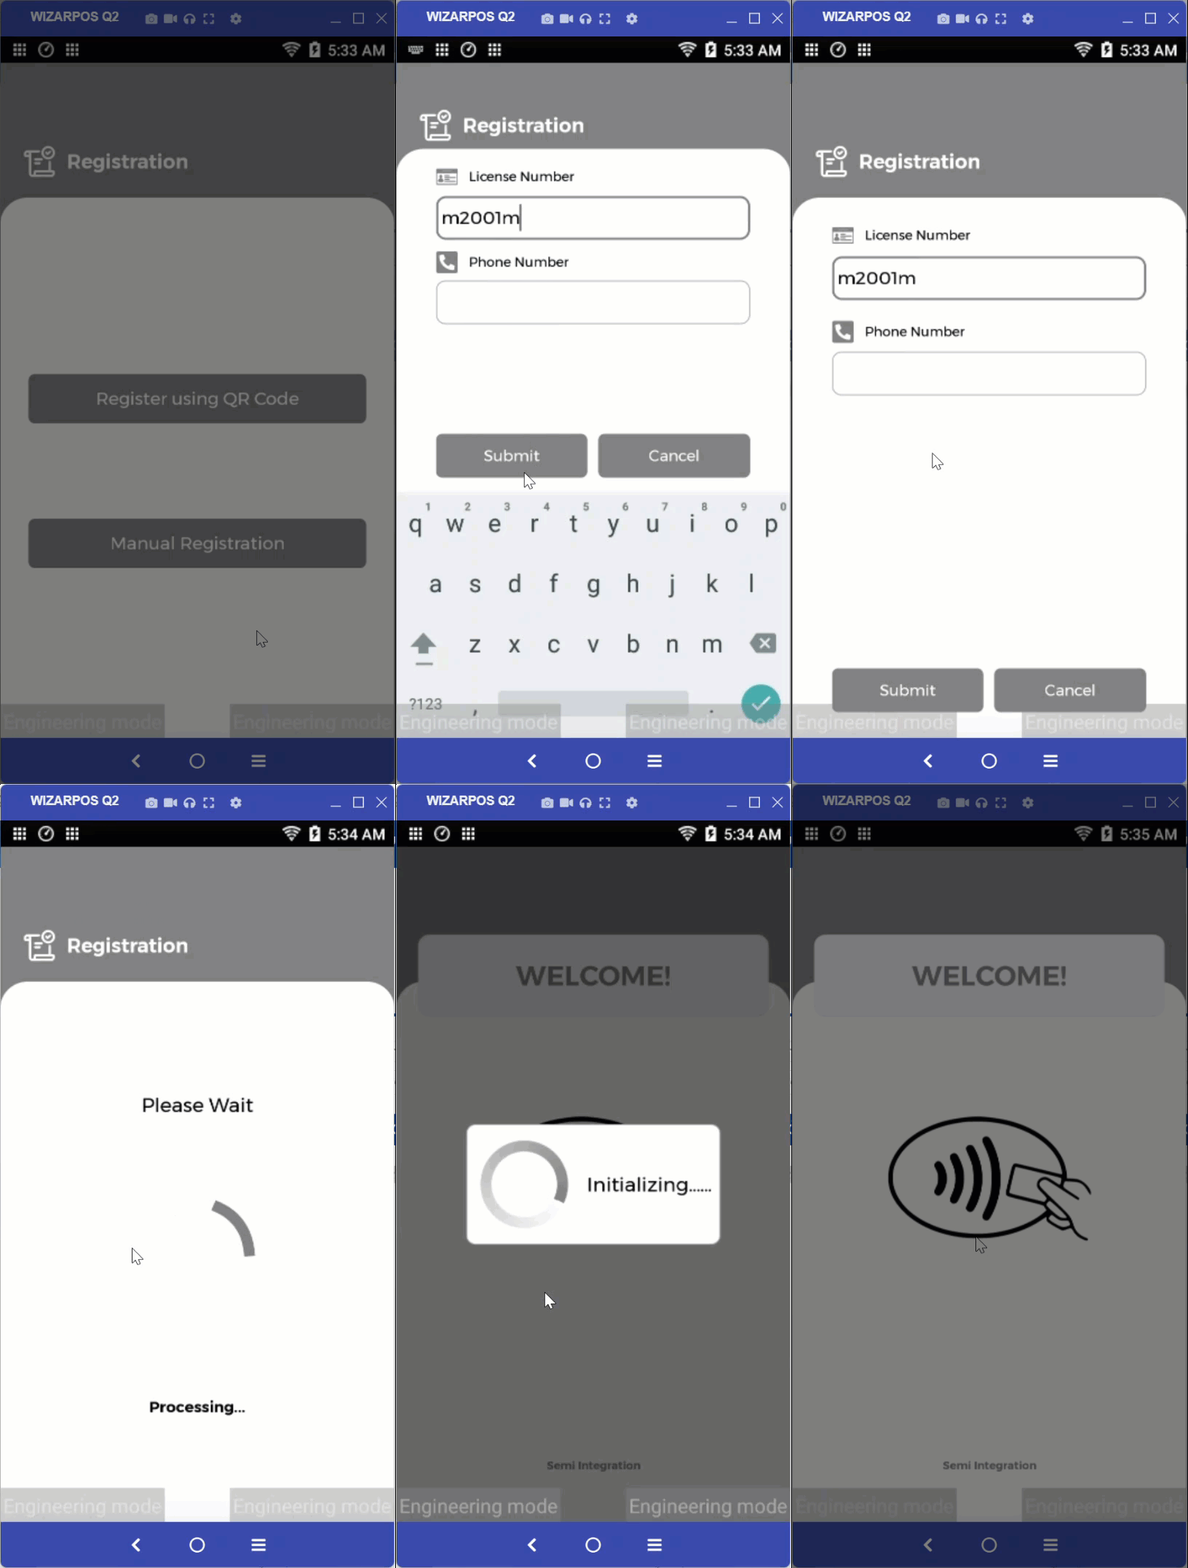
To configure your device to point to the test (sandbox) environment and register the terminal, perform the following steps:
- Open the semi-integration application on your WizarPos device.
- Select Manual Registration.
- Enter M2001M in the License Number field and click Submit.
- Select Test (sandbox environment) from the Host dropdown.
Note: To register on the production environment, skip steps 3 and 4. - Enter the License Number and Phone Number provided by your certification analyst.
- License Number: S534-XXXX-8AAB
- Phone Number: 732XXXX447
If you do not have these credentials, email cert.questions@chargeanywhere.com.
Production Environment Registration
- If you are a merchant registering for live transactions, you do not need to point to the test environment.
- The Semi-Integration application, by default, connects to the production environment upon installation and activation.
- Simply launch the app, enter your production License Number and Phone Number, and your terminal will be registered to the live system.
Configuring Connection Options
To choose the connection option, perform the following steps:
- Tap the Merchant Logo six times.
- Enter PIN in the PIN text field when prompted. The default PIN is ‘12345678.’
- Select Configuration, then Setup, then Transaction Settings.
- Under Connection Options, choose one of the following:
- TCP Connection: Suitable for devices on the same LAN that communicate via TCP.
- WebSocket Connection: Suitable for devices on the same LAN that communicate via WebSocket protocol.
- Cloud Connect: Suitable for devices NOT on the same LAN and will communicate over HTTPS/TLS1.2.
- Serial Port: Suitable for devices connected over a serial port socket connection.
- Press Submit.
- Press Back twice.
- Press Exit.
- Restart the semi-integration application. The terminal is now ready to process payments.
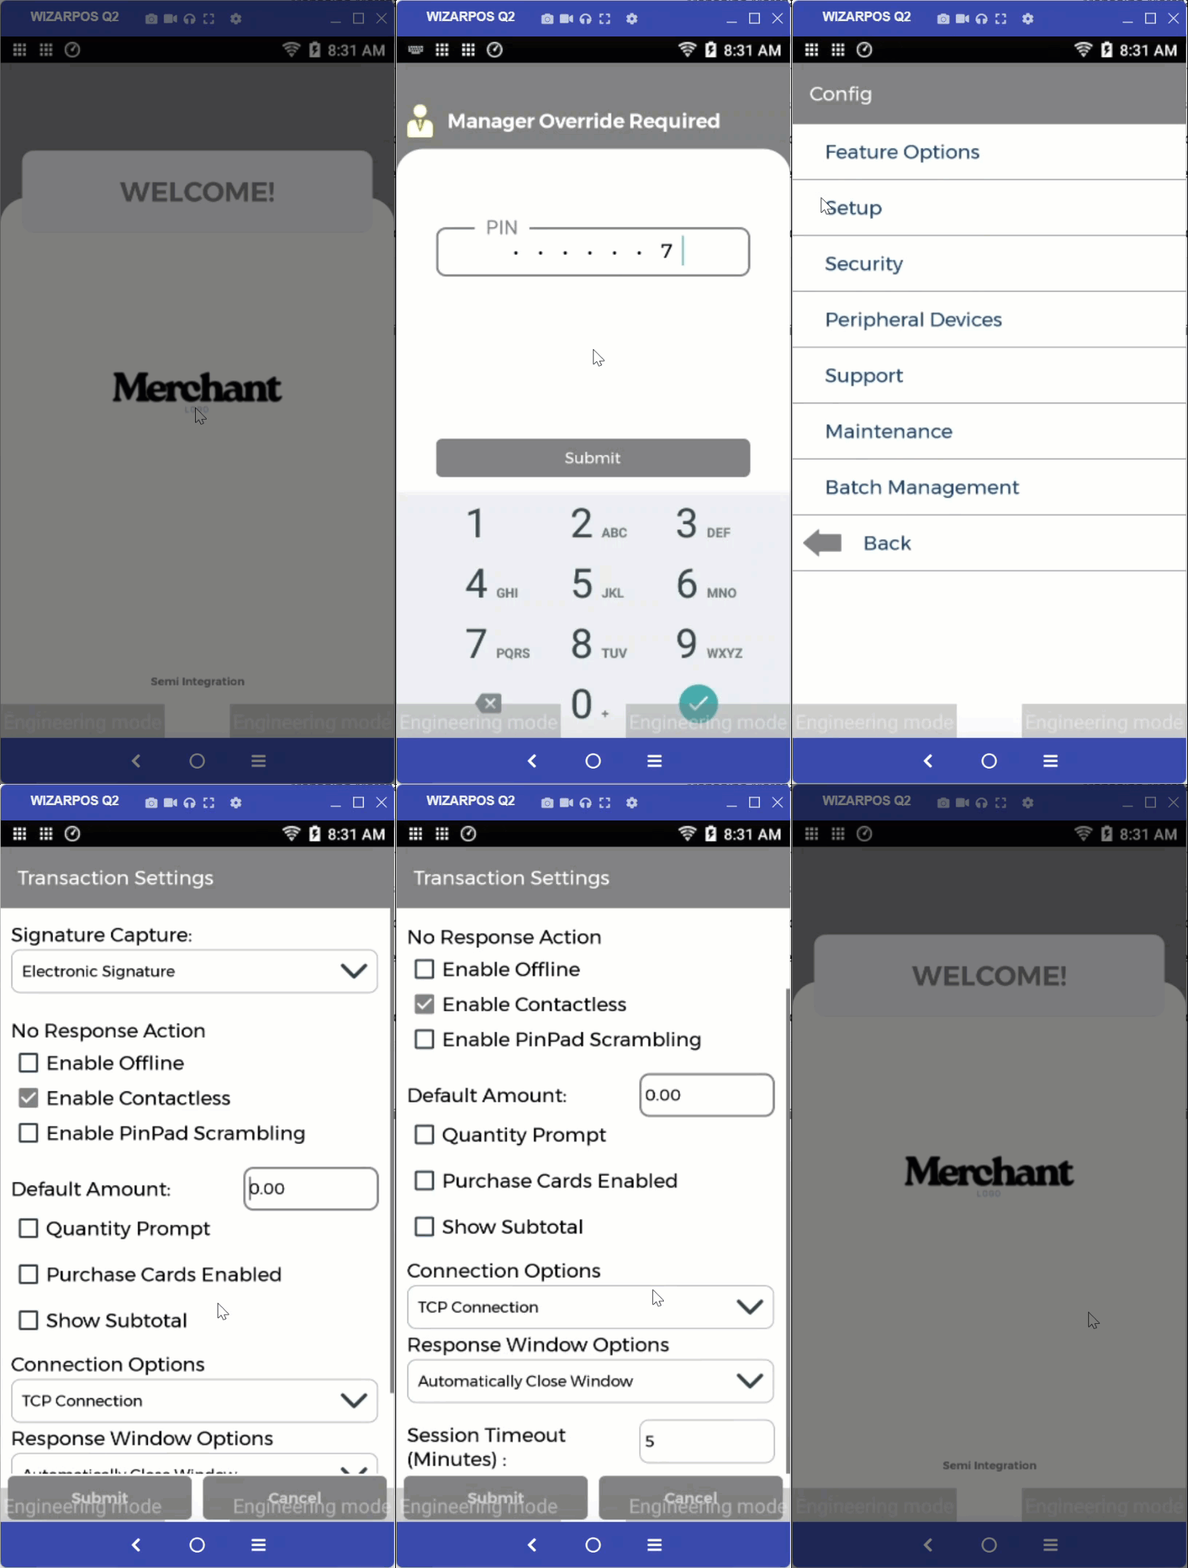
Note: For detailed instructions on the Connection Options setup, refer to the Semi-Integration Developer Guide.

5. Transactions
The semi-integration app supports a variety of transaction types, each catering to specific needs and scenarios encountered in the merchant environment. This section provides a comprehensive overview of each transaction type, ensuring that merchants can efficiently and accurately process transactions.
Transaction Flow Overview
Transactions in the semi-integration app involve selecting the transaction type and tender type from the client app, entering the amount (if applicable), and then processing the payment from the semi-integration app on the Wizarpos device. The connection between the client app and the semi-integration app can be established using TCP mode, WebSockets, cloud connect, or serial port connection mode.
The following section demonstrates detailed steps for each transaction type using TCP Connection as the connection option between the test client and the semi-integration application.
Note: To know the list of predefined trigger values that can be used to test various transaction responses within Charge Anywhere, refer to the Trigger Values for Testing Transactions guide.
For a comprehensive guide on all valid response codes (including AVS and CVV), transaction types, and a detailed explanation of Transaction Reversal reasons, please see our master list of Transaction Responses and Codes.
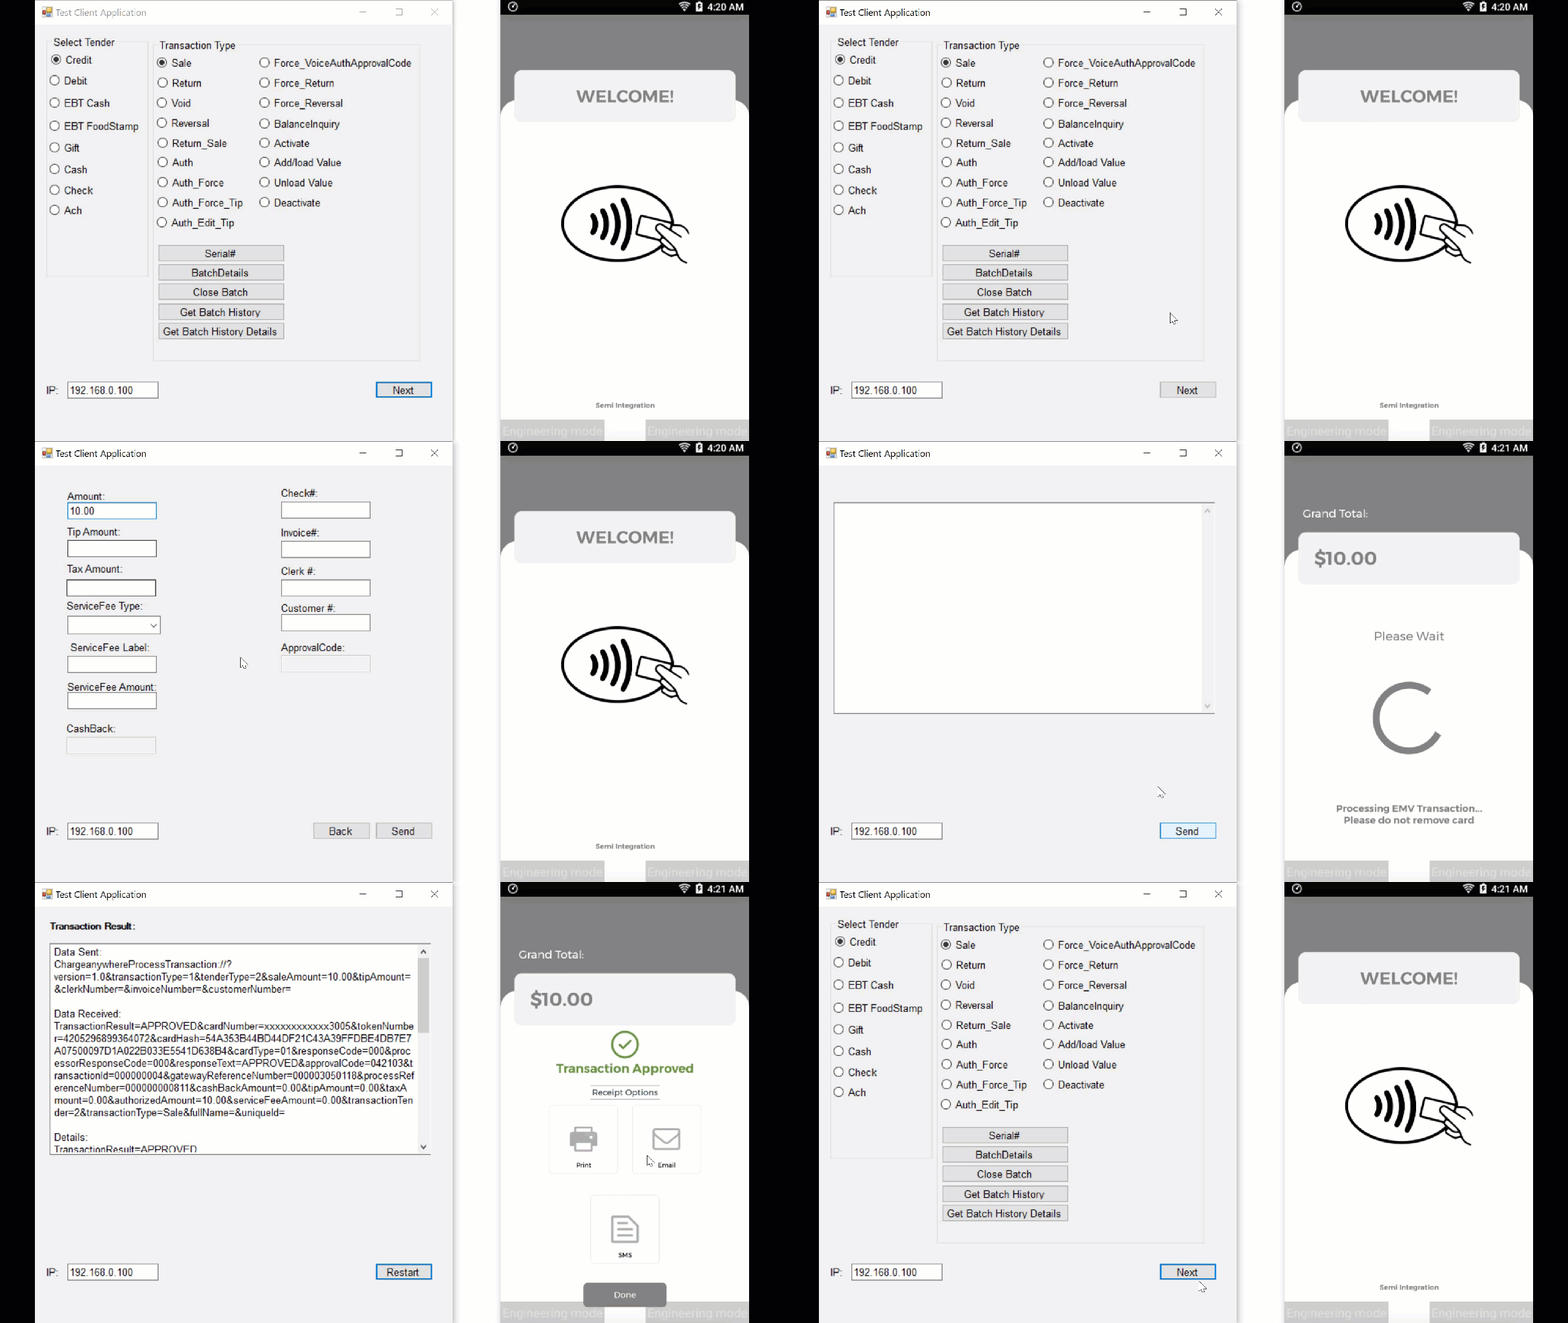
Sale
A Sale transaction is the most common type of transaction where the customer purchases goods or services, and the amount is charged to their payment method. This process involves selecting the sale option, entering the transaction amount, and completing the payment through the semi-integration app.
- Select Transaction Type and Tender Type in the Client App
- In the client app, select ‘Sale‘ as the transaction type.
- Select the preferred tender type.
- Enter the charge amount and other details if required.
- Process Payment in Semi-Integration App
- Open the semi-integration app on the WizarPos device.
- The charge amount will be displayed.
- Tap/insert the card for automatic entry. You can also manually enter card details by selecting the Manual option.
- Approval and Receipt
- Upon approval, you’ll receive a confirmation message.
- Collect the customer’s signature, email, and phone number.
- Select Print Merchant Copy to print the merchant receipt and Print Customer Copy to print the customer receipt.
- Select Done to complete the transaction.
Return
A Return transaction allows merchants to process refunds for customers who return previously purchased goods or services. This involves selecting the return option, entering the amount to be refunded, and confirming the transaction.
- Select Transaction Type and Tender Type in the Client App
- In the client app, select ‘Return‘ as the transaction type.
- Select the preferred tender type.
- Enter the return amount and other details if required.
- Process Return in Semi-Integration App
- Open the semi-integration app on the WizarPos device.
- The return amount will be displayed.
- Tap/insert the card for automatic entry. You can also manually enter card details by selecting the Manual option.
- Approval and Receipt
- Upon approval, you’ll receive a confirmation message.
- Collect the customer’s signature, email, and phone number.
- Select Print Merchant Copy to print the merchant receipt and Print Customer Copy to print the customer receipt.
- Select Done to complete the transaction.

Void
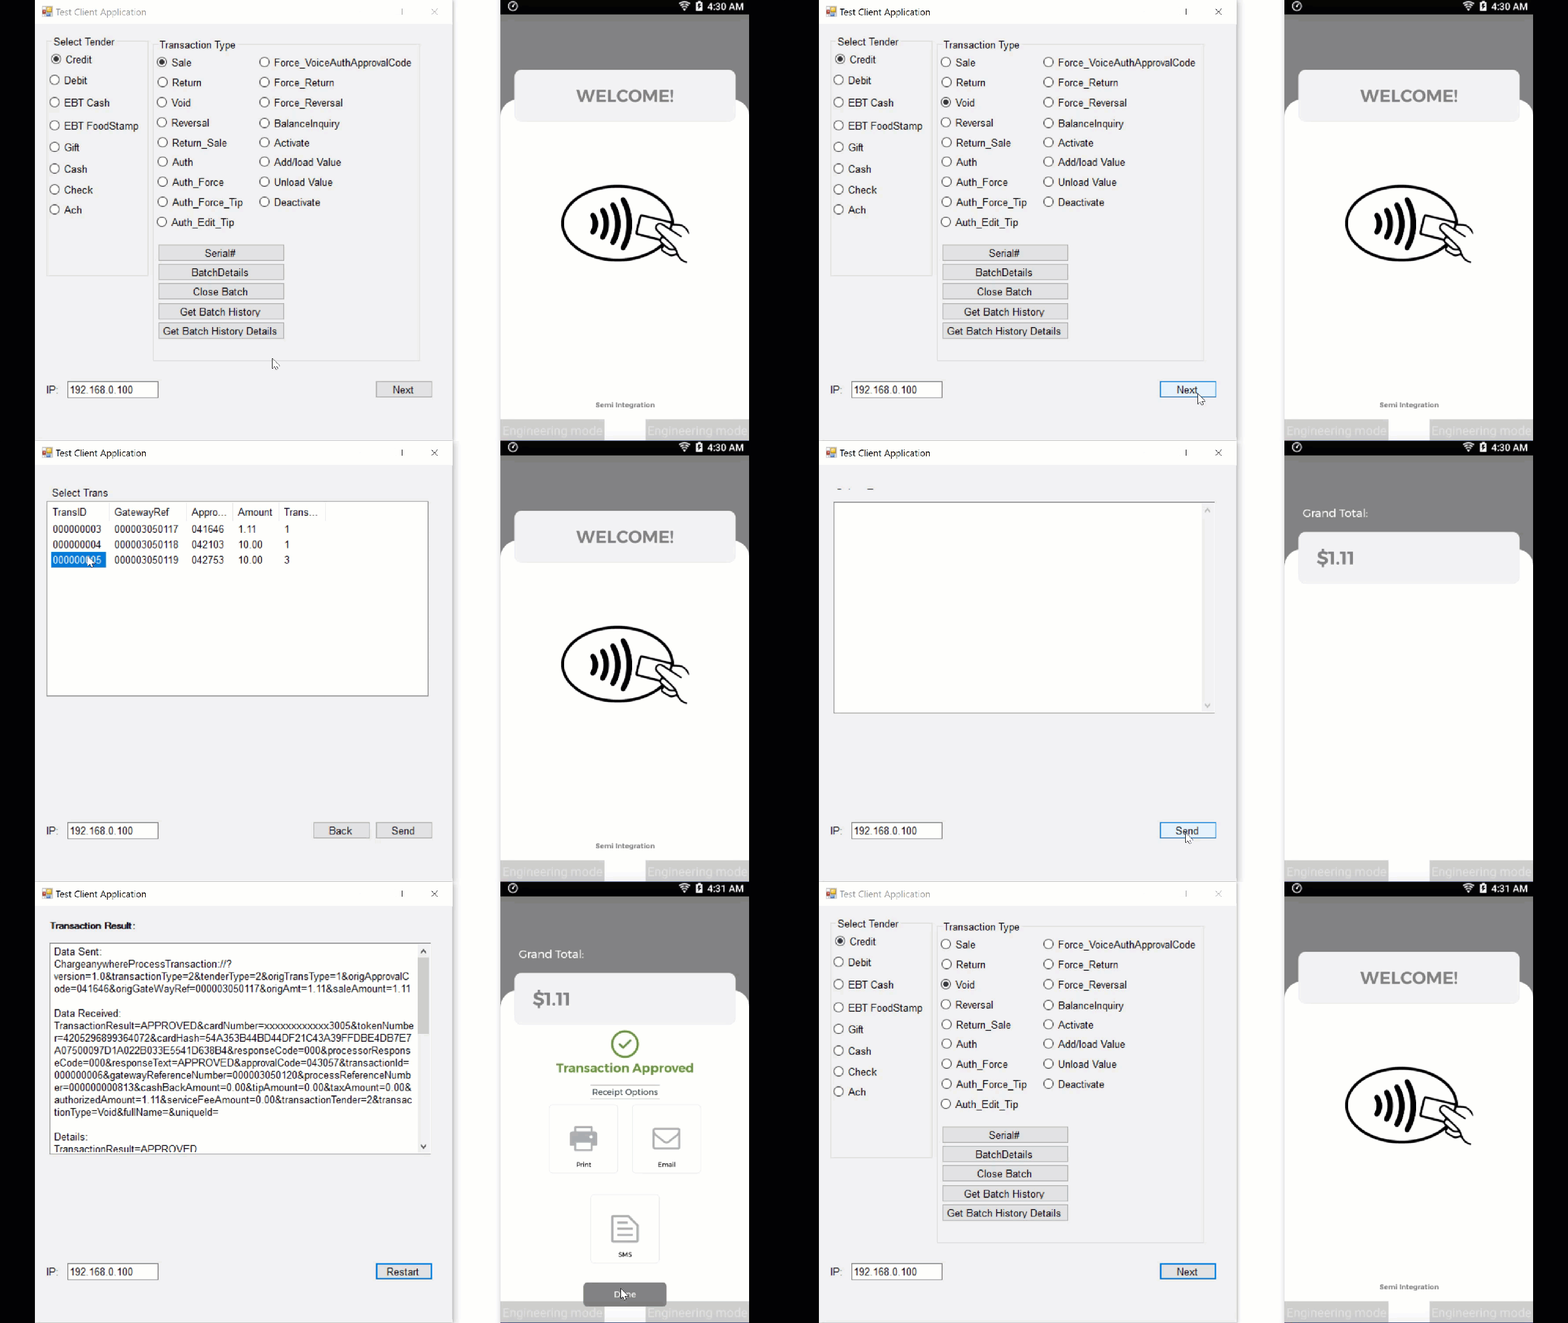
A Void transaction is used to cancel a previously authorized transaction before it is settled. This is typically done to correct mistakes or errors. The void process involves selecting the transaction to void and confirming the cancellation.
- Select Transaction Type and Tender Type in the Client App
- In the client app, select ‘Void‘ as the transaction type.
- A list of all the transactions is displayed.
- Select the transaction that you want to void.
- Process Void in Semi-Integration App
- Open the semi-integration app on the WizarPos device.
- The void transaction will process automatically.
- Approval and Receipt
- Upon approval, you’ll receive a confirmation message.
- Collect the customer’s signature, email, and phone number.
- Select Print Merchant Copy to print the merchant receipt and Print Customer Copy to print the customer receipt.
- Select Done to complete the transaction.
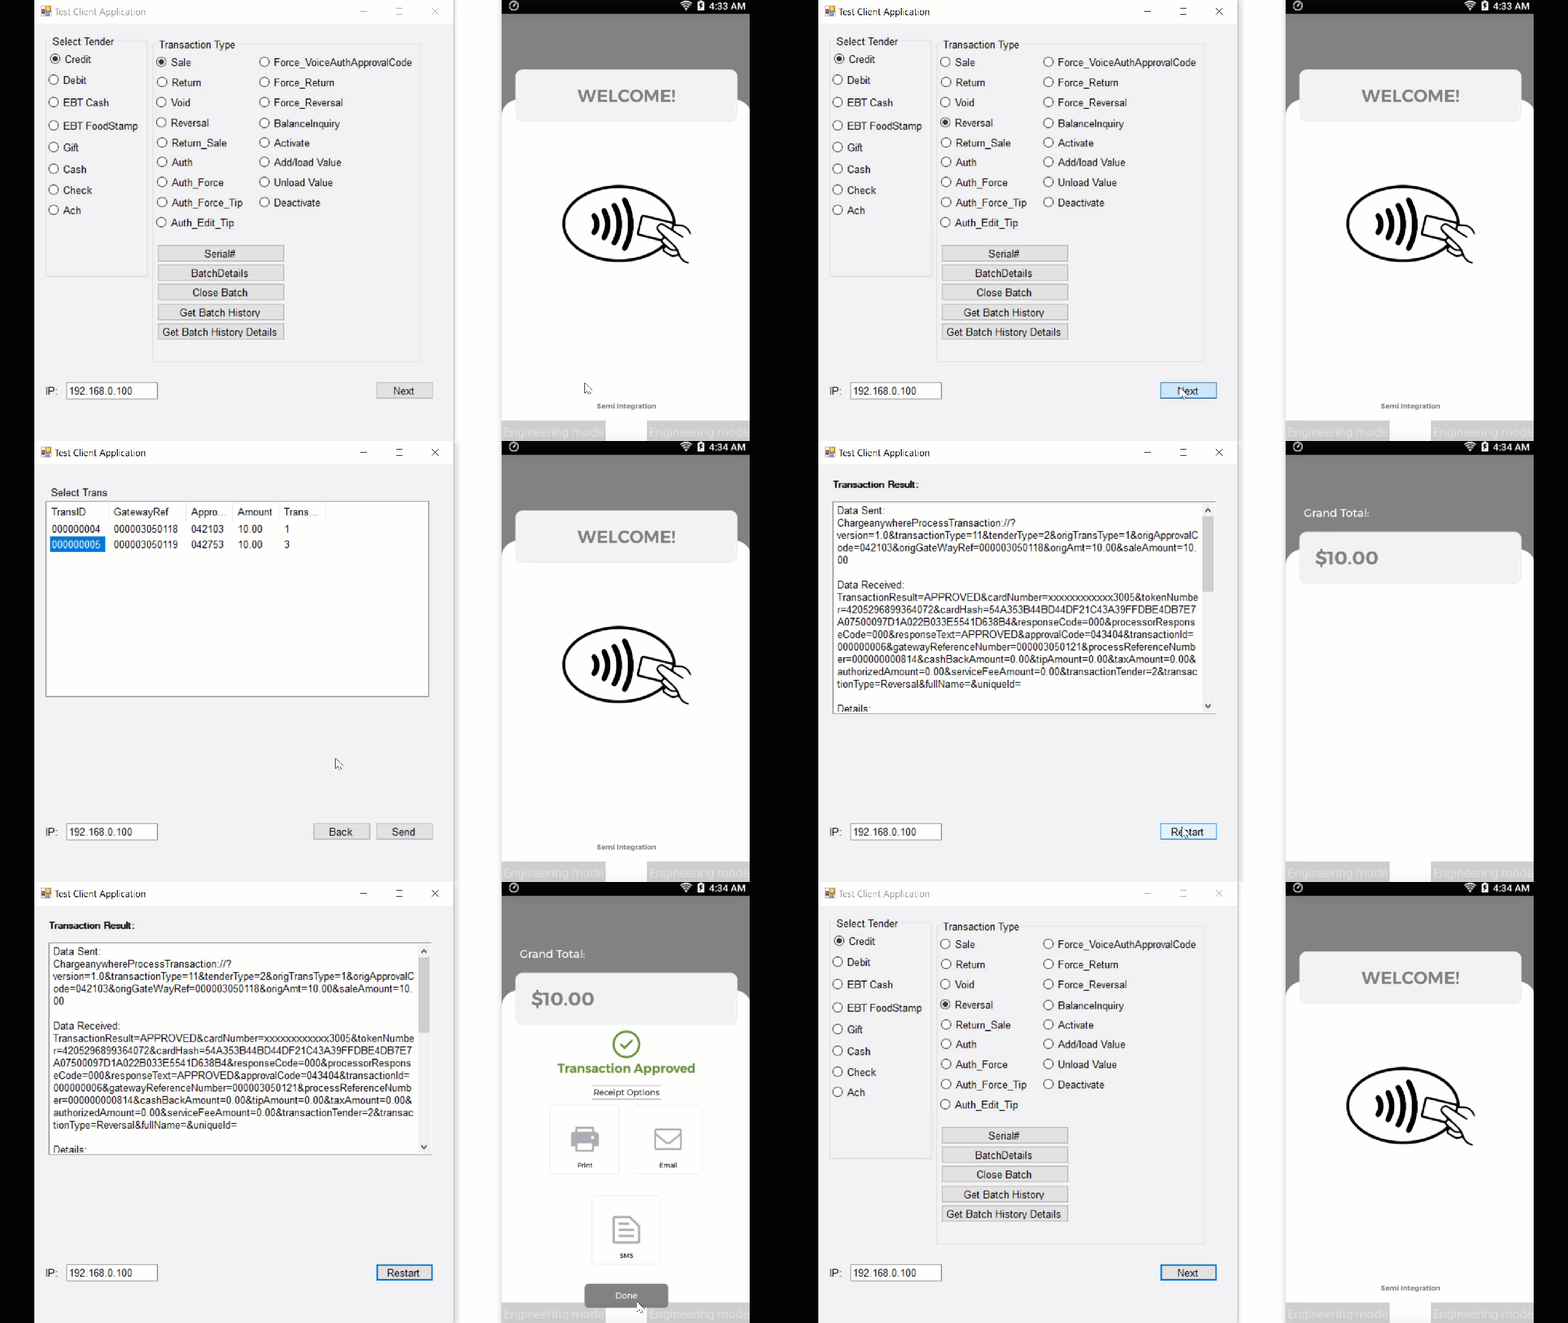
Reversal
A Reversal transaction is used to reverse a previously completed transaction. This might be necessary due to errors or customer disputes. The reversal process includes selecting the transaction to reverse and confirming the reversal.
- Select Transaction Type and Tender Type in the Client App
- In the client app, select ‘Reversal‘ as the transaction type.
- A list of all the transactions is displayed.
- Select the transaction that you want to reverse.
- Process Reversal in Semi-Integration App
- Open the semi-integration app on the WizarPos device.
- The reversal transaction will process automatically.
- Approval and Receipt
- Upon approval, you’ll receive a confirmation message.
- Collect the customer’s signature, email, and phone number.
- Select Print Merchant Copy to print the merchant receipt and Print Customer Copy to print the customer receipt.
- Select Done to complete the transaction.
Void vs Reversal
Understanding the difference between Void and Reversal is essential when handling payment transactions. While both actions are used to cancel or adjust payments, their behavior differs based on context.
Void
- Used to cancel a sale before settlement.
- Applies to Sale, Refund, and Force.
- GrandTotal = Full Sale Amount
- Example: To cancel a sale of 100.00, use a Void with
GrandTotal = 100.00.
- Example: To cancel a sale of 100.00, use a Void with
Reversal
- Used to cancel or adjust an authorization (before capture) or a sale (post-authorization).
- Applies to Sale, Refund, Auth, and Force.
- The
GrandTotalindicates the amount you want to settle, not the amount you’re cancelling.
Reversal Scenarios
- Full Reversal
GrandTotal = 0.00- Cancels the entire transaction.
- Example: Reversal with
GrandTotal = 0.00→ settle 0.00, cancel 100.00
- Partial Reversal
GrandTotal = Amount to Settle- Cancels the remainder.
- Example: For an authorization of 100.00:
- Reversal with
GrandTotal = 75.00→ settle 75.00, cancel 25.00 - Followed by Force Capture of 75.00
- Reversal with
Use Void when the payment is not yet settled and you want to cancel the full amount.
Use Reversal when adjusting the authorized amount, fully or partially, before capture.
Summary Table
| Scenario | Action | GrandTotal | Outcome |
|---|---|---|---|
| Full sale needs to be canceled | Void | 100.00 | Cancels entire sale before settlement |
| Full authorized amount to be canceled | Reversal | 0.00 | Cancels the authorization completely |
| Partial capture of an authorization | Reversal + Force | 75.00 | Captures 75.00, cancels 25.00 |
| Sale already settled – needs refund | Refund | 100.00 | Initiates return of funds to customer |
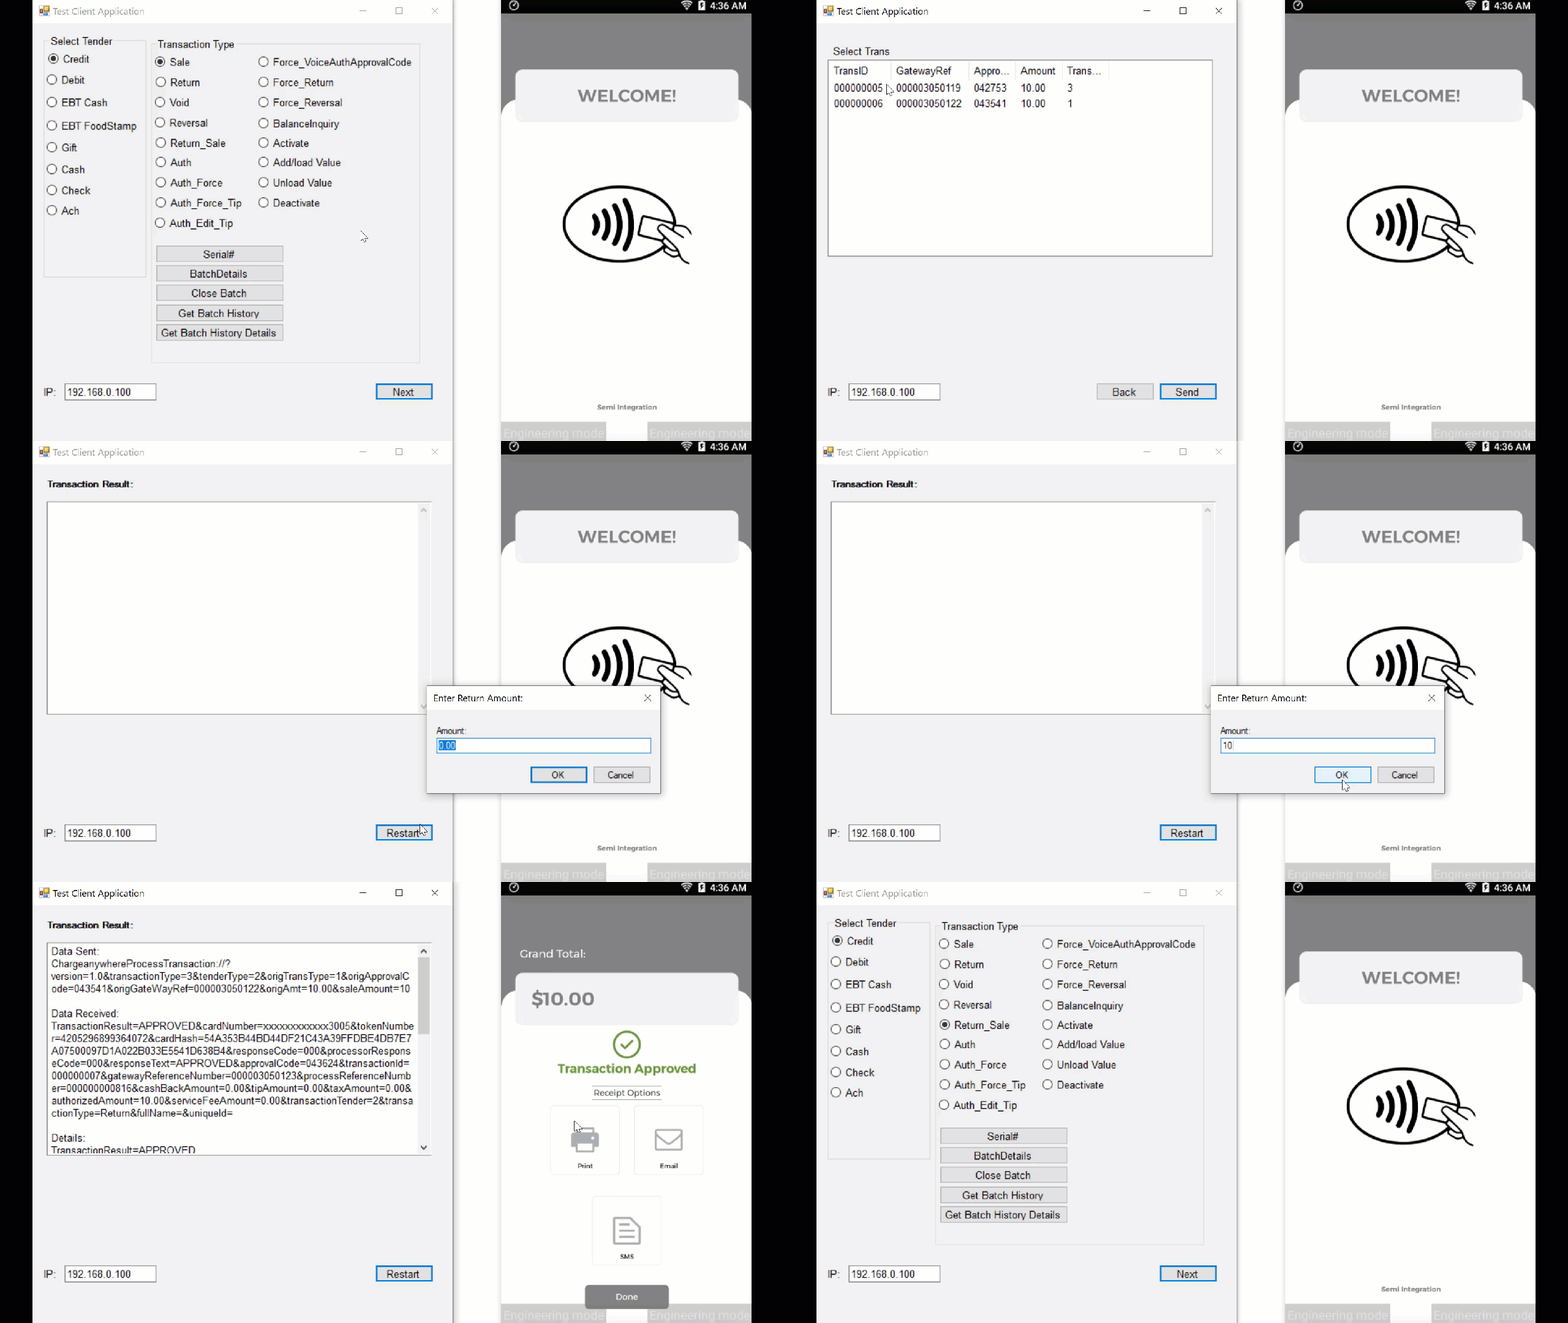
Return_Sale
A Return_Sale transaction allows merchants to process complete or partial refunds for customers who return previously purchased goods or services. Merchants can select a sale from the list of sale transactions and return either the complete or a partial amount.
- Select Transaction Type and Tender Type in the Client App
- In the client app, select ‘Return_Sale ‘ as the transaction type.
- A list of all the transactions is displayed.
- Select the transaction that you want to return.
- Process Return_Sale in Semi-Integration App
- Open the semi-integration app on the WizarPos device.
- Enter the return amount and click OK.
- The Return_Sale transaction will process automatically.
- Approval and Receipt
- Upon approval, you’ll receive a confirmation message.
- Collect the customer’s signature, email, and phone number.
- Select Print Merchant Copy to print the merchant receipt and Print Customer Copy to print the customer receipt.
- Select Done to complete the transaction.
Auth
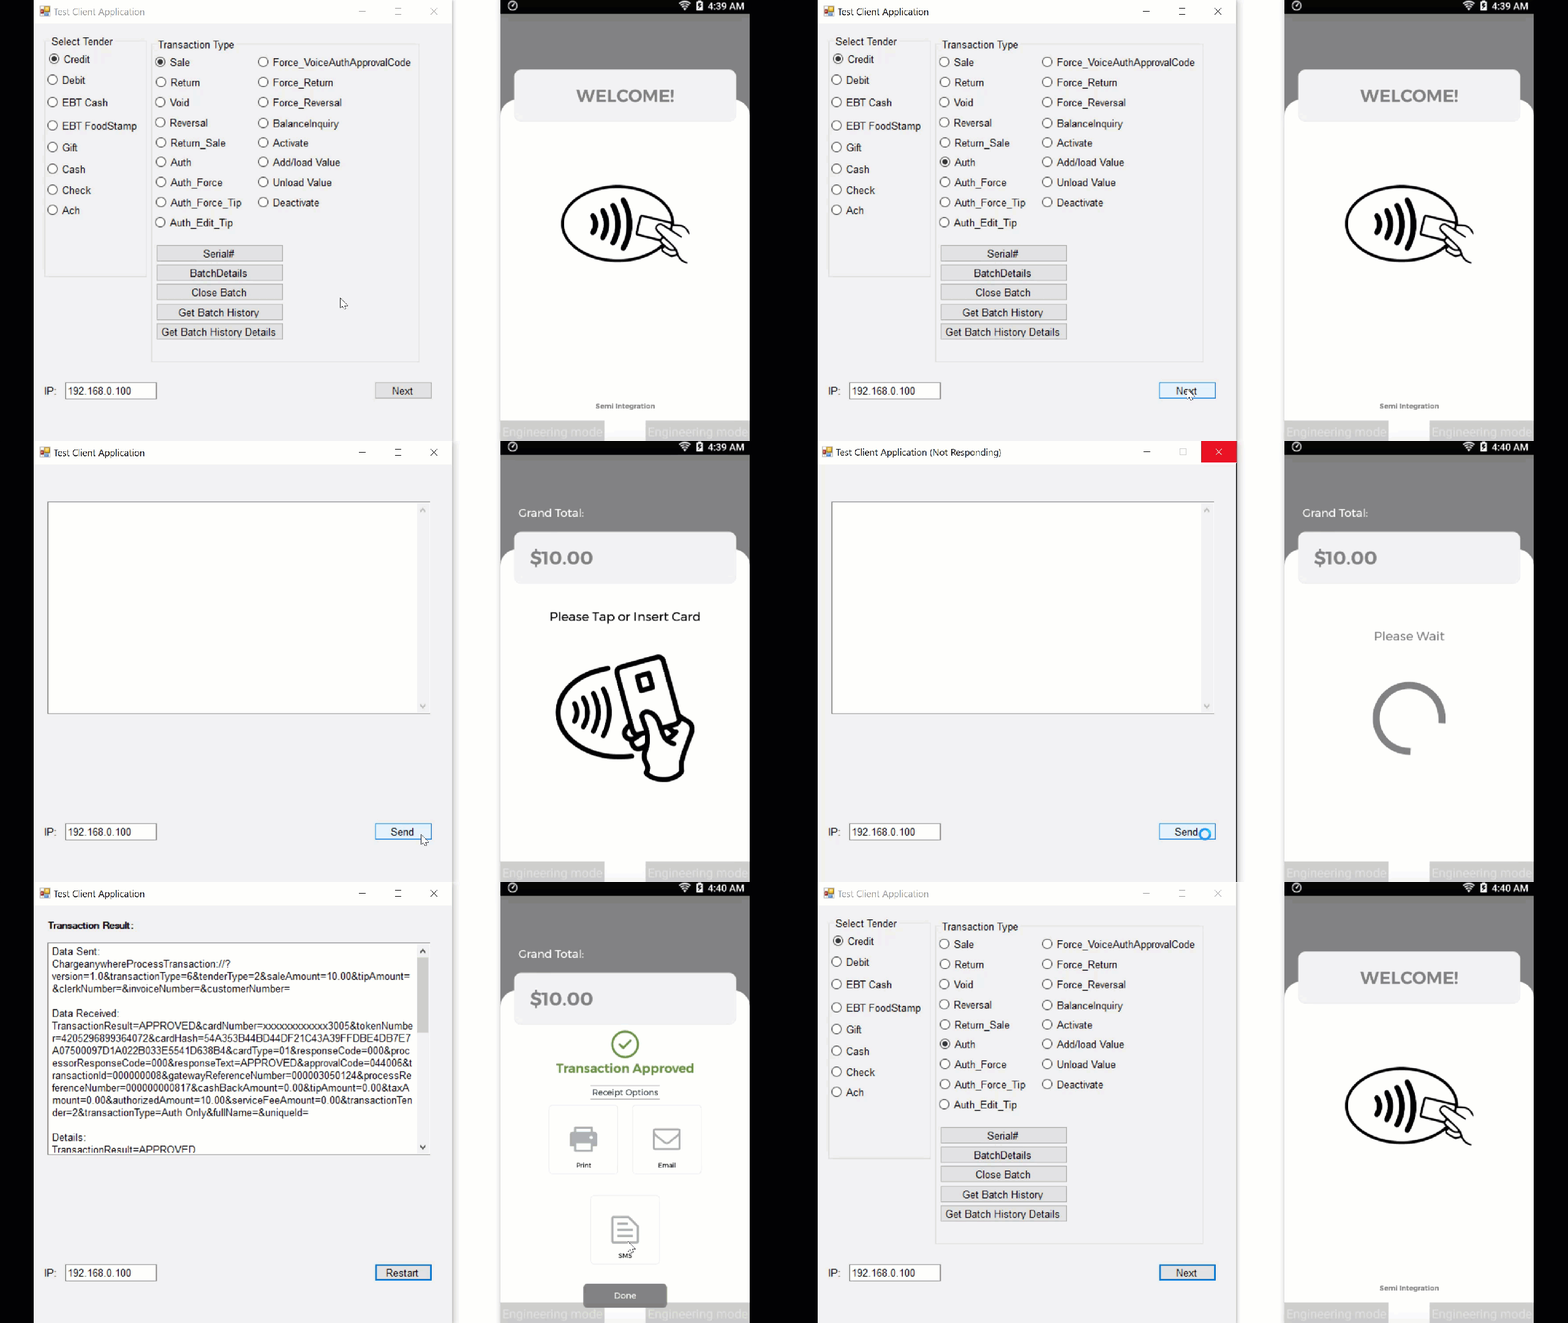
An Auth (Authorization) transaction reserves funds on the customer’s payment method without completing the sale. This is often used in scenarios where the final amount is not known at the time of authorization. The process involves authorizing the transaction and confirming the reservation of funds.
- Select Transaction Type and Tender Type in the Client App
- In the client app, select ‘Auth‘ as the transaction type.
- Select the preferred tender type.
- Enter the Auth amount and other details if required.
- Process Auth in Semi-Integration App
- Open the semi-integration app on the WizarPos device.
- The Auth amount will be displayed.
- Tap/insert the card for automatic entry. You can also manually enter card details by selecting the Manual option.
- Approval and Receipt
- Upon approval, you’ll receive a confirmation message.
- Collect the customer’s signature, email, and phone number.
- Select Print Merchant Copy to print the merchant receipt and Print Customer Copy to print the customer receipt.
- Select Done to complete the transaction.
Auth_Force
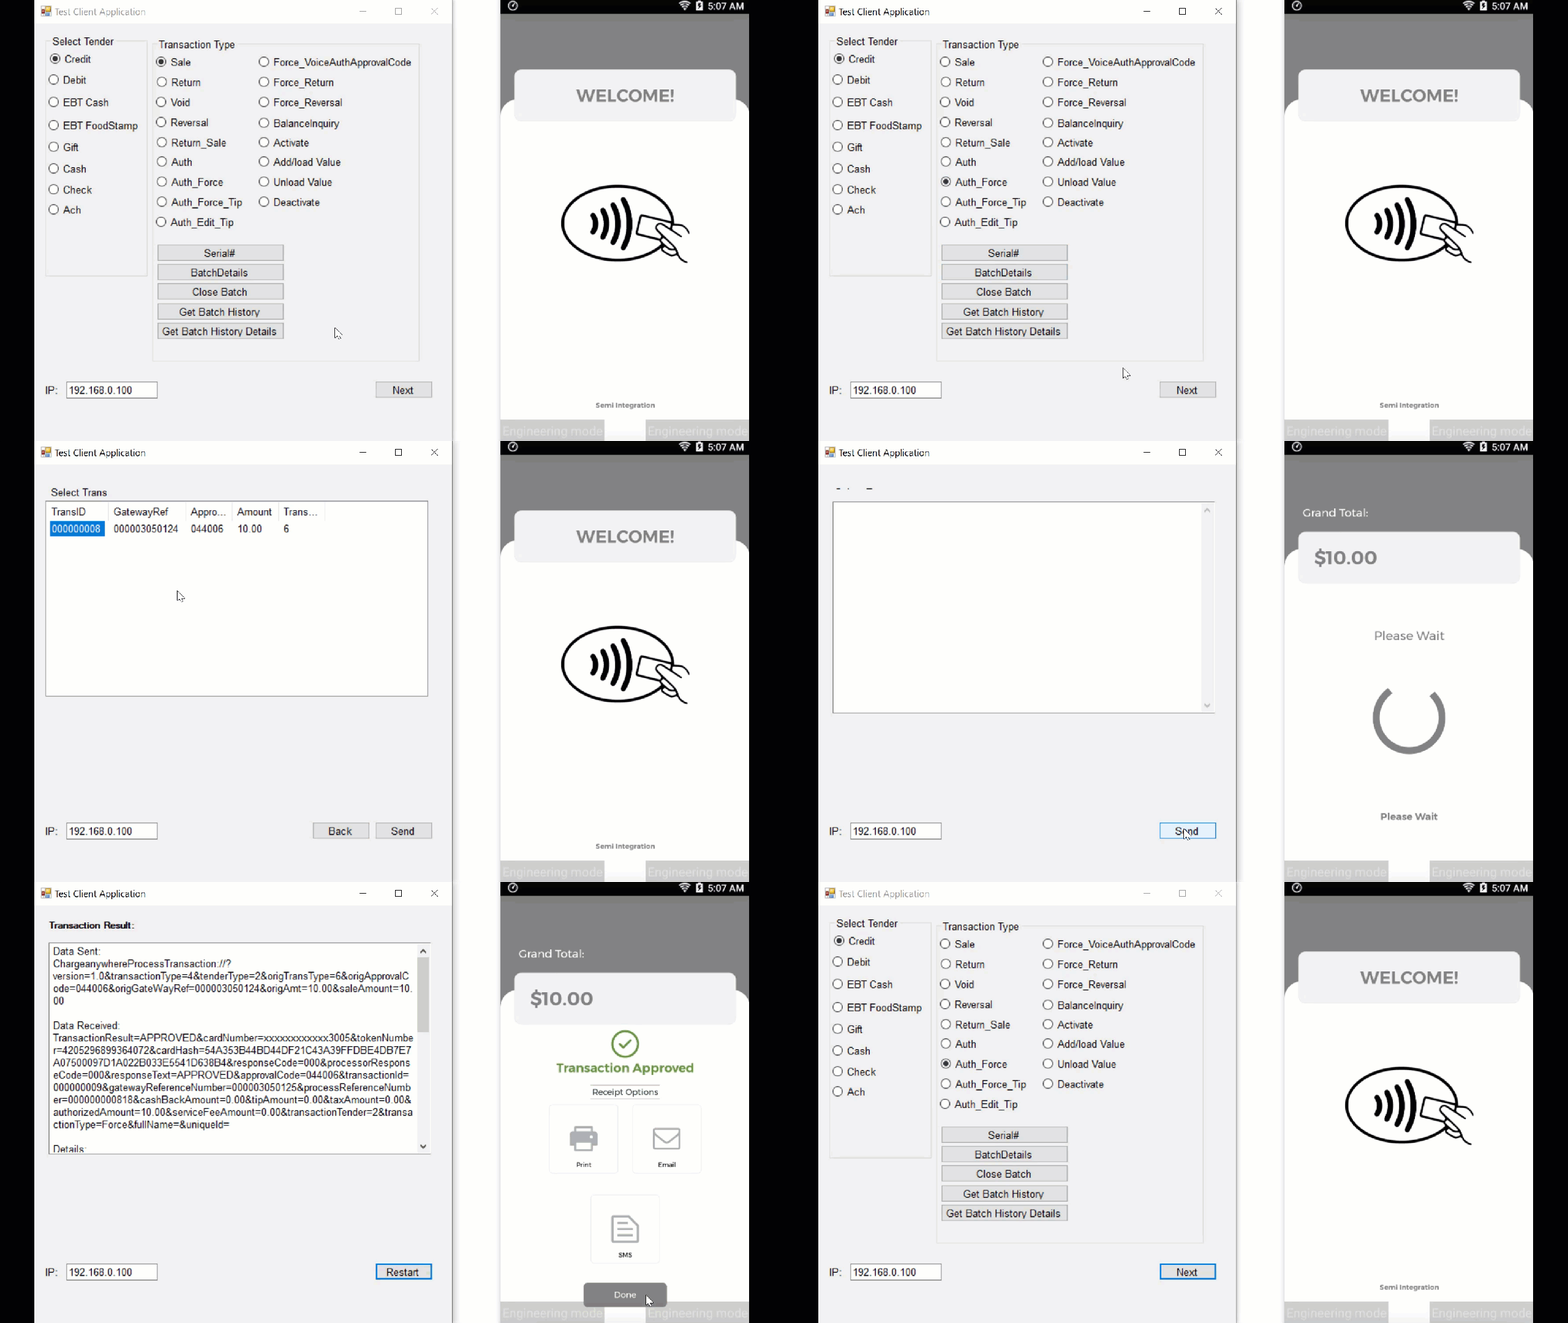
An Auth_Force transaction allows merchants to forcefully capture a previously authorized transaction. This is typically used in scenarios where the initial authorization was successful, but the capture needs to be performed separately. The process involves selecting the previous authorization from the list of authorized transactions and confirming the capture.
- Select Transaction Type and Tender Type in the Client App
- In the client app, select ‘Auth_Force ‘ as the transaction type.
- A list of all the transactions is displayed.
- Select the transaction that you want to force or capture.
- Process Auth_Force in Semi-Integration App
- Open the semi-integration app on the WizarPos device.
- The Auth_Force transaction will process automatically.
- Approval and Receipt
- Upon approval, you’ll receive a confirmation message.
- Collect the customer’s signature, email, and phone number.
- Select Print Merchant Copy to print the merchant receipt and Print Customer Copy to print the customer receipt.
- Select Done to complete the transaction.
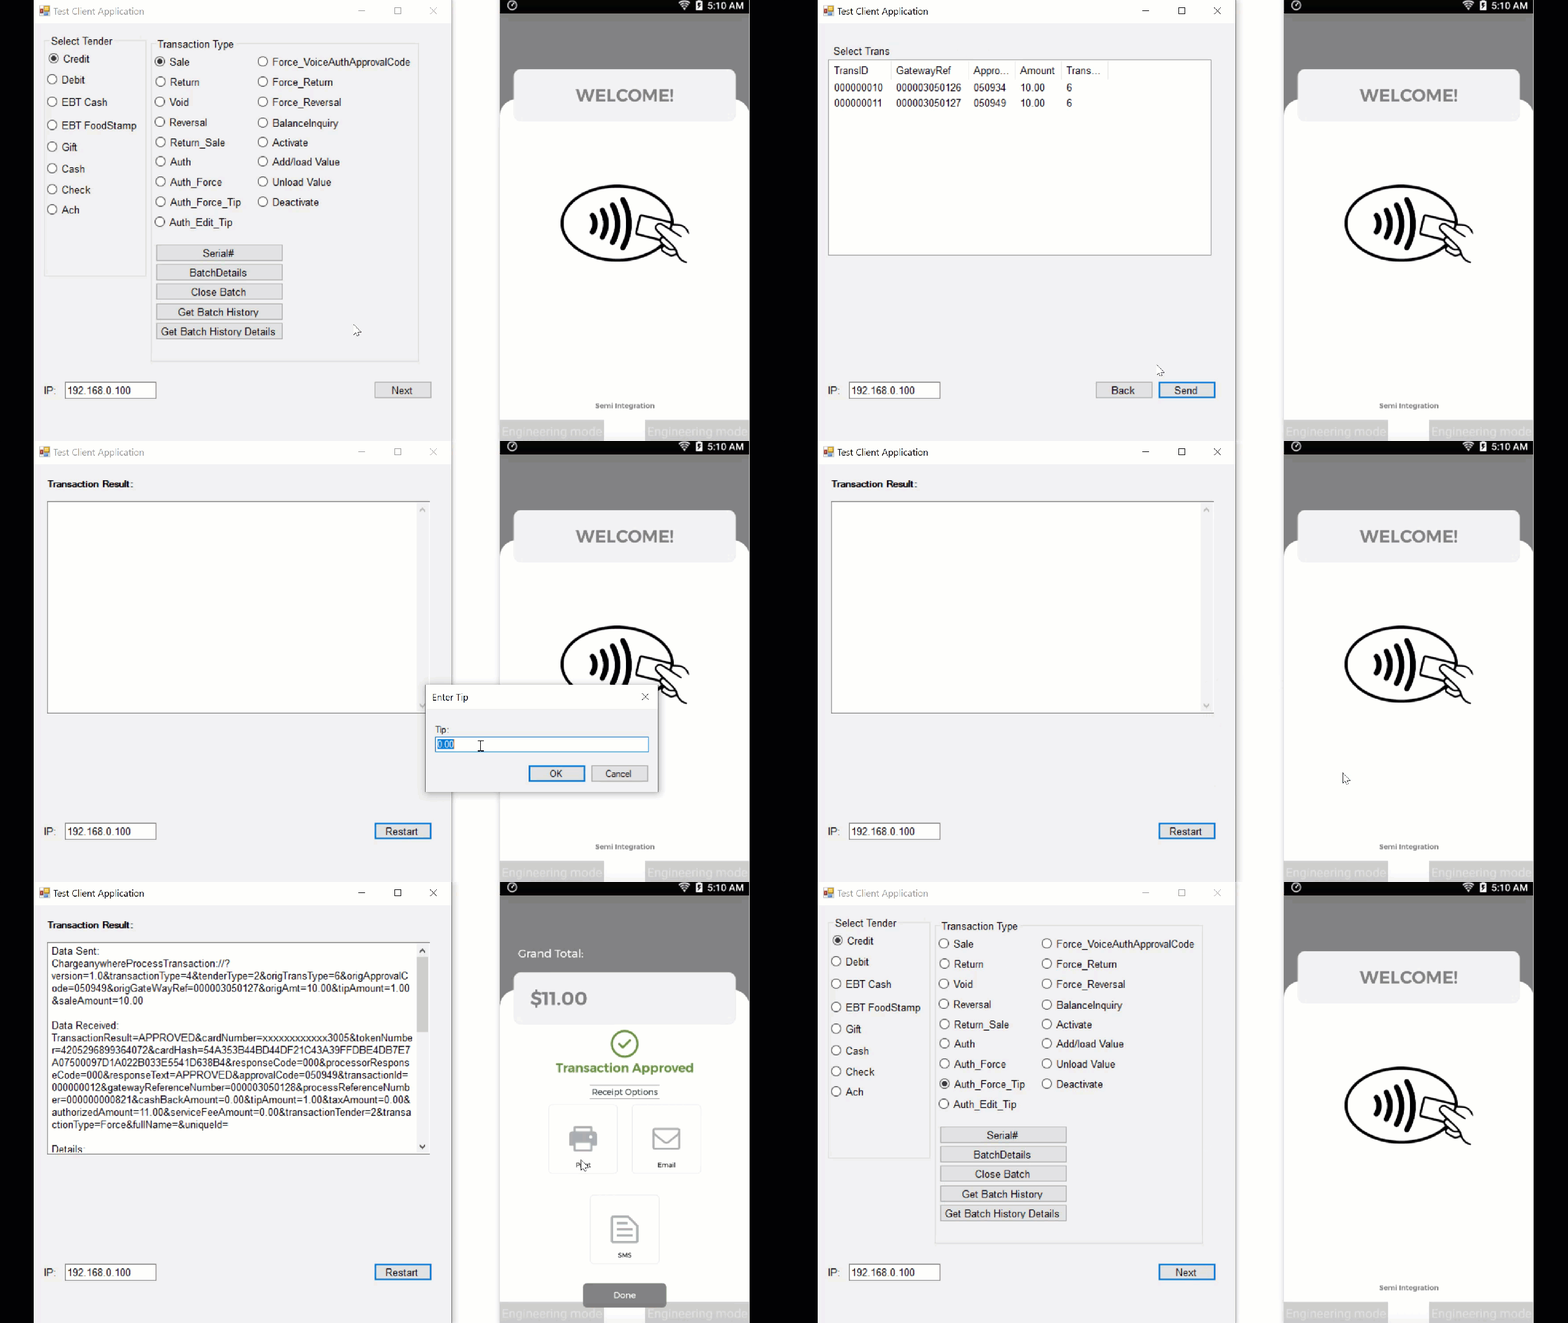
Auth_Force_Tip
An Auth_Force_Tip transaction is similar to an Auth_Force transaction but includes an additional step for entering a tip amount. This is commonly used in the hospitality industry where tips are added after the initial authorization. The process involves forcefully authorizing the transaction and entering the tip amount.
- Select Transaction Type and Tender Type in the Client App
- In the client app, select ‘Auth_Force_Tip ‘ as the transaction type.
- A list of all the transactions is displayed.
- Select the transaction that you want to force or capture.
- Process Auth_Force_Tip in Semi-Integration App
- Open the semi-integration app on the WizarPos device.
- Enter the tip amount and click OK.
- The Auth_Force_Tip transaction will process automatically.
- Approval and Receipt
- Upon approval, you’ll receive a confirmation message.
- Collect the customer’s signature, email, and phone number.
- Select Print Merchant Copy to print the merchant receipt and Print Customer Copy to print the customer receipt.
- Select Done to complete the transaction.
Force_VoiceAuthApprovalCode
A Force_VoiceAuthApprovalCode transaction is used when merchants need to process a transaction based on a voice authorization code provided by the issuing bank. This involves entering the voice authorization code and completing the transaction.
- Select Transaction Type and Tender Type in the Client App
- In the client app, select ‘Force_VoiceAuthApprovalCode‘ as the transaction type.
- Select the preferred tender type.
- Enter the amount to be captured.
- Enter the approval code and other details if required.
- Process Force_VoiceAuthApprovalCode in Semi-Integration App
- Open the semi-integration app on the WizarPos device.
- The Force_VoiceAuthApprovalCode transaction will process automatically.
- Approval and Receipt
- Upon approval, you’ll receive a confirmation message.
- Collect the customer’s signature, email, and phone number.
- Select Print Merchant Copy to print the merchant receipt and Print Customer Copy to print the customer receipt.
- Select Done to complete the transaction.
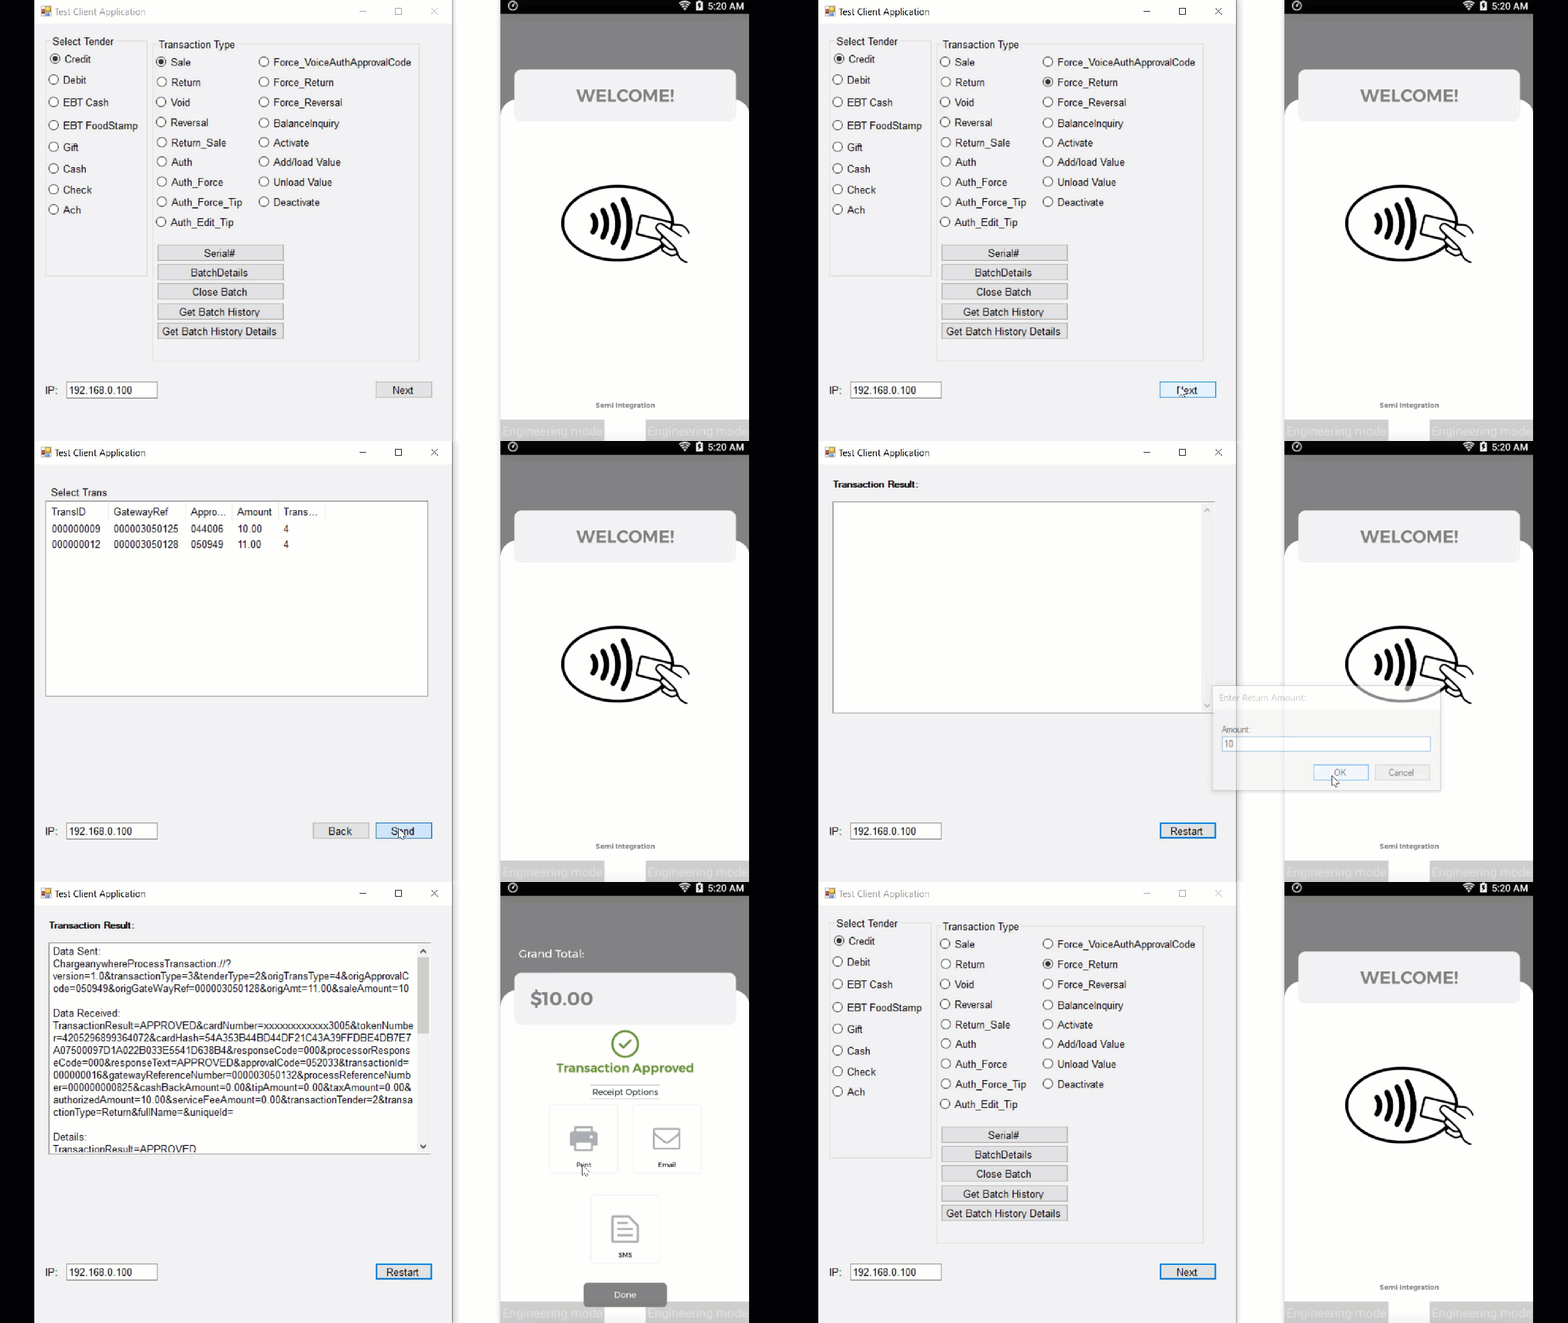
Force_Return
A Force_Return transaction allows merchants to process a return based on a previously forced transaction. This involves selecting the forced transaction to be returned and confirming the return.
- Select Transaction Type and Tender Type in the Client App
- In the client app, select ‘Force_Return‘ as the transaction type.
- A list of all the transactions is displayed.
- Select the transaction that you want to return.
- Process Force_Return in Semi-Integration App
- Open the semi-integration app on the WizarPos device.
- Enter the return amount and click OK.
- The Force_Return transaction will process automatically.
- Approval and Receipt
- Upon approval, you’ll receive a confirmation message.
- Collect the customer’s signature, email, and phone number.
- Select Print Merchant Copy to print the merchant receipt and Print Customer Copy to print the customer receipt.
- Select Done to complete the transaction.
Force_Reversal
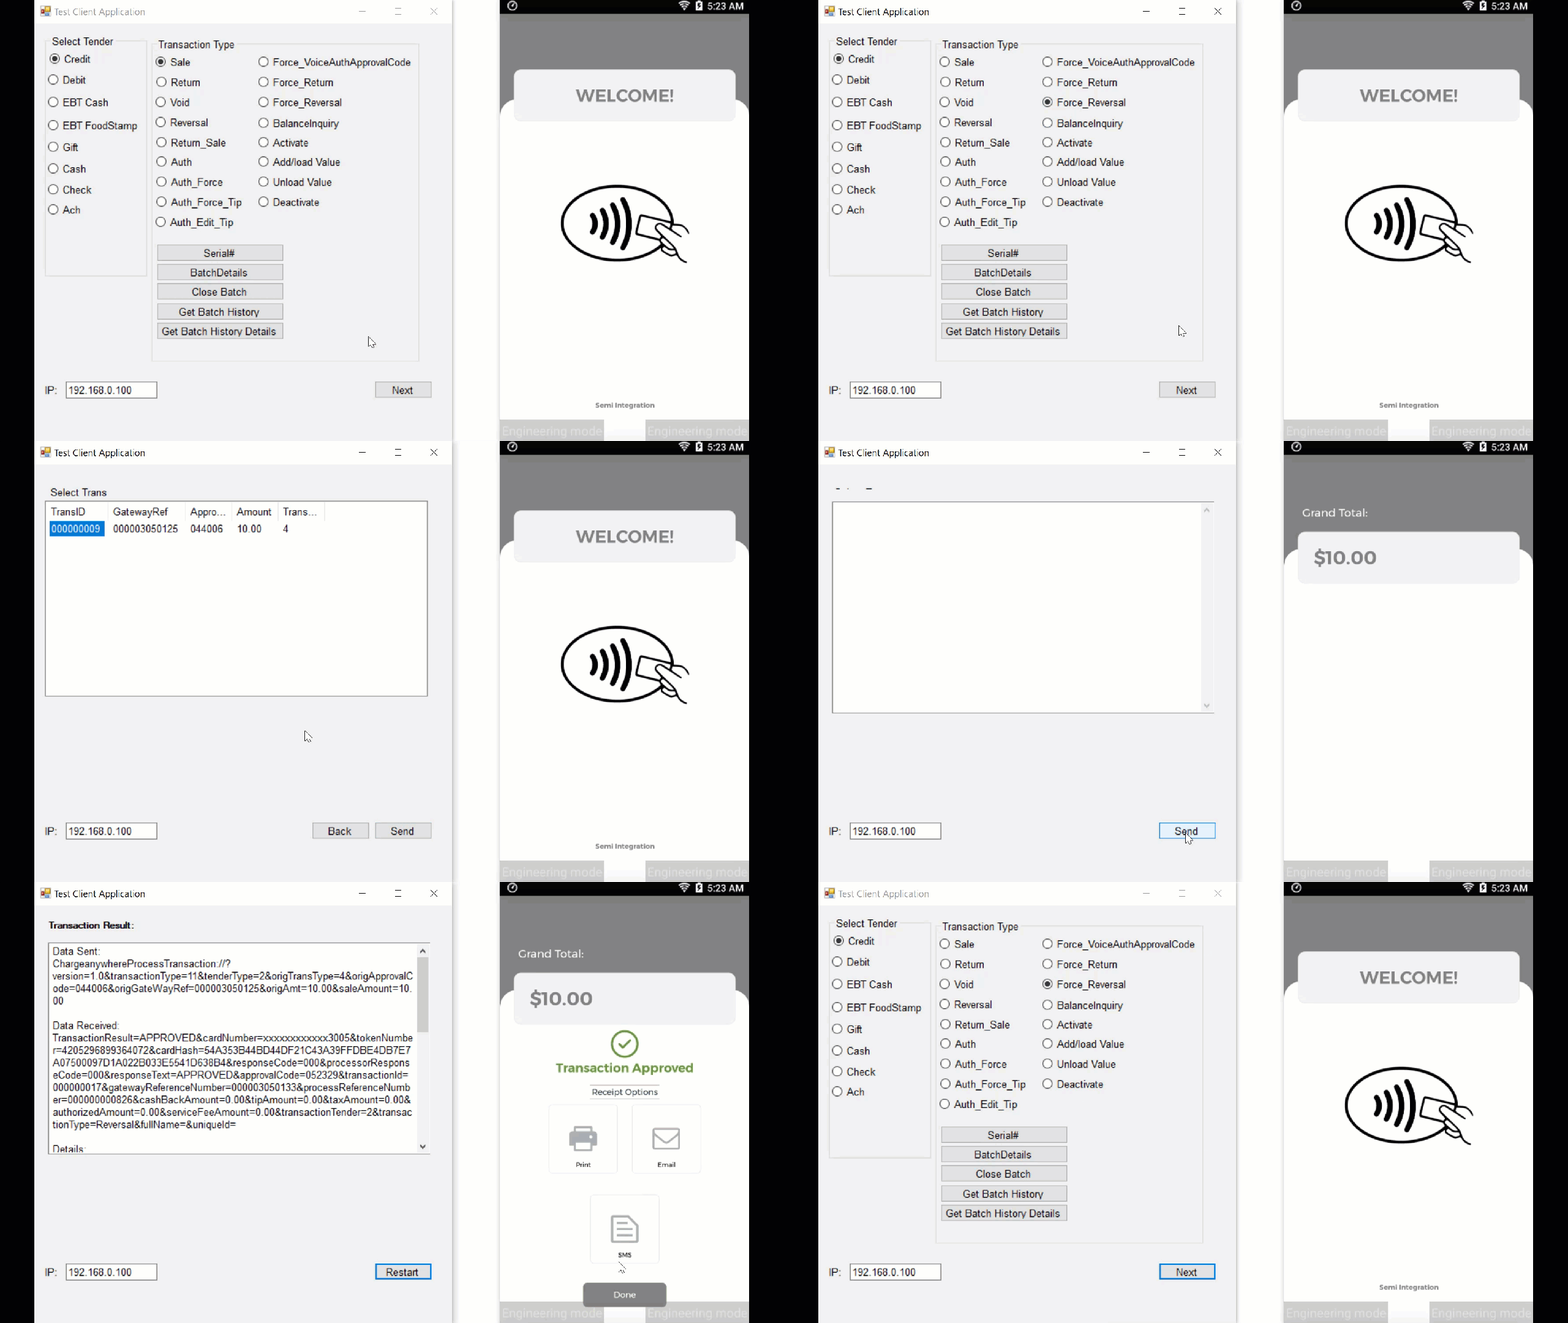
A Force_Reversal transaction is used to reverse a previously forced transaction. This might be necessary in case of errors or disputes related to forced transactions. The process involves selecting the forced transaction to reverse and confirming the reversal.
- Select Transaction Type and Tender Type in the Client App
- In the client app, select ‘Force_Reversal‘ as the transaction type.
- A list of all the transactions is displayed.
- Select the transaction that you want to reverse.
- Process Force_Reversal in Semi-Integration App
- Open the semi-integration app on the WizarPos device.
- The Force_Reversal transaction will process automatically.
- Approval and Receipt
- Upon approval, you’ll receive a confirmation message.
- Collect the customer’s signature, email, and phone number.
- Select Print Merchant Copy to print the merchant receipt and Print Customer Copy to print the customer receipt.
- Select Done to complete the transaction.
BalanceInquiry
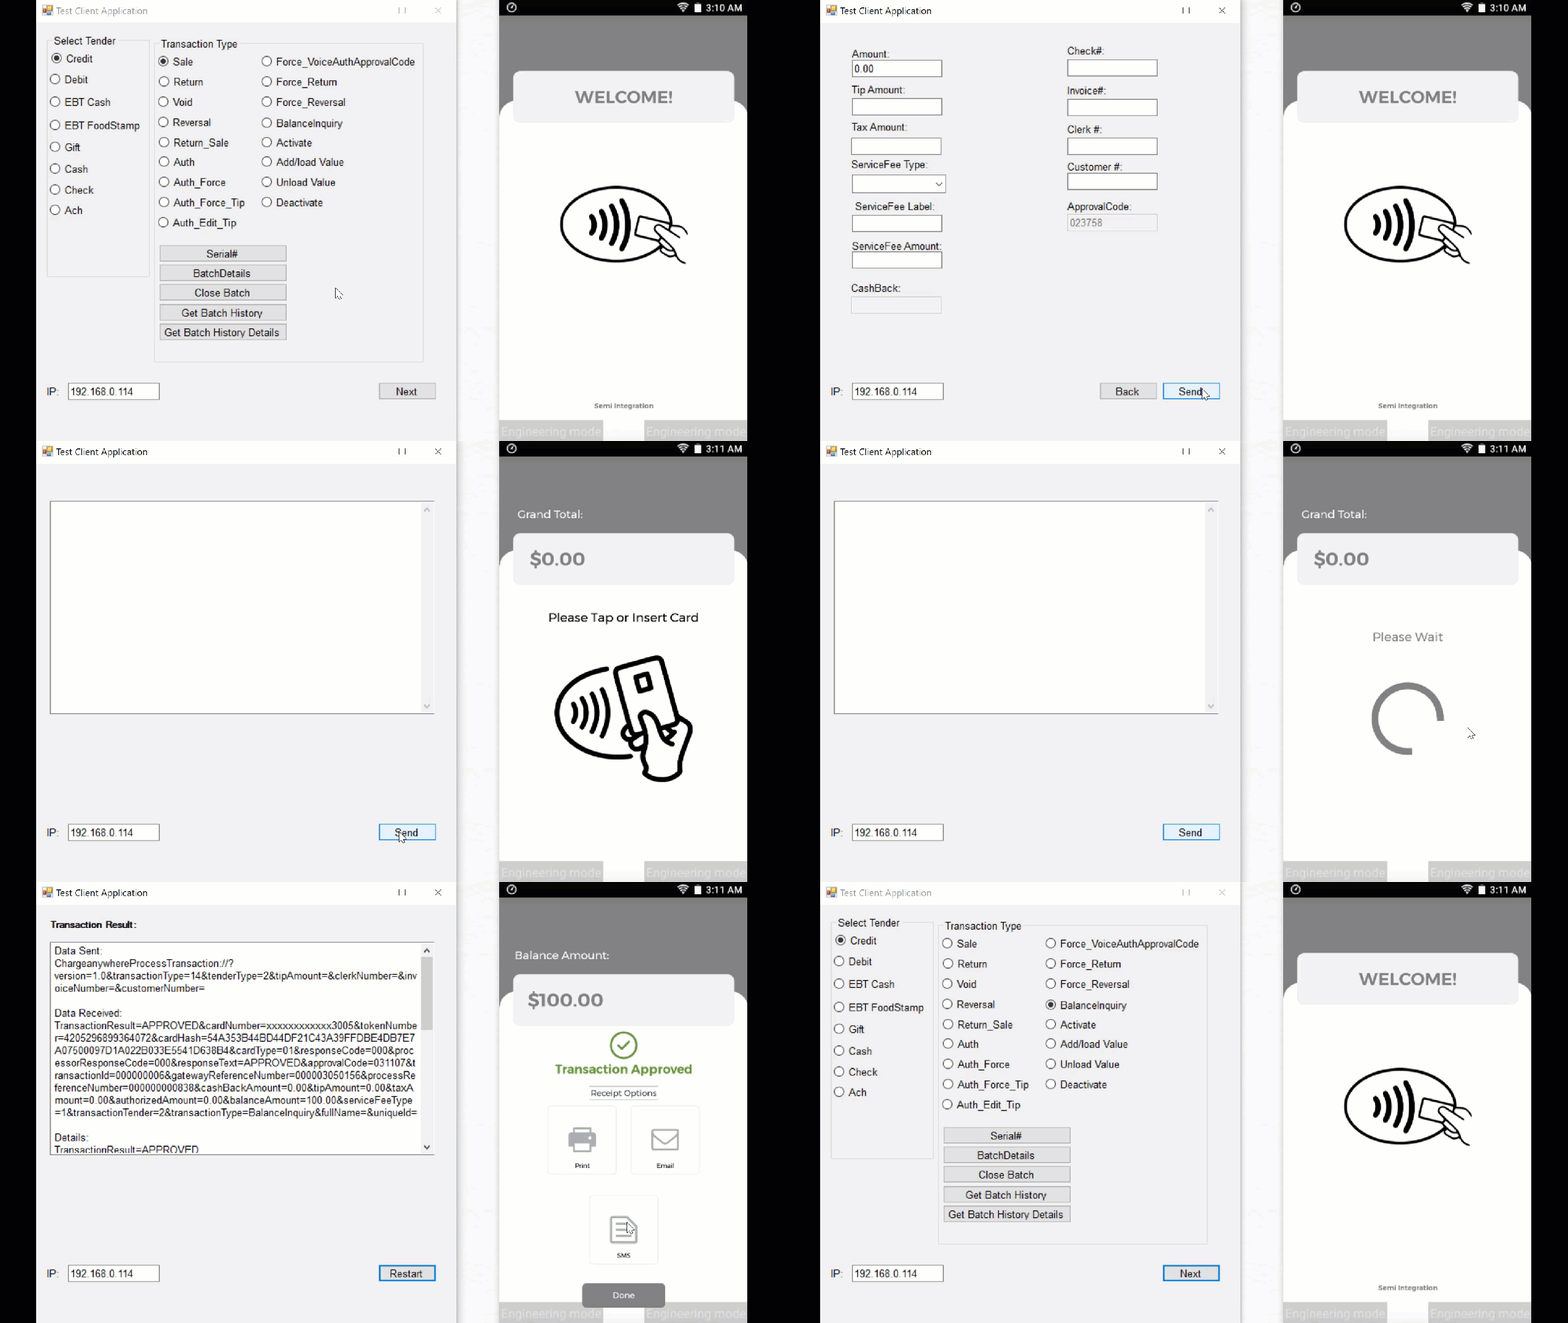
A BalanceInquiry transaction allows customers to check the balance on their gift card. This involves selecting the balance inquiry option and retrieving the current balance information.
- Select Transaction Type and Tender Type in the Client App
- In the client app, select ‘BalanceInquiry‘ as the transaction type.
- Select the Gift tender type.
- Process BalanceInquiry in Semi-Integration App
- Open the semi-integration app on the WizarPos device.
- Tap/insert the card for automatic entry. You can also manually enter card details by selecting the Manual option.
- The balance amount amount will be displayed.
- Approval and Receipt
- Upon approval, you’ll receive a confirmation message.
- Collect the customer’s signature, email, and phone number.
- Select Print Merchant Copy to print the merchant receipt and Print Customer Copy to print the customer receipt.
- Select Done to complete the transaction.
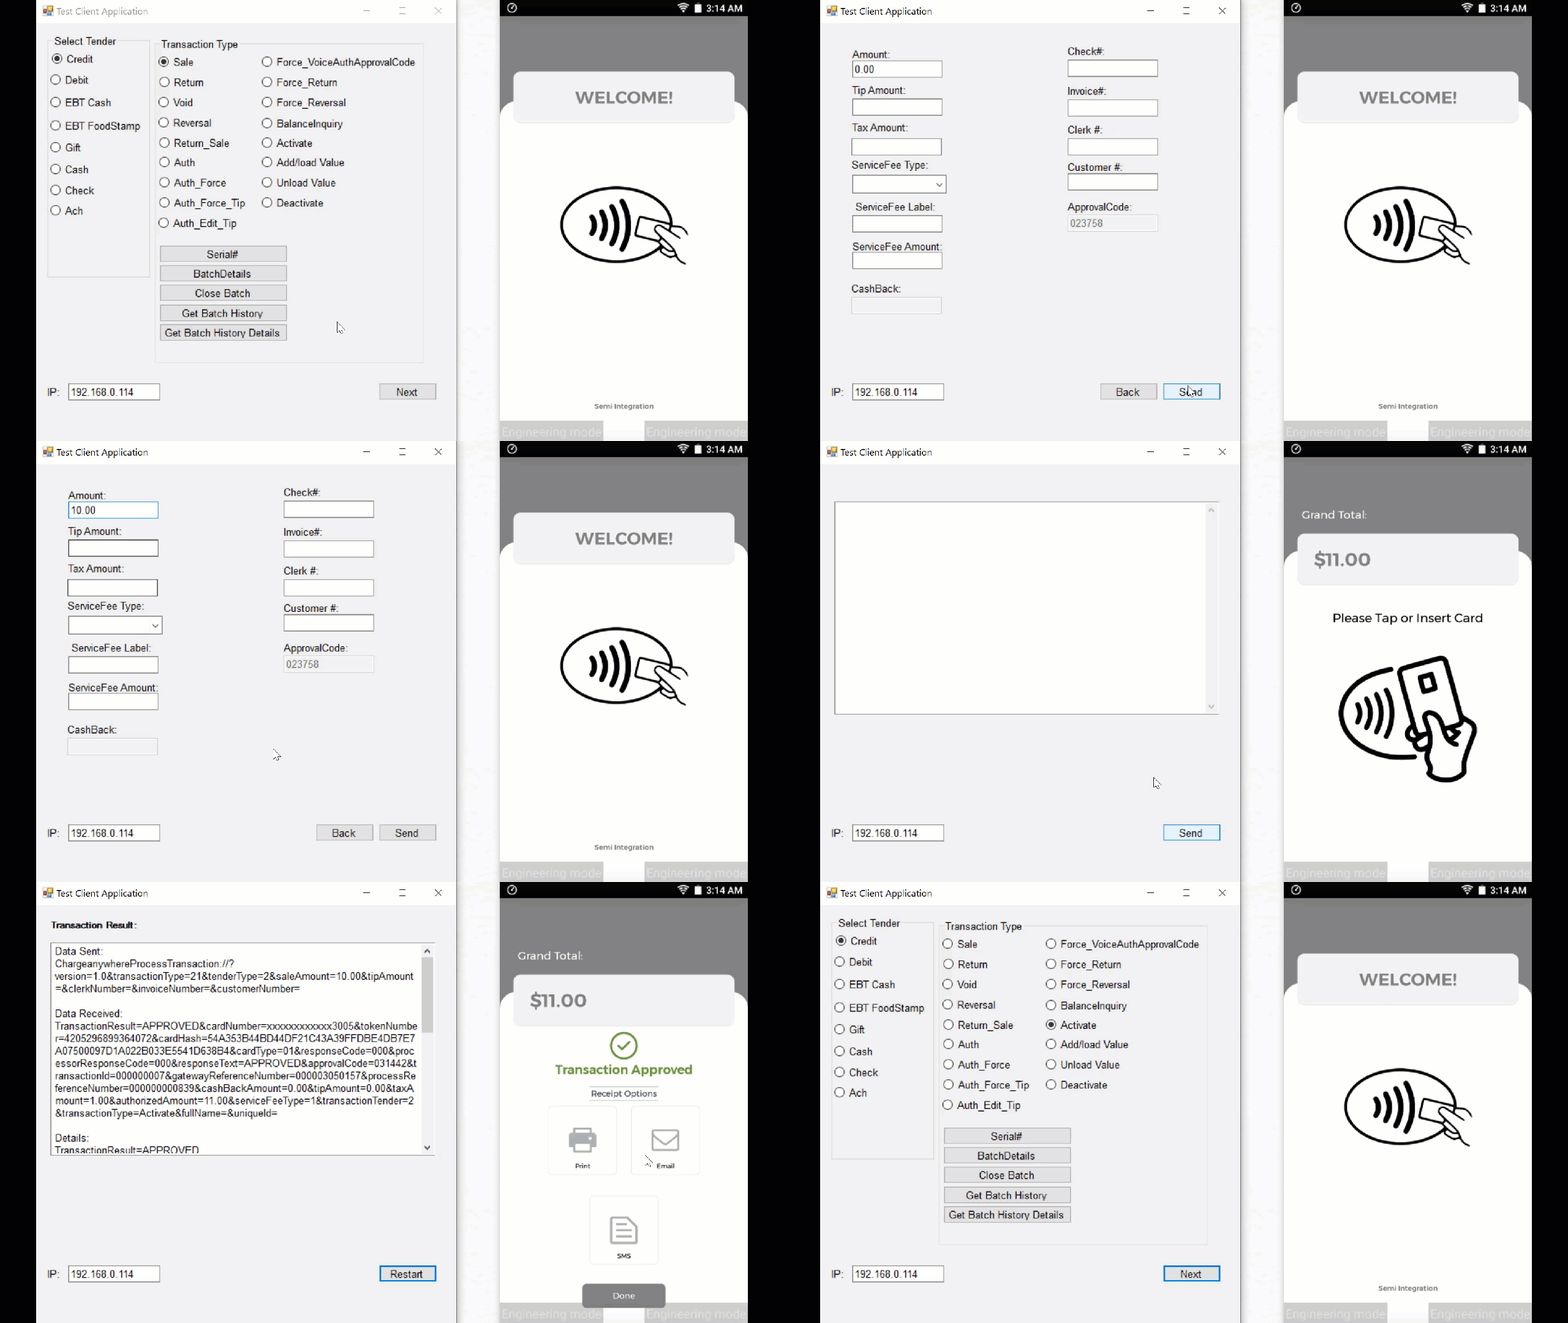
Activate
An Activate transaction is used to activate a prepaid card or gift card. This involves selecting the activation option, entering the necessary details (initial funds), and confirming the activation.
- Select Transaction Type and Tender Type in the Client App
- In the client app, select ‘Activate‘ as the transaction type.
- Select the Gift tender type.
- Enter the charge amount and other details if required.
- Process Activate in Semi-Integration App
- Open the semi-integration app on the WizarPos device.
- The charge amount will be displayed.
- Tap/insert the card for automatic entry. You can also manually enter card details by selecting the Manual option.
- Approval and Receipt
- Upon approval, you’ll receive a confirmation message.
- Collect the customer’s signature, email, and phone number.
- Select Print Merchant Copy to print the merchant receipt and Print Customer Copy to print the customer receipt.
- Select Done to complete the transaction.
Add/load Value
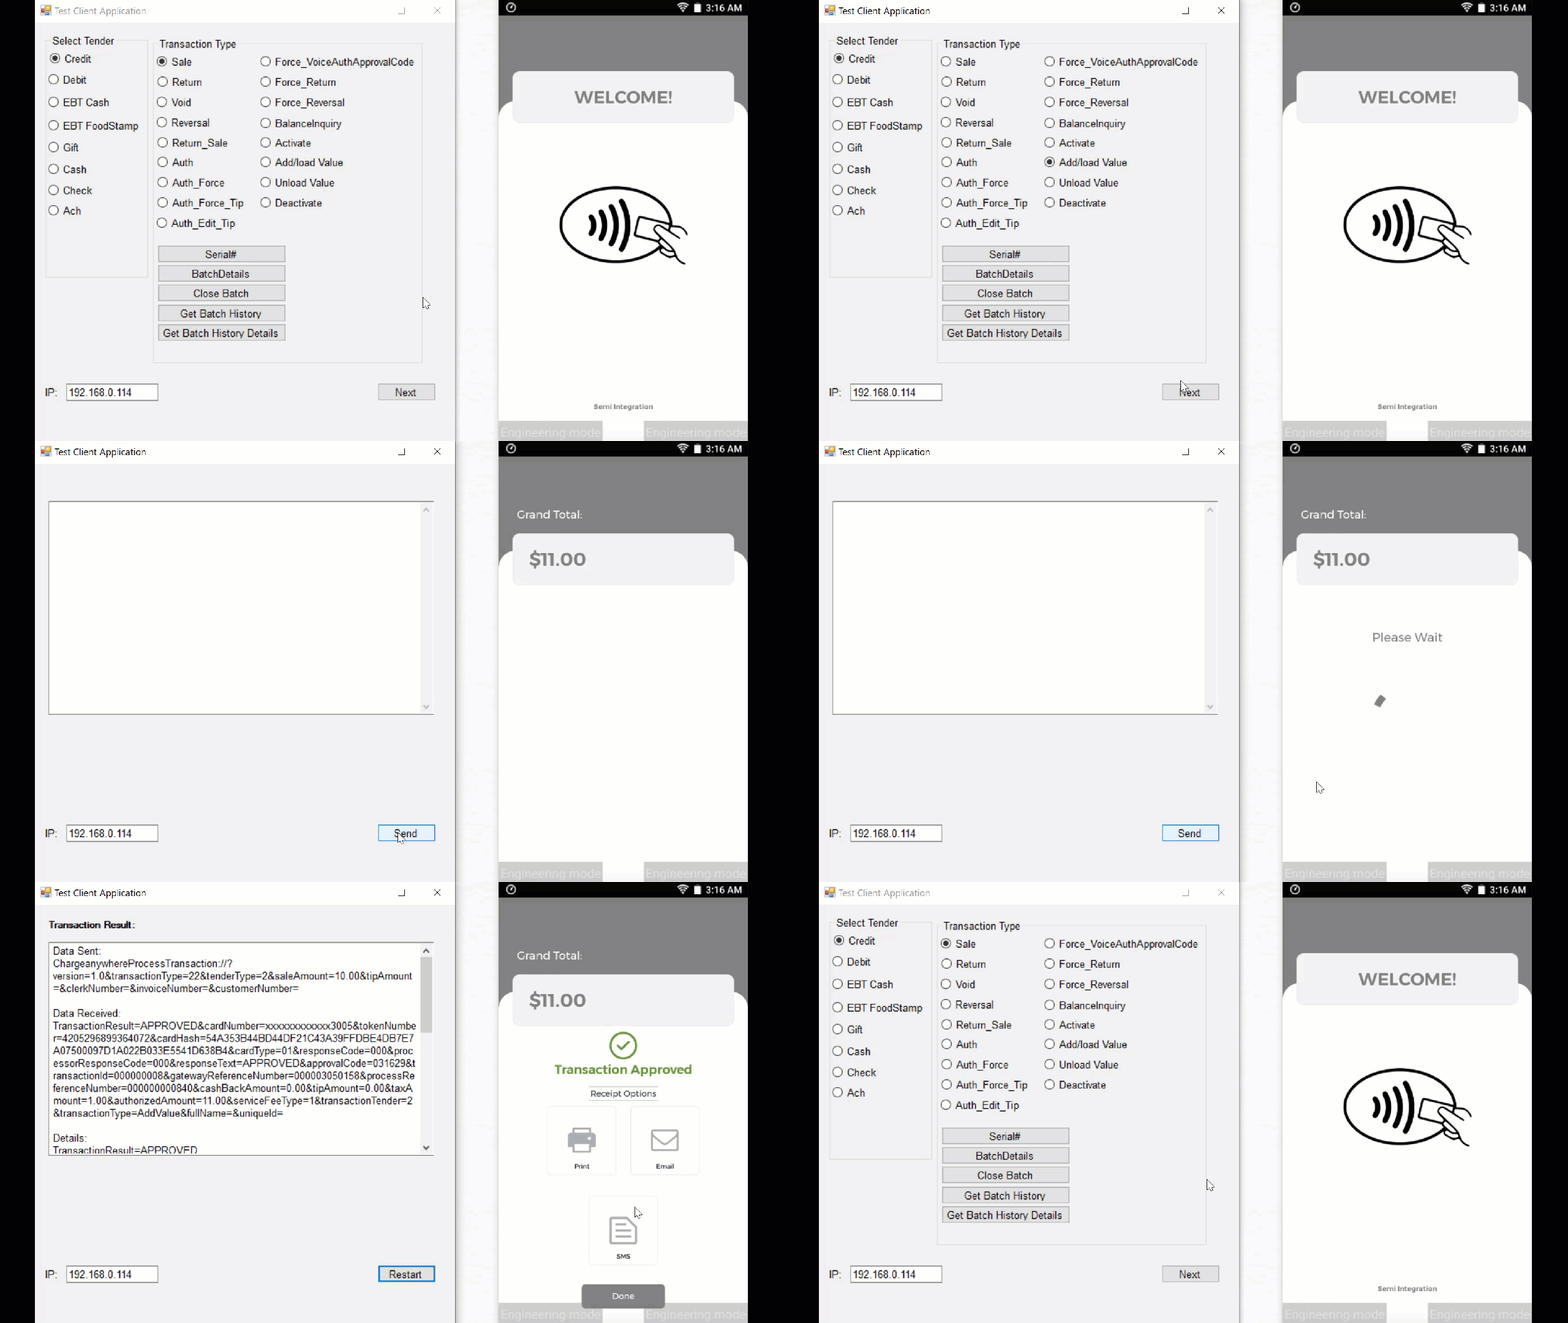
An Add/load Value transaction allows customers to add funds to their prepaid card or gift card. This process involves selecting the add/load value option, entering the amount to be added, and confirming the transaction.
- Select Transaction Type and Tender Type in the Client App
- In the client app, select ‘Add/load Value‘ as the transaction type.
- Select the Gift tender type.
- Enter the amount to be added and other details if required.
- Process Add/load Value in Semi-Integration App
- Open the semi-integration app on the WizarPos device.
- The charge amount will be displayed.
- Tap/insert the card for automatic entry. You can also manually enter card details by selecting the Manual option.
- Approval and Receipt
- Upon approval, you’ll receive a confirmation message.
- Collect the customer’s signature, email, and phone number.
- Select Print Merchant Copy to print the merchant receipt and Print Customer Copy to print the customer receipt.
- Select Done to complete the transaction.
Unload Value
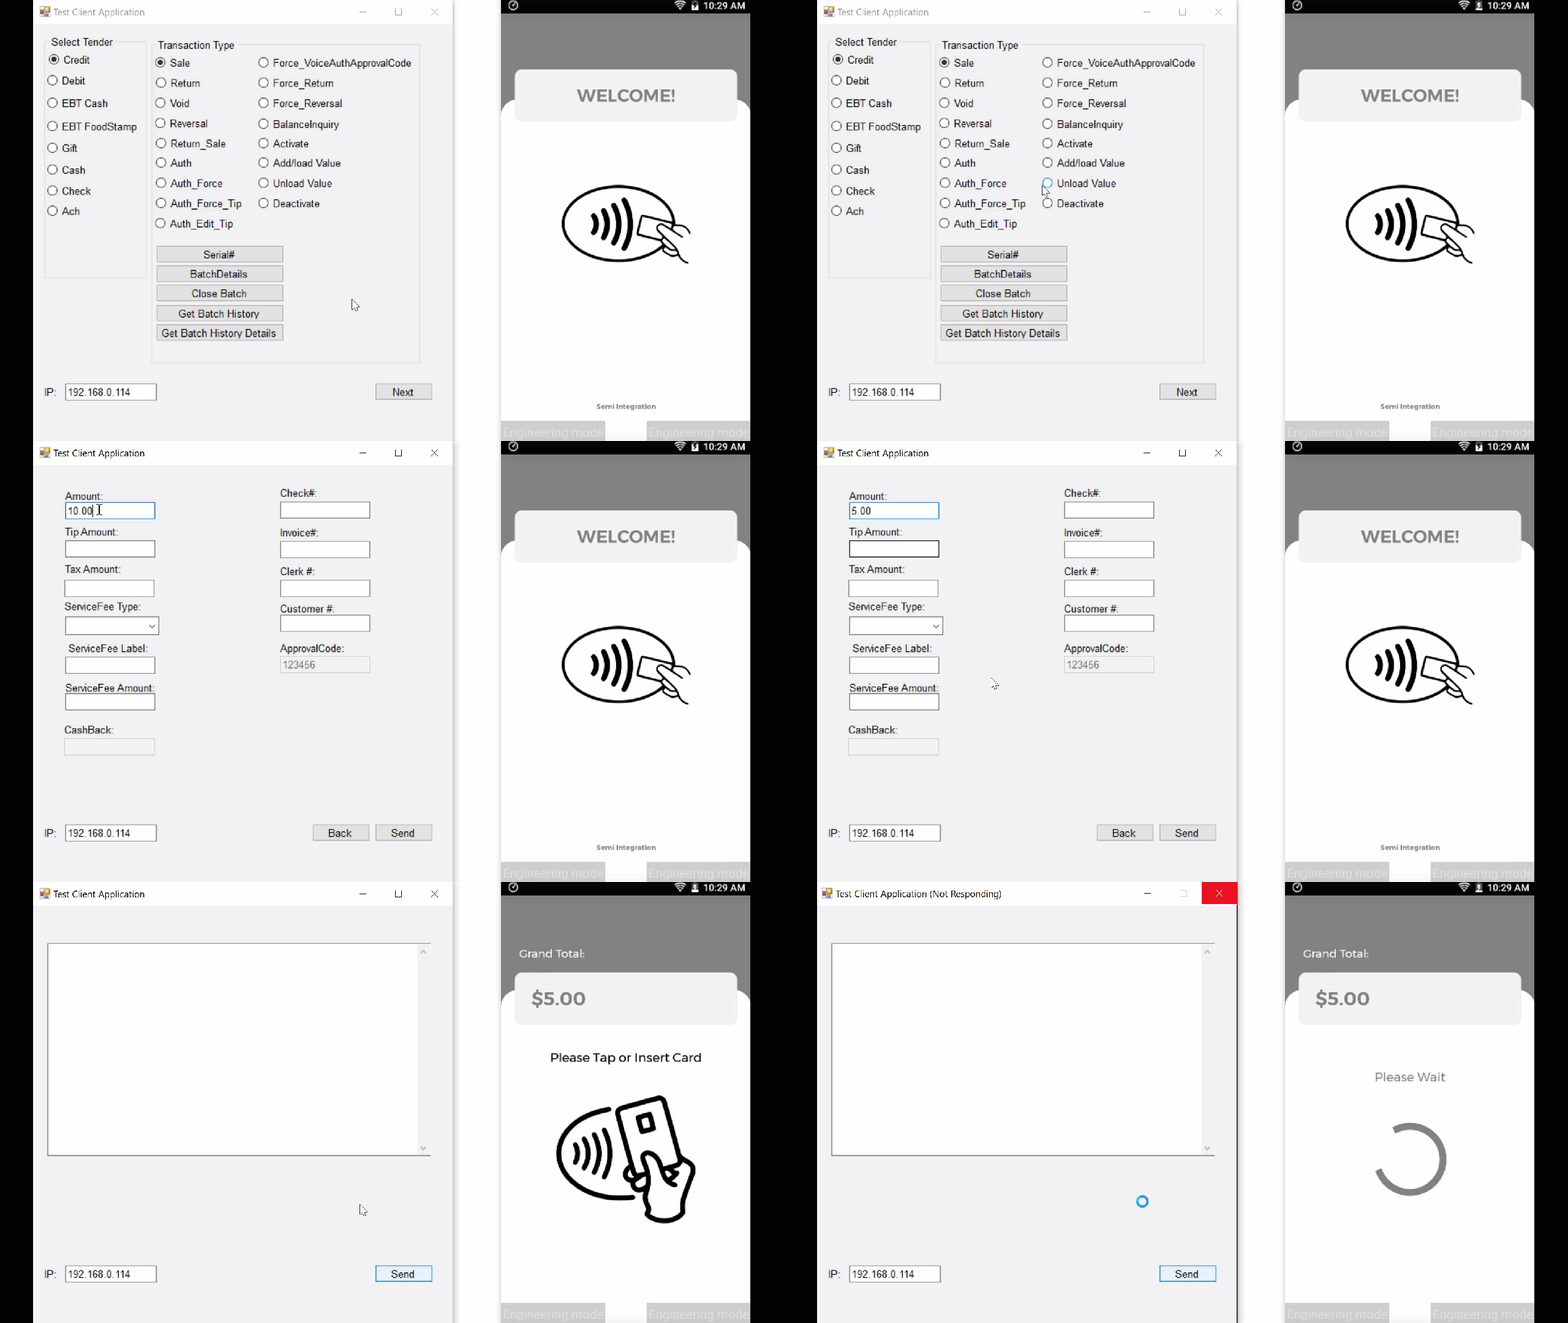
An Unload Value transaction is used to remove funds from a prepaid card or gift card. This involves selecting the unload value option, entering the amount to be removed, and confirming the transaction.
- Select Transaction Type and Tender Type in the Client App
- In the client app, select ‘Unload Value‘ as the transaction type.
- Select the Gift tender type.
- Enter the charge amount and other details if required.
- Process Unload Value in Semi-Integration App
- Open the semi-integration app on the WizarPos device.
- The charge amount will be displayed.
- Tap/insert the card for automatic entry. You can also manually enter card details by selecting the Manual option.
- Approval and Receipt
- Upon approval, you’ll receive a confirmation message.
- Collect the customer’s signature, email, and phone number.
- Select Print Merchant Copy to print the merchant receipt and Print Customer Copy to print the customer receipt.
- Select Done to complete the transaction.
Deactivate
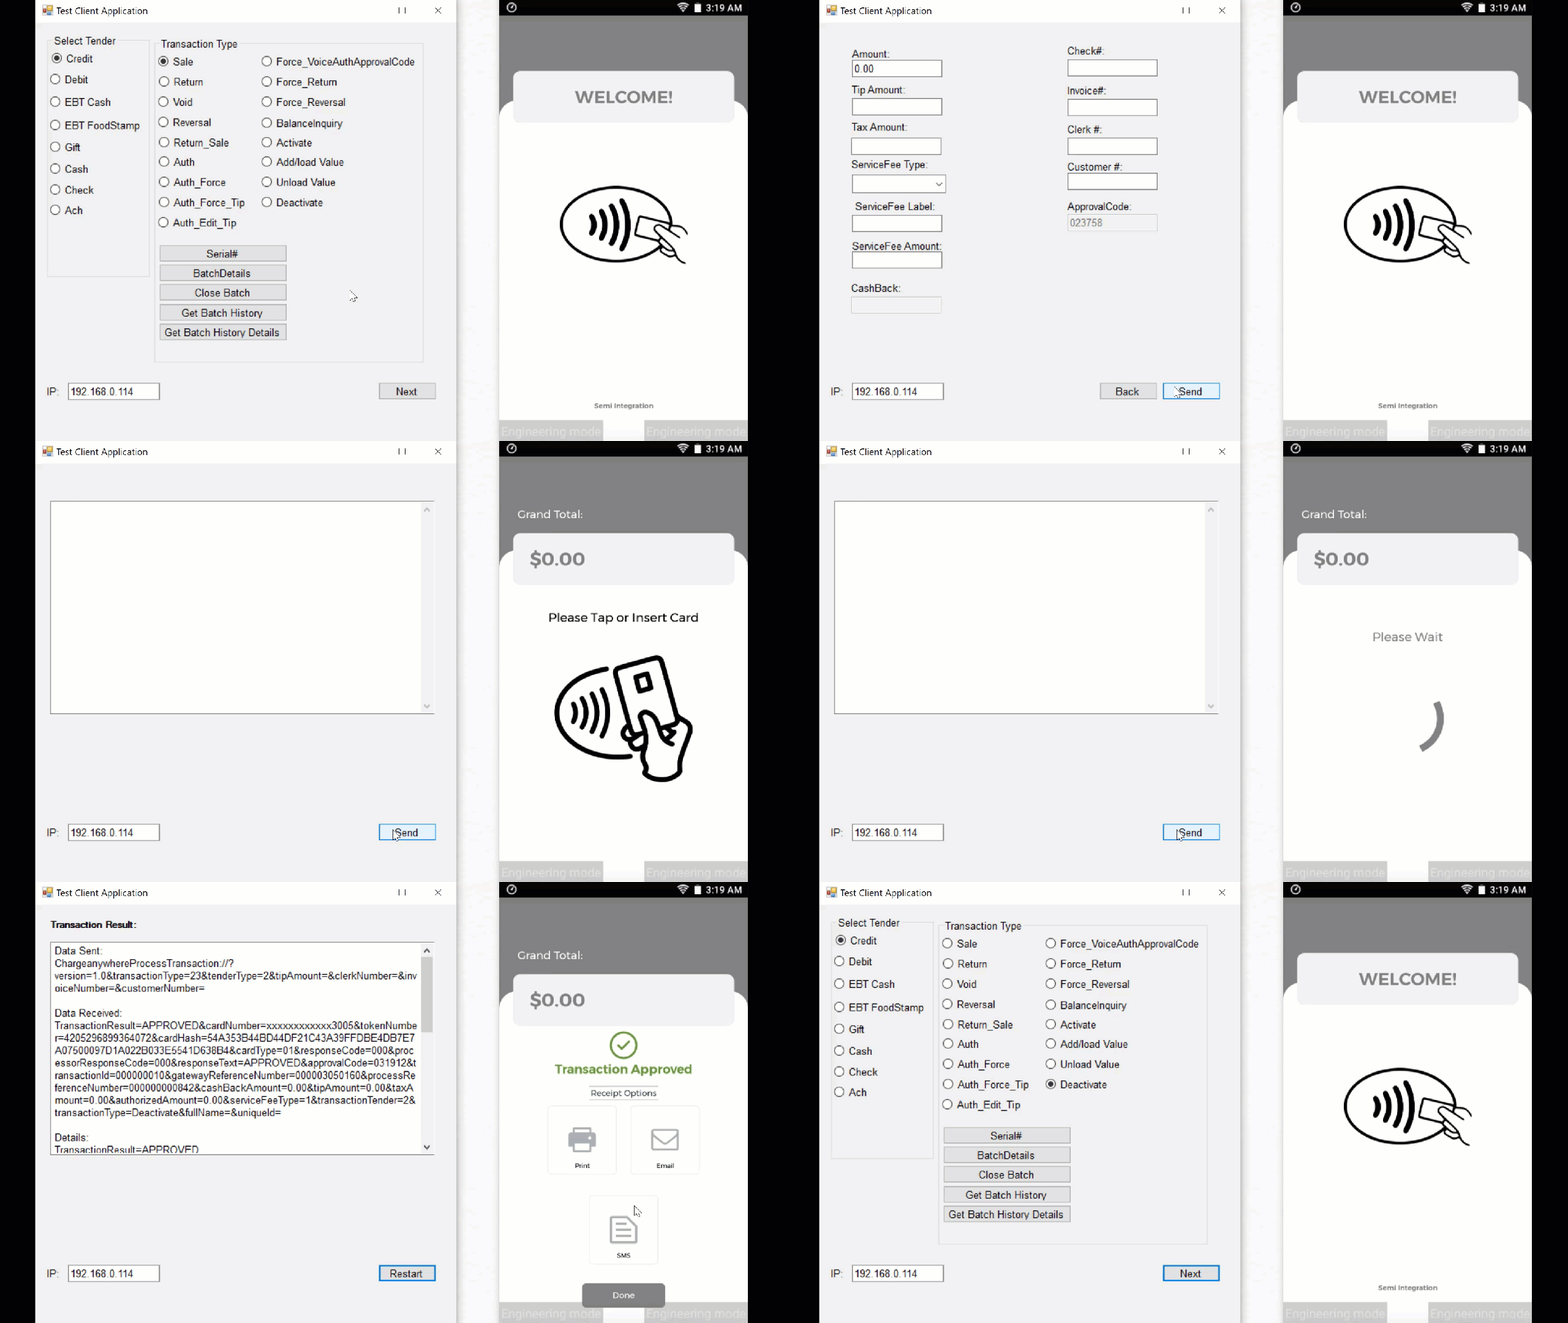
A Deactivate transaction is used to deactivate a prepaid card or gift card. This involves selecting the deactivation option, entering the necessary details, and confirming the deactivation.
- Select Transaction Type and Tender Type in the Client App
- In the client app, select ‘Deactivate‘ as the transaction type.
- Select the Gift tender type.
- Process Deactivate in Semi-Integration App
- Open the semi-integration app on the WizarPos device.
- Tap/insert the card for automatic entry. You can also manually enter card details by selecting the Manual option.
- Approval and Receipt
- Upon approval, you’ll receive a confirmation message.
- Collect the customer’s signature, email, and phone number.
- Select Print Merchant Copy to print the merchant receipt and Print Customer Copy to print the customer receipt.
- Select Done to complete the transaction.
6. Transaction Variations
Processing Sale with Credit
- Select Transaction Type and Tender Type
- In the client app, select ‘Sale‘ as the transaction type.
- Select ‘Credit‘ as the tender type.
- Enter the charge amount if required.
- Process Payment
- Open the semi-integration app on the WizarPos device.
- The charge amount will be displayed automatically.
- Tap/insert the card for automatic entry. You can also manually enter card details by selecting the Manual option.
- Approval and Receipt
- Once approved, you’ll receive a confirmation message.
- Collect the customer’s signature, email, and phone number.
- Select Print Merchant Copy to print the merchant receipt and Print Customer Copy to print the customer receipt.
- Select Done to complete the transaction.

Processing Sale with Gift
- Select Transaction Type and Tender Type
- In the client app, select ‘Sale‘ as the transaction type.
- Select ‘Gift‘ as the tender type.
- Enter the charge amount if required.
- Process Payment
- Open the semi-integration app on the WizarPos device.
- The charge amount will be displayed automatically.
- Swipe the gift card for automatic entry. You can also manually enter card details by selecting the Manual option.
- Approval and Receipt
- Once approved, you’ll receive a confirmation message.
- Collect the customer’s signature, email, and phone number.
- Select Print Merchant Copy to print the merchant receipt and Print Customer Copy to print the customer receipt.
- Select Done to complete the transaction.
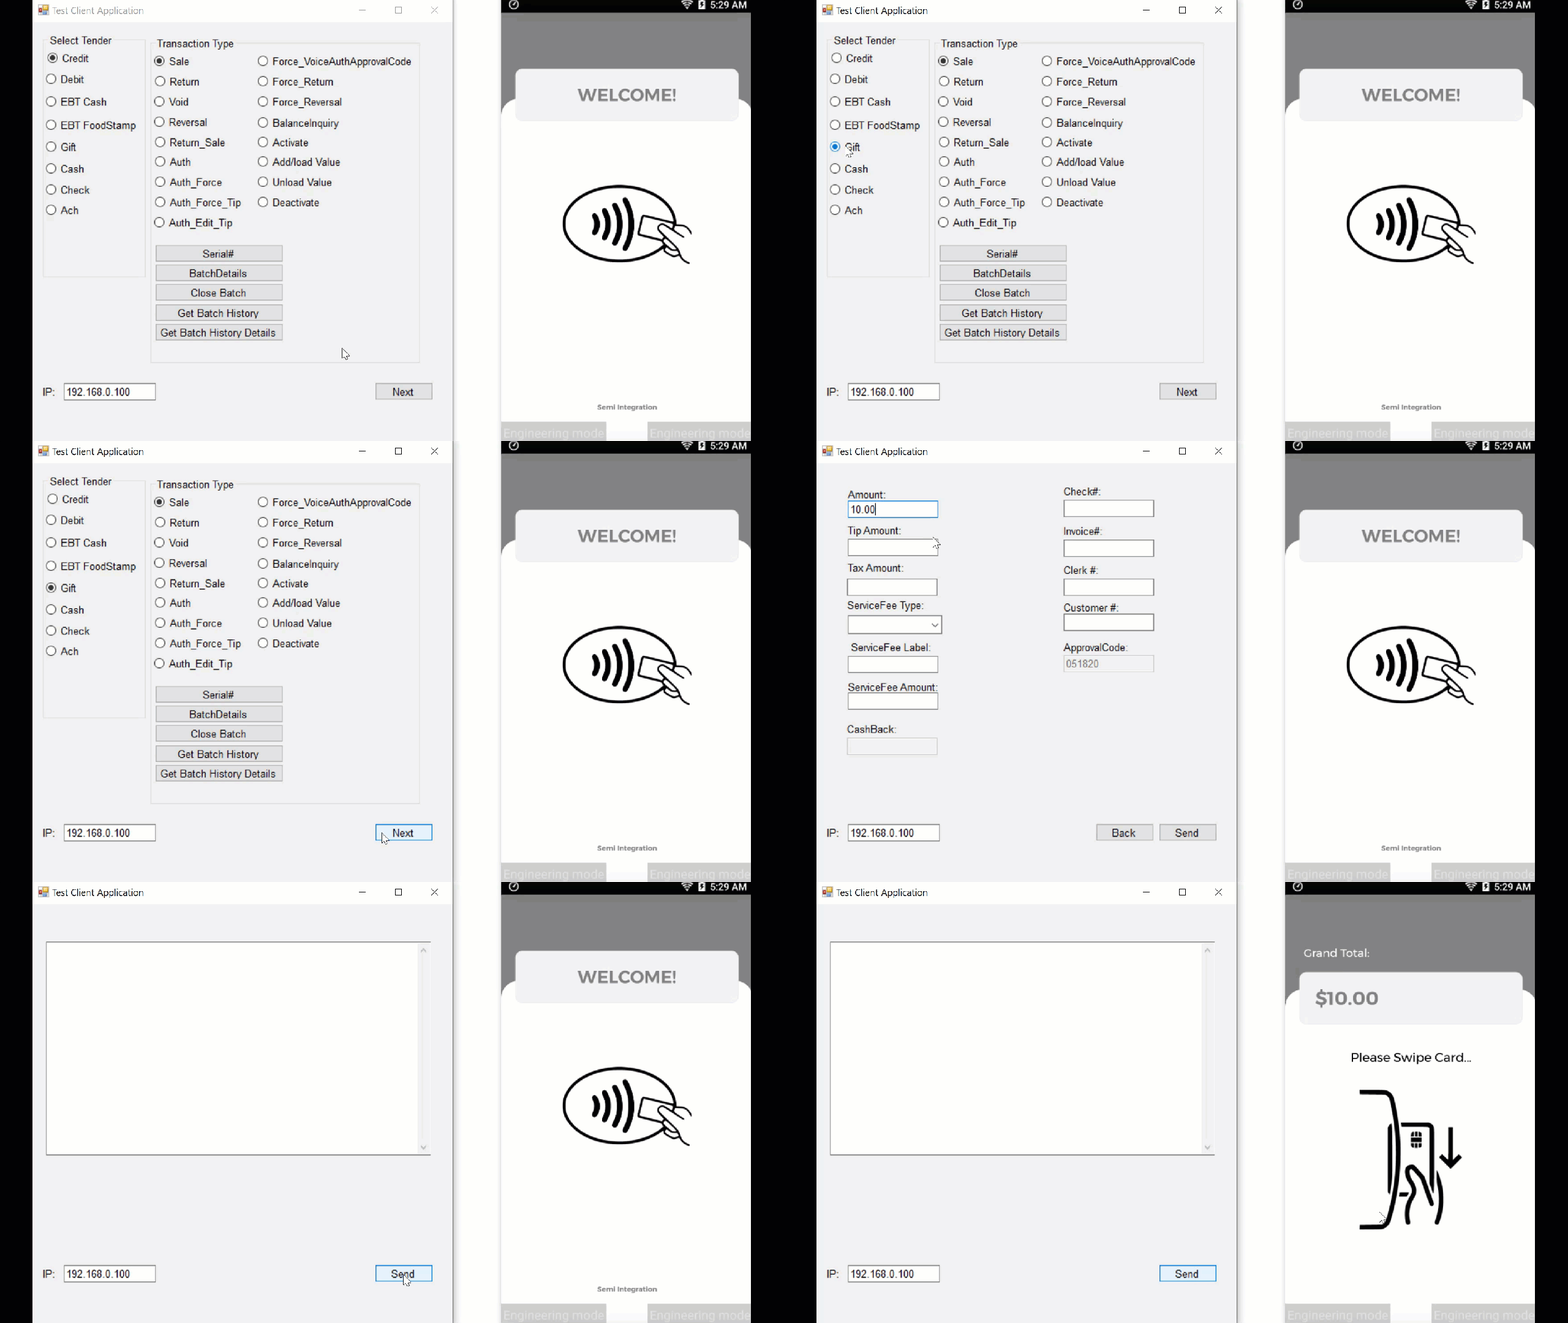
Processing Sale with Cash
- Select Transaction Type and Tender Type
- In the client app, select ‘Sale‘ as the transaction type.
- Select ‘Cash‘ as the tender type.
- Enter the charge amount if required.
- Process Payment
- Open the semi-integration app on the WizarPos device.
- The charge amount will be displayed automatically.
- Approval and Receipt
- Once approved, you’ll receive a confirmation message.
- Collect the customer’s signature, email, and phone number.
- Select Print Merchant Copy to print the merchant receipt and Print Customer Copy to print the customer receipt.
- Select Done to complete the transaction.
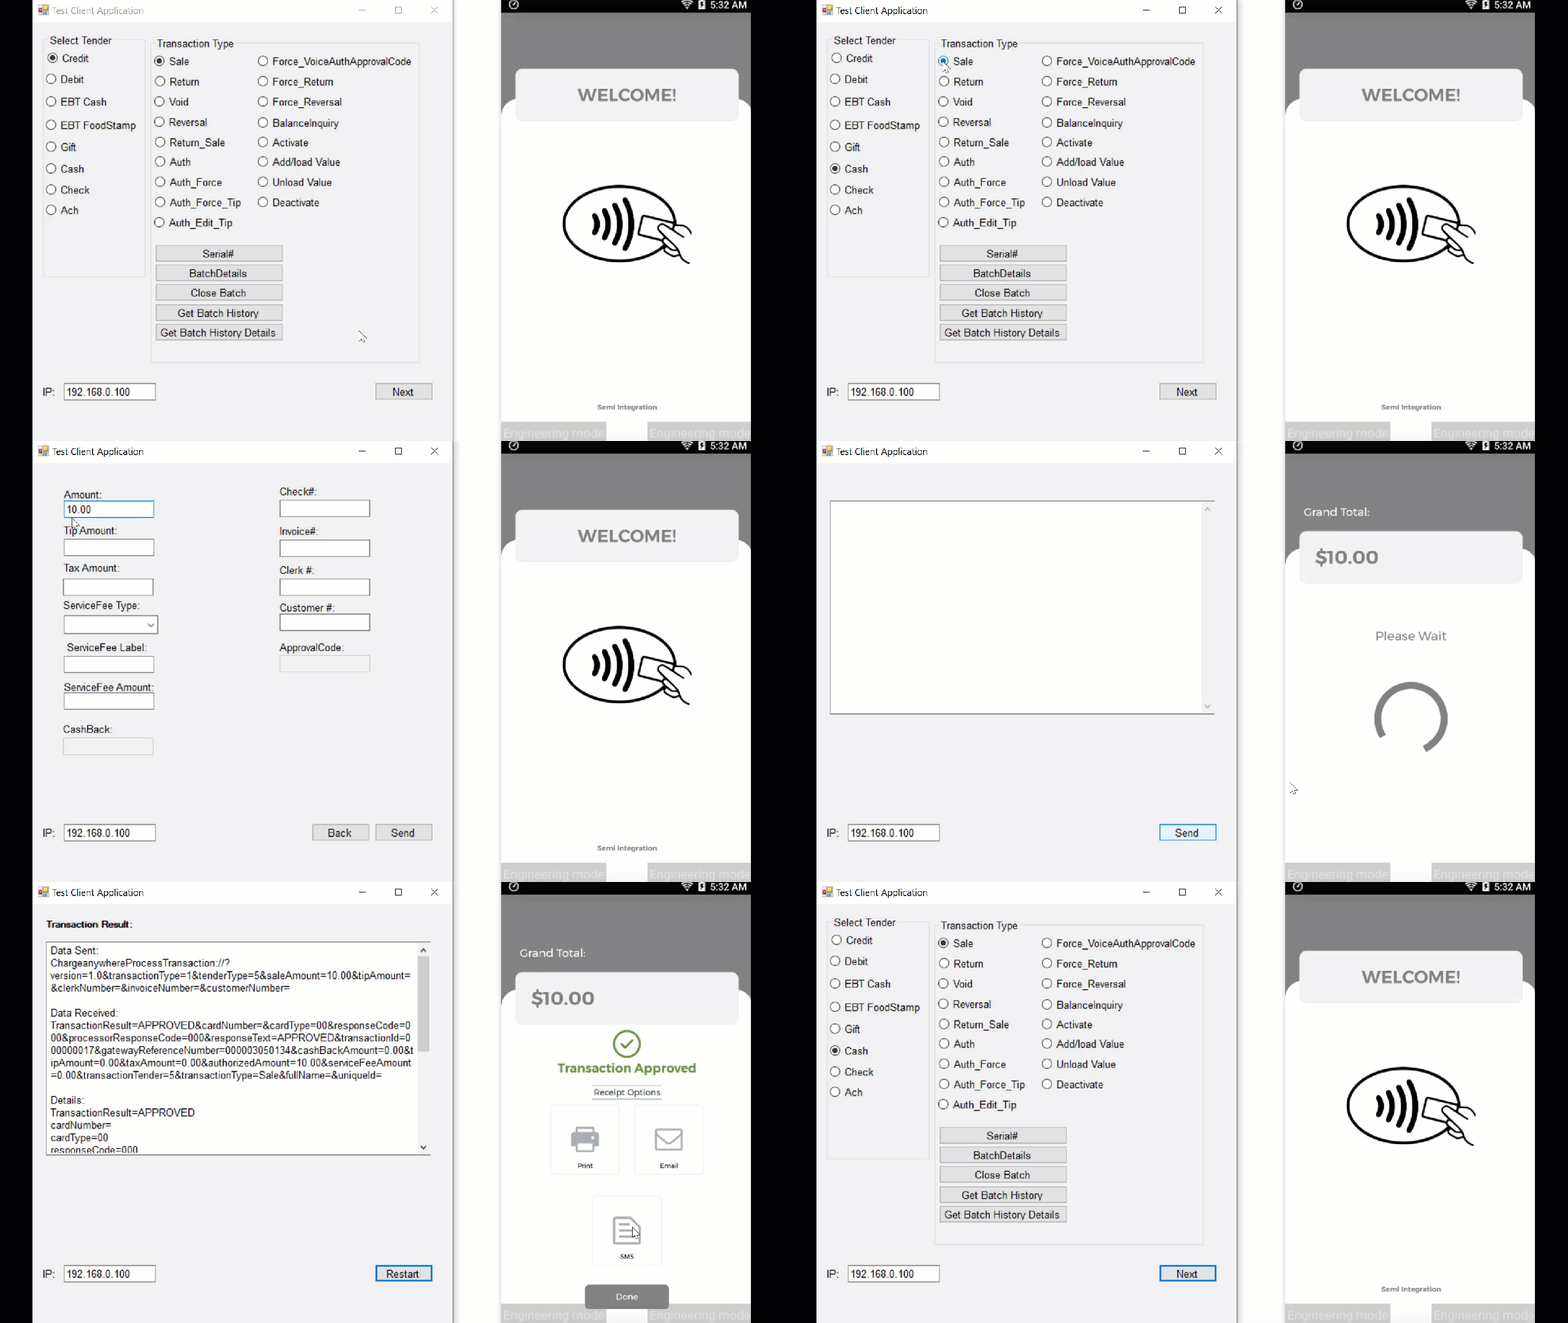
Processing Sale with Tip
Enabling Tip
- Open the semi-integration app.
- Go to
Configurations -> Setup -> Optional Prompts. - Enable the tip option if it’s not already enabled.
Processing a Sale with Tip
- Select Transaction Type and Tender Type
- In the client app, select ‘Sale‘ as the transaction type.
- Select the preferred tender type.
- Enter the charge amount if required.
- Process Payment
- Open the semi-integration app on the WizarPos device.
- The charge amount will be displayed automatically.
- Enter the tip percentage when prompted.
- Tap/insert the card for automatic entry. You can also manually enter card details by selecting the Manual option.
- Approval and Receipt
- Upon approval, you’ll receive a confirmation message.
- Collect the customer’s signature, email, and phone number.
- Select Print Merchant Copy to print the merchant receipt and Print Customer Copy to print the customer receipt.
- Select Done to complete the transaction.
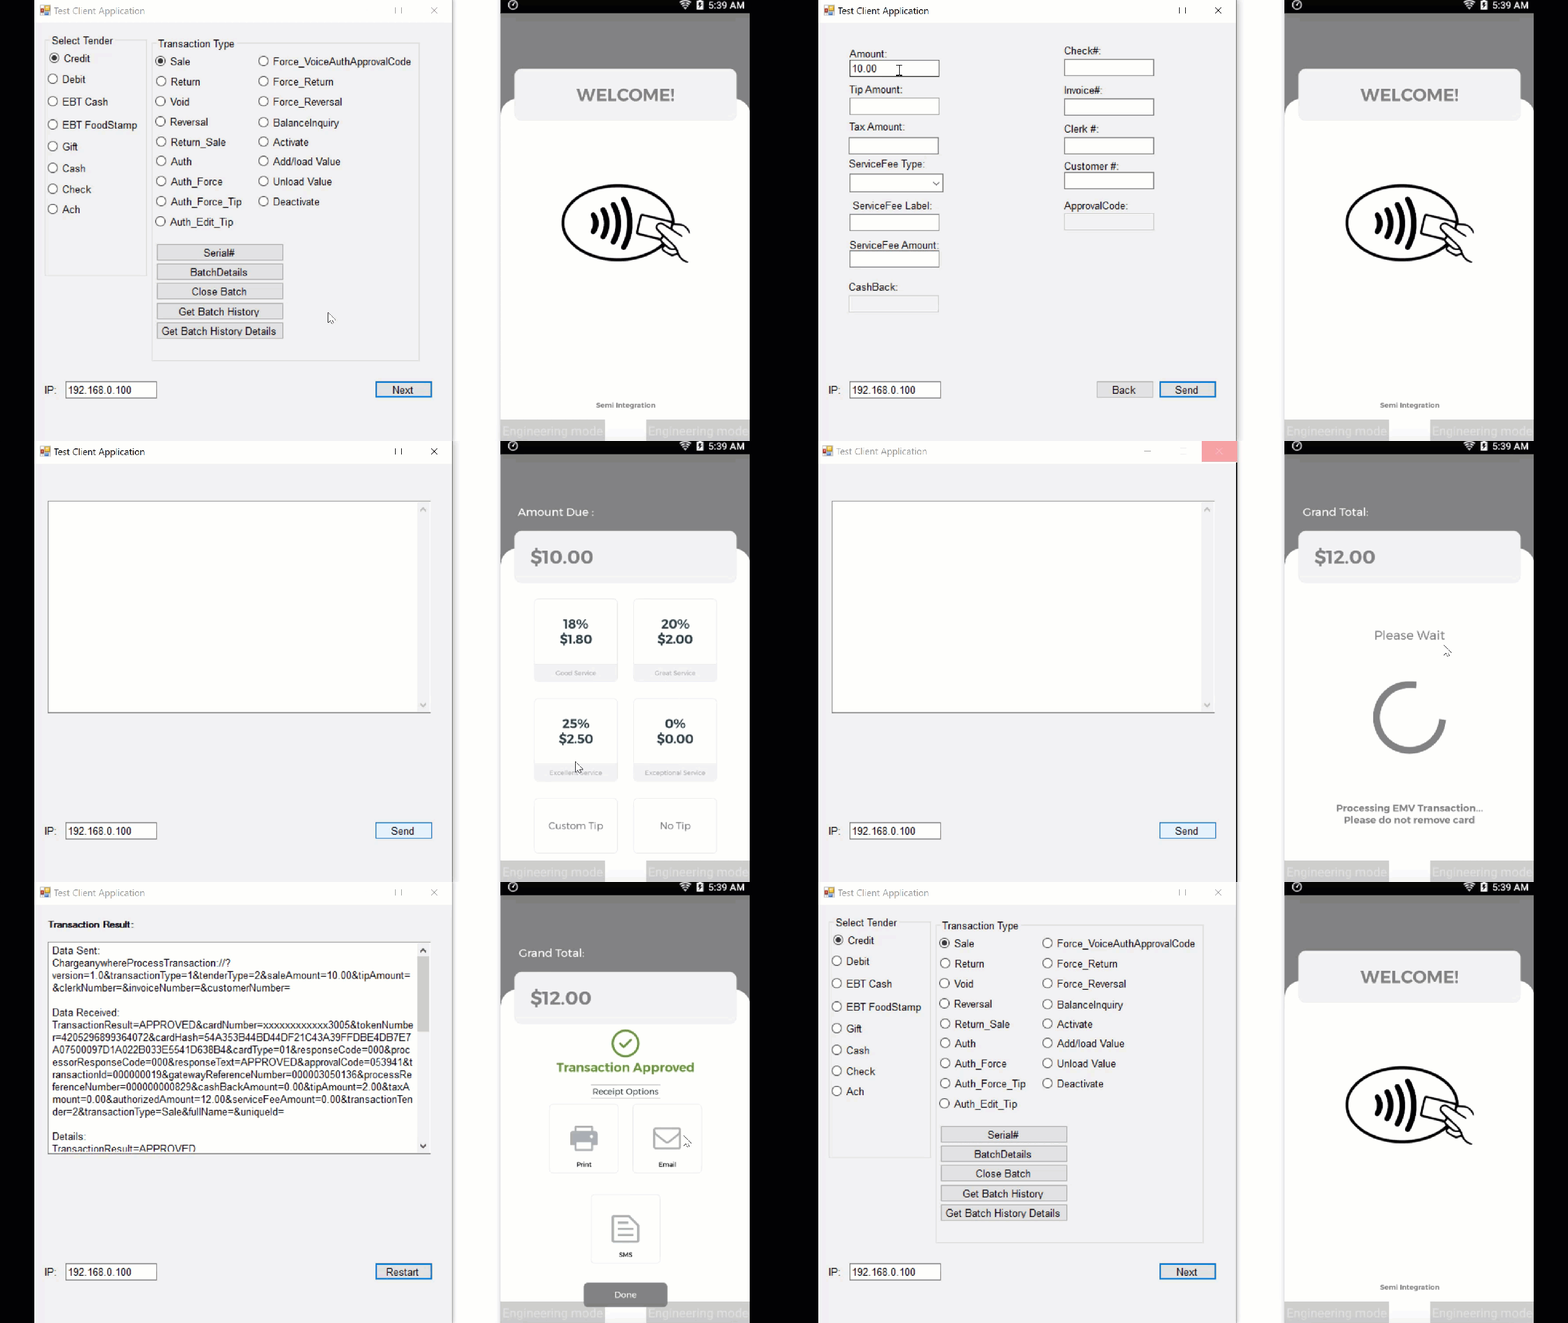
Processing Sale with Tax
Enabling Tax
- Open the semi-integration app.
- Go to
Configurations -> Setup -> Optional Prompts. - Enable the tax option.
Processing a Sale with Tax
- Select Transaction Type and Tender Type
- In the client app, select ‘Sale‘ as the transaction type.
- Select the preferred tender type.
- Enter the charge amount if required.
- Process Payment
- Open the semi-integration app on the WizarPos device.
- The charge amount will be displayed automatically. Tax will be calculated based on your tax settings.
- Tap/insert the card for automatic entry. You can also manually enter card details by selecting the Manual option.
- Approval and Receipt
- Upon approval, you’ll receive a confirmation message.
- Collect the customer’s signature, email, and phone number.
- Select Print Merchant Copy to print the merchant receipt and Print Customer Copy to print the customer receipt.
- Select Done to complete the transaction.
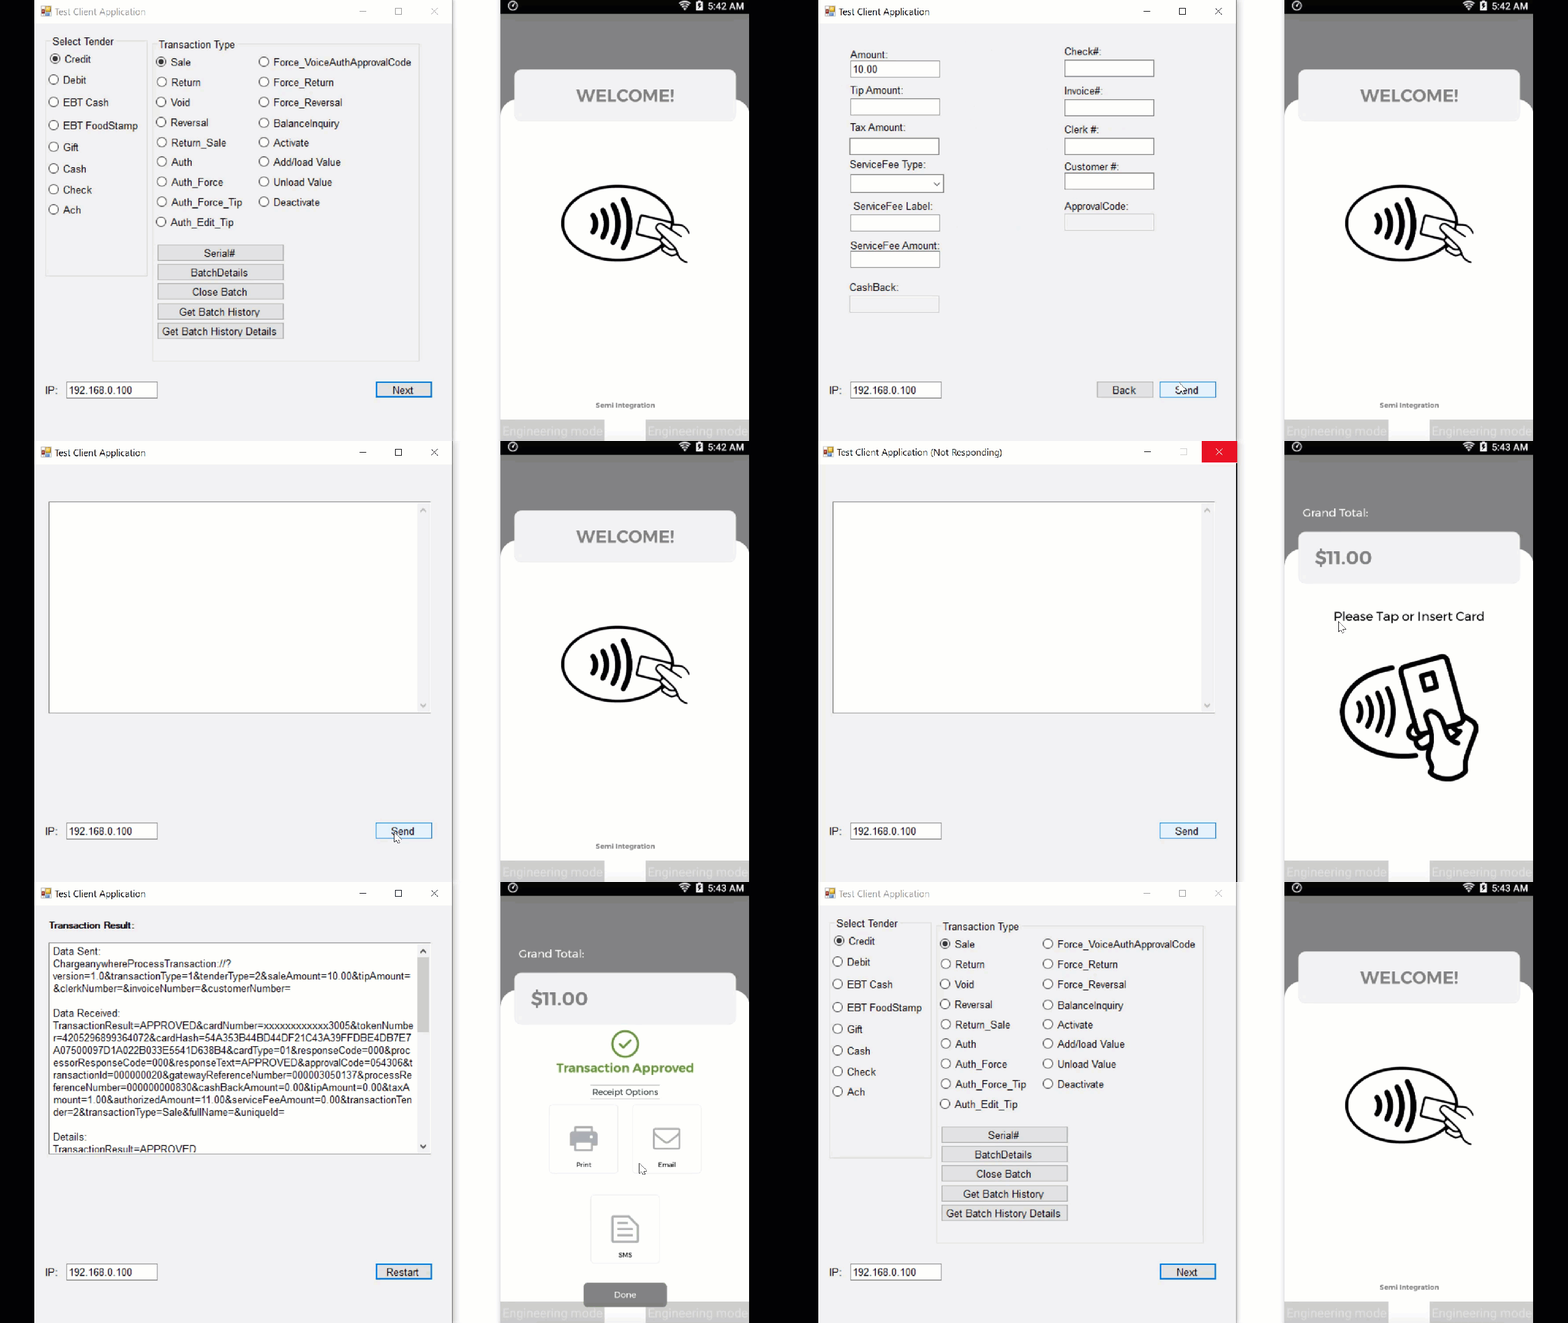
Processing Sale with Surcharge
Enabling Surcharge
- Open the semi-integration app.
- Go to
Configurations -> Setup Options -> Fee Program. - Enable the Fee Program by checking the checkbox.
- Select Surcharge from the Program Type dropdown and configure the surcharge settings.
Processing a Sale with Surcharge
- Select Transaction Type and Tender Type
- In the client app, select ‘Sale‘ as the transaction type.
- Select the preferred tender type.
- Enter the charge amount if required.
- Process Payment
- Open the semi-integration app on the WizarPos device.
- The charge amount will be displayed automatically. The surcharge will be applied based on your settings.
- Tap/insert the card for automatic entry. You can also manually enter card details by selecting the Manual option.
- Approval and Receipt
- Upon approval, you’ll receive a confirmation message.
- Collect the customer’s signature, email, and phone number.
- Select Print Merchant Copy to print the merchant receipt and Print Customer Copy to print the customer receipt.
- Select Done to complete the transaction.
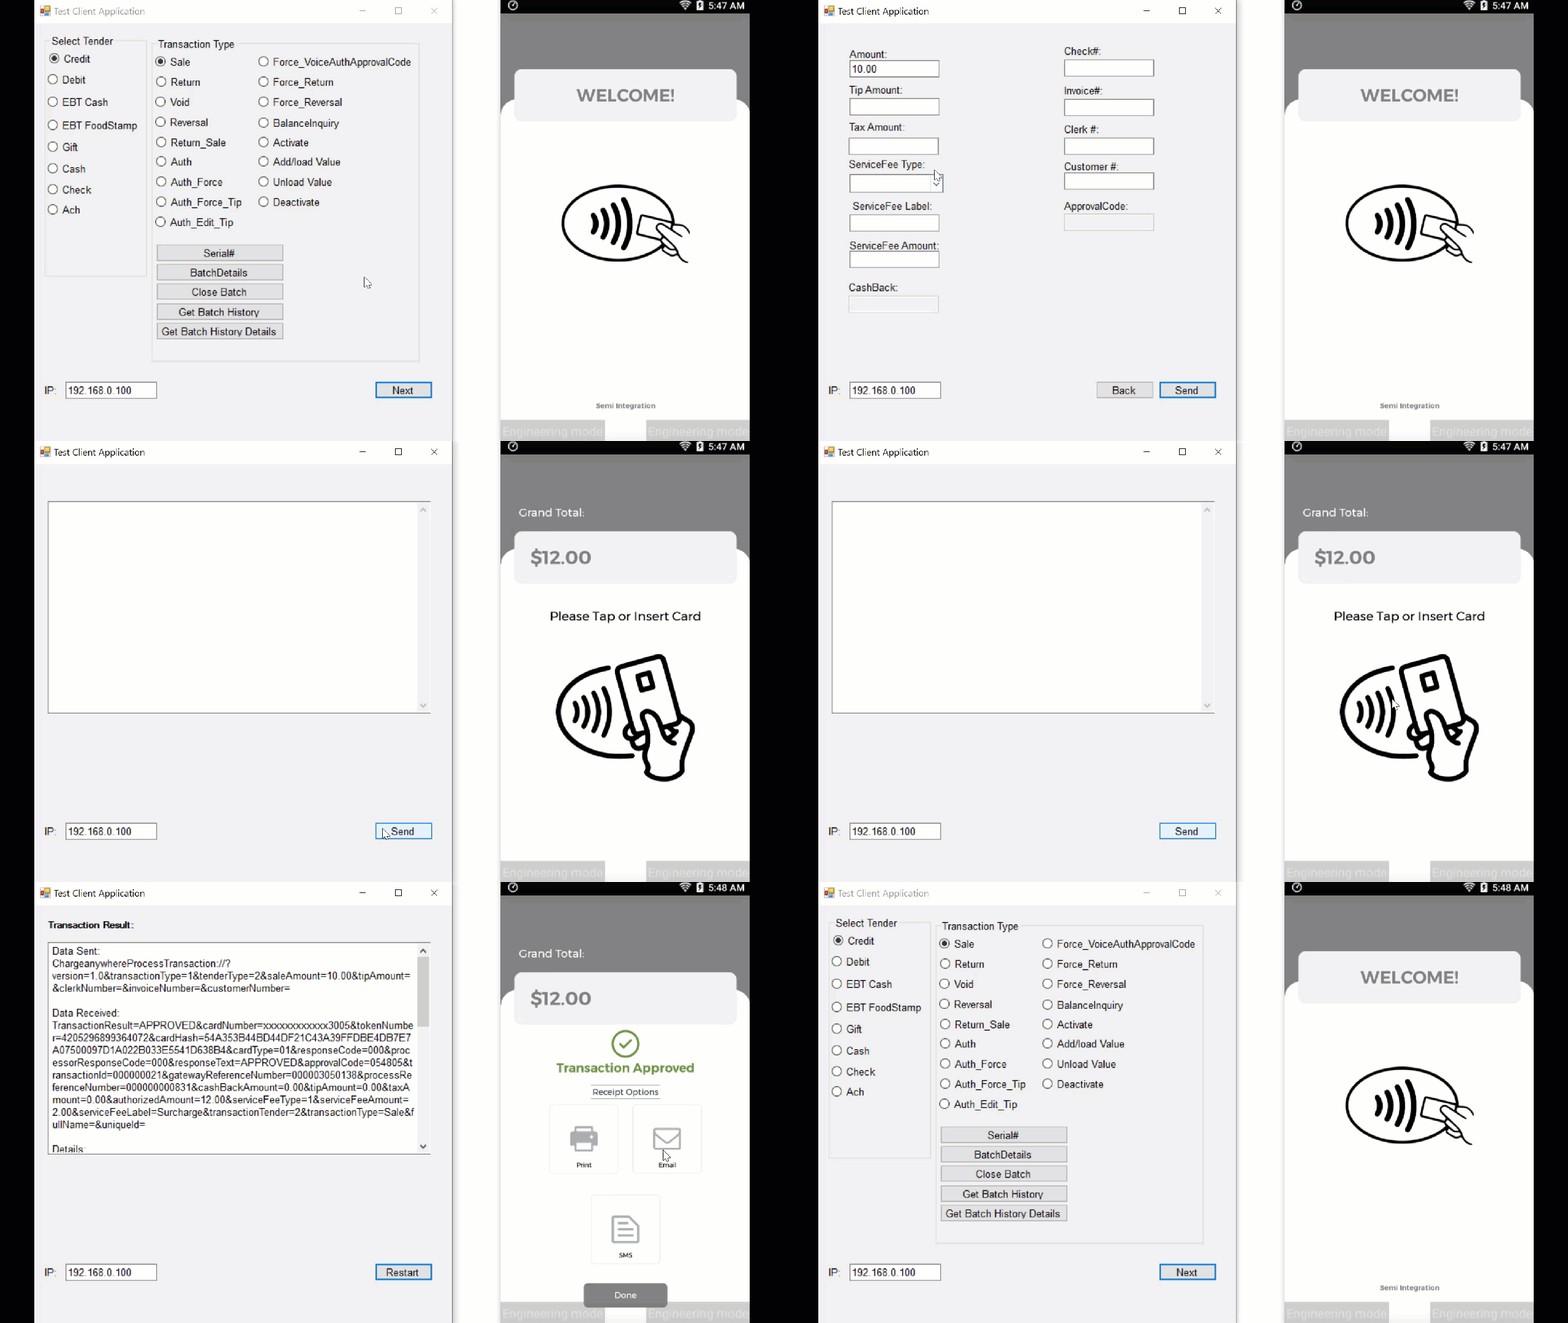
Processing Sale with Cash Discount
Enabling Cash Discount
- Open the semi-integration app.
- Go to
Configurations -> Setup Options -> Fee Program. - Enable the Fee Program by checking the checkbox.
- Select Cash Discount from the dropdown and configure the cash discount settings.
Processing a Sale with Cash Discount
- Select Transaction Type and Tender Type
- In the client app, select ‘Sale‘ as the transaction type.
- Select the preferred tender type.
- Enter the charge amount if required.
- Process Payment
- Open the semi-integration app on the WizarPos device.
- The charge amount will be displayed automatically.
- Select the cash discount type:
- Card: Adds the cash discount fee to the sale amount.
- Cash: Does not add the cash discount fee to the sale amount.
- Tap/insert the card for automatic entry. You can also manually enter card details by selecting the Manual option.
- Approval and Receipt
- Upon approval, you’ll receive a confirmation message.
- Collect the customer’s signature, email, and phone number.
- Select Print Merchant Copy to print the merchant receipt and Print Customer Copy to print the customer receipt.
- Select Done to complete the transaction.
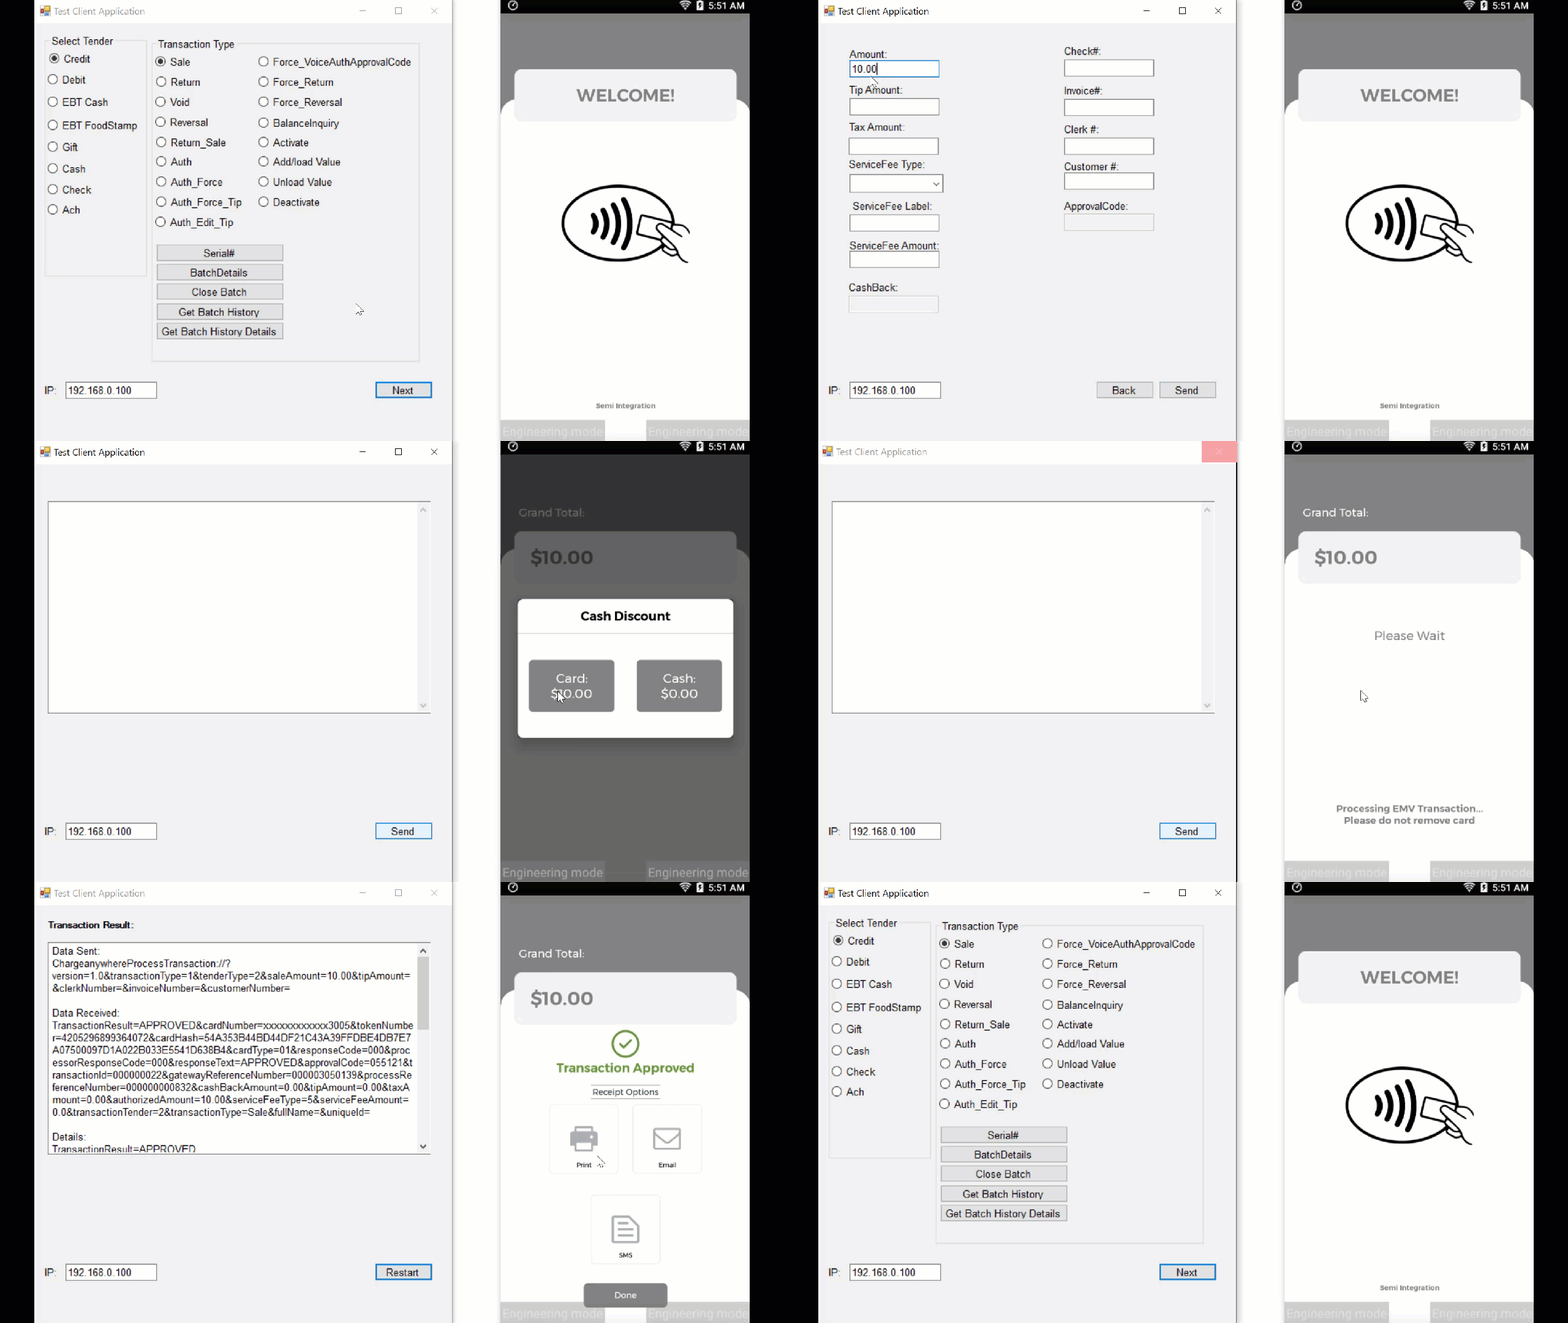
Processing Sale with Items
- Select Transaction Type and Tender Type
- In the client app, select ‘Sale‘ as the transaction type.
- Select ‘Credit‘ as the tender type.
- Enter the charge amount if required.
- In the Items field, enter the total number of items being sold.
- Transaction Info
- Open the semi-integration app on the WizarPos device.
- The Transaction Info screen will be displayed, showing a list of name-value pairs corresponding to the items entered.
- Review the item information and select ‘Continue‘.
- Process Payment
- The charge amount will be displayed automatically.
- Tap/insert the card for automatic entry. You can also manually enter card details by selecting the Manual option.
- Approval and Receipt
- Once approved, you’ll receive a confirmation message.
- Collect the customer’s signature, email, and phone number.
- Select Print Merchant Copy to print the merchant receipt and Print Customer Copy to print the customer receipt.
- Select Done to complete the transaction.
Note:
The Items field in the test client application is a simulation input. The value entered in this field is used to simulate name-value pairs, which are then displayed in the Transaction Info screen of the semi-integration app.Clients can configure this behavior in their app environment to pass actual name-value pair data, which will then be reflected dynamically in the semi-integration interface.
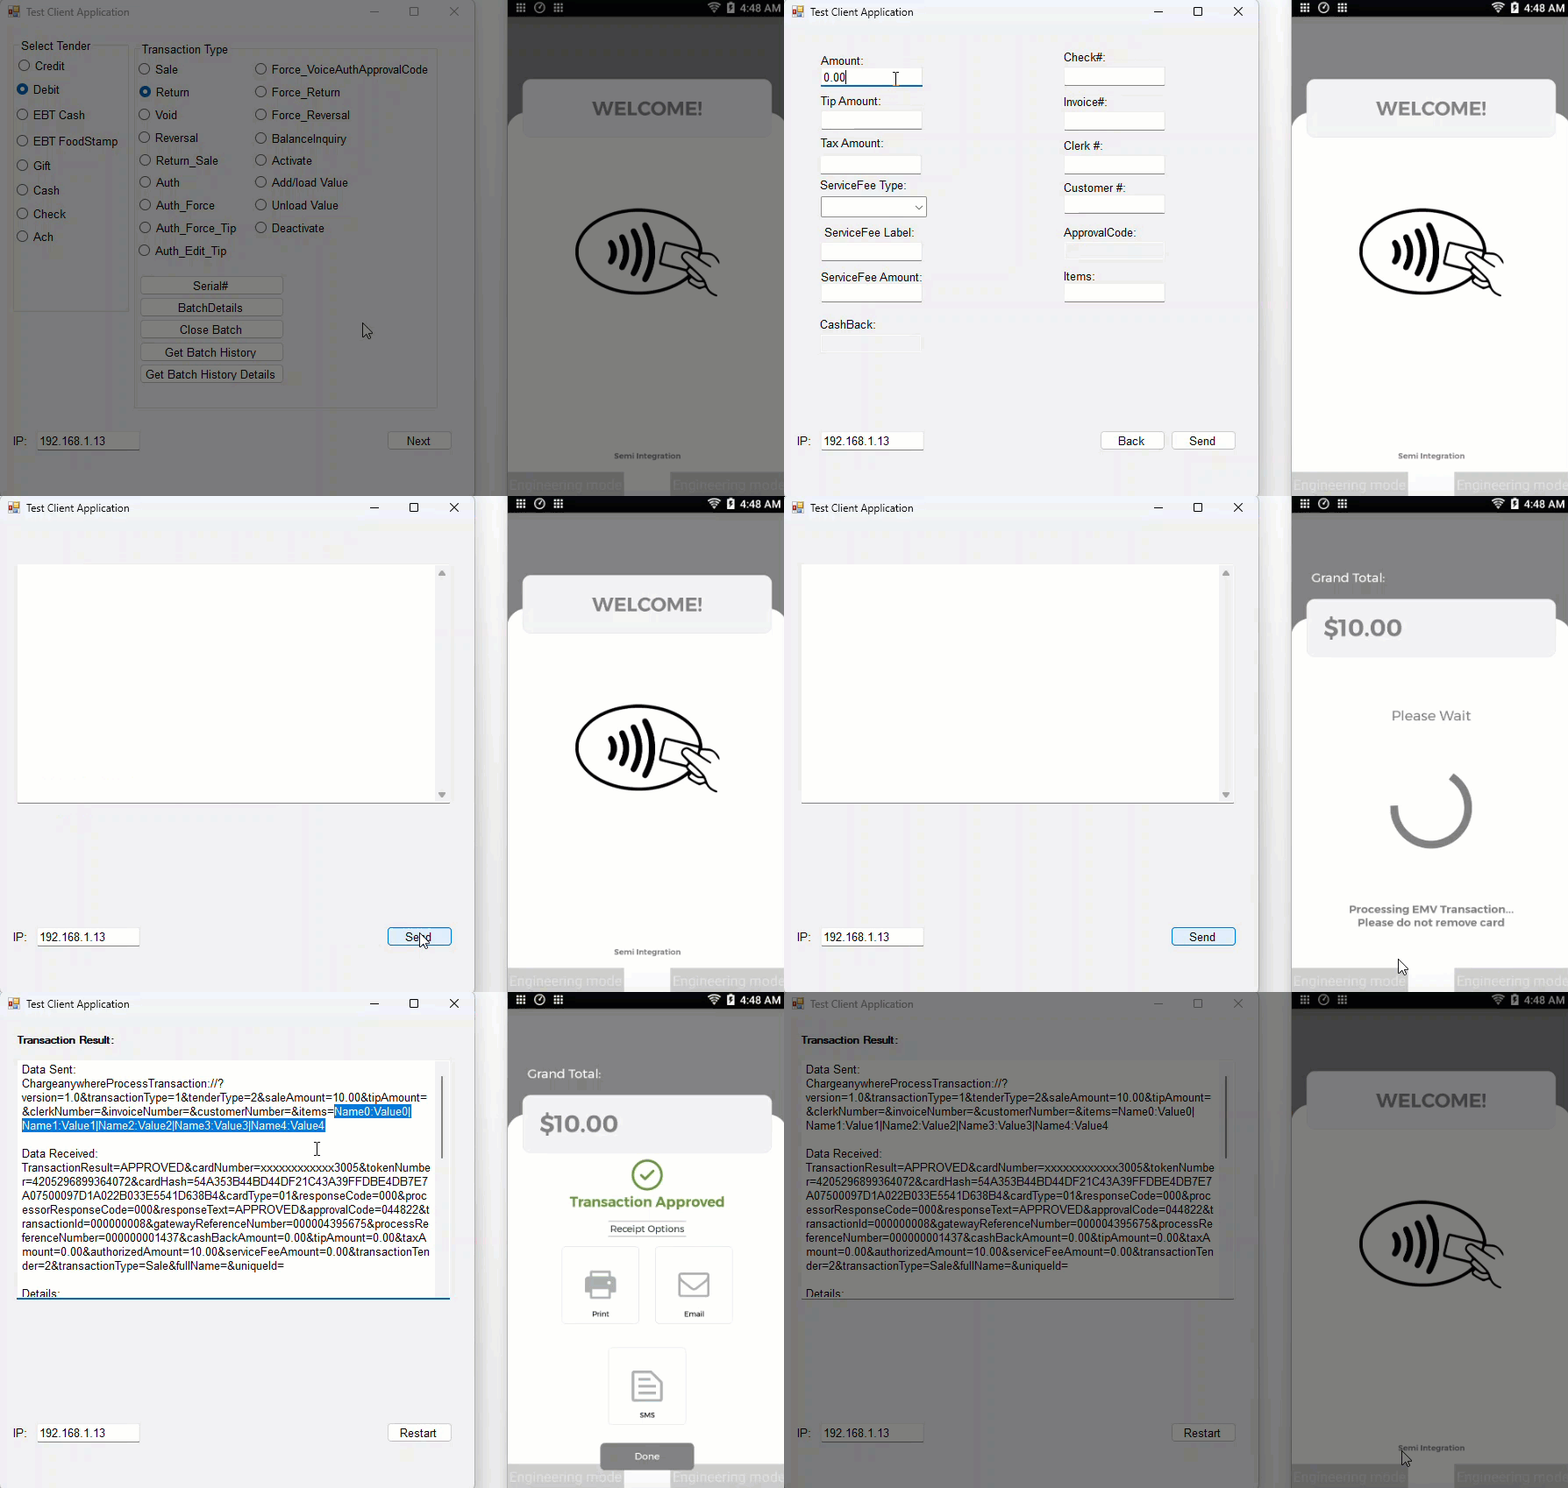
7. Non Transactional API Calls
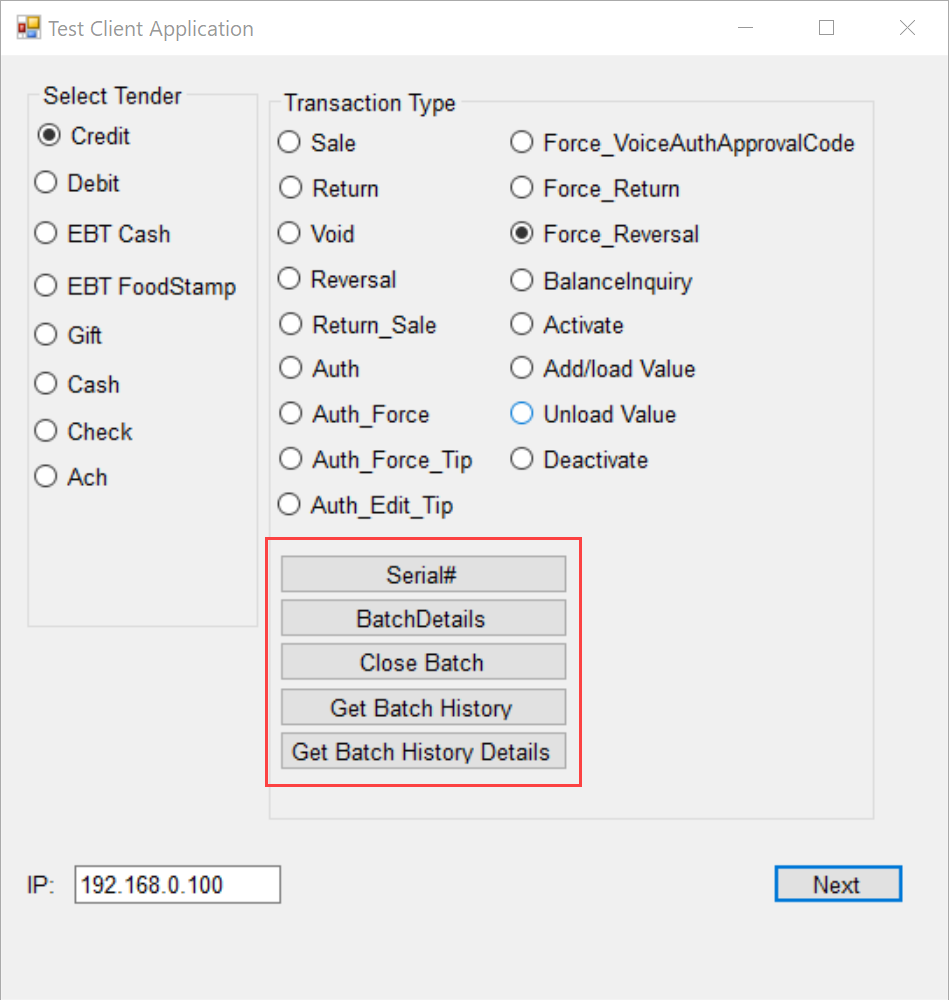
The semi-integration app supports several API calls that the client app can make. These API calls are detailed below:
- Get Serial Number
- Action Value:
1 - API Call:
getSerialNumber - Description: Retrieves the serial number of the device.
- Response: Returns the serial number of the device.
- Action Value:
- Get Batch Details
- Action Value:
2 - API Call:
getBatchDetails - Description: Retrieves the details of the current batch.
- Response: Returns the batch ID, the transaction count, and the total amount for the current batch.
- Action Value:
- Close Batch
- Action Value:
3 - API Call:
closeBatch - Description: Closes the current batch and processes the batch totals.
- Response: Returns the status of the batch closure, including the batch ID, the transaction count, and the total amount for the closed batch.
- Action Value:
- Get Batch History
- Action Value:
4 - API Call:
getBatchHistory(Not Applicable to Cloud Connect) - Description: Retrieves the history of batches processed.
- Response: Returns a list of previous batches, including batch IDs, transaction counts, and total amounts.
- Action Value:
- Get Batch History Details
- Action Value:
5 - API Call:
getBatchHistoryDetails(Not Applicable to Cloud Connect) - Description: Retrieves detailed information about the transactions in a specific batch.
- Response: Returns details of a specified batch, including transaction IDs, amounts, and statuses of the transactions.
- Action Value:
- Default Action
- Action Value:
0 - Description: The default action if no valid action value is provided.
- Response: Returns an “Invalid action” status.
- Action Value:
8. Logs
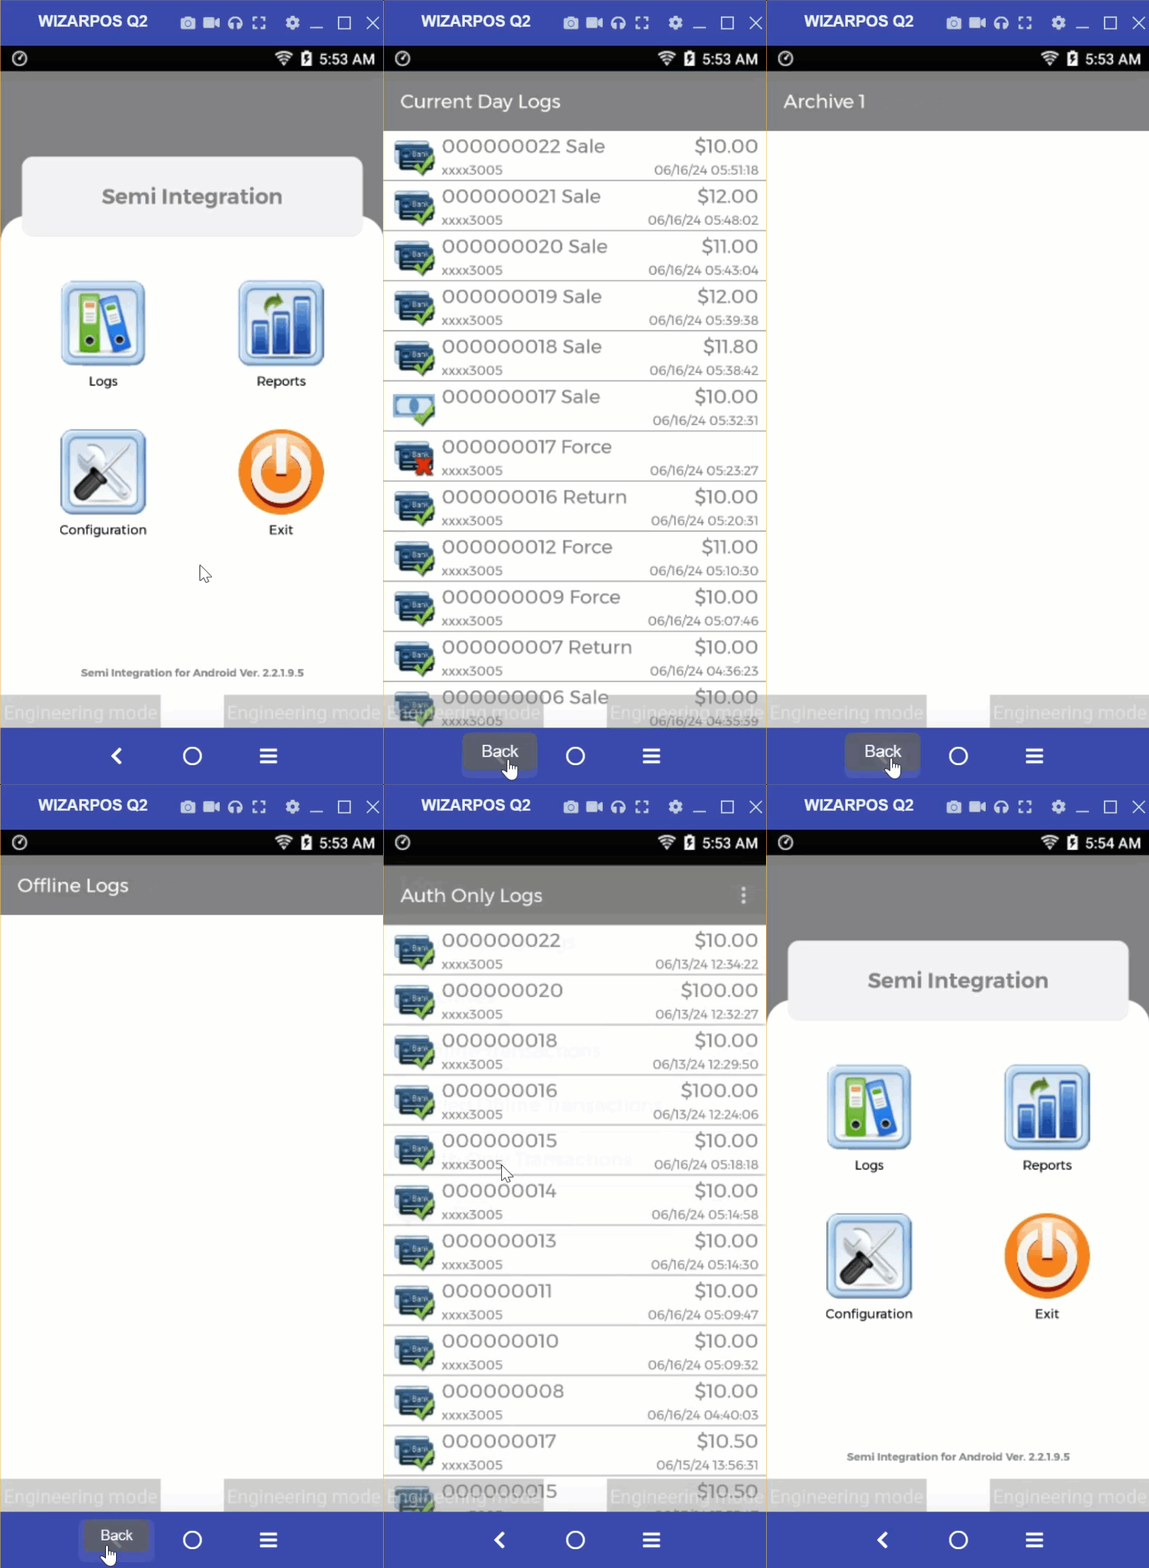
The Logs section in the Semi Integration app allows users to view and manage transaction logs, including current-day logs, archived logs, offline transactions, failed offline transactions, and authorization-only transactions. Here’s how to navigate and utilize each feature within the Logs section.
To access Logs, perform the following steps:
- Open the Semi Integration app on your device.
- Click six times on the merchant logo.
- Enter username and password. Click Submit.
- Tap on the Logs icon from the main menu.
- Current Day Logs: Displays all transactions processed on the current day. This section provides a comprehensive list of transactions processed today, allowing users to view detailed information for each transaction by tapping on them.
- Archives: The Archives section contains logs of transactions from previous days. Users can select different archives to view logs, and a list of transactions from the selected archive will be displayed. Detailed information for each transaction can be accessed by tapping on them.
- Offline Transactions: This section shows transactions that were processed offline and have not yet been synchronized with the payment server. A list of all offline transactions is provided, and detailed information for each transaction can be viewed. Once connectivity is restored, these transactions can be synchronized with the payment server.
- Failed Offline Transactions: Failed Offline Transactions displays transactions that failed to process due to errors during the offline mode. This section provides a list of all failed offline transactions, and users can view detailed information and understand the reason for the failure by tapping on each transaction.
- Auth Only Transactions: Auth Only Transactions lists transactions that were authorized but not yet captured. A list of all authorization-only transactions is displayed, allowing users to view detailed information for each transaction. These transactions need to be captured to complete the payment process.
- Navigation: Tap the “Back” button to return to the previous menu.
9. Reports
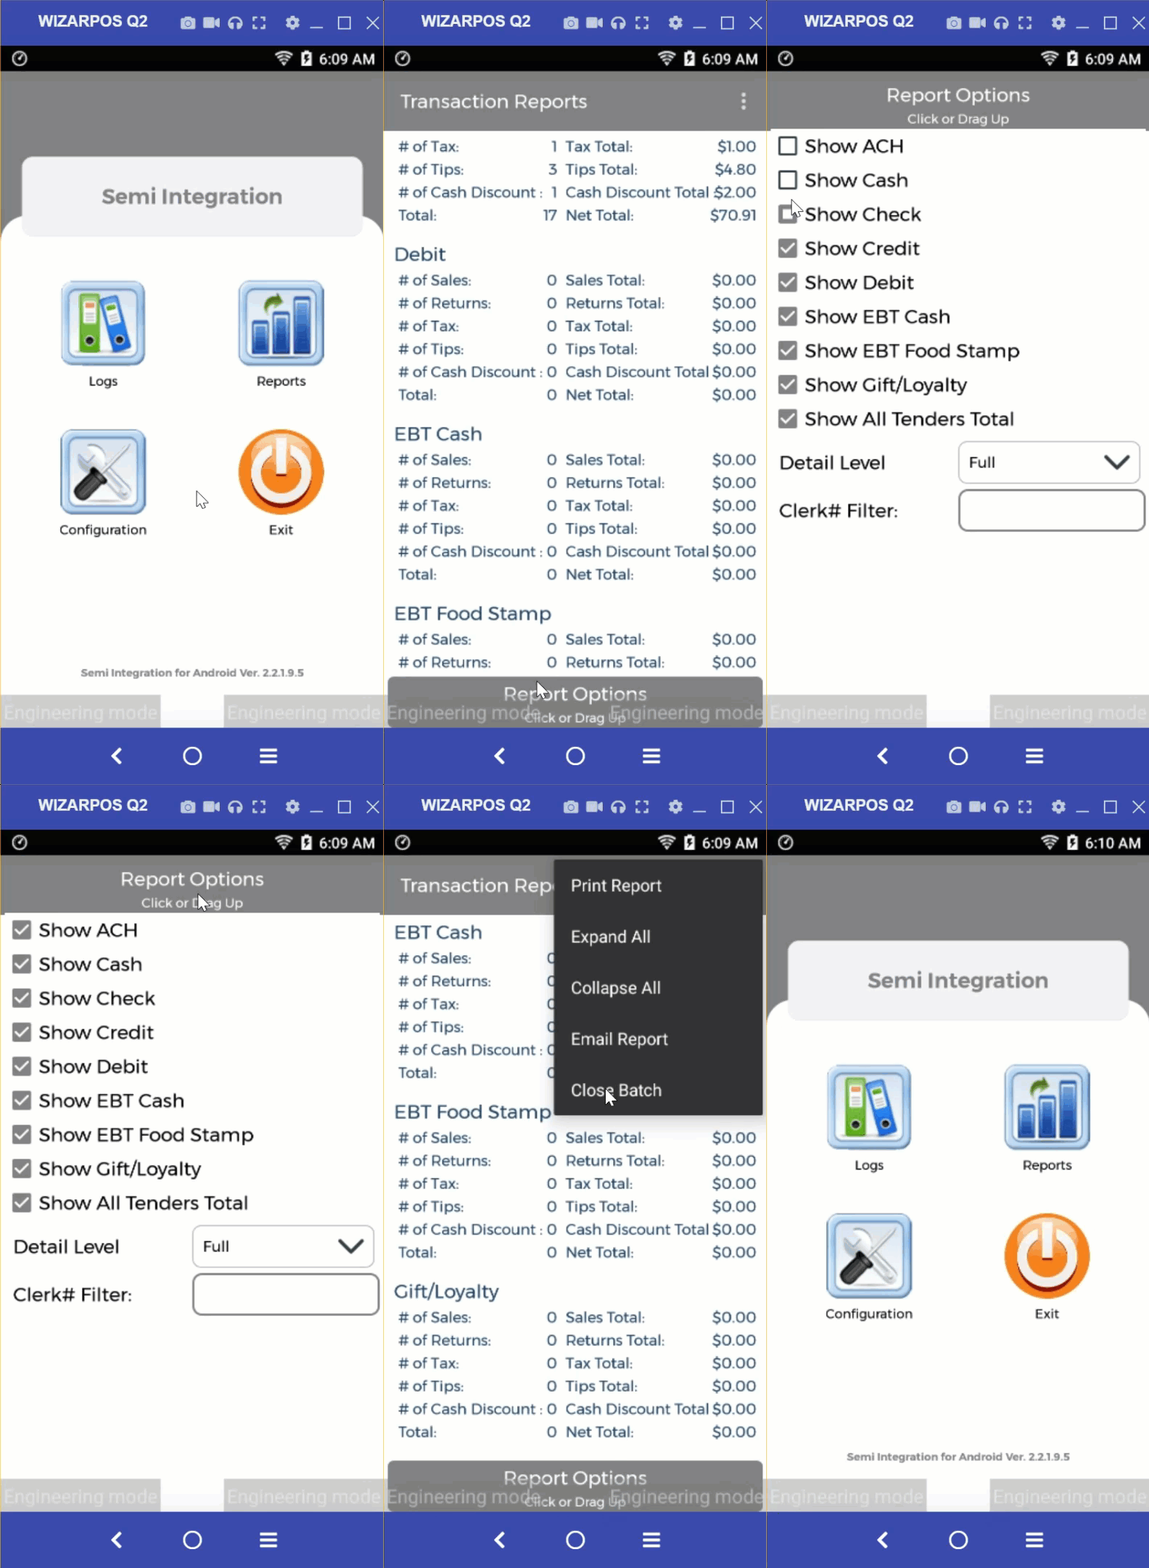
Reports provide insights and analysis on the transactions processed through Charge Anywhere. These reports can provide valuable information on several key metrics including credit net total, revenue, detailed sales report, etc. You can also print details of transactions from the reports section.
Report Types
- EDC Summary: The EDC Summary report provides an overview of transactions aggregated by EDC/Payment Types. It offers a consolidated summary of transactions, including totals and key metrics.
- EDC Daily: The EDC Daily report gives you a daily breakdown of transactions. This report is helpful for tracking daily transaction trends and performance.
- EDC Daily Detail: For a more detailed view of EDC transactions, the EDC Daily Detail report offers a comprehensive breakdown. It includes transaction-specific information, such as transaction type, amount, and timestamps, providing a granular understanding of daily EDC activity.
- Brand Summary: The Brand Summary report compiles data related to specific brands, Visa, MasterCard, etc. It summarizes sales, returns, and other relevant metrics for each brand.
- Brand Daily: Access the Brand Daily report for a daily overview of sales and performance metrics. This report is useful for monitoring daily brand-specific trends.
- Brand Daily Detail: For a deeper dive into brand-specific transactions, the Brand Daily Detail report provides transaction-level details. It includes information like itemized sales, returns, and timestamps, allowing for a thorough analysis of daily brand activity.
10. Configuration
To access the configuration options in the semi-integration app, click six times on the merchant logo and enter the login credentials to open the configuration menu. Configuration settings enable you to set up various options and parameters to customize the behavior and functionality of the app. These settings include the following options:
- Feature Options
- Setup
- Security
- Peripheral Devices
- Support
- Maintenance
- Batch Management
Before you start configuring the Semi Integration app, you need to set up a PIN and create your username and password from the app.
Notes: By default, Manager Override is enabled in the settings, necessitating the use of a PIN for authentication instead of a password. The default PIN is ‘12345678.’ Additionally, merchants can change the default PIN in the STEM configuration of the Partner Portal.
Change PIN
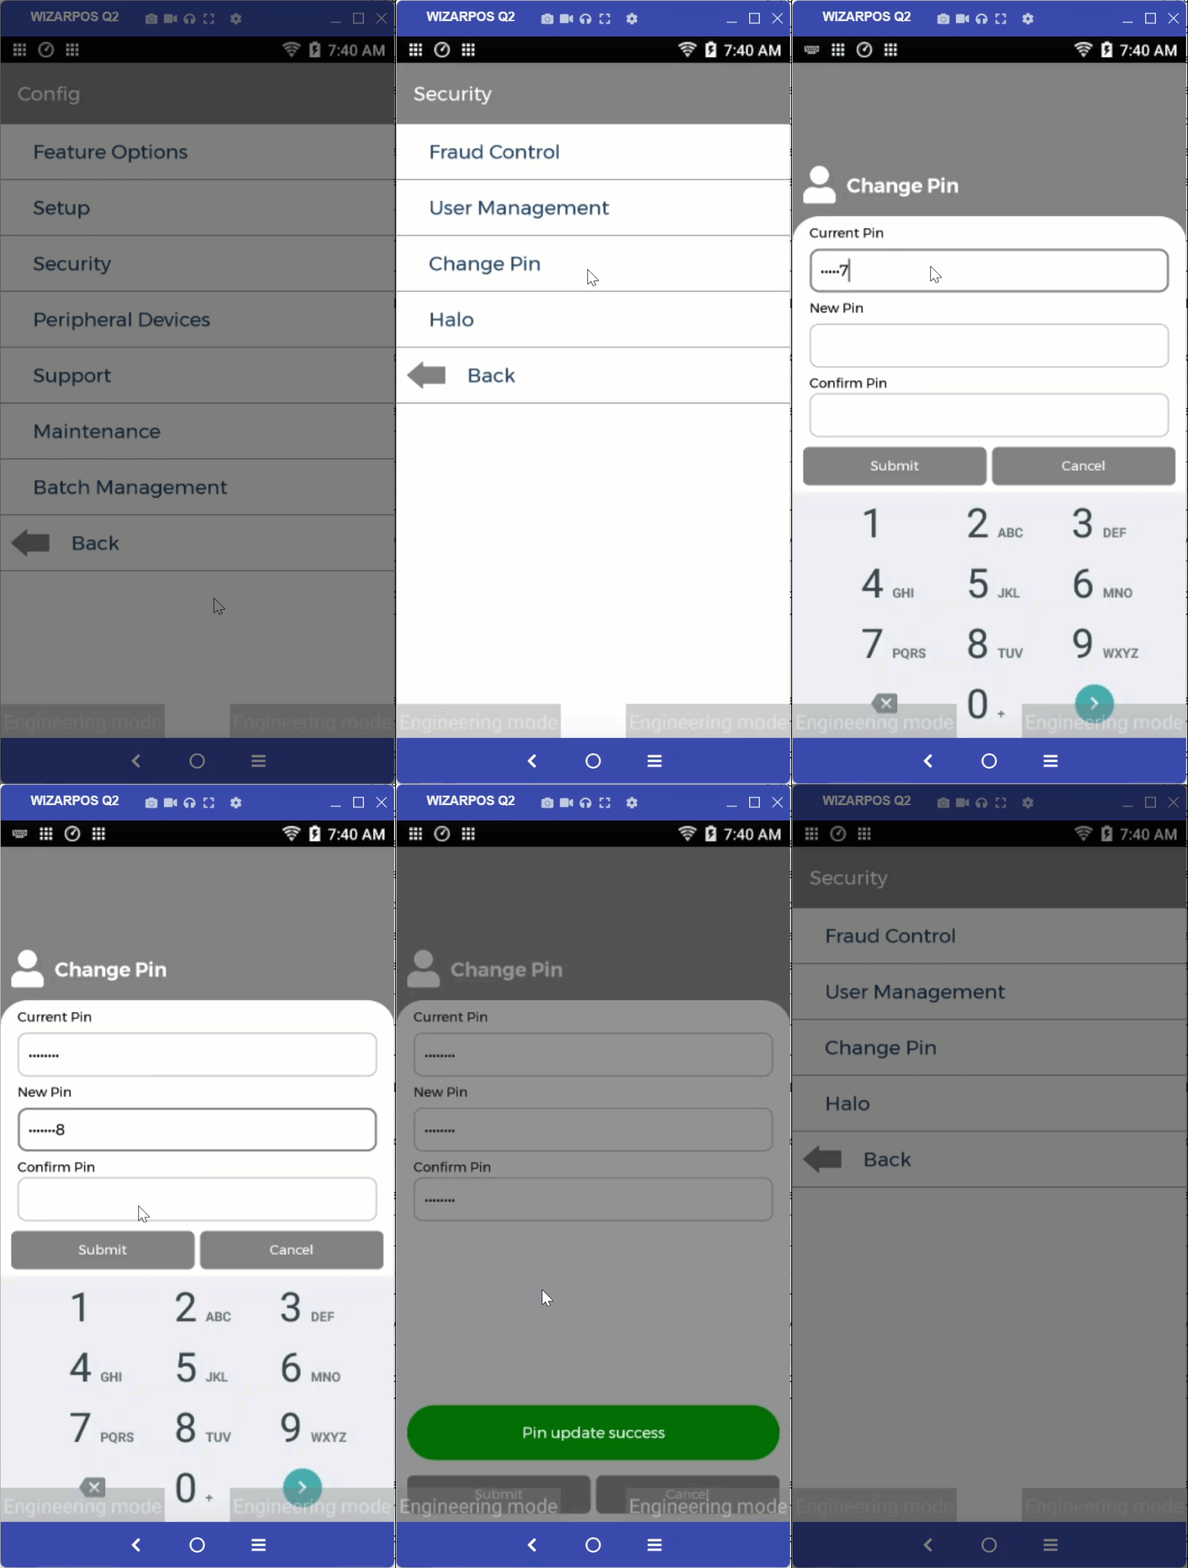
To change your PIN, navigate to Configuration -> Security -> Change PIN
- Enter Current PIN
- Enter New PIN and Confirm New PIN
- Click Submit to confirm the PIN change
Password Setup
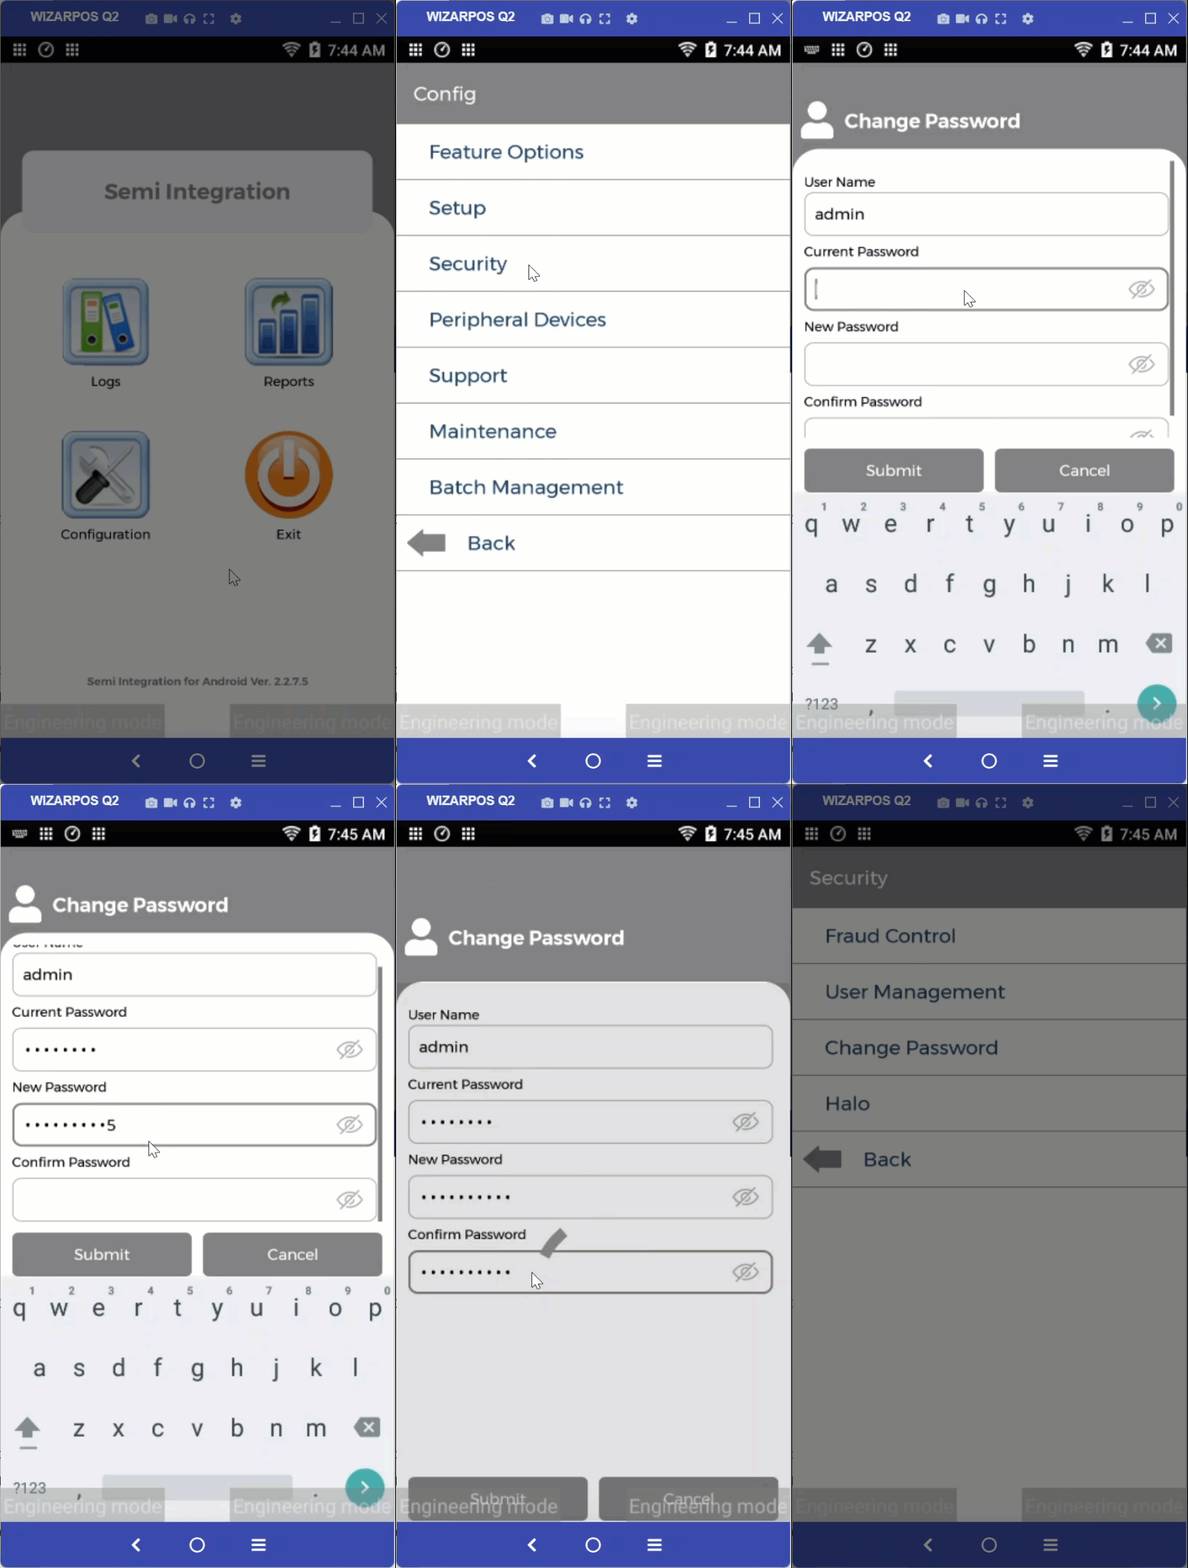
To enable username and password you need to disable Manager Override by navigating to Configuration -> Security -> Fraud Control -> Allow Manager Override
To set up your password, follow these steps:
- Navigate to
Configuration -> Security -> Change Password - Provide your username and password.
Note: The default username is ‘admin,’ and the default password is your phone number. - Enter your new password, confirm the password.
- Click the Submit button to store the new password securely.
Feature Options
- Refresh Services: Refresh the services to ensure the latest configurations are applied.
Setup
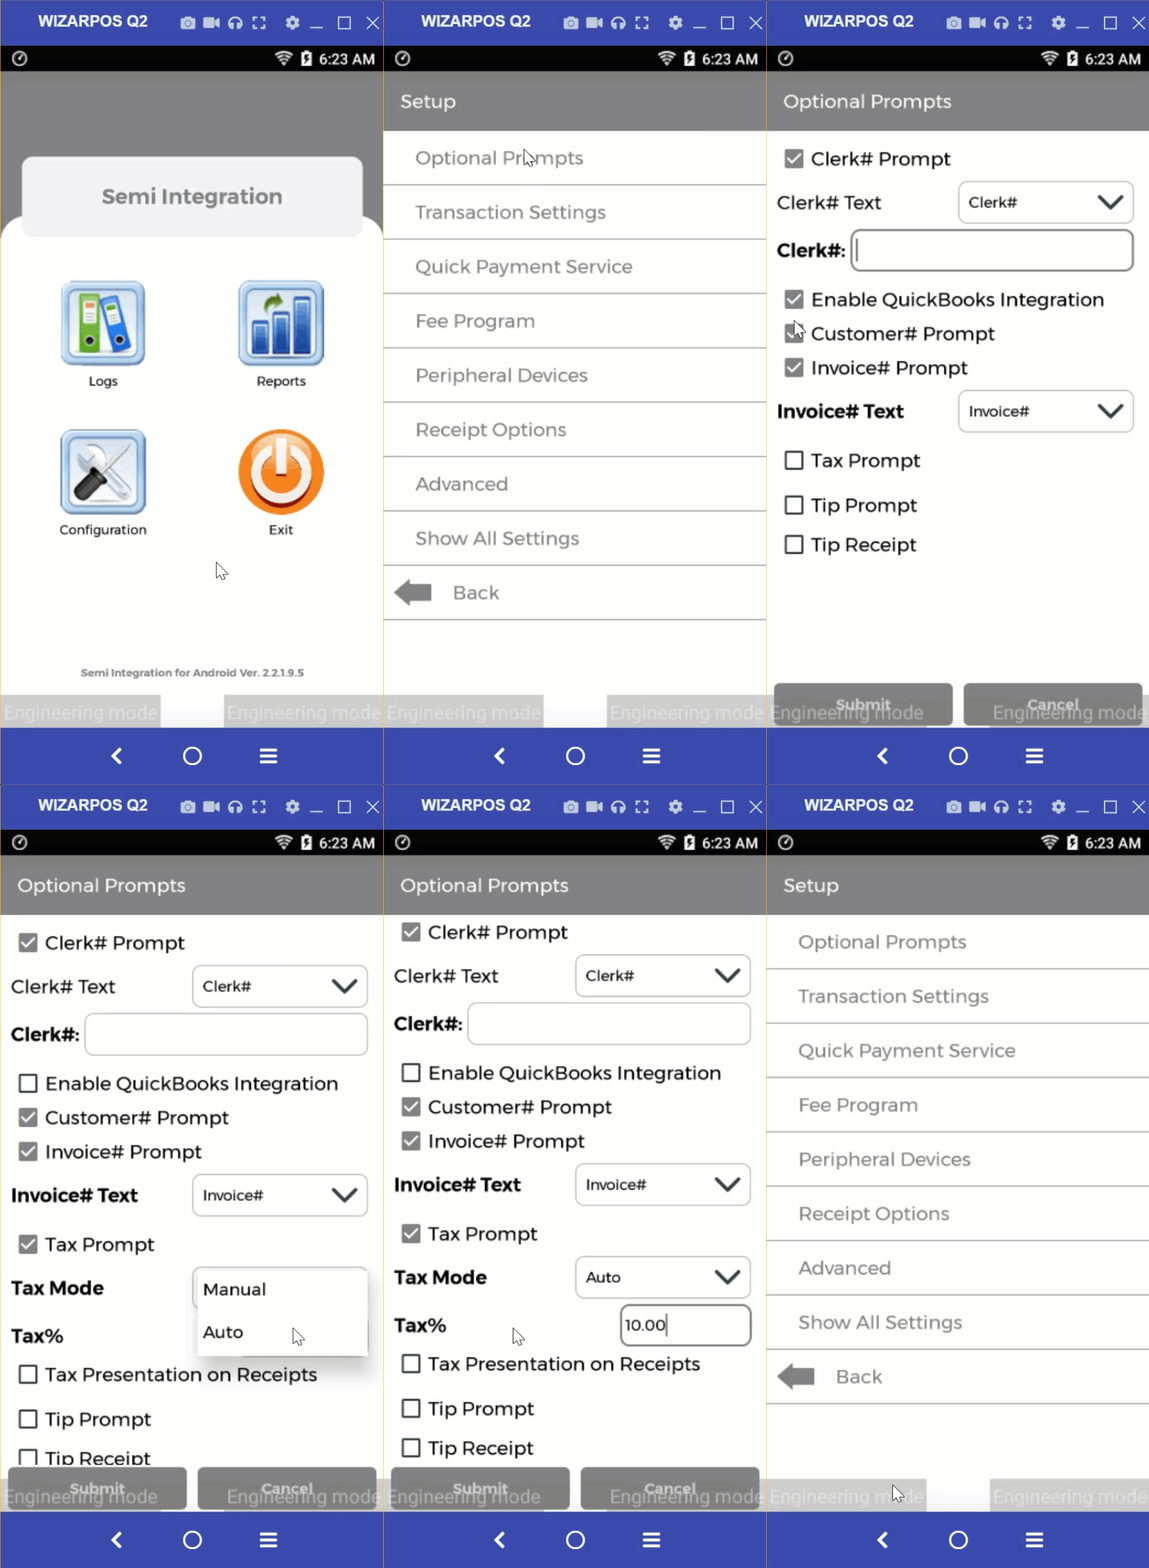
Optional Prompts: This subsection empowers users to set up optional prompts for various identifiers, such as clerk ID, customer ID, and invoice ID. It also enables integration with QuickBooks, streamlining accounting processes.
- Clerk# Prompt: The prompt is displayed to enter the clerk’s identification number.
- Clerk# Text: The available options for the clerk’s identification, can include Clerk#, Driver#, Operator#, Employee#, Vendor#, Server ID, Bartender ID, and Waiter ID.
- Clerk#: The actual clerk’s identification number.
- Enable QuickBooks Integration: An option to enable integration with QuickBooks accounting software.
- Customer# Prompt: The prompt is displayed to enter the customer’s identification number.
- Invoice# Prompt: The prompt is displayed to enter the invoice number.
- Invoice# Text: The available options for the invoice number, can include Invoice#, Ticket#, Job#, and Order#.
- Tax Prompt: The prompt displayed to enter the tax amount or tax-related information.
- Tax Mode: The mode for handling taxes, which can be set to Auto or Manual.
- Tax%: The tax percentage applied to the transaction.
- Tax Presentation on Receipts: The format and visibility of tax information on receipts.
- Tip Prompt: The prompt is displayed to enter the tip amount.
- Tip Receipt: An option to include a tip section on the receipt.
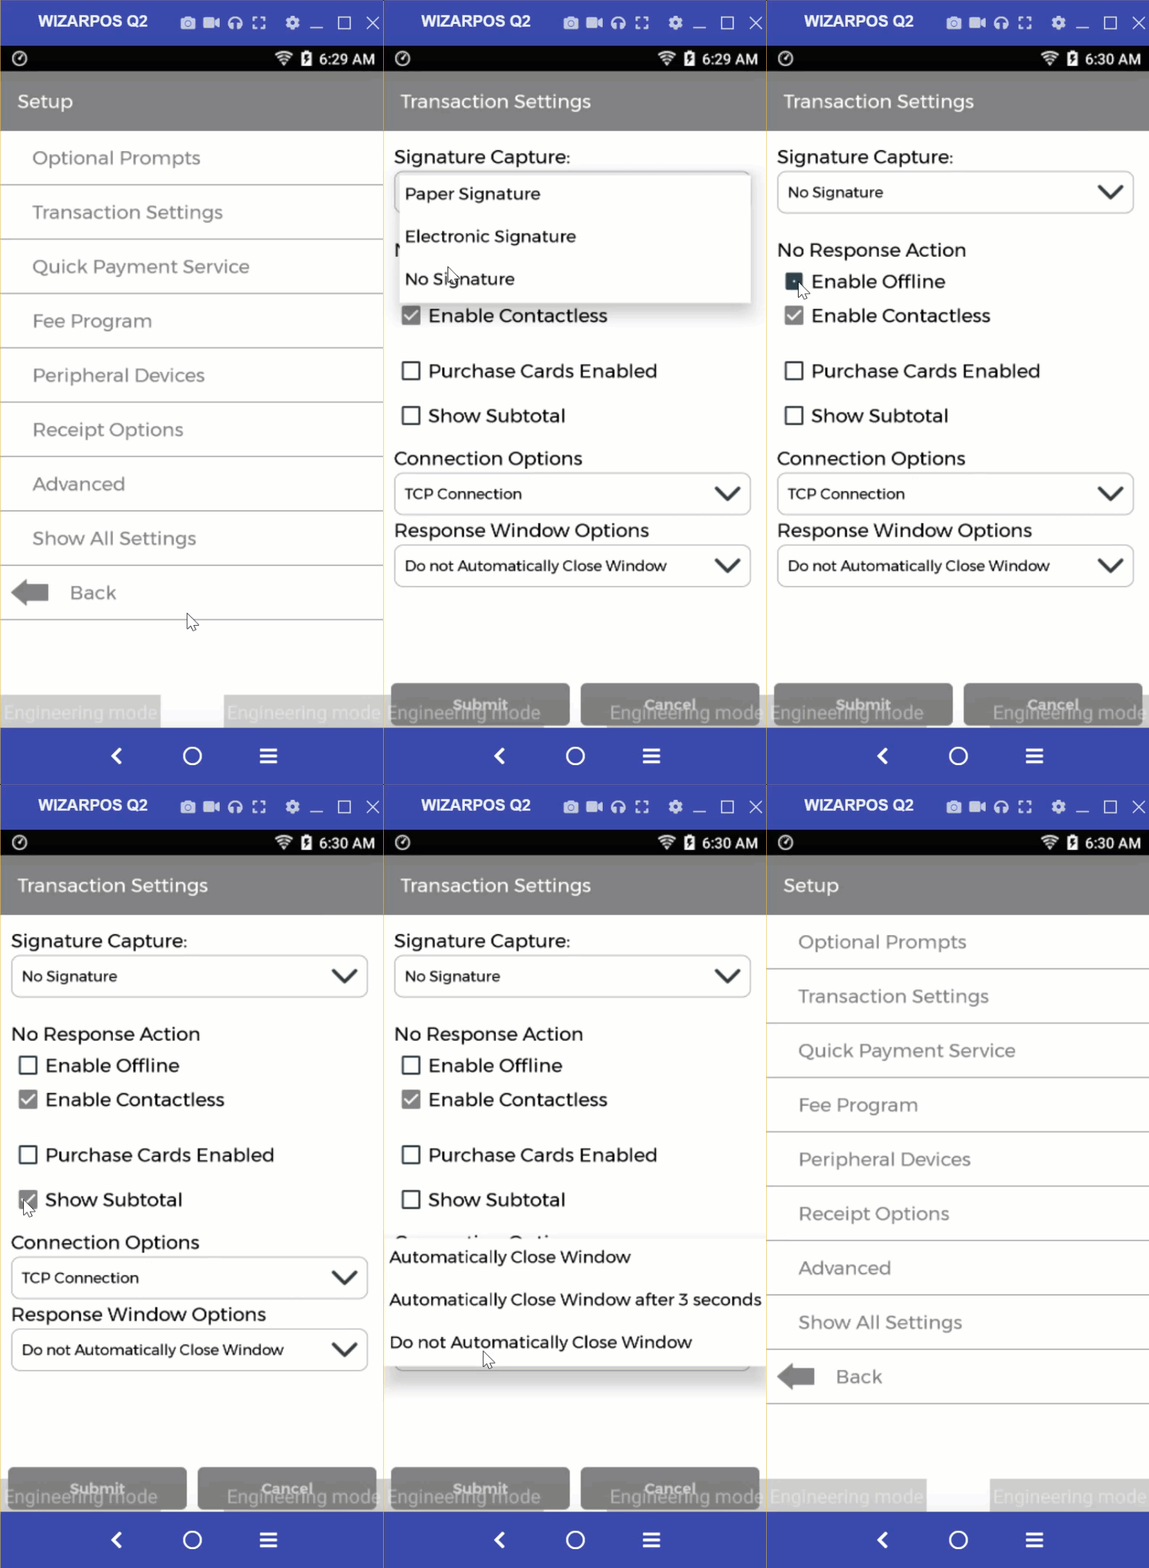
Transaction Settings: Here, users can define preferences related to transaction handling. They can choose the desired signature capture method, and enable offline mode and contactless payments. Additionally, users can configure connection options.
- Signature Capture: Choose between a paper signature, an electronic signature, or no signature.
- Enable Offline: Enabling the ability to process transactions offline when there is no internet connectivity, with the intention to sync them later when a connection is available.
- Enable Contactless: Allows the acceptance of contactless payments, such as tap-to-pay cards or mobile wallets, for quick and convenient transactions.
- Show Subtotal: Displaying a subtotal amount on the payment screen, providing a breakdown of the total cost before additional fees or taxes are applied.
- Connection Options: Select the communication method (TCP, WebSocket, Cloud Connect, Serial Port).
- Response Window Options: Configure the response window behavior after a transaction.
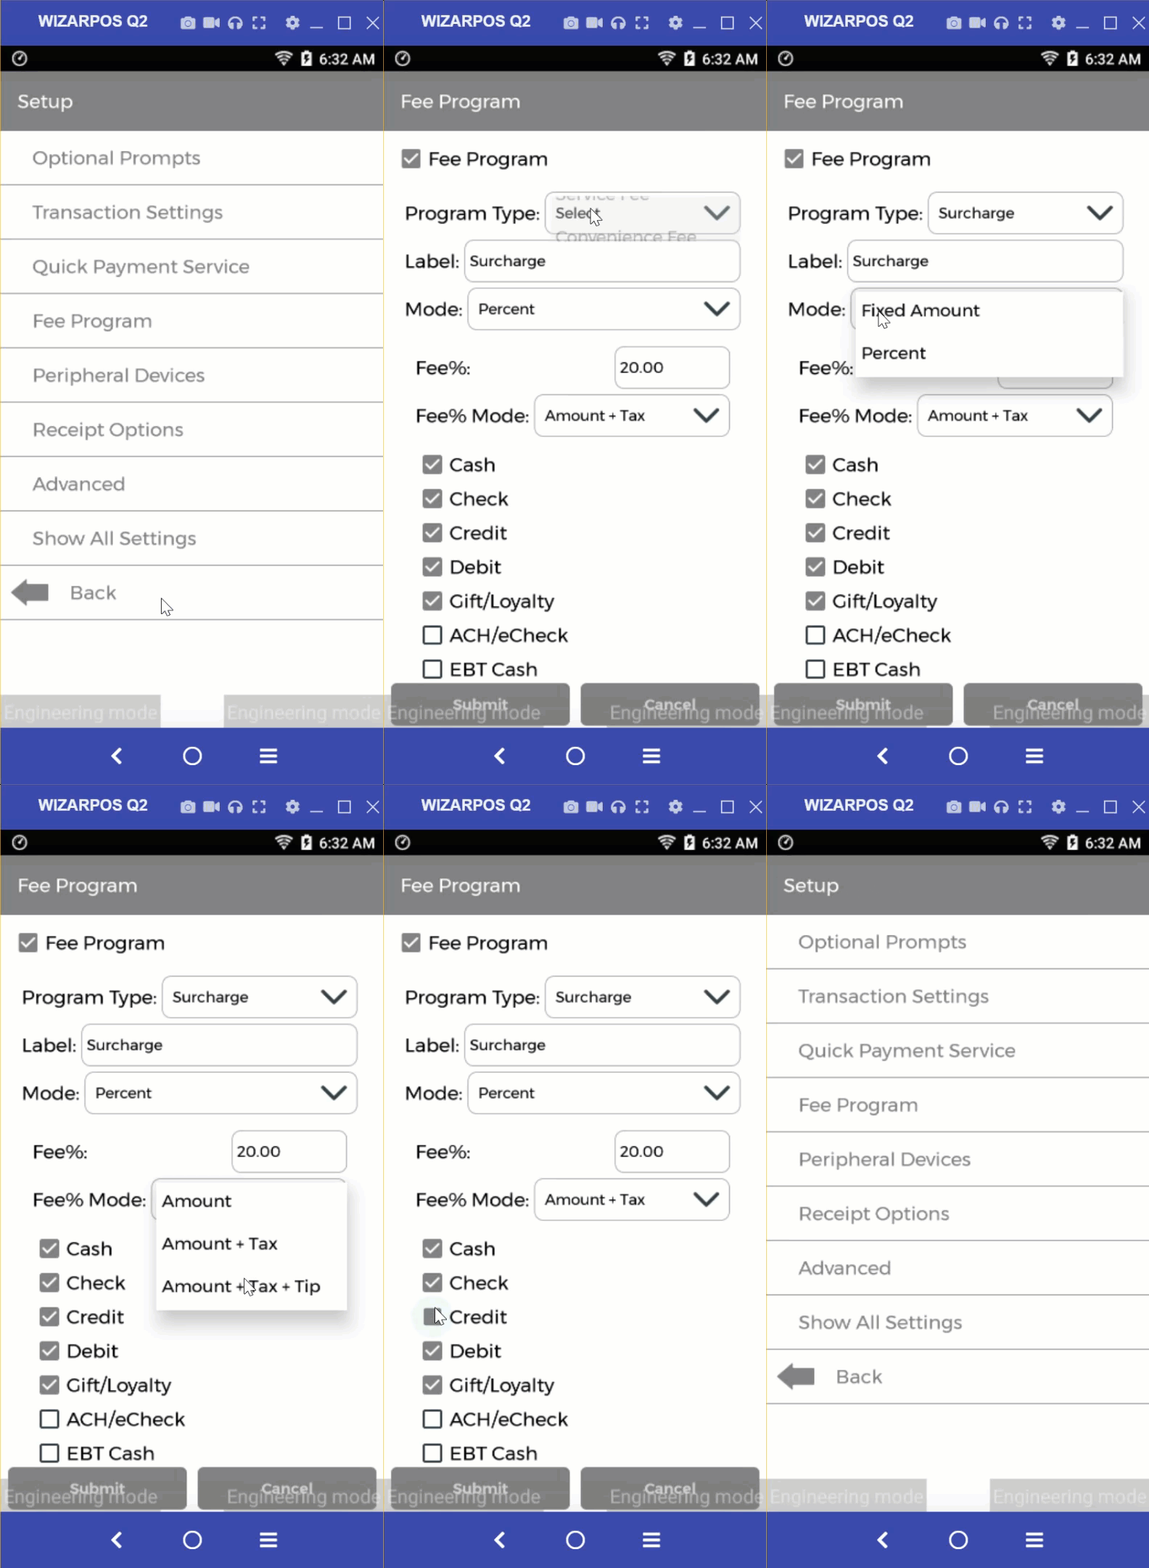
Fee Program: The fee program lets a merchant pass the cost of payment processing fees to the customer as an additional charge on top of the original transaction amount.
Fee programs are of four types:
- Surcharge
- Service Fee
- Convenience Fee
- Dual Pricing
- Cash Discount
Fee Program Rules:
- Surcharge
- The default label is Surcharge but merchants are allowed to specify a different label
- Charge Anywhere sends the value to the processor (gateway)
- Charge Anywhere prints the value on the receipt and details
- The default mode is percent
- Service Fee
- It is only allowed to be called Service Fee
- Charge Anywhere sends the value to the processor
- Charge Anywhere prints the value on the receipt and details
- The default mode is percent
- It is only allowed for specific MCCs (N/A)
- Convenience Fee
- It is only allowed to be called Convenience Fee
- Charge Anywhere prints the value on the receipt and details
- Charge Anywhere does not send the value to the processor
- The default mode is amount
- Dual Pricing (value entered is the cash value and the total amount is increased by fee )
- The default label is Cash Discount but merchants are allowed to specify a different label
- Charge Anywhere does not send the value to the processor
- Charge Anywhere does not print the value on the receipt and details
- The default mode is percent
- Cash Discount (value entered is the card value and the total amount is decreased by fee)
- The default label is Cash Discount but merchants are allowed to specify a different label
- Charge Anywhere does not send the value to the processor
- Charge Anywhere does not print the value on the receipt and details
- The default mode is percent
Peripheral Devices: This subsection guides users in setting up peripheral devices like printers and swipers.
- Printer: Option to connect a printer.
- Swiper: Option to connect a swiper.
Receipt Options: Users can customize the content displayed in the header and footer of receipts. They can also define print options and configure email and SMS settings for sending receipts to customers.
- View/Edit Header: This option allows you to view or edit the header section of the receipt. This section typically contains the company name and other branding elements. Editing this section can help businesses customize their receipts and maintain a consistent brand image.
- View/ Edit Footer: This option allows you to view or edit the footer section of the receipt.
- Print Options: This option allows you to print a merchant and or customer copy for approved and declined receipts.
- Email Options: This option provides settings for sending receipts via email. Users can enter the recipient’s email address to send the receipt. This option can be useful for businesses that want to provide their customers with electronic receipts.
- SMS Options: This option provides settings for sending receipts via SMS text message. This option can be useful for businesses that want to provide their customers with a quick and convenient way to receive their receipts.
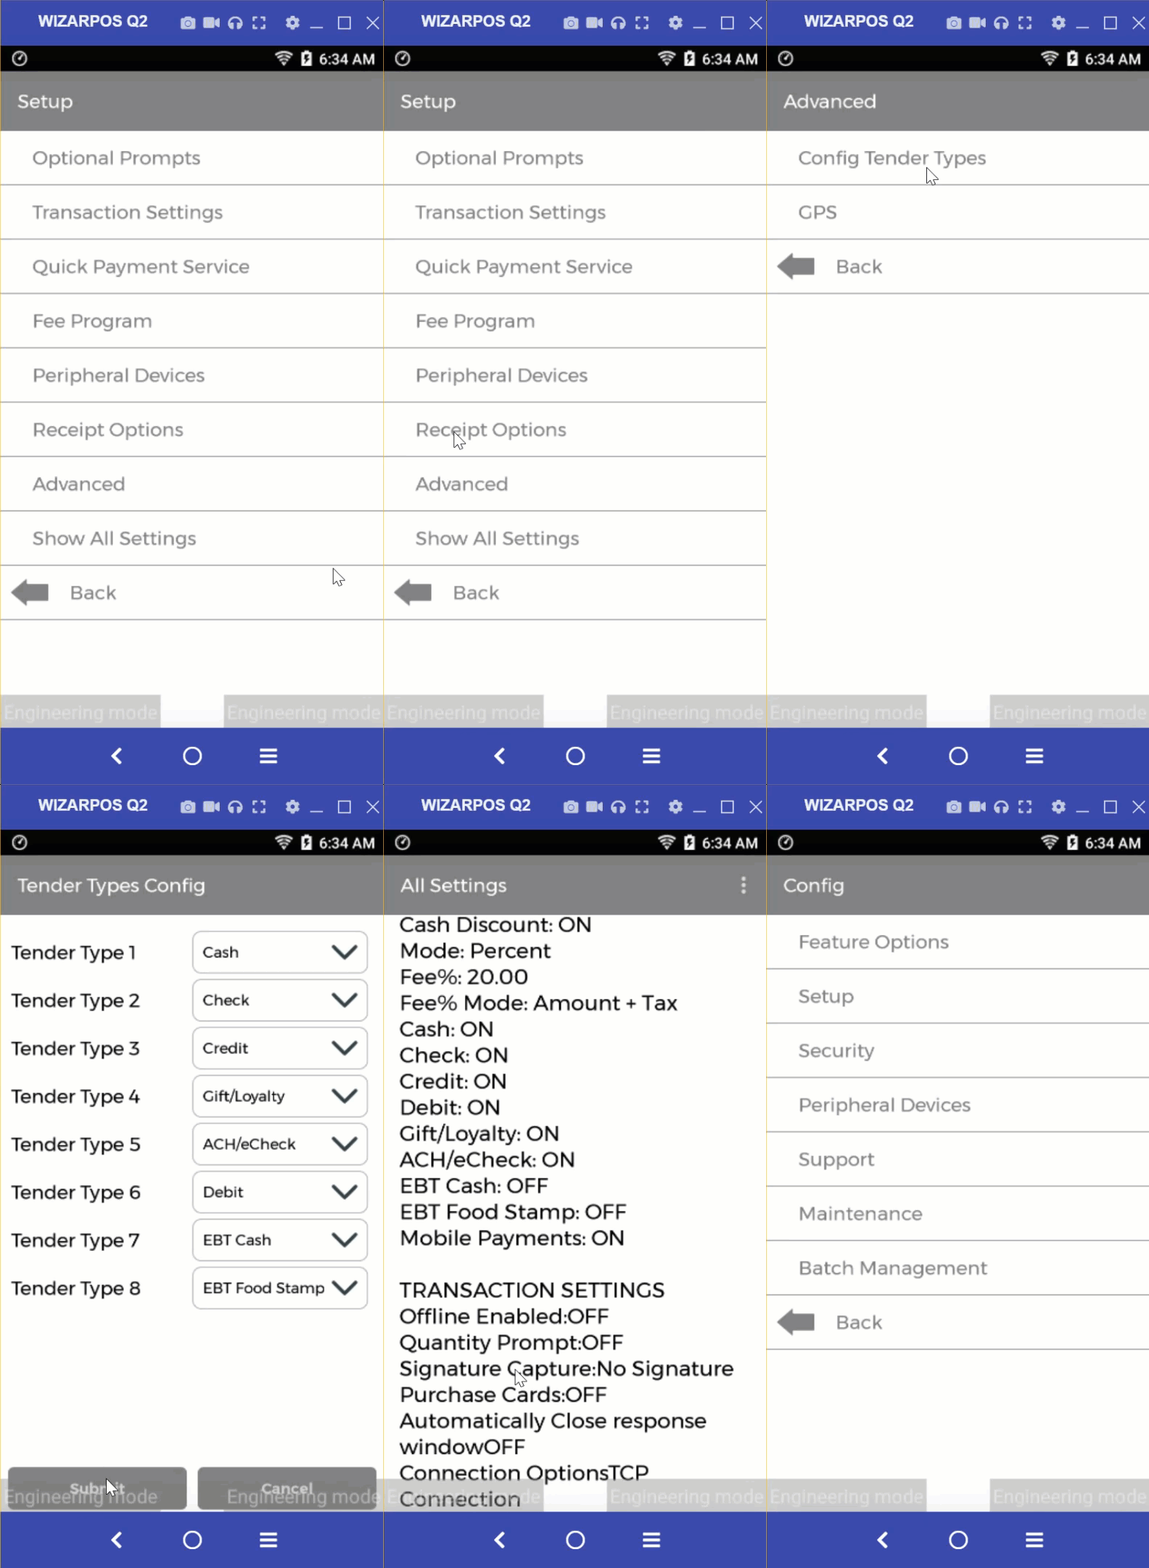
Advanced: The Advanced Settings section offers users more advanced configuration options, such as defining specific tender types and incorporating GPS functionality into the app.
- Config Tender Types: In this option, users can define and configure various payment methods or tender types such as ACH, Cash, Check, Credit, Debit, EBT Cash, EBT Food Stamp, Gift/Loyalty, etc.
- GPS: GPS or Global Positioning System is a location-based service that enables the app to determine the precise location of a device or person during the transaction.
Show All Settings: By selecting this option, users can view all available settings and configurations at a glance, providing a comprehensive overview of the customization options available within the app.
Security
Configure security settings, user permissions, and password requirements to ensure a secure environment for your transactions.
Fraud Control: Manage fraud control settings, including manager overrides and CVV prompts.
- Allow Manager Override: Enable or disable manager override for fraud control settings.
- Enter Last 4 Digits: Prompt for the last 4 digits of the card number during a transaction.
- Name/Card#: Choose to hide, show, or ask for the cardholder’s name or card number.
- Card Present: Set the prompt for card present verification.
- AVS: Configure Address Verification System (AVS) settings.
- CVV: Set the prompt for Card Verification Value (CVV) during a transaction.
User Management: Add, edit, or delete users.
- Add User: Add a new user to the system.
- Edit User: Edit existing user details.
- Delete User: Remove a user from the system.
Change Pin/Change Password: Change pin or password depending upon manager override enabled or disabled.
HALO: Set high authorization limits for sale and return transactions.
- Sale HALO: Set the high authorization limit for sale transactions.
- Return HALO: Set the high authorization limit for return transactions.

Support
Access support resources, including tax settings configuration, help desk information, card issuer contact details, frequently asked questions, log sharing and app-related information.
Help Desk Info:
- Card Processor Name: Please provide the name of the card processor.
- Phone#: Please provide the phone number of the card processor.
- Terminal Name: Please provide the name of the terminal.
- Phone#: Please provide the phone number.
Card Type Info: If you encounter a suspicious transaction, please reach out to us immediately. Make sure to have your merchant ID number available for reference. Here are the contact numbers for reporting suspicious transactions:
- American Express: (800) 528-2121
- Discover Card: (800) 347-1111
- Visa/MasterCard: (800) 944-1111
- Diners Club: (800) 525-9040
FAQ: This setting provides answers to frequently asked questions about the app, such as how to use certain features or troubleshoot common issues.
Send Log: Share logs and error information via email, WhatsApp, or other communication channels to troubleshoot and resolve technical problems efficiently.
About: This setting provides information about the app, such as App Info, Gateway Info, Processor Info, and Hardware Info.

Maintenance
This setting refers to the process of updating, repairing, or otherwise maintaining the app’s functionality.
- Rotate KEK: KEK stands for Key Encryption Key, which is used to encrypt and decrypt sensitive information in the payment processing system. This setting allows the user to rotate or change the KEK periodically for security reasons, to prevent unauthorized access to sensitive information.
- Rotate Keys: This setting allows the user to rotate or change the encryption keys used QuickSale 2.0. This is done to ensure the security of the payment processing system by preventing unauthorized access.
- Rotate Logs: Rotate Logs allow users to manage and rotate the transaction logs within the payment processing system. This functionality ensures that log files are periodically updated and old logs are archived or deleted, helping to maintain the performance and security of the system by preventing the accumulation of excessive data.
- Unregister: This setting allows the user to unregister from the QuickSale 2.0 app. Click on the unregister button, then enter the License number and Phone number in the corresponding box. Then click on submit to unregister the user.
- View GPS Data: This setting allows the user to view the GPS data associated with a particular payment transaction. This can be useful for tracking the location of a payment transaction and verifying the authenticity of the transaction.
- Update AJR File: The Update AJR File setting allows users to update the Automated Journal Report (AJR) file. This report contains detailed records of all payment transactions processed by the system. Regularly updating the AJR file is crucial for maintaining accurate and up-to-date records, facilitating audits, and ensuring compliance with regulatory requirements.

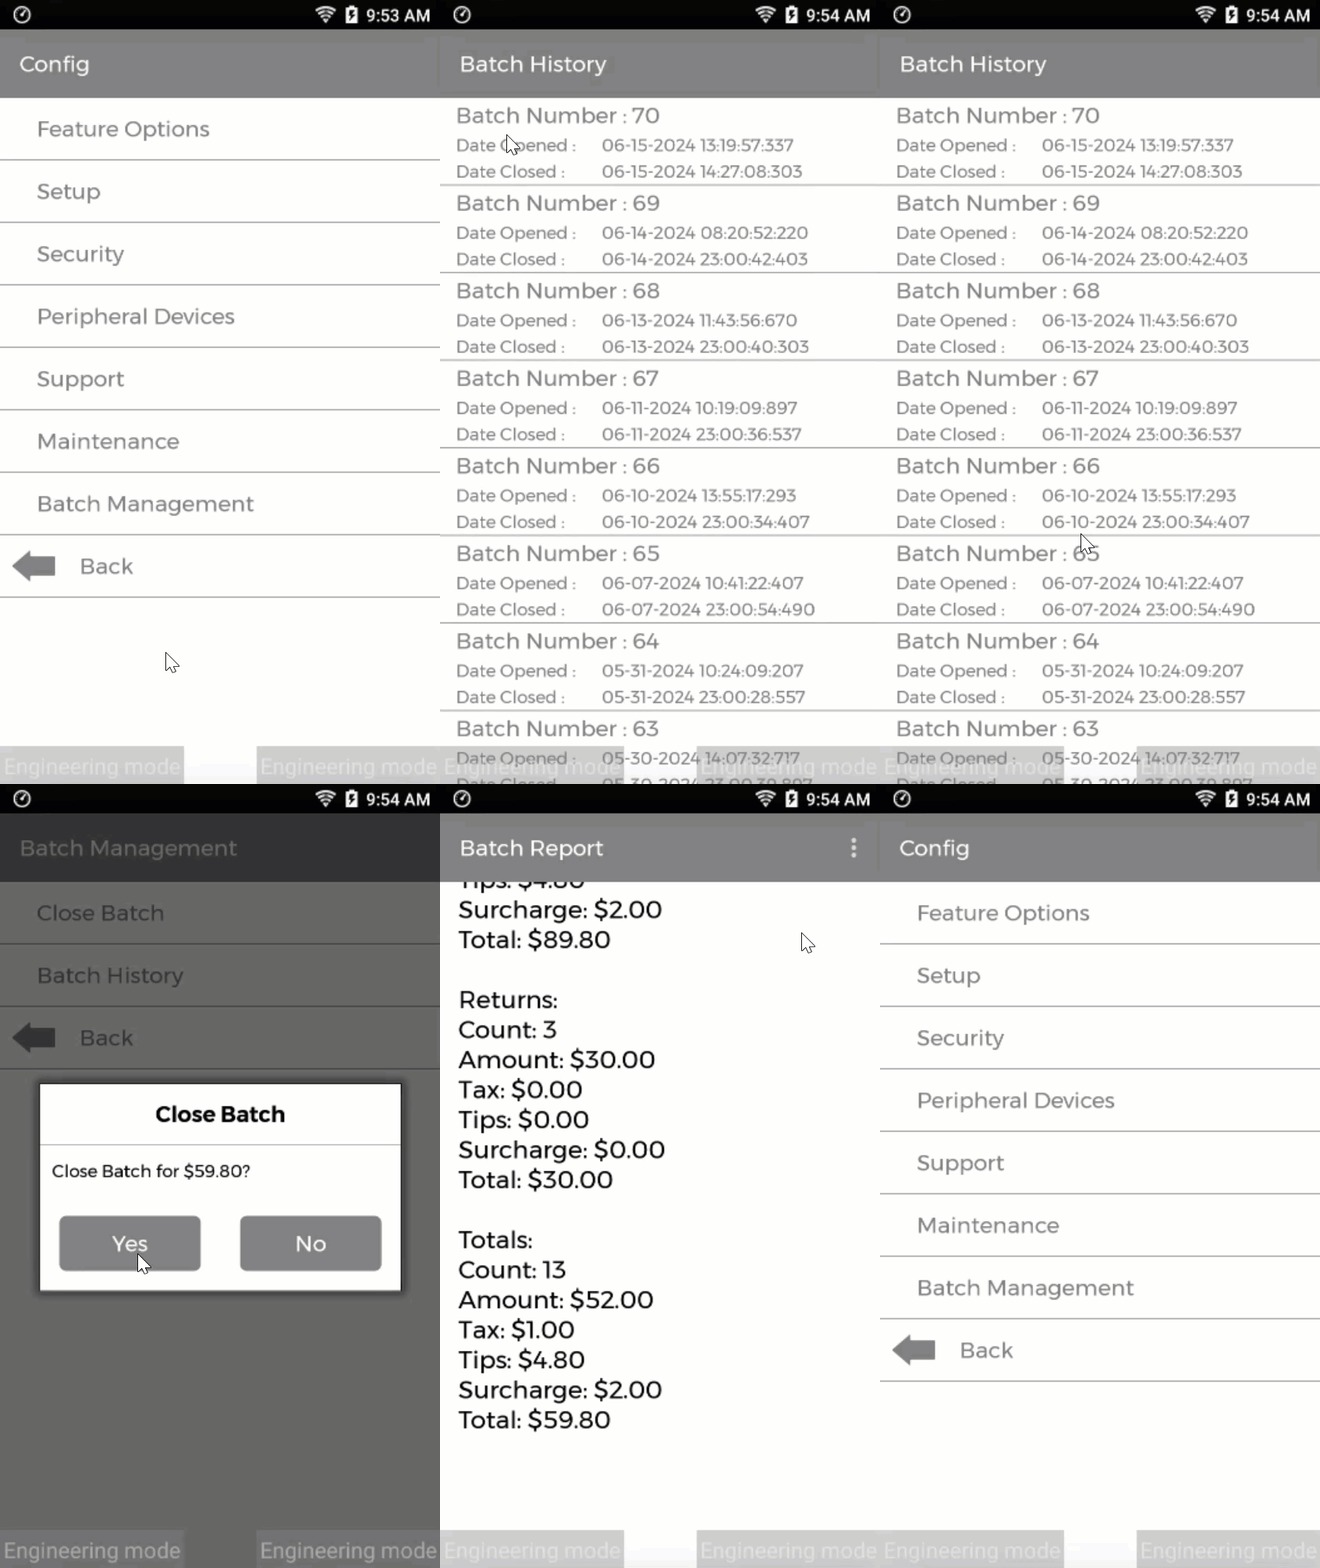
Batch Management
Batch Management involves overseeing the grouping of transactions processed over a specific period. This process ensures that transactions are correctly categorized, reviewed, and finalized for settlement, maintaining the integrity and accuracy of financial records.
Close Batch: Close Batch allows users to finalize the current batch of transactions for settlement. This action ensures that all transactions within the batch are processed and recorded, preparing them for settlement with the payment processor.
Batch History: Batch History provides users with access to historical data of previously processed transaction batches. This functionality is crucial for auditing, reporting, and reviewing past transaction details.
11. Troubleshooting
If you encounter any issues with the app, please seek support at support@chargeanywhere.com for troubleshooting tips and FAQs.
12. Exit App
After you are done with the transactions, you can exit the app by clicking on the Exit button.
13. Change Log
| Date | Update Summary |
| December 30, 2025 | Update the Semi-Integration.zip file in the Installation section. |
| December 10, 2025 | Added a link to the QuickSale Semi Release Notes in the Introduction section. |
Receive a monthly summary of new and updated technical documents.